Blue Mage DPS Rotation, Openers, and Abilities — Endwalker 6.45
On this page, you will learn how to optimise your opener and rotation in both single-target and multi-target situations. We also cover the use of your cooldowns, to ensure you can achieve the best use of them every time as a Blue Mage DPS in Final Fantasy XIV: Endwalker (Patch 6.45).
Blue Mage Rotation
This guide is intended for level 80 Blue Mages that have learned all spells. If you're not at that point yet, then check out the Leveling and Spells pages.
DPS Spell Loadout
The last three spots can be used for utility spells. If you need even more
utility spells, the order to drop spells is ![]() Bristle (but only
if not using
Bristle (but only
if not using ![]() Breath of Magic or
Breath of Magic or
![]() Mortal Flame), followed by
Mortal Flame), followed by ![]() Sea Shanty and
then
Sea Shanty and
then ![]() The Rose of Destruction.
The Rose of Destruction.

Moon Flute Opener
The most important part dealing DPS effectively as a Blue Mage is
being able to pull off a ![]() Moon Flute opener. Moon Flute grants
50% increased damage for 15 seconds followed by 15 seconds of being unable to
use spells or abilities. We can abuse this to cram all of our highest potency
spells into that 15 second window.
Moon Flute opener. Moon Flute grants
50% increased damage for 15 seconds followed by 15 seconds of being unable to
use spells or abilities. We can abuse this to cram all of our highest potency
spells into that 15 second window.
The timeline for the opener can be found below, where larger spells on the
bottom are GCD and smaller spells on top are OGCD. Blue Mage spells are weird,
and ![]() Surpanakha actually requires a quadruple weave to get the
full effect. When we use it, we actually have multiple OGCDs in a row and a
ton of GCD clipping, but it's the only way to make everything fit!
Surpanakha actually requires a quadruple weave to get the
full effect. When we use it, we actually have multiple OGCDs in a row and a
ton of GCD clipping, but it's the only way to make everything fit!
After Moon Flute Opener
You might be wondering what to do after the Moon Flute opener. It's actually pretty simple, we basically follow this priority:
- Is the boss nearly dead and in
 Final Sting range?
Everyone (except the tank usually) should coordinate a
Final Sting range?
Everyone (except the tank usually) should coordinate a
 Moon Flute, use any cooldowns they have available, and
then finish with
Moon Flute, use any cooldowns they have available, and
then finish with  Whistle into
Final Sting.
Whistle into
Final Sting. - Is there raidwide damage about to happen? If yes, use
 Cold Fog to be able to spam a 400 potency instant cast
spell for 15 seconds!
Cold Fog to be able to spam a 400 potency instant cast
spell for 15 seconds! - Is
 Nightbloom or
  Song of Torment
(they don't stack) on the target? If no, use
Song of Torment
(they don't stack) on the target? If no, use  Bristle
followed by Song of Torment.
Bristle
followed by Song of Torment. - Are any cooldowns up that will be up in time again for the next Moon
Flute? If yes, use them. This applies to
 Feather Rain,
 Shock Strike, and
  The Rose of Destruction to
name a few.
The Rose of Destruction to
name a few. - Is
 Triple Trident off cooldown, and you are
running a Spell Speed setup? Use the combo with Whistle
and
Triple Trident off cooldown, and you are
running a Spell Speed setup? Use the combo with Whistle
and  Tingle! You can also hold until the next opener, and
if you are running a Critical Hit setup you only want to use it in the
opener.
Tingle! You can also hold until the next opener, and
if you are running a Critical Hit setup you only want to use it in the
opener. - Use
 Sonic Boom or equivalent filler spell.
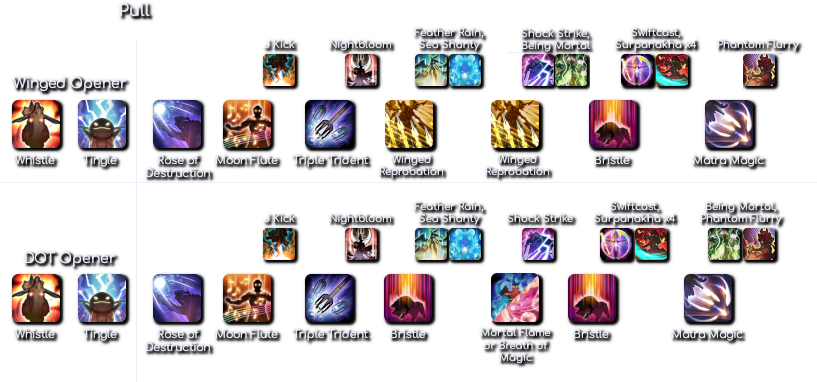
What If I Can't Fit Everything?
The DoT opener requires a faster GCD than the
![]() Winged Reprobation opener, and execution of both is highly
ping dependent. Players can complete the DOT opener with a GCD as high as 2.2s
and the Winged Reprobation opener with a GCD as high as 2.5s, but depending on
your situation you may need a faster GCD.
Winged Reprobation opener, and execution of both is highly
ping dependent. Players can complete the DOT opener with a GCD as high as 2.2s
and the Winged Reprobation opener with a GCD as high as 2.5s, but depending on
your situation you may need a faster GCD.
If you cannot fit everything due to lack of SpS, high ping, or something
else, there are some adjustments you can make. First, switch your gear to a set
that increases SpS. If that is not sufficient (or you insist on using gear that
makes it harder for you), the easiest adjustment is to move
![]() J Kick before Moon Flute. If you don't expect to need J Kick
for mobility, you can replace J Kick with
J Kick before Moon Flute. If you don't expect to need J Kick
for mobility, you can replace J Kick with ![]() Quasar since it has
a shorter animation lock. If that still fails, you can drop the second
Quasar since it has
a shorter animation lock. If that still fails, you can drop the second
![]() Bristle in the opener entirely.
Bristle in the opener entirely.
Which Opener Do I Use?
Each group should have one person applying ![]() Mortal Flame and
one person applying
Mortal Flame and
one person applying ![]() Breath of Magic, everyone else can fill
those spots with Winged Reprobation. If you are playing solo this mostly doesn't
matter, but prioritize Breath of Magic first.
Breath of Magic, everyone else can fill
those spots with Winged Reprobation. If you are playing solo this mostly doesn't
matter, but prioritize Breath of Magic first.
After the first opener, the Mortal Flame applier will switch to the Winged
Opener. If you don't have spell slots for Winged Reprobation you can just fill
the slots with ![]() Sonic Boom or whatever else you want.
Sonic Boom or whatever else you want.
Do I Use the Second Hit of Phantom Flurry?
You might be wondering why ![]() Phantom Flurry is the last spell
used, and whether you should use the second activation. When we use Phantom
Flurry at the end of
Phantom Flurry is the last spell
used, and whether you should use the second activation. When we use Phantom
Flurry at the end of ![]() Moon Flute, the damage buff snapshots and
we are able to continue channeling even after we go into Waning. This means it
is actually more damage to let it run out rather than try to use the second
activation. On top of this, the opener is already so tight that it is unlikely
you could even use the second activation if you wanted to!
Moon Flute, the damage buff snapshots and
we are able to continue channeling even after we go into Waning. This means it
is actually more damage to let it run out rather than try to use the second
activation. On top of this, the opener is already so tight that it is unlikely
you could even use the second activation if you wanted to!
What about Final Sting and Off-guard?
![]() Final Sting loses value in higher level content just due to how much HP enemies have. It is still
valuable for Extremes and Morbol fights, though. If you've got slots after putting in utility spells for a fight, definitely bring it.
Final Sting loses value in higher level content just due to how much HP enemies have. It is still
valuable for Extremes and Morbol fights, though. If you've got slots after putting in utility spells for a fight, definitely bring it.
![]() Off-guard is a great spell to bring if you've got room as well. Tank and healer should be the role
to apply the buff during a Moon Flute opener, and DPS can just apply it at other times if they have it. It's not a huge
gain outside of Moon Flute, but it's still something.
Off-guard is a great spell to bring if you've got room as well. Tank and healer should be the role
to apply the buff during a Moon Flute opener, and DPS can just apply it at other times if they have it. It's not a huge
gain outside of Moon Flute, but it's still something.
What Do I Do After Moon Flute?
Use ![]() Winged Reprobation ASAP so it goes on cooldown to be up
for the next opener. Use any other cooldowns as they become available, such as
Winged Reprobation ASAP so it goes on cooldown to be up
for the next opener. Use any other cooldowns as they become available, such as
![]() The Rose of Destruction. If you have enough SpS to reduce the
cooldown of Winged Reprobation down below 80s, you can actually do this right
after you come out of Waning without causing any drift:
The Rose of Destruction. If you have enough SpS to reduce the
cooldown of Winged Reprobation down below 80s, you can actually do this right
after you come out of Waning without causing any drift:
- The Rose of Destruction
- Whistle
- Tingle
 Winged Reprobation
- Whistle
- Tingle
- Winged Reprobation
Whistle and Tingle on Winged Reprobation is actually a gain over using Sonic Boom and Winged Reprobation. This requires SpS to pull off, so people running slow builds will want to just use Rose and Winged Reprobation ASAP.
How Frequently Do I Use a Moon Flute Opener
If we're looking at just target dummy damage, ideally we use an opener every
two minutes when all of our cooldowns are up. However, in practice we usually need
to handle mechanics, or might need to use ![]() Diamondback, or any
number of things. What this means is that we still try to use it every
two minutes, but only when it is actually safe to do so. Most of the time this
will be right after a big mechanic or phase transition.
Diamondback, or any
number of things. What this means is that we still try to use it every
two minutes, but only when it is actually safe to do so. Most of the time this
will be right after a big mechanic or phase transition.
The exception to this is the person who is maintaining
![]() Breath of Magic. If it is possible to do so, they should Moon
Flute every minute when reapplying it. This opener will basically consist of
using any spells that have come off cooldown such as
Breath of Magic. If it is possible to do so, they should Moon
Flute every minute when reapplying it. This opener will basically consist of
using any spells that have come off cooldown such as
![]() Feather Rain or
Feather Rain or ![]() Shock Strike, and filling
the empty GCDs with
Shock Strike, and filling
the empty GCDs with ![]() Sonic Boom or
Sonic Boom or
![]() Winged Reprobation
Winged Reprobation
What About Apokalypsis?
![]() Apokalypsis is a strong spell that, similar to
Apokalypsis is a strong spell that, similar to
![]() Phantom Flurry, benefits from being channeled for a long time.
The actual ideal rotation would be to have two different openers, one that ends
with
Phantom Flurry, benefits from being channeled for a long time.
The actual ideal rotation would be to have two different openers, one that ends
with ![]() Phantom Flurry and one that ends with
Phantom Flurry and one that ends with
![]() Apokalypsis and alternate them each minute. This is not
practical for just about any fight due to Waning and not being able to move
while channeling, so the single rotation is suggested above.
Apokalypsis and alternate them each minute. This is not
practical for just about any fight due to Waning and not being able to move
while channeling, so the single rotation is suggested above.
Main Healer Loadout
The main healer will primarily be using ![]() Pom Cure to keep
the tank alive and
Pom Cure to keep
the tank alive and ![]() White Wind/
White Wind/![]() Stotram to
keep the party alive. If you need utility spells, the order to drop spells is
Stotram to
keep the party alive. If you need utility spells, the order to drop spells is
![]() Sea Shanty then
Sea Shanty then ![]() The Rose of Destruction. While
The Rose of Destruction. While
![]() Cold Fog is incredibly strong, it is unlikely you will get a
full usage of it as the main healer so we do not bring it.
Cold Fog is incredibly strong, it is unlikely you will get a
full usage of it as the main healer so we do not bring it.

Off Healer Loadout
The off healer will play primarily as a DPS, but helps heal where necessary
(such as after raidwide damage). If you need utility spells, the order to drop
spells is ![]() Sea Shanty then
Sea Shanty then
![]() The Rose of Destruction.
The Rose of Destruction.

Do Healers Use Moon Flute Openers?
Healers do benefit from using this opener. It is common to have one healer act as "main healer" who focuses primarily on healing, and one healer act as "off healer" who focuses primarily on DPS but helps with healing where needed. Off healers will definitely be using a Moon Flute opener.
Tank Loadout
Tanks actually have the most flexibility in terms of spell slots since our
typical utility spells are already baked into our loadouts! We mostly just keep
our MP healthy with ![]() Blood Drain and
Blood Drain and
![]() Magic Hammer so that we can mitigate tankbusters with
Magic Hammer so that we can mitigate tankbusters with
![]() Diamondback and help heal with
Diamondback and help heal with ![]() White Wind.
White Wind.
![]() Mighty Guard reduces the damage we deal by 40%, so we're not
going to be doing that much damage to begin with! However,
Mighty Guard reduces the damage we deal by 40%, so we're not
going to be doing that much damage to begin with! However,
![]() Goblin Punch is an amazing filler spell that has very little
damage drop-off compared to even DPS mimic fillers! If you need even more
utility spells, the order to drop spells is
Goblin Punch is an amazing filler spell that has very little
damage drop-off compared to even DPS mimic fillers! If you need even more
utility spells, the order to drop spells is ![]() Chelonian Gate (if
you can't get good use out of it) followed by
Chelonian Gate (if
you can't get good use out of it) followed by ![]() Sea Shanty. Just
like with main healer it is unlikely that we will be able to make full use of
Sea Shanty. Just
like with main healer it is unlikely that we will be able to make full use of
![]() Cold Fog so we don't bother.
Cold Fog so we don't bother.

What about Frog Legs
![]() Frog Legs has a very small range and isn't a proper
Frog Legs has a very small range and isn't a proper
![]() Provoke. It only sets your threat to be exactly 1 higher than the
current highest threat. Its use is mostly limited to tank swaps, so bring it if
the fight requires it. It can be used to help a tank get threat if they've died,
but if a tank dies you're already in trouble and
Provoke. It only sets your threat to be exactly 1 higher than the
current highest threat. Its use is mostly limited to tank swaps, so bring it if
the fight requires it. It can be used to help a tank get threat if they've died,
but if a tank dies you're already in trouble and ![]() White Wind
under
White Wind
under ![]() Mighty Guard will usually do a better job of getting
threat back, anyway.
Mighty Guard will usually do a better job of getting
threat back, anyway.
Do Tanks Use Moon Flute Openers?
There are almost no circumstances where a tank will use this opener. Tanks
primarily have to focus on keeping MP up with ![]() Blood Drain so
that they can use
Blood Drain so
that they can use ![]() Diamondback for tankbusters. Additionally,
tanks will be focusing a lot on using things like
Diamondback for tankbusters. Additionally,
tanks will be focusing a lot on using things like ![]() Bad Breath
to mitigate raid damage and help heal with
Bad Breath
to mitigate raid damage and help heal with ![]() White Wind.
White Wind.
Soloing Content

Soloing synced content on Blue Mage is possible with
![]() Basic Instinct and
Basic Instinct and ![]() Mighty Guard. If we use
these two spells along with tank mimicry, we deal a ton of damage while still
being bulky.
Mighty Guard. If we use
these two spells along with tank mimicry, we deal a ton of damage while still
being bulky. ![]() Rehydration provides an MP-efficient way to keep
ourselves healed, and
Rehydration provides an MP-efficient way to keep
ourselves healed, and ![]() Devour gives us even more effective HP
Devour gives us even more effective HP
The basic approach to soloing content is this:
- Keep
 Basic Instinct and
  Mighty Guard
active at all times, keep
Mighty Guard
active at all times, keep  Devour up as much as
possible.
Devour up as much as
possible. - Vibe Check (
 The Ram's Voice and
 Ultravibration) trash packs when it's up, otherwise use
 Breath of Magic and other big AOE spells.
 Dragon Force and
  Peat Pelt +
 Deep Clean provide a ton of extra sustain.
 - Use
 Doom on bosses if possible, otherwise kill it
normally with
Doom on bosses if possible, otherwise kill it
normally with  Goblin Punch and all other spells.
What do I bring for the last two slots?
This mostly depends on the situation, but some basic recommendations would be
![]() White Wind for faster healing (if you can manage MP
effectively),
White Wind for faster healing (if you can manage MP
effectively), ![]() Mortal Flame for extra boss damage, or
Mortal Flame for extra boss damage, or
![]() Moon Flute for even more damage on your main spells.
Moon Flute for even more damage on your main spells.
Some spells like ![]() Sea Shanty or
Sea Shanty or
![]() Dimensional Shift are very strong for trash packs. Sea Shanty
has no damage falloff on multiple targets so is quite potent. Dimensional Shift
is a decent option for weakening enemies when they can't be Vibe Checked, but
its slow cast time and the fact that it is based on current HP means it's not
great for spamming.
Dimensional Shift are very strong for trash packs. Sea Shanty
has no damage falloff on multiple targets so is quite potent. Dimensional Shift
is a decent option for weakening enemies when they can't be Vibe Checked, but
its slow cast time and the fact that it is based on current HP means it's not
great for spamming.
Dungeon Rotations
The above information mostly applies to bosses, such as in Trials or Raids. Dungeons are slightly different for Blue Mage.
When running dungeons, we are able to use abilities like
![]() The Ram's Voice to freeze enemies and
The Ram's Voice to freeze enemies and
![]() Ultravibration to kill them instantly. Some dungeon bosses
are even vulnerable to effects like
Ultravibration to kill them instantly. Some dungeon bosses
are even vulnerable to effects like ![]() Missile and
Missile and
![]() Doom! This means that we really don't actually spend a lot of
time DPSing, and instead we just run straight through cheesing enemies along the
way. When you are running dungeons with other Blue Mages, it's important to
figure out a
Doom! This means that we really don't actually spend a lot of
time DPSing, and instead we just run straight through cheesing enemies along the
way. When you are running dungeons with other Blue Mages, it's important to
figure out a ![]() Ultravibration rotation so that you don't
overlap cooldowns and waste them!
Ultravibration rotation so that you don't
overlap cooldowns and waste them!
Changelog
- 24 Jul. 2023: Updated for Patch 6.45.
- 23 May 2023: Checked for Patch 6.4.
- 24 Feb. 2023: Guide added.
Guides from Other Classes

This guide has been written by Liam Galt, who created the Blue Academy Youtube channel and Discord in response to the lack of consolidated and accurate Blue Mage resources available. Liam enjoys finding non-standard solutions to problems, so Blue Mage content with all of its zaniness is a natural interest! Outside of Blue Mage, he also enjoys Savage and Ultimate raiding which he streams on Twitch.
- Same-Region Matching Starts this Fall. But There’s a Catch
- Have Your First Look At Evercold’s Realmships & Dungeons
- How Character Action Skins Will Give You More Ways to Customize
- How Auto Content Balancing Will Change How You Play Evercold
- This Rare FFXIV Minion Secretly Became Sellable in Patch 7.55
- The Yo-kai Watch Event Returns Again to Eorzea
- Best Crafting Rotations for 7.55 Phantom Occultum Relics
- FFXIV Hits the Switch 2 Soon! Here’s What We Know About the Release Date