Overview of FFLogs Mitigation in FFXIV
This page contains information on the website "FFLogs" and teaches the player how to understand mitigation in FFXIV.
Understanding Mitigation
Mitigation in this game is not as straightforward as it seems, and the game's tendency to obfuscate critical information from the player certainly does not help in this regard. This guide will go over the exact mechanics of FFXIV mitigation and how they are reflected on FFLogs.
Damage Snapshots and Resolution
Each instance of damage in this game consists of two components - the snapshot
and the resolution. The snapshot is when the final damage is calculated based
on all relevant mitigation on a player. This includes shields, buff based mitigation
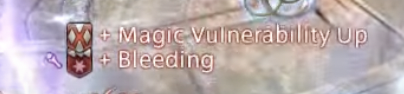
such as ![]() Heart of Light, as well as debuff mitigation on the
boss like
Heart of Light, as well as debuff mitigation on the
boss like ![]() Addle. After this point, the damage is essentially 'locked in,'
and no further action from the player can affect the damage they are about to receive.
Damage resolution is when the calculated damage is dealt to the player,
reducing their HP and possibly killing them.
Addle. After this point, the damage is essentially 'locked in,'
and no further action from the player can affect the damage they are about to receive.
Damage resolution is when the calculated damage is dealt to the player,
reducing their HP and possibly killing them.
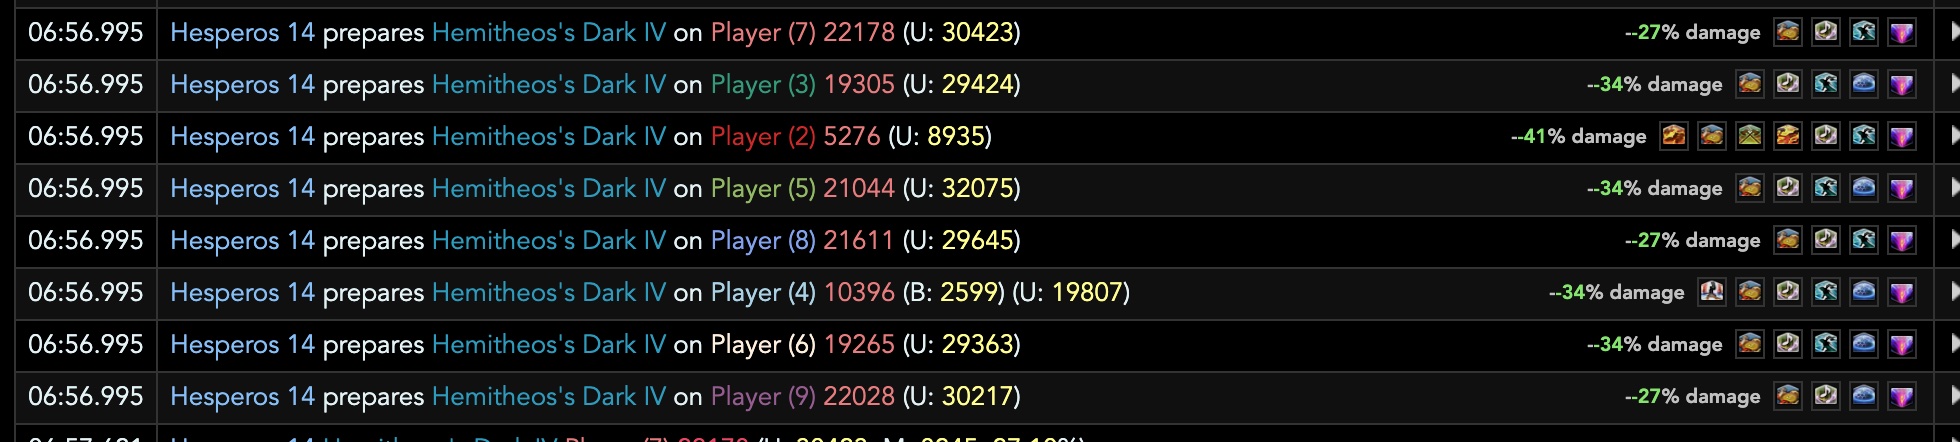
The time difference between damage snapshot and resolution varies from attack to attack, though it is generally within a few seconds of each other. You can check an attack's snapshot timing and its resolution timing by looking at the damage taken tab under events view.

Gigaflare from the Unending Coil of Bahamut (Ultimate) is probably one of the most egregious examples of damage resolution delay, where the damage is locked in a good 5 seconds before actually being dealt to the player. This means that any extra mitigation - such as shields - applied in those 5 seconds will have no effect. This discrepancy between damage snapshot and damage resolution is also why you will sometimes see shields remaining on players at full strength after a raidwide has gone out - this does not necessarily mean that the attack ignores shields, rather, it is more likely that the shields were applied after the damage snapshot.
Snapshot Timing
Since proper mitigation requires any relevant buffs or debuffs to be applied by the time of snapshot, it is important to know when a particular attack actually snapshots in relation to fight cues, most commonly the castbar of the attack itself.
Single Hit with Castbar
A lot of attacks in this game follow the pattern of dealing a single instance of damage after the end of a cast. In the majority of cases, the snapshot coincides roughly with the end of the castbar, which you can verify by looking at the events view of the casts tab with "Enemies" selected.

In the above example, Akh Afah is a 7.7 second cast that snapshots its damage within the same second as the castbar finishing. Shields, buffs and debuffs need to be applied before the end of the castbar to mitigate this attack. However, while rare, there are some examples of snapshots happening a good few seconds after the cast has finished.
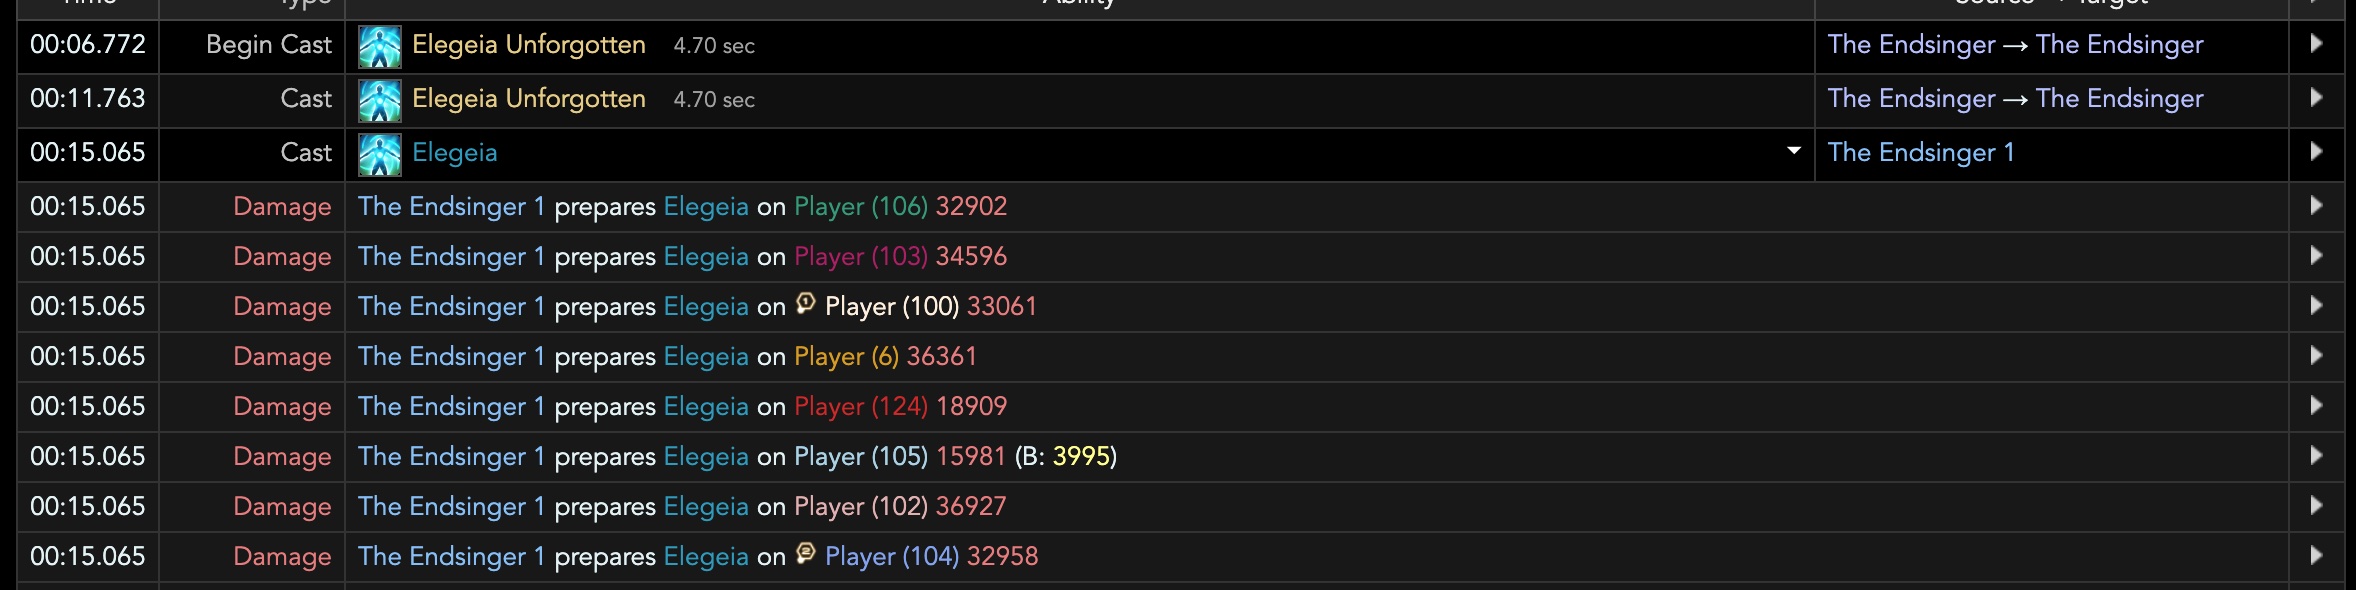
From Endsinger Extreme, her raidwide attack Elegeia might seem like a standard raidwide, but actually snapshots almost 4 seconds after the end of her Elegeia Unforgotten castbar. While the cast itself is short enough that you will not be at risk of mitigating too early even with 10s debuffs if going off the castbar, that may not always hold true for these kinds post-castbar snapshot attacks, and mitigating too early can be a real risk.
Multi-Hit with Castbar
Quite a few attacks, such as the iconic "Akh Morn" from dragon enemies, do multiple hits in succession after a single castbar. A lot of people mistakenly believe that just because the hits were associated with a castbar, all of them snapshot at the end of the castbar. This is untrue, as actual multi-hits will have independent snapshot timings that are generally a bit before the actual damage of each hit goes out.

In the above example, Akh Morn hits four times after the castbar finishes, each with its own damage snapshot 1-2 seconds apart. What this means is that if a mitigation is applied too early during the castbar, it can fail to mitigate the tail end of Akh Morn hits. Conversely, even if you did not apply mitigation by the time the castbar finishes, you can still mitigate the later hits.
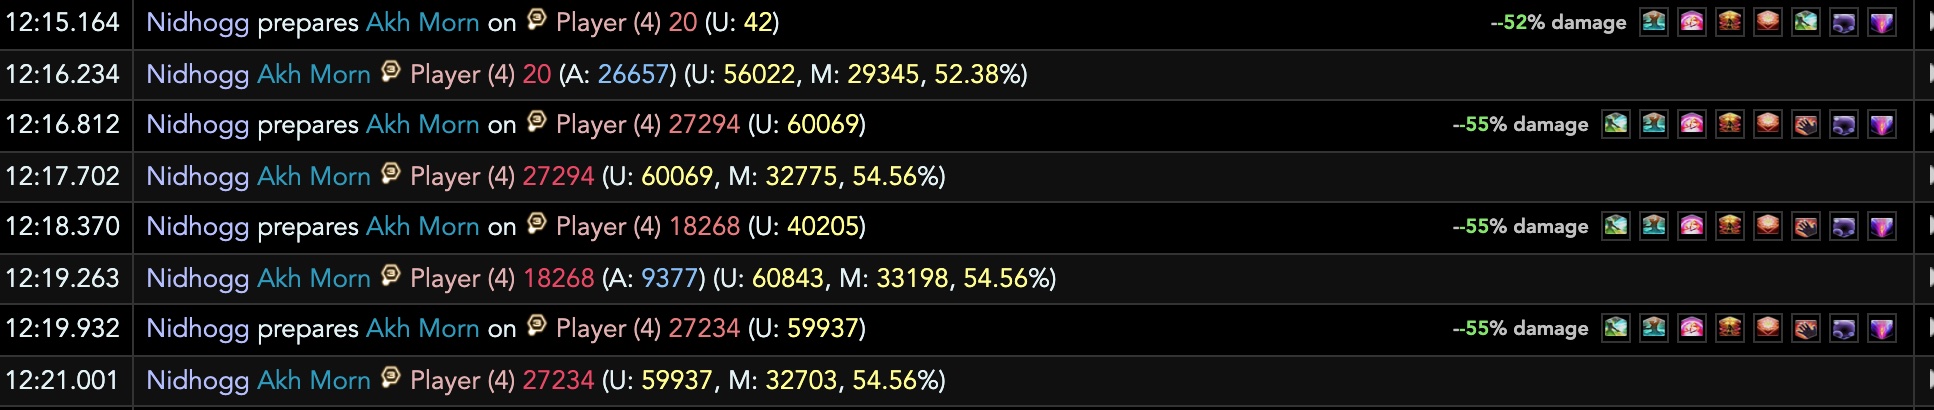
You can see the effect of this under the damage taken events view. In the screenshot, Feint was applied late after the castbar for Akh Morn, but due to the independent snapshots of the four hits, it was able to mitigate the last three hits. For some attacks that have multiple hits, it may actually be beneficial to delay mitigation until after the end of the castbar to mitigate a higher number of hits.
Damage Over Time Applications
A few attacks will inflict damage over time (DoT for short) debuffs to players. The strength of each tick is determined at the time the debuff was inflicted based on all the % mitigations that were present, and any mitigation applied after the debuff has gone out will have no effect. This also means that any mitigations that were on time will reduce tick potency for the entire duration of the DoT, even if the mitigation expires almost immediately after the snapshot.
Shields have no interaction with the potency per tick. While they will reduce your damage taken from DoT effects by the shield's full amount, they do not change the base potency of a tick the same way that % mitigation will. However, this has its own advantages as it means that shields can be late to a DoT's initial application but still mitigate useful damage from the ticks themselves.
Damage Instances Not Associated with Castbars
Lastly, there are damage instances in this game not explicitly associated with a castbar, but rather exist as part of a larger mechanic. To efficiently mitigate these damage instances, you will likely need to look towards other timing cues. Some of these damage instances are conveniently associated with a timed debuff and deal damage when that debuff expires, such as the Spell-in-Waiting mechanics from Eden's Gate and Eden's Promise, or the water and thunder debuffs in The Epic of Alexander (Ultimate). The snapshot for those attacks would be when the debuff falls off, so you can use that in place of conventional castbars.

Other attacks do not have explicit timing indicators, and you may have to refer to gameplay footage and look for potential visual or audio cues in the fight itself to help you time mitigation. However, it is often good practice to confirm beforehand that the snapshot happens immediately before the damage resolution.
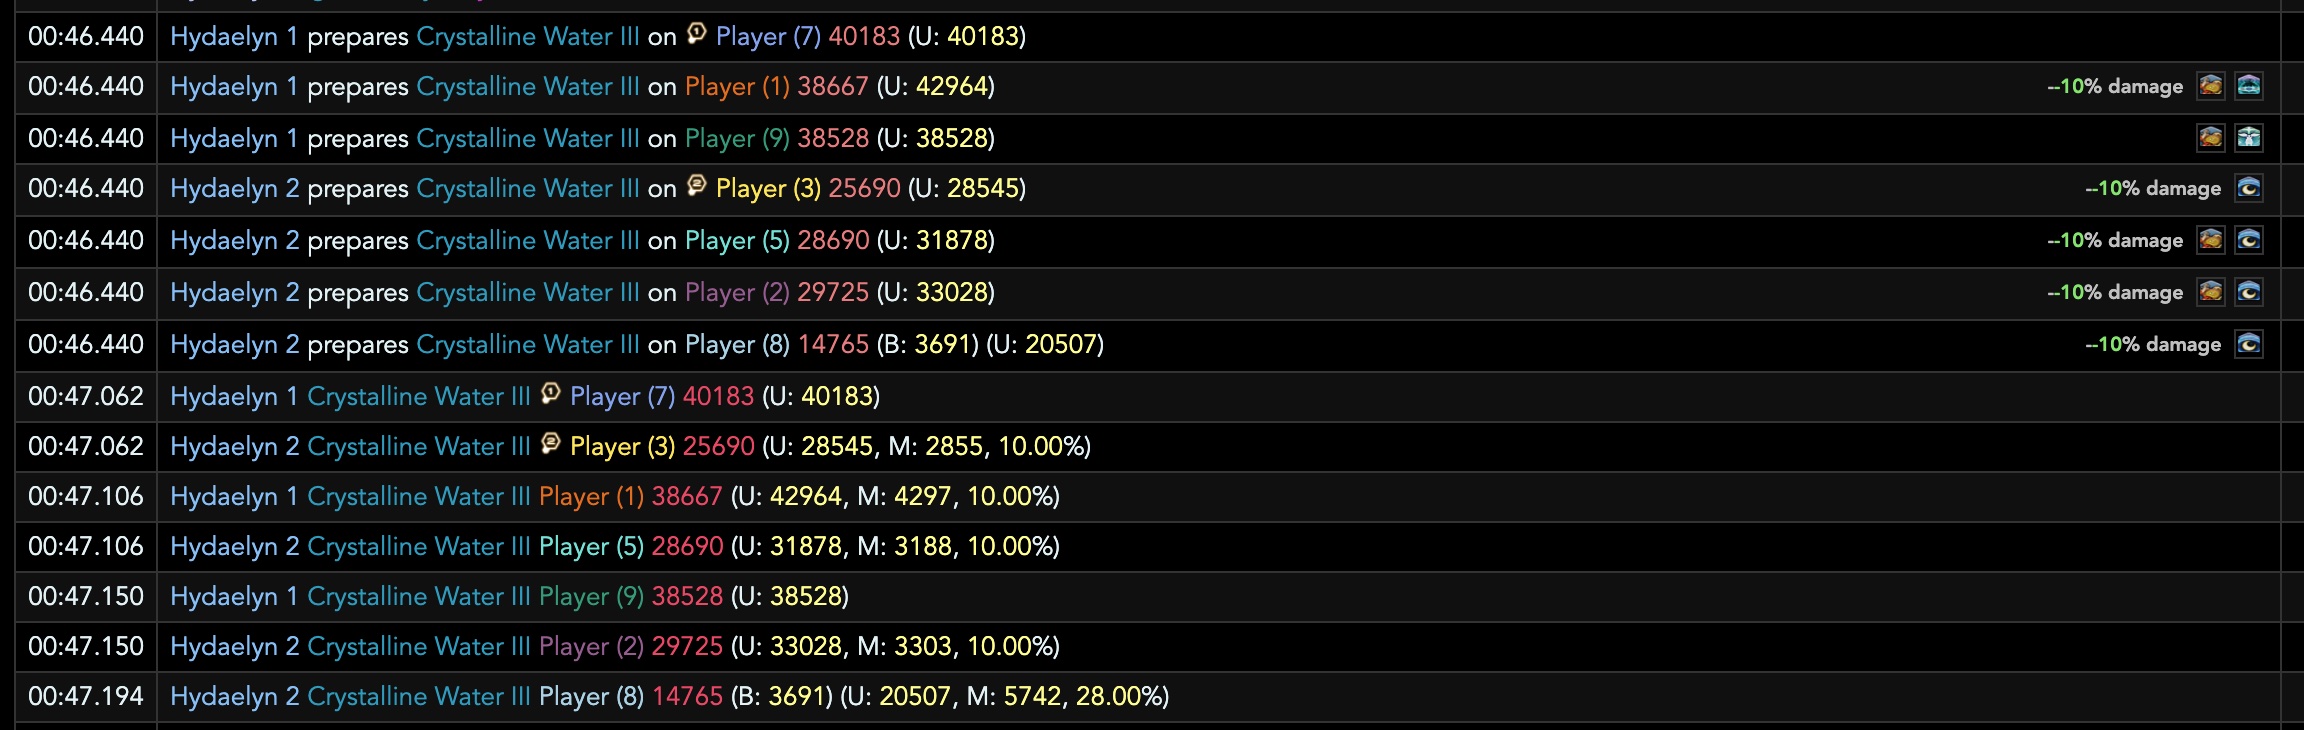
The above example is from the Minstrel's Ballad: Hydaelyn's Call, an untelegraphed stack with no castbar that happens in combination with some other mechanics. The screenshot indicates that the snapshot is essentially right before the damage resolution (unlike the previously mentioned Gigaflare), so you can treat the damage event itself as the snapshot for the purposes of timing mitigation.
Identifying Damage Types
While a lot of mitigation works on both magic and physical damage, there is
still a good amount that works exclusively on one type such as ![]() Magick Barrier,
or otherwise have reduced effectiveness like
Magick Barrier,
or otherwise have reduced effectiveness like ![]() Feint. Effective mitigation
planning requires you to identify which attacks are magical and physical. As of
patch 6.3, the game now differentiates between magical, physical and nonstandard
damage by attaching appropriate icons to the damage flying text. However, it is
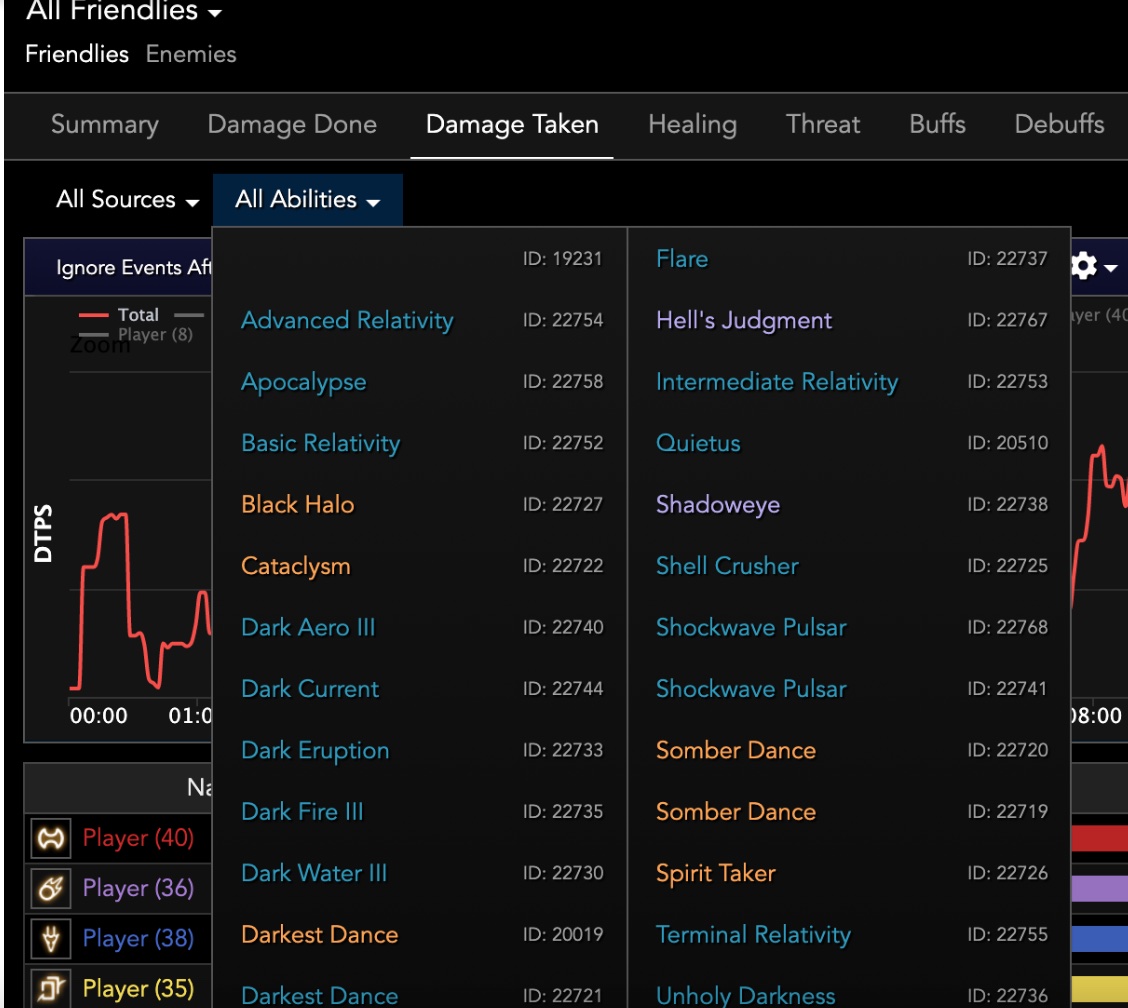
often useful to look at damage typing over an entire encounter. The All Abilities
drop down menu in the damage taken tab will give you the information you need.
Feint. Effective mitigation
planning requires you to identify which attacks are magical and physical. As of
patch 6.3, the game now differentiates between magical, physical and nonstandard
damage by attaching appropriate icons to the damage flying text. However, it is
often useful to look at damage typing over an entire encounter. The All Abilities
drop down menu in the damage taken tab will give you the information you need.
FFLogs color codes damage depending on their type, blue for magical, orange
for physical and purple for neither, or what players have dubbed 'darkness'
damage. Contrary to popular belief, this third type of damage can in theory be
mitigated by skills that are type agnostic such as ![]() Reprisal
or
Reprisal
or ![]() Shield Samba. However, recent FFXIV raids have typically used
'darkness' almost exclusively for flat, percentage based damage that cannot be reduced
by any sort of % mitigation (sometimes ignoring shields as well).
Shield Samba. However, recent FFXIV raids have typically used
'darkness' almost exclusively for flat, percentage based damage that cannot be reduced
by any sort of % mitigation (sometimes ignoring shields as well).
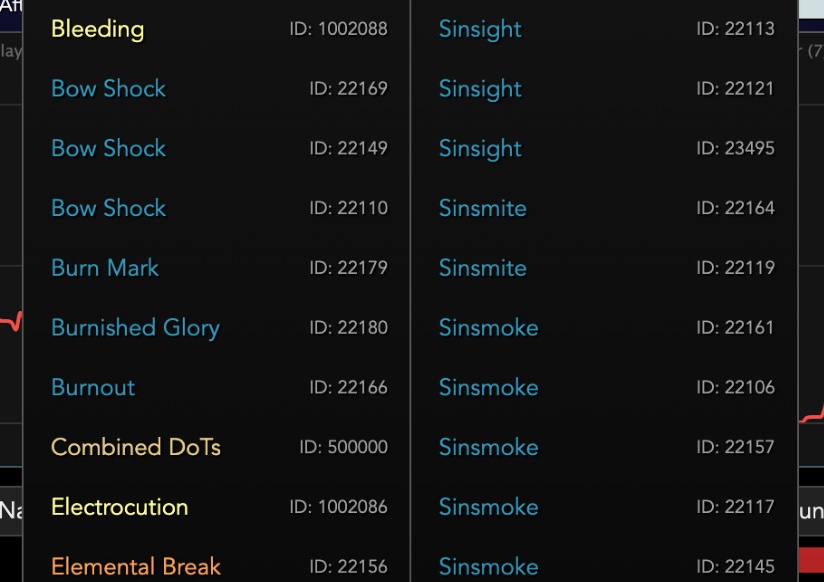
Enemy DoTs will always be coded as yellow by FFLogs because their actual type is not known. However, a general rule of thumb is that DoTs will be the same type as the attack that inflicted them. In the absence of upfront damage, you can check the flying text of the status application in game to determine the DoT's typing.
If the DoT is something applied to the whole party, you can also sanity check this information by looking at the average damage to magical jobs and physical jobs as they have significantly different magical and physical defenses.
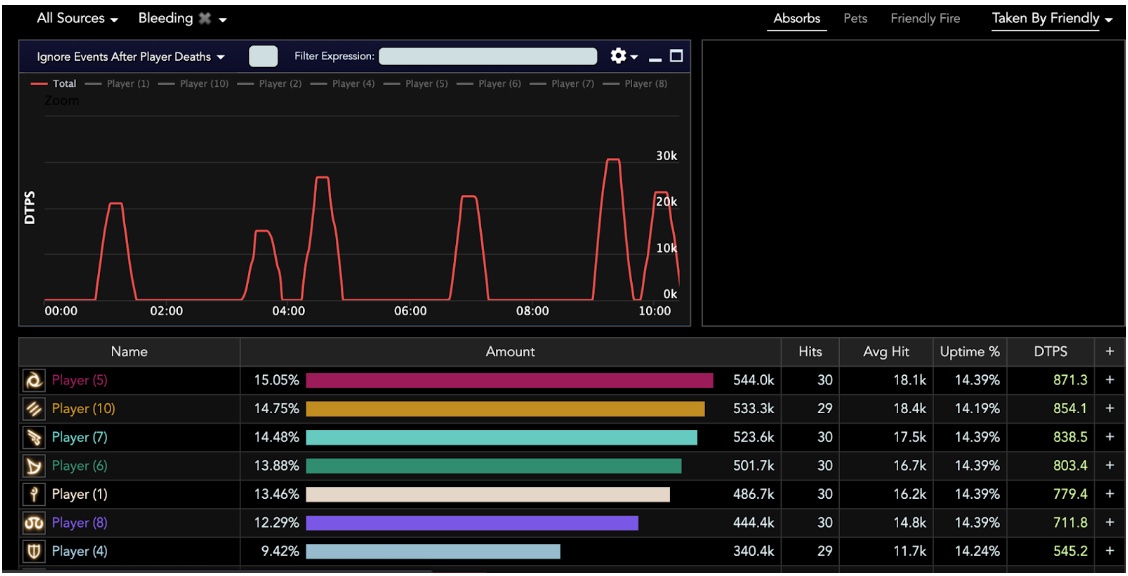
In the above example we see a DoT attack from Eden's Promise: Anamorphosis (Savage). This DoT is inflicted by the magical raidwide Burnished Glory, so we can already make an educated guess on its typing, but you can also see the DoT dealing higher average damage to non-tank physical jobs as they have lower magical defense compared to magical based jobs.
Debuff Based Mitigation and Damage Actors
Percent mitigation is divided into two categories:
- Buffs placed on a player that reduce the damage they take.
- Debuffs inflicted on the enemy that reduce the damage they do.
From a damage calculation standpoint, a 10% incoming damage reduction buff is equivalent to a 10% outgoing damage debuff. But from a practical standpoint, buffs and debuffs have their respective advantages and disadvantages such as debuff mitigation requiring a target, and buff mitigation requiring the party to be within range of its application.
Debuff mitigation has another nuance to it, which is whether or not it works on attacks that are not dealt by the main boss actor. Though you may only see one boss entity in single target fights, the boss is actually composed of multiple actors that do damage and execute certain mechanics. In FFXIV, a single actor can only handle one instance of damage at a time, which means that while typical raidwides are casted by the targetable main boss actor, attacks such as damaging puddles on each party member will be performed by eight subactors underneath the hood.

This is a typical example of how a spread puddle mechanic looks in FFLogs, with eight Hydaelyn subactors dealing damage to players, one per puddle. These subactors can be identified in FFLogs by the existence of a number suffix to their name. Subactors are not explicitly shown as being affected by debuff mitigations placed on the main boss actor, but through a lot of testing and experimentation, we know that their damage is reduced by mitigation all the same. For current logs, FFLogs will mirror debuffs such as Addle/Reprisal/Feint over to subactors and take them into account in its damage calculations, but it can occasionally bug out and fail to do so. Just keep in mind that the absence of a debuff mitigation in a damage instance does not necessarily mean it failed to mitigate damage.
The above example shows ![]() Reprisal properly mitigating damage from
the tether breaks in the Curtain Call mechanic from Asphodelos: The Fourth Circle (Savage),
which are actually dealt by the main boss's subactors instead of the 'thorn object'
as many players believe.
Reprisal properly mitigating damage from
the tether breaks in the Curtain Call mechanic from Asphodelos: The Fourth Circle (Savage),
which are actually dealt by the main boss's subactors instead of the 'thorn object'
as many players believe.
Mitigation Application and Shield Propagation Delay
All status applications in this game have a delay, which means that pressing a mitigation skill too close to the snapshot timing runs the legitimate risk of mitigating too late.
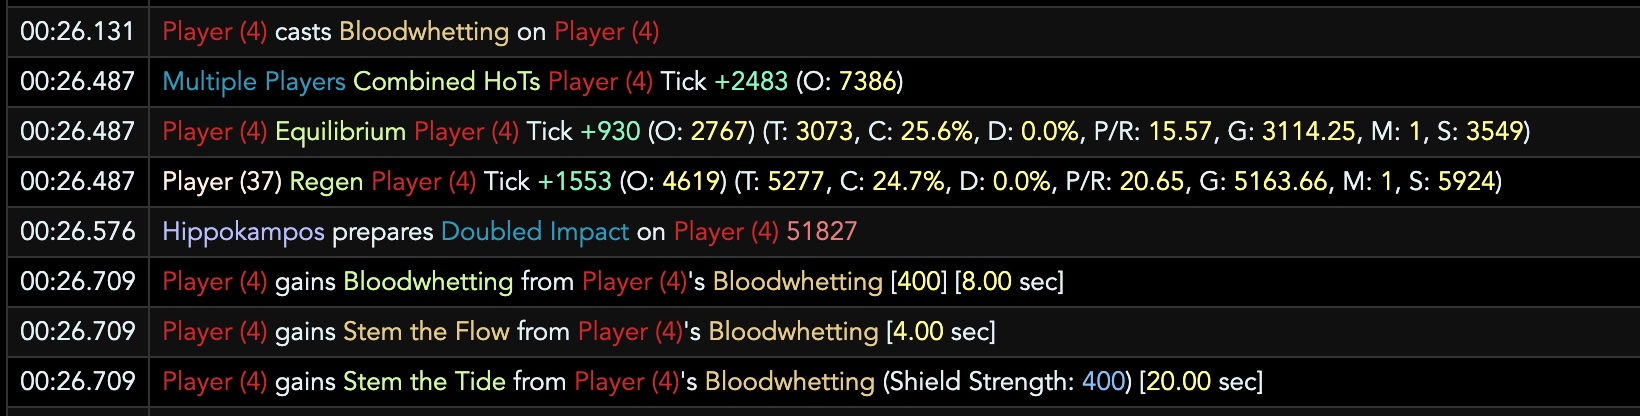
The Warrior pressed ![]() Bloodwhetting before the damage snapshot
of Doubled Impact, but did not gain the mitigation and shield buffs from the
skill until 0.6s later, missing the snapshot and resulting in them taking full
damage. This is the reason you often the hear the advice for tanks to press their
mitigation no later than 70% of the castbar - while the snapshot itself is at
the end of the castbar, you need to account for status application delays when
it comes to mitigating.
Bloodwhetting before the damage snapshot
of Doubled Impact, but did not gain the mitigation and shield buffs from the
skill until 0.6s later, missing the snapshot and resulting in them taking full
damage. This is the reason you often the hear the advice for tanks to press their
mitigation no later than 70% of the castbar - while the snapshot itself is at
the end of the castbar, you need to account for status application delays when
it comes to mitigating.
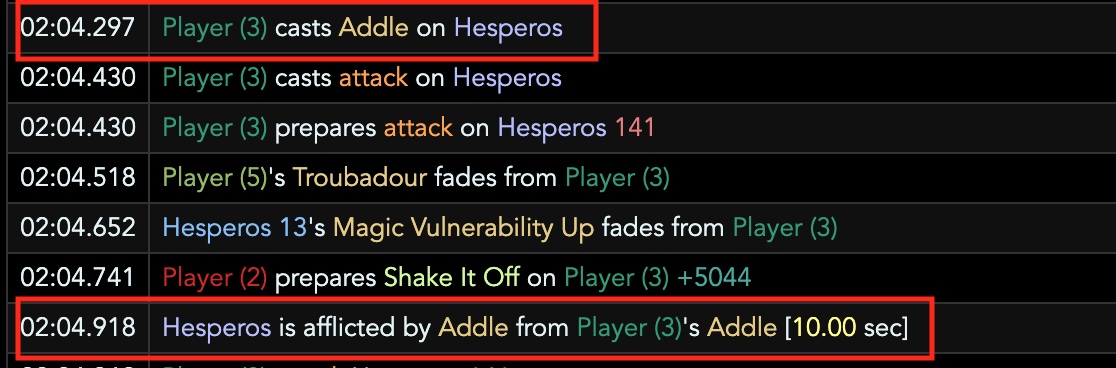
Similarly, debuff mitigation also has a delay between skill usage and status application.
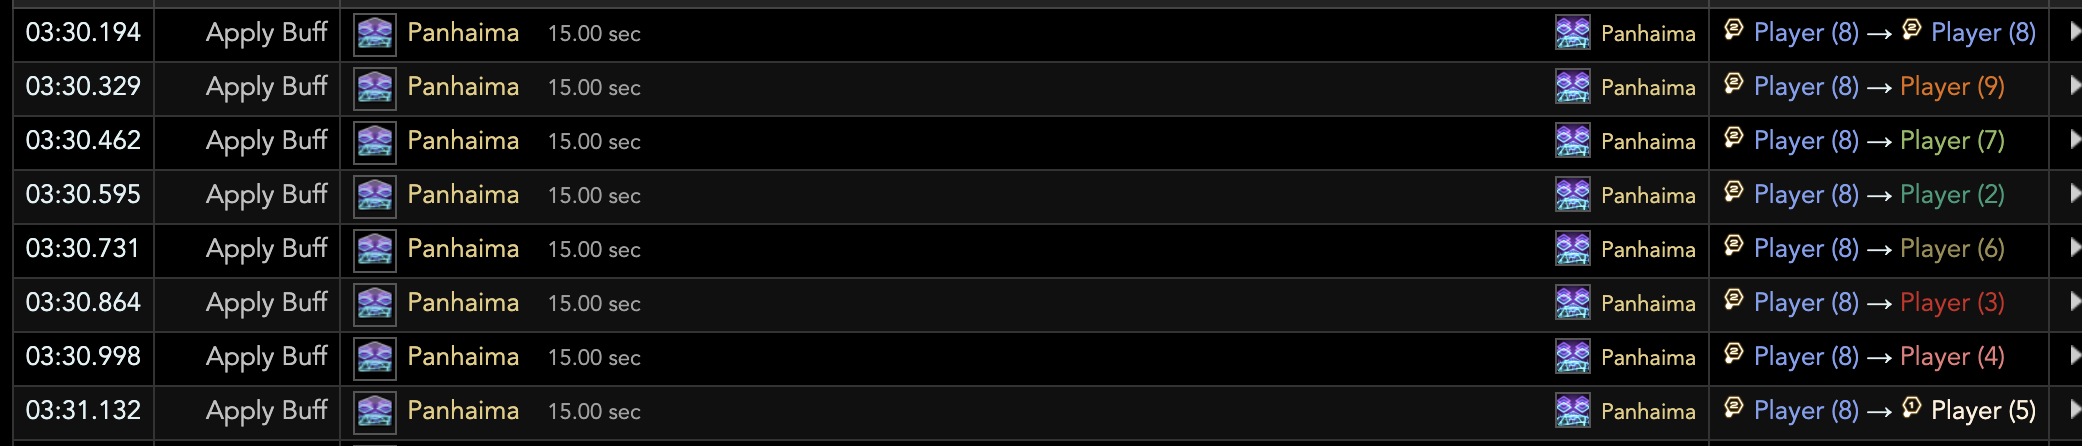
Shields and AoE buff based mitigation also have a propagation delay associated
with them because the statuses need to ripple through all players in range. This
can lead to situations where only certain players take lethal damage from an
attack because they were last on the propagation order. While a large amount of
healer shields, such as ![]() Succor or
Succor or ![]() Eukrasian Prognosis
do not suffer from this propagation delay and are applied at the same time to
the whole party, other shields such as
Eukrasian Prognosis
do not suffer from this propagation delay and are applied at the same time to
the whole party, other shields such as ![]() Panhaima can have a
significant propagation delay, with the shield reaching the final player almost
an entire second after the first.
Panhaima can have a
significant propagation delay, with the shield reaching the final player almost
an entire second after the first.
Even single target shields such as ![]() The Blackest Night or
The Blackest Night or
![]() Celestial Intersection are significantly different in terms
of application delay - the former taking more than half a second while the latter
is instant from button press. There is no pattern to which shields suffer from
more delay than others; it is simply something you need to play around.
Celestial Intersection are significantly different in terms
of application delay - the former taking more than half a second while the latter
is instant from button press. There is no pattern to which shields suffer from
more delay than others; it is simply something you need to play around.
Stacking Mitigation and Shields
Percent mitigation stacks multiplicatively instead of additively in this game. For example, having one 20%, one 30% and two 10% mitigations result in 0.8 * 0.7 * 0.9 * 0.9 = 0.45x damage taken, for a damage reduction of 55% instead of 20 + 30 + 10 + 10 = 70%.

This is also how FFLogs comes up with the final mitigation % number. In the
above example, ![]() Shadow Wall,
Shadow Wall, ![]() Rampart,
Rampart, ![]() Shield Samba
and
Shield Samba
and ![]() Expedient combined to mitigate 55% damage.
Expedient combined to mitigate 55% damage. ![]() Dark Missionary
and
Dark Missionary
and ![]() Dark Mind were also active mitigation buffs, but do not count
towards mitigation as the hit itself is physical.
Dark Mind were also active mitigation buffs, but do not count
towards mitigation as the hit itself is physical.
Shields, on the other hand, are purely additive as long as the shields themselves stack. They are applied in the damage calculation after all the % mitigation has been applied to the raw damage, making it possible to mitigate extremely hard hitting attacks with very minor usage of % mitigation.

The percent mitigation on this attack is very light, totaling a mere 31% reduction, with the bulk of it being mitigated by a 64k shield applied after the 31% reduction.
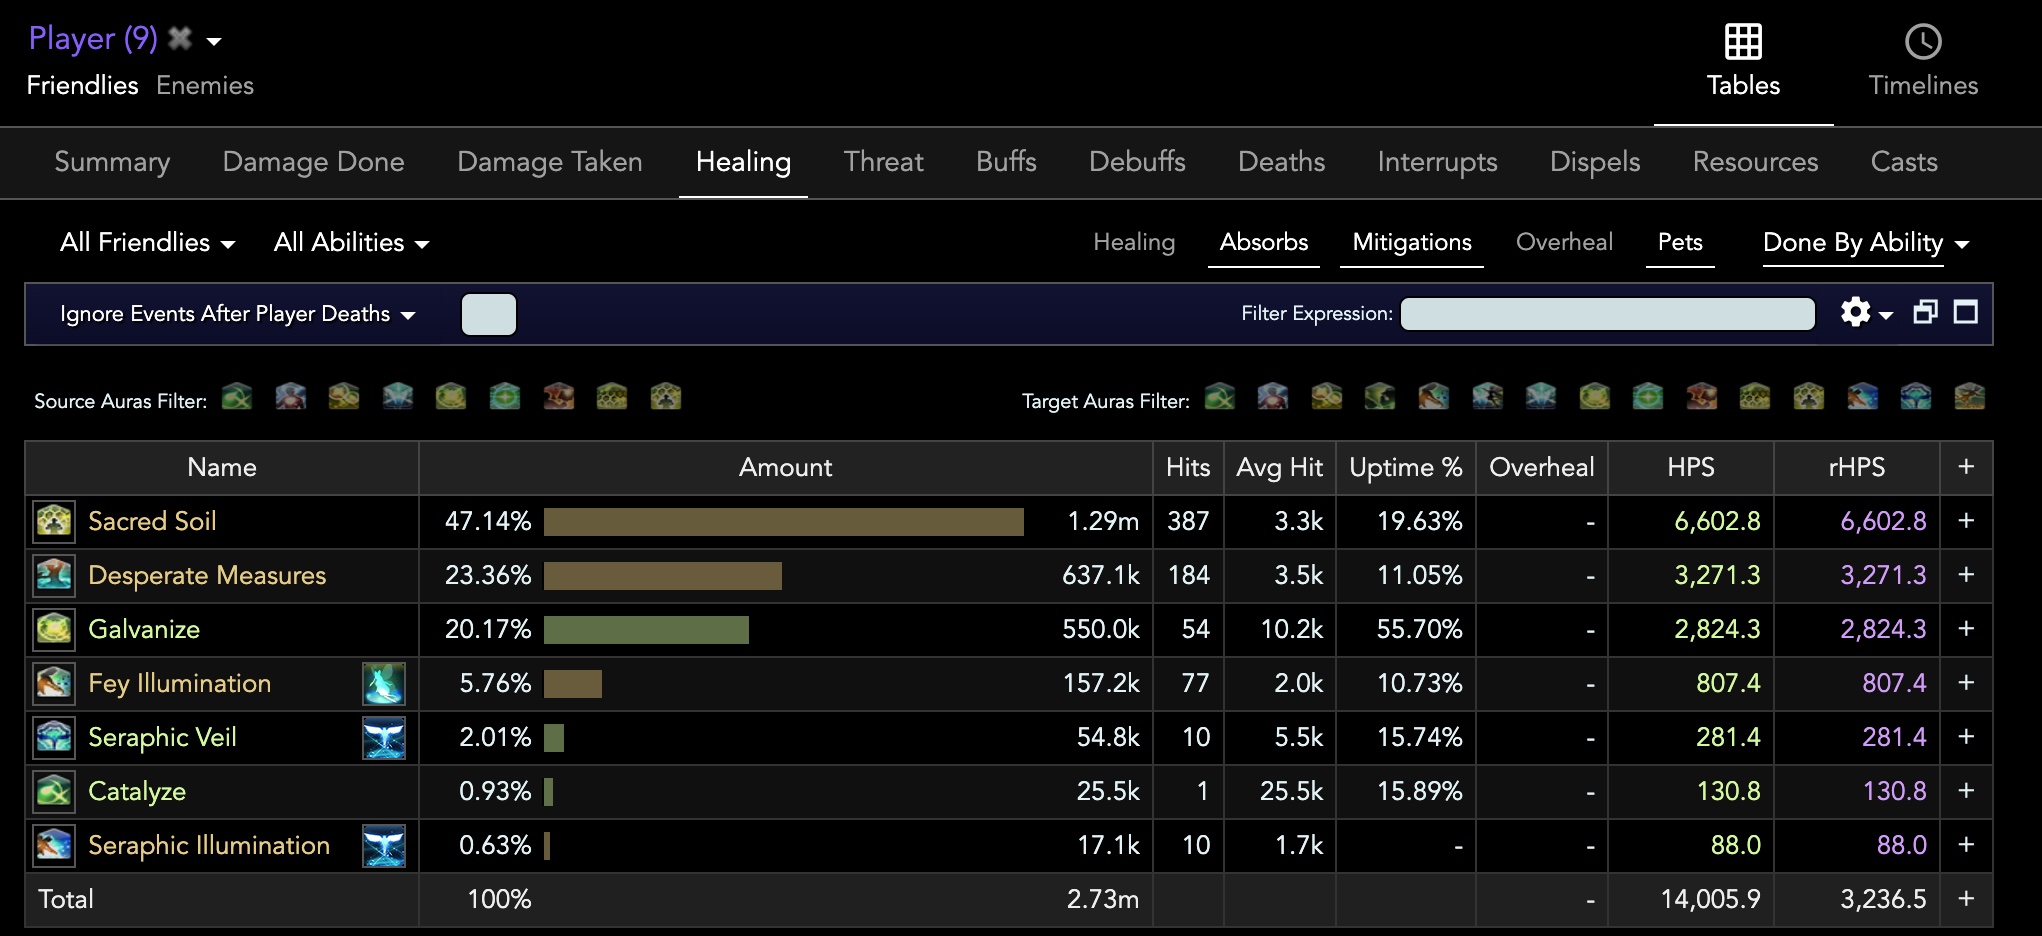
Mitigation view on FFLogs
Finally, FFLogs allows you to look at the amount of damage mitigated by percent buffs under the healing tab, as long as you have "Mitigations" selected on the top right menu.
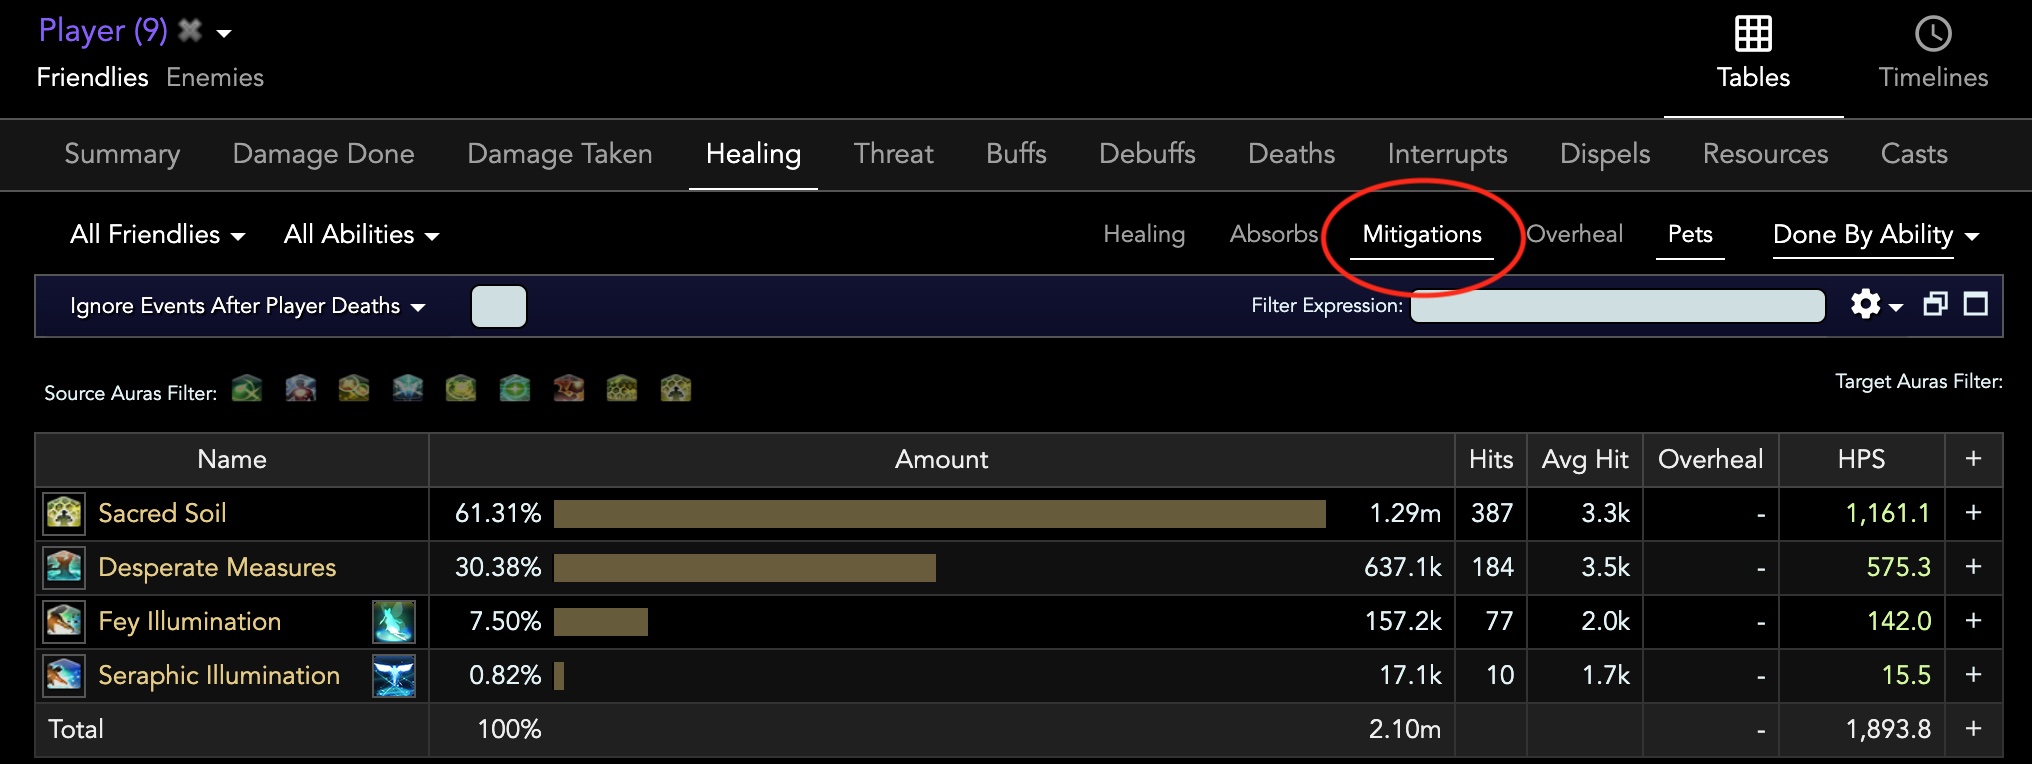
This view only includes damage reduced by % mitigation and does not include shielding. To also view shielded damage, you can select the "Absorbs" button next to "Mitigations".
Changelog
- 26 May 2022: Guide added.
More FFXIV Content

Meru has been raiding since early Stormblood and has done high end content in a variety of roles. She has a lot of experience reading and analyzing logs and has done extensive testing on a variety of mitigation related issues. She hangs out in the Balance Discord and is often pinged in multiple channels for mitigation questions, but sadly very little fishing questions.
- Last Chance For THE PRIMALS x Download Festival T-Shirt!
- Team DN Claims #WorldFirst in FFXIV’s Dancing Mad!
- FFXIV Players Blown Away By Store Updates!
- Support #WorldFirst in FFXIV Dancing Mad Ultimate — Now Available!
- Calling FFXIV Fishers To Catch The Rainbow For Charity!
- Last Chance To Enter FFXIV x Jollibee Sweepstakes!
- The Senor Otters Make Their Grand Debut in FFXIV
- Don’t Miss the FFXIV x FFXI Collab Event Ending Soon!