Overview of FFLogs Death Information in FFXIV
This page contains information on the website "FFLogs" and an in depth look on how to analyze death information pertaining to FFXIV.
Analyzing Deaths
The Deaths tab shows all deaths that have occured in a log, along with a summary of damage taken and healing received before the death.
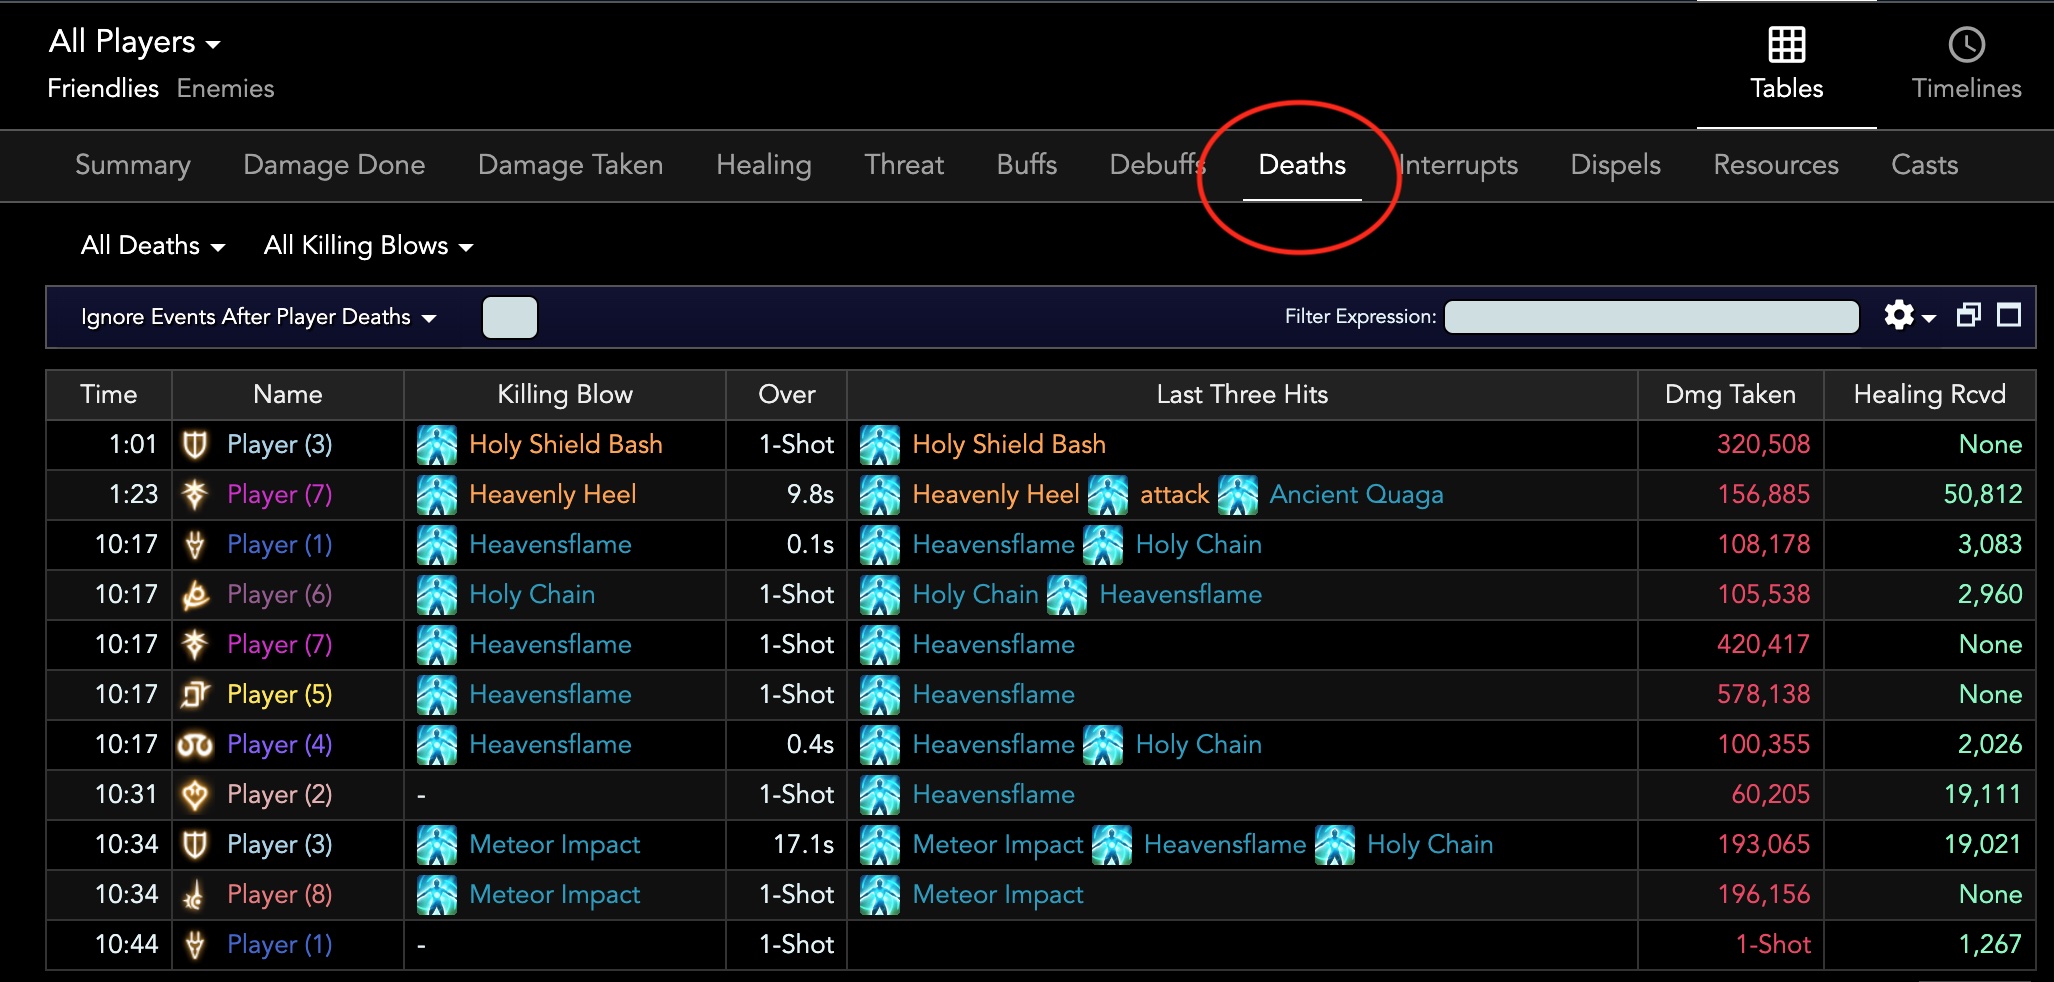
While it is a useful overview, most deaths require a deeper analysis than just looking at the surface damage taken and healing received.
Clicking into one of the deaths will give a more detailed breakdown of the events surrounding the death.
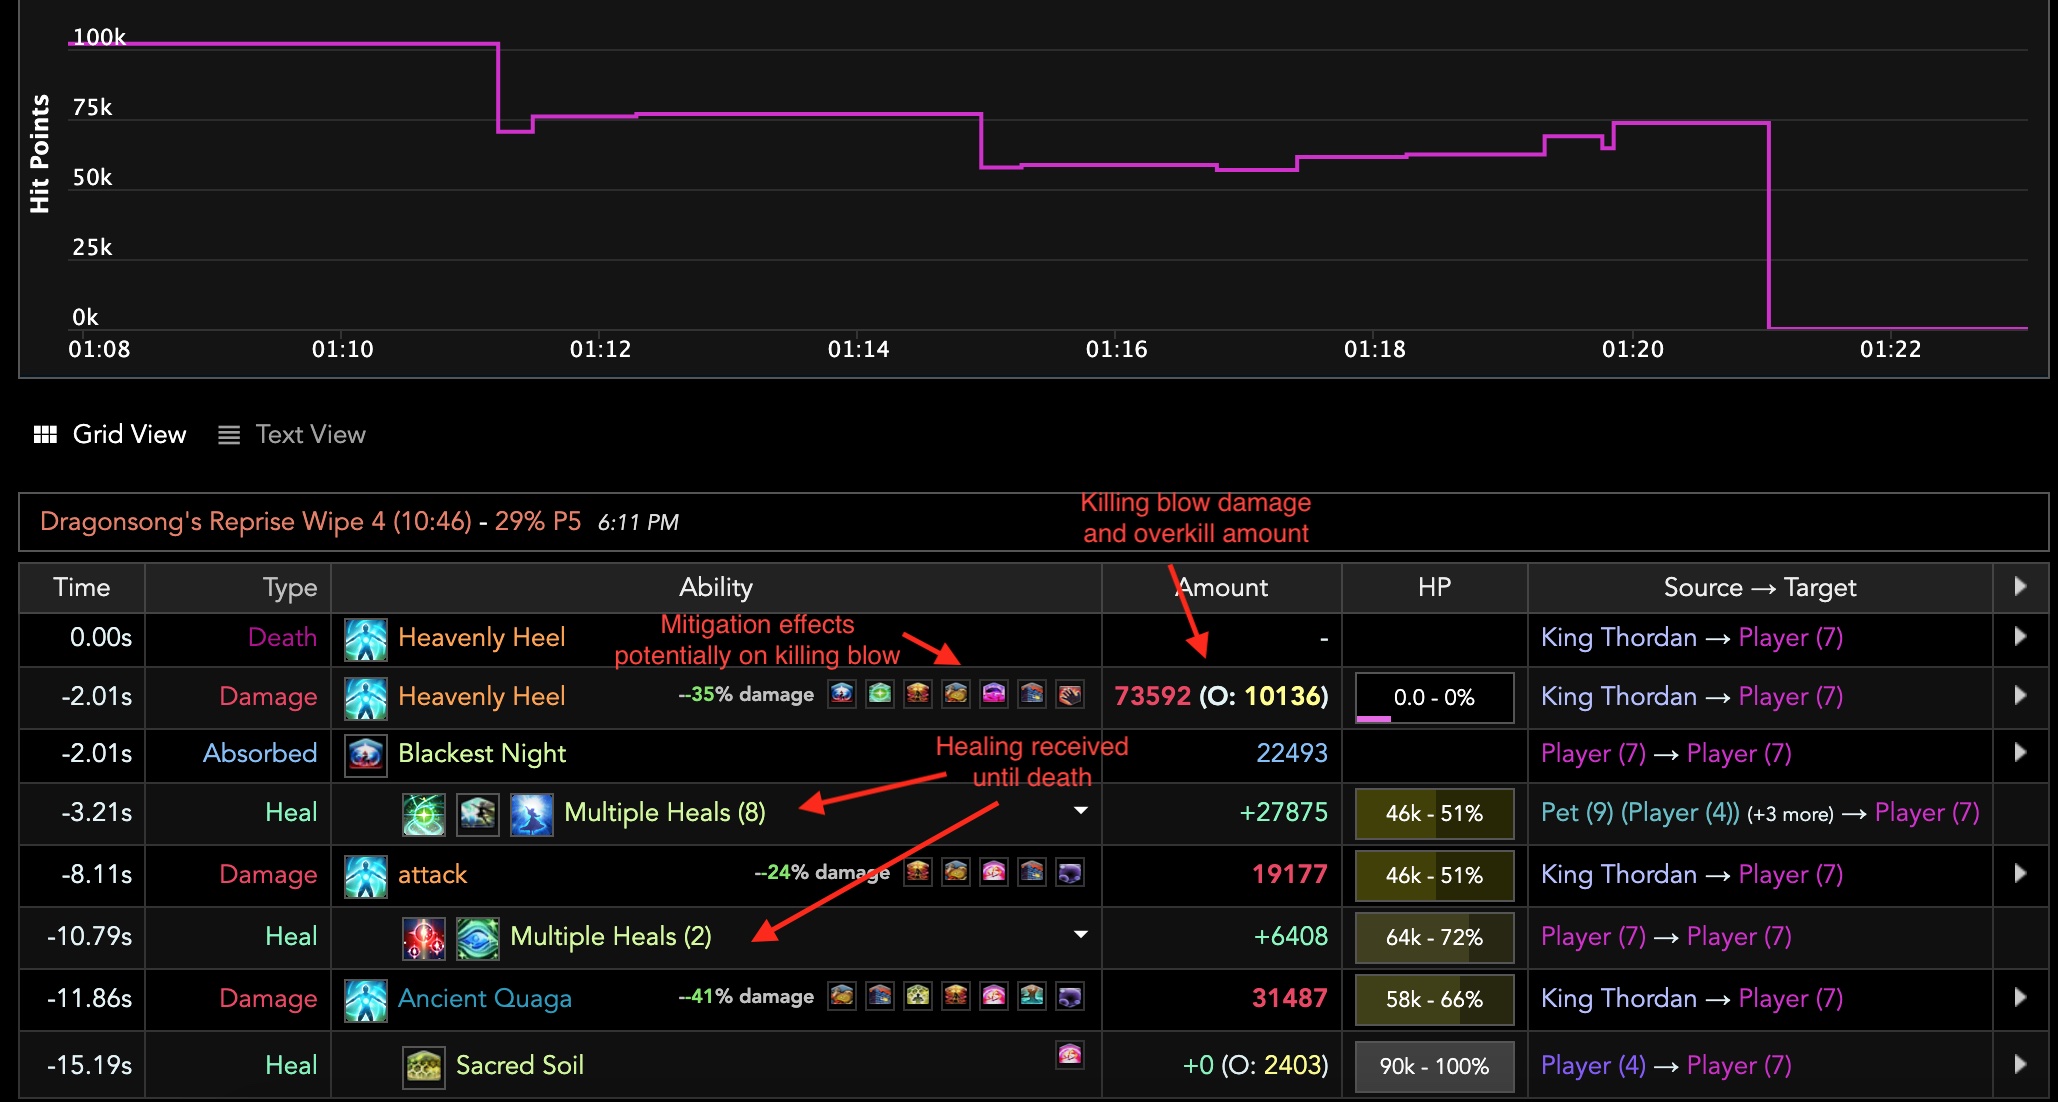
There is a lot to unpack here. Firstly, the detailed death view offers a graphical representation of the player’s health leading up to their death. In this example, you can see that they started out with max health but were hit by two attacks preceding the fatal blow.
We want to focus on the killing blow, in this case, the tankbuster Heavenly Heel which dealt 83,728 total damage to the tank who only had around 74k health at that point, thus overkilling them by 10,136 damage.
Similar to Damage Taken events, the detailed death view also shows
relevant mitigation buffs that were present for each instance of damage taken.
In this case, the only relevant mitigation buffs were ![]() Feint,
Feint,
![]() The Blackest Night,
The Blackest Night, ![]() Rampart and
Rampart and ![]() Oblation.
Note that the buffs shown on this line may be inaccurate sometimes as FFLogs
displays buffs active when the damage was resolved. This means if a shield or
defensive CD was applied after the snapshot, (thus having no effect) but
before damage resolution, it can show up on the killing blow line and lead to
inaccurate conclusions on how much effective mitigation there was.
Oblation.
Note that the buffs shown on this line may be inaccurate sometimes as FFLogs
displays buffs active when the damage was resolved. This means if a shield or
defensive CD was applied after the snapshot, (thus having no effect) but
before damage resolution, it can show up on the killing blow line and lead to
inaccurate conclusions on how much effective mitigation there was.

For example, the above image shows the black mage dying to the Irresistible Grace stack in the final phase of the Epic of Alexander (Ultimate). While it is a hard-hitting attack, the player was at max HP and had five forms of mitigation on them, which is enough for survival normally.

However, if we look at the same attack under the damage taken view, we see
the accurate portrayal of mitigation with respect to the actual damage snapshot.
Irresistible Grace has a ~1s gap between the snapshot (the 'prepares' line) and
the actual resolution, and the only mitigations applied in time were ![]() Reprisal,
Reprisal,
![]() Tactician and the shield Nocturnal Opposition (an old Astrologian
ability). Missing another 10% from
Tactician and the shield Nocturnal Opposition (an old Astrologian
ability). Missing another 10% from ![]() Collective Unconscious and
the beefy shield from
Collective Unconscious and
the beefy shield from ![]() Shake It Off is enough to drive the damage
into fatal territory.
Shake It Off is enough to drive the damage
into fatal territory.

You can cross check with the summary tab using events view and confirm that the two aforementioned mitigations were indeed applied between the damage snapshot and resolution.
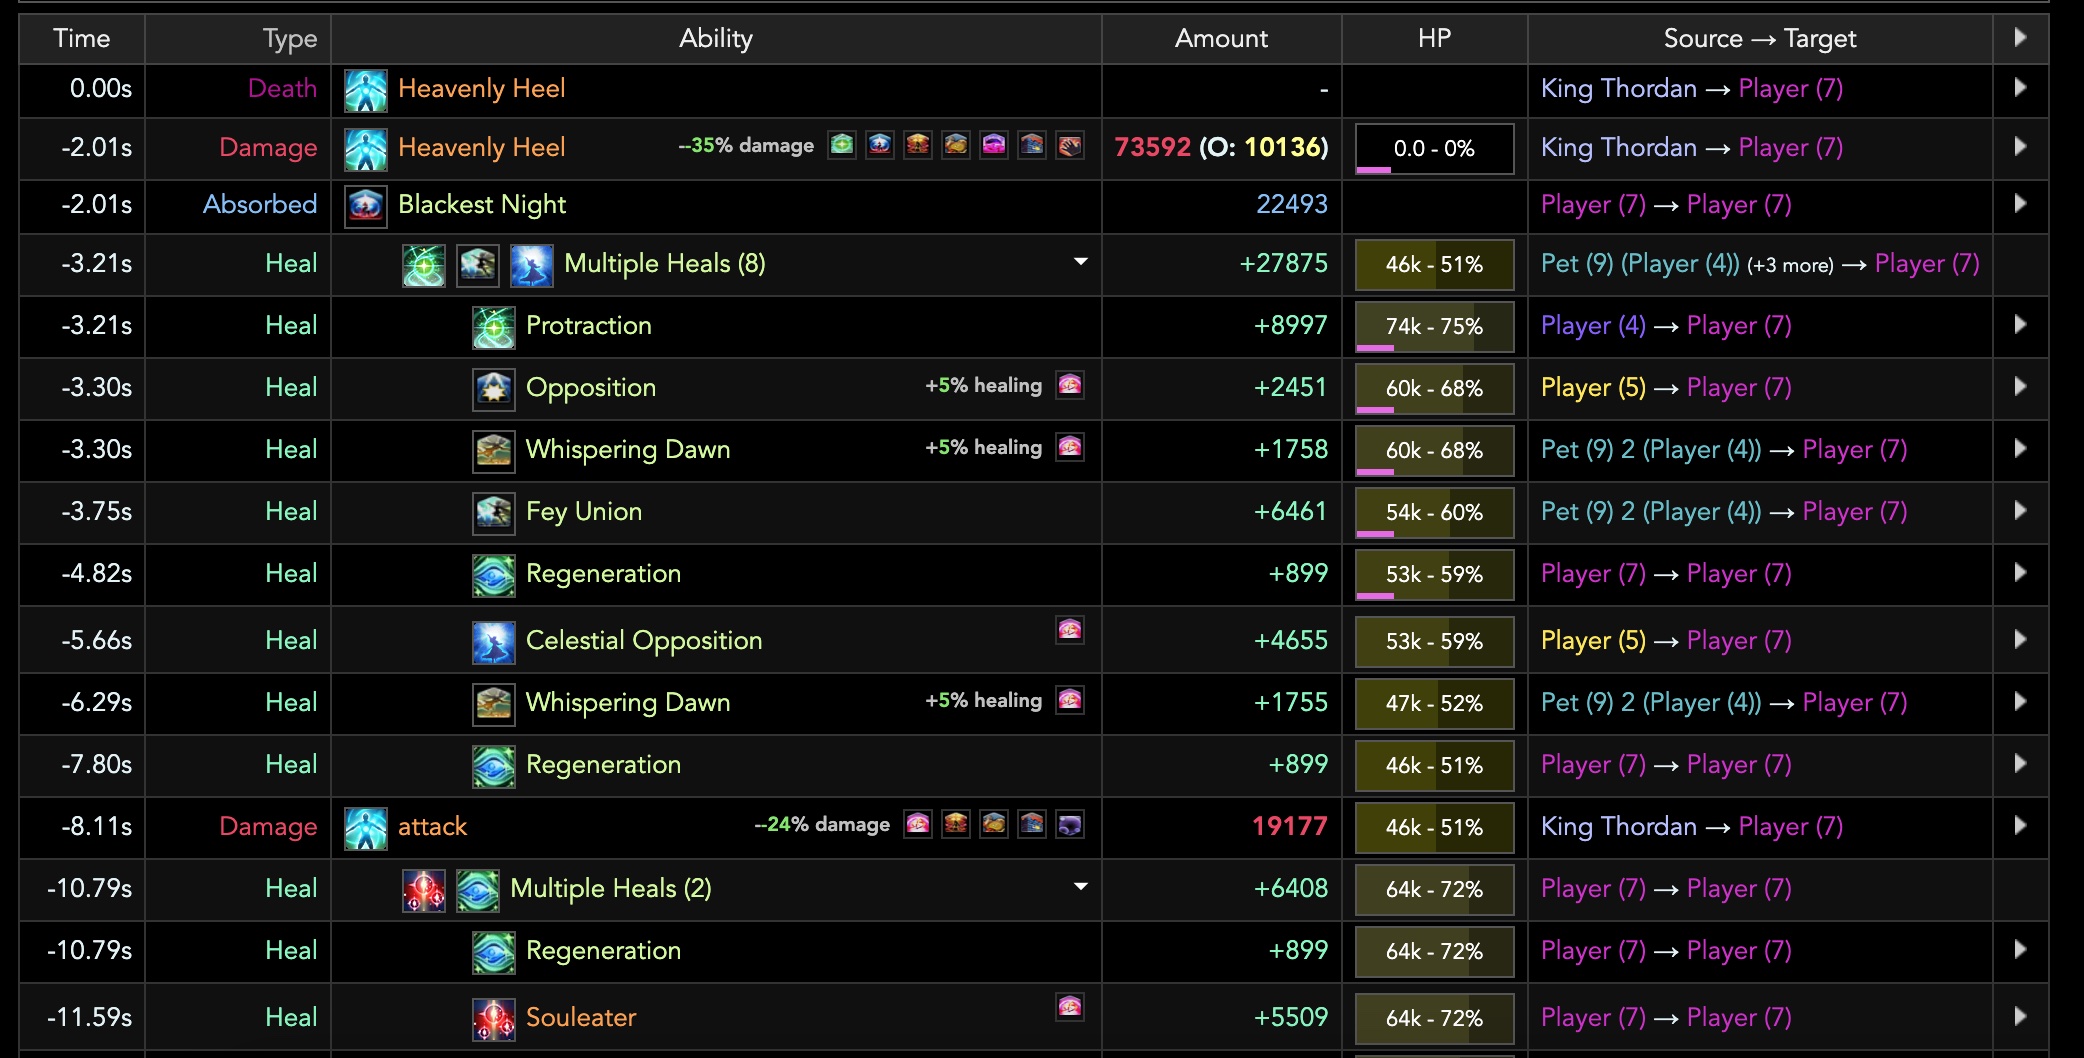
Back to the original death summary, clicking into the Multiple Heals line expands
it to reveal all sources of healing received by the tank before the killing blow.
In this case, we see that they only received a few regens but no single-target healing
outside of ![]() Protraction and
Protraction and ![]() Aetherpact, both of
which are fairly weak, leaving the tank at only 75% HP before the buster occured.
Aetherpact, both of
which are fairly weak, leaving the tank at only 75% HP before the buster occured.

Scrolling all the way to the bottom displays a list of all buff-based mitigation
available to the player and when they were last used, giving us an easy view of
whether more mitigation could have been applied to avoid the death. In this case,
everything but ![]() Shadow Wall was already used, and 77s since the
last usage is not enough for Shadow Wall to come back up again. However, note
that this tab is not a comprehensive list of mitigation as it only displays
buff based mitigation, thus leaving out something like
Shadow Wall was already used, and 77s since the
last usage is not enough for Shadow Wall to come back up again. However, note
that this tab is not a comprehensive list of mitigation as it only displays
buff based mitigation, thus leaving out something like ![]() Reprisal that
could have been applied to reduce damage as well. It also does not include mitigation
from the party, for example
Reprisal that
could have been applied to reduce damage as well. It also does not include mitigation
from the party, for example ![]() Exaltation or the cotank's short
CD.
Exaltation or the cotank's short
CD.
Changelog
- 05 Jun. 2022: Guide added.
More FFXIV Content

Meru has been raiding since early Stormblood and has done high end content in a variety of roles. She has a lot of experience reading and analyzing logs and has done extensive testing on a variety of mitigation related issues. She hangs out in the Balance Discord and is often pinged in multiple channels for mitigation questions, but sadly very little fishing questions.
- Last Chance For THE PRIMALS x Download Festival T-Shirt!
- Team DN Claims #WorldFirst in FFXIV’s Dancing Mad!
- FFXIV Players Blown Away By Store Updates!
- Support #WorldFirst in FFXIV Dancing Mad Ultimate — Now Available!
- Calling FFXIV Fishers To Catch The Rainbow For Charity!
- Last Chance To Enter FFXIV x Jollibee Sweepstakes!
- The Senor Otters Make Their Grand Debut in FFXIV
- Don’t Miss the FFXIV x FFXI Collab Event Ending Soon!