The Omega Protocol Ultimate (TOP) Phase 6 Guide for FFXIV
This page contains detailed information and strategy about the high-end Duty "The Omega Protocol (Ultimate)", commonly abbreviated as TOP. This section of the guide will cover Phase 6, where players will confront Alpha Omega, the final portion of the Ultimate.
Introduction to Phase 6 of The Omega Protocol (Ultimate)
This final phase has an enrage timer of 4:27s and a DPS check of 76.6k. This phase also involves the use of five DPS LB3s, which combined result in ~7k dps on the boss assuming you are running double melee. Three two minute raid buff windows will also be used in this phase, with one of them being under potion.
Feel free to follow along with this Toolbox for the remainder of the fight, as it will provide additional visuals for all mechanics.
Tank Autos
Alpha Omega has fixed autos where it will auto twice between every mechanic (except for right before Magic Number), one targeting whoever has top aggro and another targeting the player farthest away from it. The autos can double stack on one tank (e.g. highest aggro and farthest) and kill them, so the off-tank should turn off stance for the entirety of the phase. Non-tanks can survive these autos as well, so even if the main tank dies, the off tank should stay farthest away from the boss without stance and just let the top aggro auto go on a DPS, allowing for as many people to practice the next mechanic as possible.
Brilliant Dynamis
The three stacks of ![]() Quickening Dynamis you obtained in the past phase will
come into play in Phase 6. Upon surviving the initial Cosmo Memory raid-wide,
they transform into
Quickening Dynamis you obtained in the past phase will
come into play in Phase 6. Upon surviving the initial Cosmo Memory raid-wide,
they transform into ![]() Brilliant Dynamis, a buff that has the following effects:
Brilliant Dynamis, a buff that has the following effects:
- A one time LB gain upon initial transformation. This totals to ~90% of an LB bar for the whole party.
- Varying damage reduction on all damage instances in this phase; without this damage reduction, mechanics will one-shot.
- When a player uses LB with this buff, they will be refunded for the same amount of bars they consumed.
When the last effect is activated, the buff also transforms into
![]() Spark of Dynamis,
which only retains the damage reduction effect from Brilliant Dynamis. Both
Brilliant Dynamis and Spark of Dynamis are lost upon death, guaranteeing that the
player dies to the next mechanic after their revival.
Spark of Dynamis,
which only retains the damage reduction effect from Brilliant Dynamis. Both
Brilliant Dynamis and Spark of Dynamis are lost upon death, guaranteeing that the
player dies to the next mechanic after their revival.
Cosmo Memory
A hard-hitting raidwide that can do up to 400k unmitigated, tank LB3 should be used here. The tank should be using LB3 at around 3 or 4 GCDs into the fight. Even with tank LB3, this raidwide requires a bit of mitigation to be survivable, but many mitigations will be free to use here, such as Reprisal or any 90s that isn't being used before the second Wave Cannon.
This will also be your first buff window, ideally with as many resources as possible that you built up from the end of Phase 5.
Cosmo Arrow and Cosmo Dive
After two tank autos, Alpha Omega will channel Cosmo Arrow, which spawns several line AoEs that will proceed to either move outwards or inwards, one pulse at a time, depending on their initial spawn positions. There are only two patterns to this - Alpha Omega will either telegraph a plus-shaped AoE in the center of the arena first, then a box-shaped AoE on the outside of the arena, or it will do the reverse.
Have the party start on the Southwest safespot at the beginning of the mechanic. While this iteration of Cosmo Arrow does not require the party to be spread out during the dodges, I highly recommend players practice their actual clock spot dodges here, so you do not need to remember two sets of dodges. Refer to the following two videos for footage of either plus-shaped pattern or box-shaped pattern.
Alpha Omega will also start channeling Cosmo Dive as the line AoEs from Cosmo Arrow are going off. Cosmo Dive is three simultaneous hits that will target the two closest players with a tankbuster level hit that deal around 270k damage, and the third closest player with stack that can deal up to 95k damage unmitigated on casters if shared amongst six players.
Have the party stay after the last Cosmo Arrow dodge, near the edge of the hitbox, and the tanks head further into the hitbox, designating one tank to split off into the left side and one into the right side to take their busters separately. Tank autos follow after this mechanic, so ensure the off-tank is leaving the boss's hitbox immediately and the party stay tucked inside the hitbox.
Tips and Tricks
- The snapshot for the line AoEs can be surprisingly fast. You need to be moving into the next set of dodges as soon as the AoE effect from the previous set goes off. Do not be too greedy with casting in early prog on clean runs, having even one death significantly sets back your chances at seeing further into the phase.
- Regardless of the pattern, the first step of the dodges is always waiting two pulses either in the center (for plus-shaped first), or outer edge (box-shaped first.)
- Intercardinal dodge players can use the waymark itself to gauge the 'in' and 'out' portions of their dodges. The outer edge of the waymark denotes both melee range and a safe spot for the 'out' dodge, and the inner edge of the waymark does the same for the 'in' dodge.
- Cardinal dodge players should take note of the boss's hitbox ring when performing the sidestep dodge on the plus-shaped pattern. Since there is a line AoE coming out from the center at the same time, you cannot be too far inside the boss hitbox. Try to do your sidestep dodge on the edge of the boss's hitbox ring.
- Pre-shields can be done after the second tank auto, before the dodges begin, and last until Cosmo Dive.
Unlimited Wave Cannon and Wave Cannon
After two tank autos, everyone should stack directly in the middle of the hitbox as Alpha Omega starts spawning inward arrow indicators on the outer edge of the arena. It will spawn a total of four of them, either going clockwise from the initial spawn or counterclockwise. The arrow indicators will transform into circular AoEs that travel in the direction as indicated by the arrow. Shortly before they transform, baited puddles will also start appearing underneath all players' feet, for a total of six puddles.
Our goal is to go from the center of the arena to the edge of the wall right next to the first arrow indicator, then rotate into the rest of them. For example, if the first spawn was North going clockwise, the party would head towards Northwest, dropping three puddles on their way, then keep rotating clockwise until the remaining three puddles have dropped.
After the six puddles have resolved, Alpha Omega now channels Wave Cannon. This is an attack that targets four random players with a line AoE that inflicts Magical Vulnerability up, then proceeds to target the remaining four players with the same attack. After both sets of it, Alpha Omega will perform a much larger line AoE that will need to be shared by the entire party, with the two tanks in front as the first two targets hit take significantly more damage. This is where tank invulnerabilities come into play; because the tankbuster hit on the first two players can do up to 370k on a tank, it is often much easier to handle it with one tank using their invuln and the other tank using their 30% mitigation and whatever other CDs they have available (with assistance from the invulning tank.)
We will resolve the mechanic by having players immediately spread out into their
clock spots after dropping the sixth puddle, popping ![]() Sprint if needed. After taking
two sets of Wave Cannons at your clock spots, stack on a predetermined spot and have
the tanks in front of the rest of the party.
Sprint if needed. After taking
two sets of Wave Cannons at your clock spots, stack on a predetermined spot and have
the tanks in front of the rest of the party.
Tips and Tricks
- Once again, 30s shields can be applied after the second tank auto from the preceding mechanic, though Sage may prefer to delay their shield application as an easy movement option during baited puddles.
- I recommend picking a stack spot on one of the healers, preferring one that also minimizes caster movement. This gives the healer a chance to hardcast a heal if needed, and can save caster movement options that are better used in other mechanics.
Cosmo Arrow and Wave Cannon
After another two tank autos, Alpha Omega repeats the Cosmo Arrow portion of the first mechanic, this time pairing it with Wave Cannon, requiring players to be spread out during the Cosmo Arrow dodges. This is where the intercardinal and cardinal dodges you practiced in the first Cosmo Arrow come into play. Split up the party into four pairs, with each pair starting on an intercardinal safespot. You can either have the cardinal clockspot players rotate clockwise for their intercardinal starting point and dodge counter-clockwise back to their cardinal clockspot, or vice versa.
If you've practiced the intercardinal and cardinal dodges in the first Cosmo Arrow as you should, there is nothing different you do in this set of Cosmo Arrow aside from changing your starting position. The Wave Cannon lasers will naturally resolve as you're performing the dodges, and after two sets of lasers, everyone should stack up at the designated stack spot, the two tanks in front, for the final stack.
The second raid buff window will follow this mechanic.
Tips and Tricks
- During the dodges for the plus-shaped pattern, it is extremely important for the cardinal players to hug the side they will be dodging to, and intercardinal players go max melee (use the intercardinal waymark.) This is because the first set of Wave Cannon lasers are going out around that time, so if both players are stacked inside the square safe-spot, they will cleave each other. This is not a concern for the box-shaped pattern as cardinal players are forced to split off before the lasers hit by the dodge pattern.
- As raid buffs are going out during tank autos, it is important to position the party in such a way that the far tank can still bait their autos and be within range of raid buffs. Generally, if the party steps inside the hitbox, the far tank can go max melee behind them and still be within range of buffs without cleaving the party.
Unlimited Wave Cannon and Cosmo Dive
This is a repeat of the first iteration of Unlimited Wave Cannon, except Alpha Omega does Cosmo Dive after the sixth puddle bait instead of Wave Cannon. This is also where your first two melee LB3s will be happening. After the sixth puddle bait, the party simply stops where they were, and the tanks split off going left and right inside the boss's hitbox to bait the tankbuster Cosmo Dive hits. The first melee LB3 should be done as Cosmo Dive is hitting the party.
Two tank autos will follow afterwards, so have the far tank go outside the hitbox, party stack step into the hitbox and the second melee perform their LB3. After both autos, all eight players should stack in the middle of the hitbox for the final mechanic, Cosmo Meteor. Tanks, make sure to wait until the castbar for Cosmo Meteor starts before moving in; the Limit Break effects may make it hard to distinguish tank autos visually. The second melee LB player will be animation locked for a bit, but they will have plenty of time to move center for the upcoming bait.
Cosmo Meteor
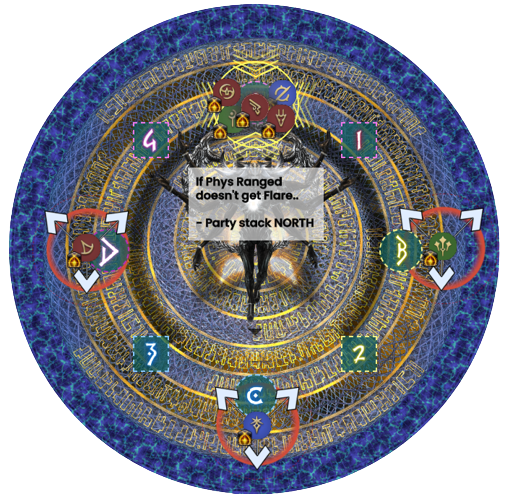
Alpha Omega drops a large baited puddle beneath every player. Simply move out of it into your clock spots, with one potential alteration. The physical ranged DPS in the party will go North, and whoever was North originally will take their spot. This is because Alpha Omega will spawn two Cosmo Meteors North and South and six Cosmo Comets in a circle. The Cosmo Meteors have significantly more HP than the Comets, and thus need to be hit by physical ranged DPS LB3 on top of caster LB3.
As soon as players get to their clock spots, the caster should use caster LB3 targeted to kill all six Cosmo Comets and significantly damage the Cosmo Meteors. If you want a completely fool-proof way of targeting it, I recommend using a <t> macro as the boss is centered during that phase.
Limit Break macro:
/ac "Limit Break" <t>
As this is going on, four random players will be hit with a Cosmo Meteor AOE which applies a Magical Vulnerability up, followed by the four that were not targeted in the first round. This will then repeat a second time, resulting in two hits on each player.
Once the Cosmo Comets have died and your LB bars have refunded, the physical ranged DPS needs to use their LB3. Since the meteors are lined up right in front of their position, they can simply target the boss with it and hit their other two intended targets.
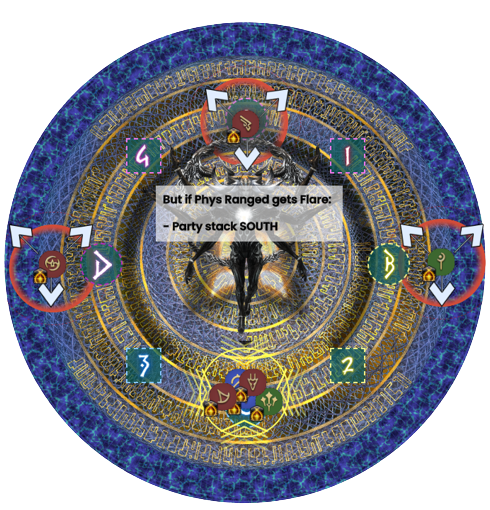
Three random players will get flare markers, while one of the remaining five players will get selected for an untelegraphed stack marker. Since the physical ranged DPS is animation locked from their LB, the party needs to adjust around them. If they did not get a flare marker, then the party stack will be north and the flares spread out West, South and East. If the physical ranged did get a flare marker, the stack will be taken South, with the remaining two flare markers going West and East.
Tips and Tricks
- Cosmo Meteors can each do up to 110k unmitigated on physical DPS, and thus require very high mitigation and significant healing in between. I highly recommend sending one healer, one with shielding capability, to the middle after the initial baited puddle has disappeared to assist with healing and re-shielding. While that is usually the shield healer, astrologian's Neutral Sect is incredibly potent as both a shielding tool and from a pure healing throughput standpoint, and if your Astrologian has chosen to use neutral there, they should be given priority to go middle.
- Players should stay inside the boss's hitbox ring in order to avoid missing healing and shielding. Going barely outside the initial baited puddle is a good distance to avoid clipping each other.
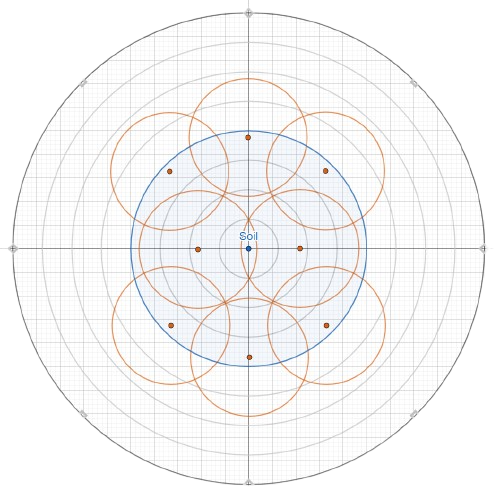
- If you really prefer both healers going mid to assist with healing and shielding, you can use the following diagram as a reference for their positioning.
- The Cosmo Meteors and Cosmo Comets are fully killable by Limit Break and do not need any player damage on them. There is no need to detarget the boss at any time during this mechanic.
- If all flares are properly spread out on the cardinals, players can be safely max melee with a flare. However, if two flares happen to be too close together and a player cannot make it all the way to the next cardinal, it is safer for both players to go to the wall to reduce as much proximity damage as they can.
Magic Number and Enrage
There are no more tank autos, so it is safe for the party to stack together after
resolving meteor flares. Alpha Omega will channel Magic Number, a raid-wide that
requires tank LB3 and inflicts the ![]() Magic Number debuff. This debuff needs to be
cleansed by healer LB3, and will kill players when it expires without being
cleansed. Alpha Omega does this twice, requiring both tanks and healers use their
limit breaks.
Magic Number debuff. This debuff needs to be
cleansed by healer LB3, and will kill players when it expires without being
cleansed. Alpha Omega does this twice, requiring both tanks and healers use their
limit breaks.
After two rounds of Magic Number, Alpha Omega begins its incredibly long enrage cast, and one melee will use the final limit break as soon as they're able to. The final raid buff window also falls here, and you will have a chance to kill Alpha Omega if its HP is at 17% or lower when it begins the enrage cast - good luck!
Tips and Tricks
- Magic Number does not need any extra mit aside from tank LB if players are at full HP, but using any mitigation left over on the first Magic Number is free and can provide some extra safety margin if players are for some reason not topped from meteors.
- The timing to use tank LB is around the start of the Magic Number castbar. The timing to use healer LB is when you see the Magic Number damage/debuff appear - note that it is possible to use the healer LB too early if the tank LB was very early. Make sure you wait for the debuff application - the debuff lasts 6s and healer LB cleanses it after a 2s cast, so there is plenty of time.
- While a lot of players choose to use their potion during this final raid buff window (basically popping it after the second healer Limit Break), the melee doing the final LB will likely lose some pot duration, so they may opt to pot during one of the earlier windows - most likely the opener since they can have full resources from Phase 5.
- Due to the fact healer Limit Break not only replenishes HP, but also MP, it's actually a damage
gain to let the Dark Knight die to Magic Number by clicking off the tank
Limit Break. The Dark Knight will want to deplete all of their reserves of mana
through
 Edge of Shadow usage, click off the Limit Break buff, killing them in the process, and then
immediately resurrect through healer Limit Break. For as silly as this seems, it is a gain, and you will raise
without resurrection sickness. This happens twice, so make sure to dump the mana gained quickly.
The only prior setup needed for this to work is the Dark
Knight needs to be the one who uses the first tank Limit Break.
Losing the
Edge of Shadow usage, click off the Limit Break buff, killing them in the process, and then
immediately resurrect through healer Limit Break. For as silly as this seems, it is a gain, and you will raise
without resurrection sickness. This happens twice, so make sure to dump the mana gained quickly.
The only prior setup needed for this to work is the Dark
Knight needs to be the one who uses the first tank Limit Break.
Losing the  Spark of Dynamis buff no longer matters, as there's no further damage in the fight.
The following macro can be used if you're not comfortable clicking
the tank Limit Break buff:
Spark of Dynamis buff no longer matters, as there's no further damage in the fight.
The following macro can be used if you're not comfortable clicking
the tank Limit Break buff:
/statusoff "Dark Force"
/statusoff "Gunmetal Soul"
/statusoff "Land Waker"
/statusoff "Last Bastion"
/micon "Edge of Shadow"
Mitigation Tips and Tricks
This phase has a very high mitigation and healing requirement, arguably an entire mechanic in itself. Having a solid mitigation plan and being able to execute it consistently is key to having a smooth prog. While mitigation plans will, and should, vary between groups, here are some general mitigation tips and pitfalls to avoid.
- Having tank invulns available for both Wave Cannons can lessen the mitigation load significantly, as the kitchen sinking tank can now benefit from co-tank assistance, often reducing the 370k buster to very nonthreatening numbers when combined with party mitigation. Healers can also easily focus mit one tank instead of two if needed. This also simplifies the tank cooldown plan itself a lot, since tanks will now be locked into using their shorts + 90s cooldowns for Cosmo Dives, and either invuln or 30% + whatever is available for Wave Cannon.
- Trying to maximize two minute mitigation/healing cooldowns is a trap, because the
timeline does not allow full usages of two minutes without leaving certain attacks
severely undermitigated. Instead, you should aim to ensure maximum usages of your most
effective two minutes and let the remaining ones fill in any mitigation gaps. For example,
Astrologian's
 Neutral Sect is probably one of the most powerful healer two minutes with
its ability to offer an additional layer of shielding and potent regens, so you'll want
to plan for two effective usages of it during the phase. A White Mage's
Neutral Sect is probably one of the most powerful healer two minutes with
its ability to offer an additional layer of shielding and potent regens, so you'll want
to plan for two effective usages of it during the phase. A White Mage's  Temperance, on the
other hand, while offering a nice position-agnostic 10% mitigation and good boost to the
White Mage's own healing, is generally not going to be worth displacing a more powerful
two minute healer cooldown.
Temperance, on the
other hand, while offering a nice position-agnostic 10% mitigation and good boost to the
White Mage's own healing, is generally not going to be worth displacing a more powerful
two minute healer cooldown. - While it is technically possible to catch both Wave Cannon lasers and stack with a 10s mitigation, I recommend explicitly assigning 10s to either catch the lasers or the stack. This ensures you will have no surprises with 10s falling off early, leaving you with less mitigation than you expected for the stack, which is often more fatal than the lasers. Having players hyper-focused on getting the timing right for 10s mit can also be a detriment to prog if it causes them to mess up mechanics - especially since the second Wave Cannon occurs during Cosmo Arrow.
- 15s buff based mitigation, on the other hand, is very easy to use during the
first Wave Cannon to cover both lasers and stacks. Using it after the sixth
puddle as the party is running towards their clock spots will cover the entire
mechanic. However, buff mitigation, unless it lasts 20s or is an aura like a White Mage's
Temperance, is not great at mitigating everything on the second Wave Cannon
as the party will be spread out for the most part doing Cosmo Arrow dodges. Prefer
to lean more on debuff based mitigation instead, or just commit buff based mitigation
to either the lasers or the stack.
- On Cosmo Meteors, 15s duration mitigation can be thrown out right as the baited puddle appears under the party and comfortably cover both sets of random hits. 10s debuff based mitigation can be applied after players reach their clock spots to the same effect.
- While the meteor flares + stack do much less damage than the initial two Cosmo
Meteor hits, you are likely to have run out of mitigation at that point, with
maybe a leftover
 Feint and one other 10%, if at all. It is critical that the party
takes the hit with at least one shield, as the combined damage of flares and stack
can kill from max HP with so little mitigation. Make sure that someone is doing the
reshielding, and that they can reach everyone, not just the five players that happen
to be in a stack.
Feint and one other 10%, if at all. It is critical that the party
takes the hit with at least one shield, as the combined damage of flares and stack
can kill from max HP with so little mitigation. Make sure that someone is doing the
reshielding, and that they can reach everyone, not just the five players that happen
to be in a stack.
Changelog
- 16 Mar. 2023: Guide added.
More Final Fantasy XIV Content

Meru has been raiding since early Stormblood and has done high end content in a variety of roles. She has a lot of experience reading and analyzing logs and has done extensive testing on a variety of mitigation related issues. She hangs out in the Balance Discord and is often pinged in multiple channels for mitigation questions, but sadly very little fishing questions.
- Complete Dawntrail’s Art Book Collection With – Relics of Eternity –
- New Framer’s Kit With Return Of Breaking Brick Mountains
- Last Chance For THE PRIMALS x Download Festival T-Shirt!
- Team DN Claims #WorldFirst in FFXIV’s Dancing Mad!
- FFXIV Players Blown Away By Store Updates!
- Support #WorldFirst in FFXIV Dancing Mad Ultimate — Now Available!
- Calling FFXIV Fishers To Catch The Rainbow For Charity!
- Last Chance To Enter FFXIV x Jollibee Sweepstakes!