The Fifth Circle (Savage): Proto-Carbuncle Raid Guide
This guide aims to prepare players for Abyssos: The Fifth Circle (Savage) by providing detailed explanations of the fight's mechanics, as well as consistent strategies for the purpose of farming.
Introduction to The Fifth Circle (Savage)
To see Nemjiji's frenzy as you recount your battle with the proto-Carbuncle, one might think that she had been infected with the mythic creation's corrupting poisons and was scrambling to record her final words before expiring. Although she claims that the many fantastical bestiaries that lie scattered about the laboratory are simply for research, you gather that she would take great pride in seeing her name inscribed upon the cover of one.
Unlock Requirements
The Fifth Circle (Savage) can be unlocked at level 90 after completing the Normal difficulty of the Abyssos raid and talking to Nemjiji in Labyrinthos (x8.4, y27.4). It requires a minimum item level of 600 to queue, but this requirement can be bypassed when entering with a full party.
Raid Guide
Proto-Carbuncle has a hard enrage of 9:58 and has a DPS check of roughly 49,200 raid DPS.
If you would prefer to watch a video that covers the fight, take a look at Hope Productions visual guide.
Party Finder Resources
Raid Preparation
All players should be assigned a clock spot, with tanks north and south, healers east and west, and DPS on intercardinals. The raid also needs to be split into light parties of one tank, one healer, and two DPS each. Finally, parties will need to assign roles to specific puddles for the Devour mechanic halfway through the fight - these will spawn at cardinals, so assign one role to each cardinal.
The boss has a Satiety meter - this does nothing and depletes at a fixed rate the entire encounter, and upon hitting zero it will begin to cast Starving Stampede.
The fight is divided into six Ruby Glow mechanic sets, with one dance mechanic in the middle: Devour. Ruby Glow mechanic sets involve solving positional puzzles while avoiding Ruby Reflection, while failure to execute Devour properly will likely result in a wipe.
The Proto-Carbuncle's Abilities
- Sonic Howl: Moderate raid-wide magical damage.
- Ruby Glow: Heavy raid-wide magical damage. Summons magical barriers in the arena that either divides it in half diagonally OR divides it into four quadrants. Any Searing Ray or Topaz Stones that does an AoE in an area inside Ruby Glow will be reflected off the barrier, dealing damage again to the area with Ruby Reflection and inflicting a damage down debuff.
- Topaz Stones: Summons Topaz Stones onto the arena, which deal magical damage in an area. This AoE can be reflected by Ruby Glow barriers. Additionally, spawns poison pools that slowly expand.
- Topaz Cluster: Summons multiple Topaz Stones in succession.
- Toxicosis: Four poison puddles spawn that inflict a moderate poison DoT when standing inside it. Two players must soak the puddle when the circular indicator is about to finish or else a Lively Bait will spawn. The add will cast Scatterbait, which deals massive damage to the raid and inflicts a damage down debuff. Additionally, if players are not standing inside the puddle, it will deal heavy damage to the two closest players to the pool.
- Venomous Mass: A magical AoE tank buster on the current #1 aggro that inflicts an uncleansable poison DoT for 12 seconds as well as a physical vulnerability up debuff.
- Toxic Crunch: A physical tank buster on the current #1 aggro that inflicts an uncleansable poison DoT for 12 seconds. As this always follows Venomous Mass, a tank swap is necessitated.
- Double Rush: The Proto-Carbuncle will jump the centre of the arena and dash to an intercardinal, dealing damage to all targets in its path. It will then dash across the arena to the opposite intercardinal, dealing heavy damage and knocking all players back to its sides. Knockback prevention abilities work on this.
- Venom Surge: Unmarked stack markers on both healers that do magic damage. This is followed by a baited ground AoE on all players, then an unmarked AoE on all players that does magic damage.
- Venom Squall: Unmarked AoE markers on all players that does magic damage. This is followed by a baited ground AoE on all players, then an unmarked stack marker on both healers that does magic damage.
- Raging Claw: The Proto-Carbuncle will slash six times in front of it.
- Raging Tail: The Proto-Carbuncle will tail swipe the arena behind it.
- Claw to Tail: Raging Claw into Raging Tail immediately after.
- Tail to Claw: Raging Tail into Raging Claw immediately after.
- Venom Pool: Unmarked stack markers on both healers that do magic damage. This will break any Topaz Stones that are hit, as well as spawn an expanding poison pool.
- Searing Ray: The boss will cleave the arena in front of it. This AoE can be reflected by Ruby Glow barriers.
- Sonic Shatter: Five instances of raid-wide magic damage.
- Starving Stampede: The main mechanic of the fight, commonly referred to as Devour. The boss will mark eight jumps across the arena. It will then mark them sequentially with a red jaw marker, indicating the order it will jump in. These do large AoEs and inflict Down for the Count is a player is hit. At the end, the boss will cast Devour on all players hit, eating them and killing them.
Ruby Glow 1
As the fight starts, the boss will immediately start with Sonic Glow into Ruby Glow, so mitigate and heal between the raid-wides. In the first Ruby Glow, the room is divided into four quadrants and there will be two Topaz Stones covering two quadrants. Two expanding poison pools will also spawn, so players need to head to one of the quadrants that are safe from Ruby Reflection as well as not covered by a poison pool.
Once the poison pool disappears, the boss will cast Venomous Pool followed by Toxic Crunch. The current main tank needs to move out of the group and mitigate, as it deals damage in an AoE. The off tank will need to provoke during the castbar and mitigate the second hit. Return the boss to the middle for the first Toxicosis Puddles.
The puddles need to be soaked by two players each, and it is best to move in at the last second to avoid taking too much residual damage. Ideally, each puddle is soaked by players of the same role - tanks and melee DPS take the two puddles in the centre, while ranged DPS and healers take the two puddles on the outside. To determine which tower belongs to which role, use the north as a fixed point. Tanks and healers will take the first inside and outside puddles starting from North and going clockwise, while both sets of DPS will take the first inside and outside puddles starting from Northwest and going counterclockwise.
The boss will cast another Venomous Mass into Toxic Crunch before casting Ruby Glow.
Ruby Glow 2
In the second Ruby Glow, the boss will divide the arena into two halves. Topaz Stones will summon one stone that will hit one half, and an expanding poison pool on the other side. This is followed by Double Rush. This means that the party must first stay behind the boss as it dashes, then possibly move to the safe side for the Ruby Reflection. This should be mitigated heavily, as it deals physical damage which may be lethal for casters and healers. Ensure that you are not knocked into the wall, or use your knockback prevention ability during the castbar of Double Rush.
The boss will return to the middle and cast Sonic Howl and Ruby Glow.
Ruby Glow 3
In the third Ruby Glow, the boss will divide the arena into four quadrants. Four sets of only Topaz Stones (and no poison pools) will be dropped by Topaz Cluster, with two in the first, two in the second, three in the third, and three in the fourth. Essentially, players will have to remember safe quadrants that do not have Topaz Stones in them, and move into them after each explosion.
To simplify this mechanic, only the first and third safe spots are needed. The second safe spot is always one of the two adjacent quadrants to the first safe spot, and the fourth and final safe spot is always across from the third safe spot.
Afterwards, the Proto-Carbuncle will cast another Venomous Mass into Toxic Crunch. This is followed by either Venom Squall or Venom Surge. If it is Squall, players will need to head to their clock spot to spread for the AoE, bait the AoE in the middle of the arena, and head east and west to stack in their light party in their clock spot for the stack marker. If it is Surge, do the opposite - first, stack with light parties at east and west, bait the AoE in the middle, then head to everyone's clock spot for the AoE.
Immediately after, the boss will cast Tail to Claw or Claw to Tail. If it is the former, stand on the front side of the boss, and move immediately to the back side after it swipes its tail. If it is the latter, wait behind the boss for it to cleave six times, then move immediately in front of the boss.
At this point, the Proto-Carbuncle's Satiety meter will reach zero, and it will begin to mark the arena for Starving Stampede, beginning the Devour mechanic.
Devour
The Proto-Carbuncle becomes untargetable, invincible, and jumps across the arena with Starving Stampede in the order shown by the red jaw. The jumps will start at a random intercardinal, but there are only two possible patterns of jumps. The diagram below shows where the jumps are located, and it can start on any of 1, 2, 3, or 4.
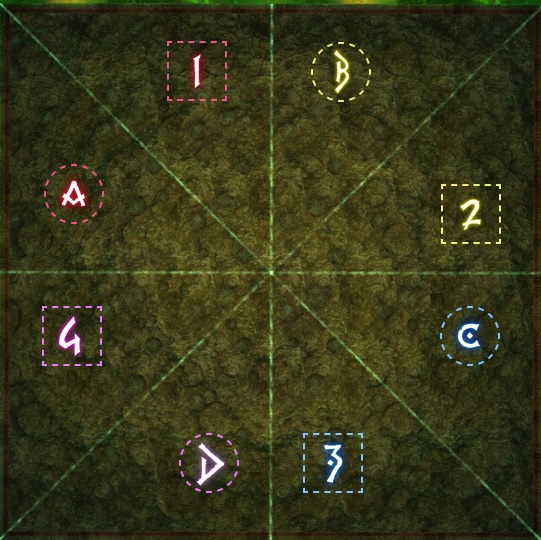
For the first pattern, the jumps will go clockwise one, counterclockwise four, and clockwise 2. For example, if the jumps started at 1, it will go 1, 2, A, D, C, B, 3, 4. In this pattern, players will want to stand opposite of the first jump, then follow it to the first jump's location after the second jump has hit. In our example, stand at 3, and once 2 has hit, move along the inside to between A and 1.
For the second pattern, the jumps will go clockwise three and counterclockwise four. For example, if the jumps started at 1, it will go 1, 2, 3, 4, C, B, A, D. In this pattern, move into the first jump, then once the fourth jump hits follow behind it to the opposite corner. In our example, stand at D, then move into 1. Once 4 hits, move along the inside to between 3 and C.
Right after Starving Stampede, Toxicosis puddles will spawn in set positions in the middle of the arena at cardinals. However, the raid needs to satiate the Proto-Carbuncle's hunger by allowing a Lively Bait add to spawn. To do this, have the DPS and healers stand in assigned puddles. The tanks can either both stand close to the puddle but not inside it and mitigate, or one tank can stand inside the puddle and use their invulnerability ability to prevent the puddle from killing them. Either way, once the add is spawned, the boss will eat it and become satiated again.
If there are multiple adds spawned, the boss will eat only one. If the boss's hunger is not satiated, it will cast Acidic Slaver, wiping the party.
Ruby Glow 4
After the puddles are soaked, the boss will cast Sonic Howl into Ruby Glow. In the fourth Ruby Glow, the boss will divide the arena into halves. The Topaz Stones that are summoned will have three on one side of the arena, and two on the other side of the arena. Soon after, the boss will cast Venom Pool targeting the two healers. Players will need to head to the half of the arena with only two stones, and stack in their light parties to destroy the two stones in that safe side, creating a safe zone. One light party needs to go close to the boss, and the other needs to head to the wall.
After the Topaz Stones explode, the poison pools from Venom Pool will begin to expand and the boss will cast either Searing Ray or Raging Claw. If it is the former, stand on the safe side of the arena, and if it is the latter, stand behind the boss. Quickly move to the safe spot of the arena that will not be filled up by poison pools. The boss will do a Venomous Mass into Toxic Crunch combo right after, so avoid the main tank.
Ruby Glow 5
Return to the middle of the arena and locate north for Ruby Glow. In Ruby Glow 5, the arena will be split into quadrants. Topaz Stones will summon two stones that block off opposing quadrants, and two poison pools on the other two quadrants. These pools will slowly expand, but leave a tiny safe spot on the quadrant it is on. Players will need to split into their light parties, with one group heading to the safe spot on the west side of the arena and one group heading to the east side of the arena. Once the Topaz Stones explode, move into the quadrants and prepare for Venom Squall.
Players will need to do this mechanic within the confines of the tiny safe spot at the edge of the arena. First, spread with three players at the wall and one closer to the boss. Then, move back to bait the AoE, and then stack together to the boss for the unmarked stack. Both healers in light parties will have to top the light party up between hits.
At this point, Toxicosis puddles will spawn. Soak these like you would the first set, and ensure players know where they are going and where their partner is, as it is likely you are in opposite light parties. Immediately after they resolve, there is a Claw to Tail or Tail to Claw, so head close to the boss and dodge that as well.
The boss does another Venomous Mass into Toxic Crunch combo before casting Sonic Howl into the final Ruby Glow of the fight.
Ruby Glow 6
In Ruby Glow 6, the arena will be split into quadrants. Topaz Stones will summon many Topaz Stones across the arena, with no poison pools. In one quadrant, there will only be two Topaz Stones, and the party needs to go there to break the stones with Venom Pool, which is casted a short while later. Again, have one light party go near the boss and one light party go to the wall. As these spawn poison pools, move out after the other Topaz Stones explode. The boss will cast Double Rush a short while later, so head to the safe spot in the arena, stand behind it, and use knockback prevention abilities or avoid getting knocked into the wall.
The rest of the fight are mechanics that have already been seen previously. The Proto-Carbuncle will cast a Venomous Mass into Toxic Crunch combo, followed by a Sonic Howl. It will then use Venom Surge or Venom Squall into Claw to Tail or Tail to Claw, which is handled exactly like the first one. After one more Venomous Mass into Toxic Crunch, it will cast Sonic Shatter, dealing heavy AoE damage, then begin to cast its enrage, Acidic Slaver. Kill the boss before it kills you!
Loot
When proto-Carbuncle is defeated, treasure coffers will appear depending on how many players have already defeated the fight for the week. The first coffer will contain a random Abyssos Accessory Coffer, while the second one will contain two random Abyssos Accessory Coffers. When opened by a player, these coffers contain an Abyssos Accessory for the job the player is currently on.
Players who defeat the encounter for the first time during the weekly reset will also receive an Abyssos Mythos I token. Four of these can be traded in for an Abyssos accessory of your choosing at a Pandaemonium gear vendor.
Changelog
- 08 Sep. 2022: Guide added.
More FFXIV Content

This guide has been written by Lyra an accomplished raider in FFXIV and has written raid guides for the game for the past five years. You can follow him on Twitter and he streams raids on Twitch.
- Complete Dawntrail’s Art Book Collection With – Relics of Eternity –
- New Framer’s Kit With Return Of Breaking Brick Mountains
- Last Chance For THE PRIMALS x Download Festival T-Shirt!
- Team DN Claims #WorldFirst in FFXIV’s Dancing Mad!
- FFXIV Players Blown Away By Store Updates!
- Support #WorldFirst in FFXIV Dancing Mad Ultimate — Now Available!
- Calling FFXIV Fishers To Catch The Rainbow For Charity!
- Last Chance To Enter FFXIV x Jollibee Sweepstakes!