The Eighth Circle Phase 2 (Savage): Hephaistos Raid Guide
This guide aims to prepare players for the loot boss in Abyssos: The Eighth Circle (Savage) by providing detailed explanations of the fight's mechanics, as well as consistent strategies for the purpose of farming.
Introduction to The Eighth Circle (Savage) Part Two
As your journey into the depths of Pandæmonium concludes, you are left with nearly more questions than answers. Professor Claudien has disappeared, and Pandæmonium has drifted into the modern age upon the currents of the aetherial sea. Even so, the glint in Nemjiji's eyes shines brighter than ever, and she seems more than eager to provide her own answers as she hears your story. Whether those will give rise to ever more questions, however, remains to be seen...
Unlock Requirements
The Eighth Circle (Savage) can be unlocked at level 90 after completing the Normal difficulty of the Abyssos raid and talking to Nemjiji in Labyrinthos (x8.4, y27.4). It requires a minimum item level of 610 to queue, but this requirement can be bypassed when entering with a full party.
Raid Guide
Hephaistos has a hard enrage of 8:28 and has a DPS check of roughly 64,700 raid DPS.
If you would prefer to watch a video that covers the fight, take a look at Hope Productions visual guide.
Raid Preparation
The fight is divided into five phases of mechanics, with three full uptime phases and two High Concept intermissions in between.
The arena is divided into sixteen squares. For most mechanics, only the front two rows will be used. The boss has no positional markers and remains at the North side of the arena at all times. The boss's auto-attacks must be shared between both tanks and deal damage in an AoE, targeting the #1 in enmity.
All players should be assigned a quickmarch position from one to four based on their role, with melee jobs in the front and ranged jobs in the back. All players should be assigned a spread position inside a single row for safety, and one melee DPS and one tank should be designated to be a "flex" player for Natural Alignment.
Hephaistos's Main Abilities
- Aioniopyr: Massive raid-wide magical damage that inflicts a bleed DoT for 9 seconds.
- Tyrant's Unholy Darkness: An AoE magical tank buster on both tanks. Tanks need to split up after auto-attacks have ceased during the cast, and stack together before they start again.
Phase 1: Natural Alignment 1
Hephaistos introduces the following abilities in this phase:
- Natural Alignment: Two players are inflicted with the Natural Alignment debuff. This debuff deals damage over time to the player, and the player cannot be damaged by any other instances of damage besides or else they will explode, wiping the party.
- Twist Nature: Castbars will appear on top of the player's heads,
indicating the next mechanic about to be cast. All of these do heavy magic
damage.
- Tyrant's Flare: A stack marker on a random non-debuffed player or an unmarked AoE on all non-debuffed players.
- Forcible Trifire: An AoE on the three furthest players from the debuffed player that requires one other person to be stacked with the target.
- Forcible Difreeze: An AoE on the two closest players to the debuffed player that requires two other players to be stacked with the target.
- Ashing Blaze: Hephaistos will cleave the right or left side of the arena, depending on which arm is glowing.
- End of Days: Hephaistos will summon illusions at the edge of the arena which will do a line AoE across one of the two Northern rows. There will be a second instance of this ability, hitting the row that was not previously hit.
Hephaistos will begin the fight by autoing the tanks twice, so both should be stacked and away from the party. He will then cast Aioniopyr, so be sure to mitigate as tanks to cover the bleed DoT, the autos, and the incoming Tyrant's Unholy Darkness. It is possible for the main tank to invuln their buster, and then take the two subsequent autos with the remainder of the invuln. This may be useful for saving tank and healer cooldowns for the next part.
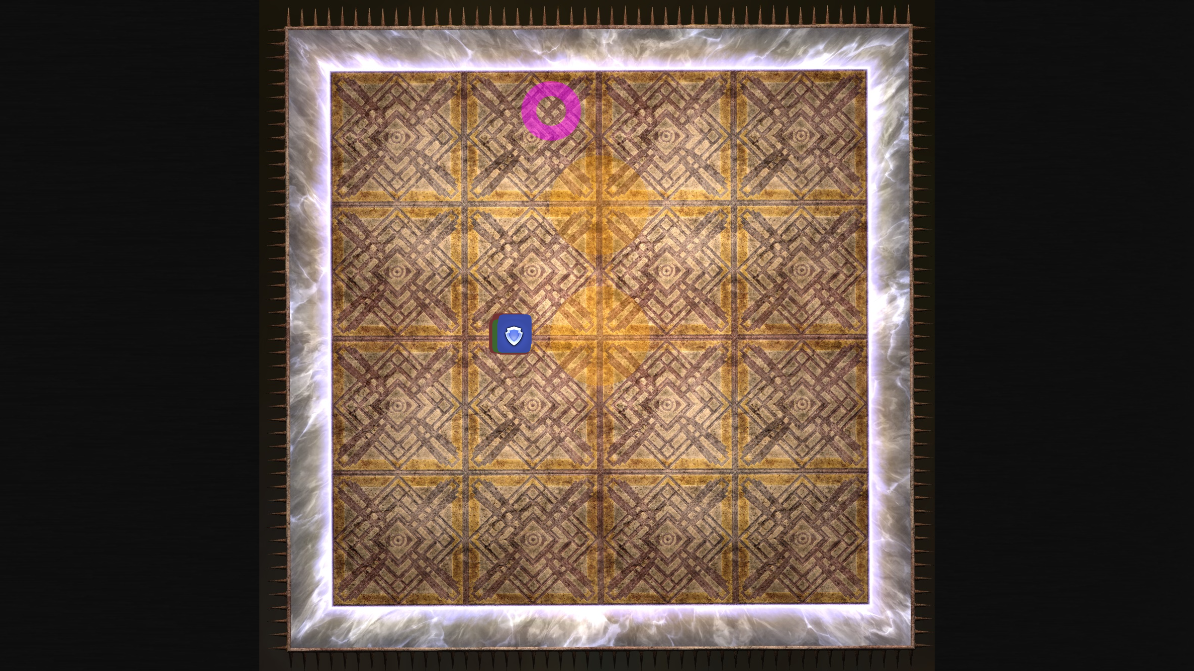
Hephaistos will then cast Natural Alignment. Two players of the same role will be inflicted with the debuff, and healers should make sure these two players do not die to the damage over time. At the same time, the two melee jobs that were designated to "flex" for the upcoming Trifire and Difreeze mechanics will automatically know where to go. Hephaistos will then cast Twist Nature, marking the debuffed players and making them show the next set of mechanics.
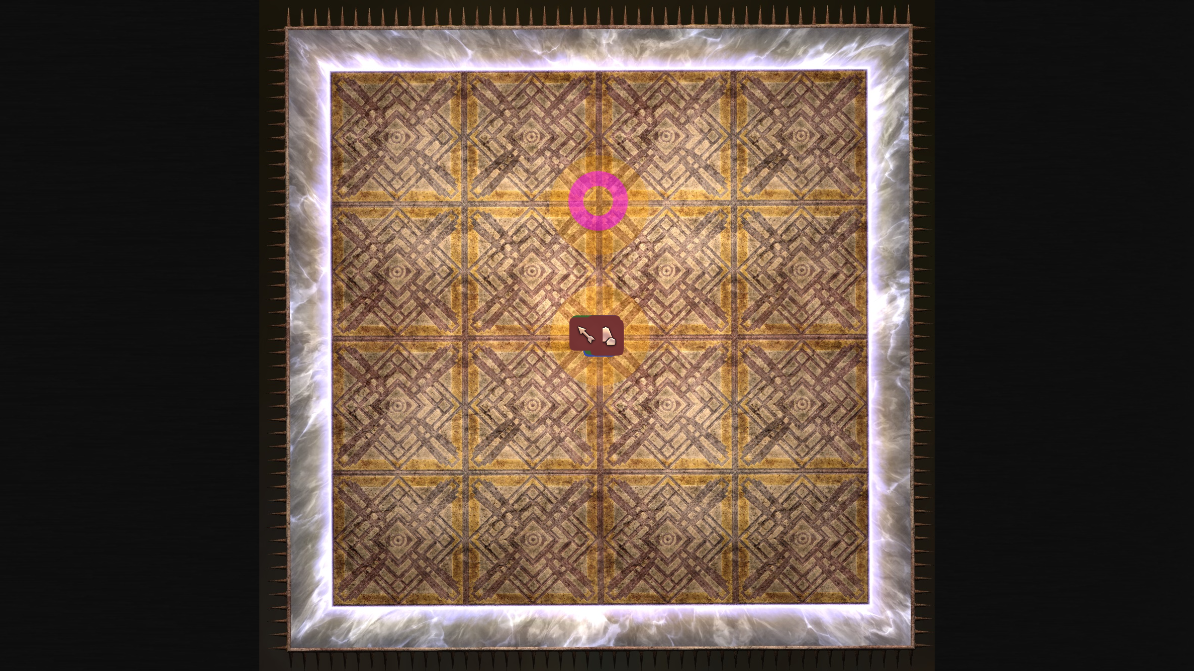
The two debuffed players will move up to ensure they are not in the path of the spread or stack mechanic. Look at the graphic above the debuffed player's head to see whether it is spread or stack. If it's spread, use quickmarch positions or clock positions from phase one to spread the AoE. If it's stack, the party should by default stack on the left side of the arena.

The other mechanic will then resolve at the same time as the boss casts Ashing Blaze. This means that the second stack or spread needs to be on one half of the arena. The two debuffed players will be together at the very North of the arena. If it's stack, the party will stack on the safe side, and if it's spread, the party will line up with quickmarch positions on the safe side on one column per role. Make sure to come in to receive healing before spreading out. After the first set of mechanics are done, return to the middle for the fire and ice Twist Nature mechanics.
For Forcible Difreeze and Forcible Trifire, the two debuffed players will always stay in the centre of the Northern two rows, moving into the row that is safe from End of Days. All other players will adjust their positions based on this, with supports defaulting on the left side and DPS defaulting on the right side.
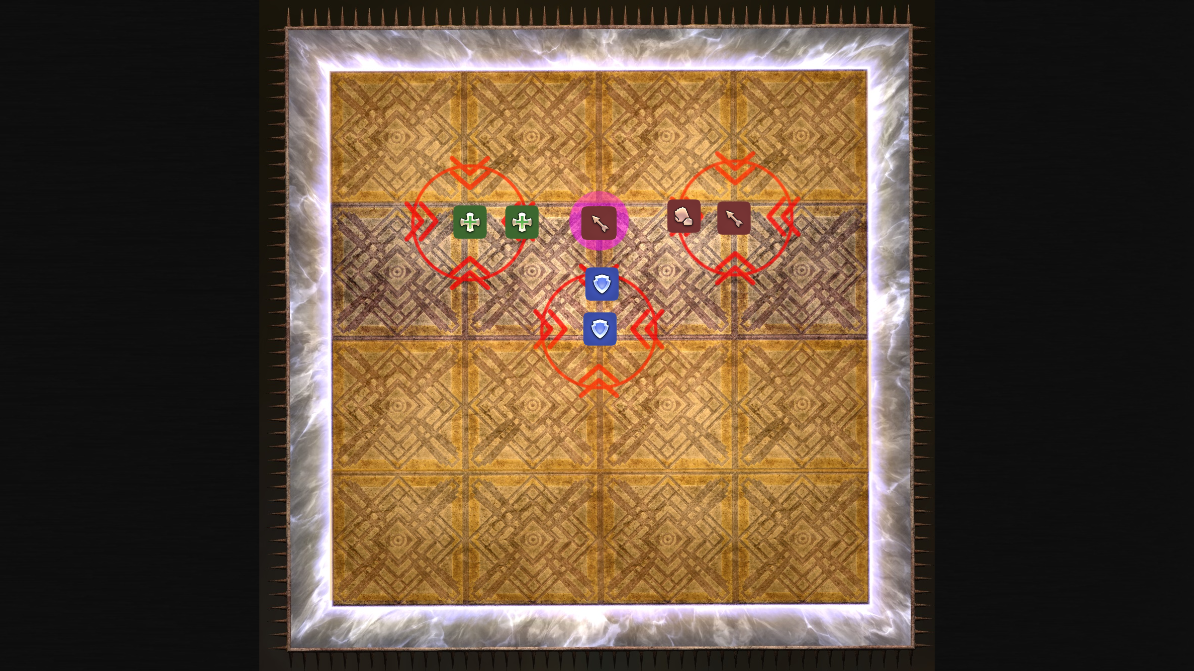
For Forcible Trifire, the melee jobs of the role not chosen will be North or South of the debuffed players depending on which row is safe. Have one player in each two-person stack be further out to bait the stack AoE, and one player on the inside as to not bait any other stack AoEs.
For Forcible Difreeze, the designated flex player will move to the other side to bait the stack AoE. The other melee player should be on the inside baiting their AoE. Be slightly further than the middle of the square to ensure the debuffed player is not hit. The other two players should try to be further away to not accidentally bait an AoE as well.
After the first mechanic, the opposite mechanic will happen with the other row being safe, so make sure to heal up, mitigate, and do the other mechanic in the other row. For example, if it was Difreeze first with the first row safe, it will then be Trifire second with the second row safe. After both mechanics are done, return to the middle and heal up for another Aioniopyr. Both tanks should be stacked pre-emptively to deal with the autos and another Tyrant's Unholy Darkness. Heal up and get ready for the first intermission, High Concept. This deals massive damage and inflicts all players with debuffs.
Phase 2: High Concept 1
Hephaistos introduces the following abilities in this phase:
- High Concept: Deals massive raid-wide magic damage (~110k) and inflicts
all players with debuffs. Imperfection debuffs will explode in a large AoE
when they resolve and inflict players hit with a Perfection buff. Splicer
debuffs require players to stack with a number of players.
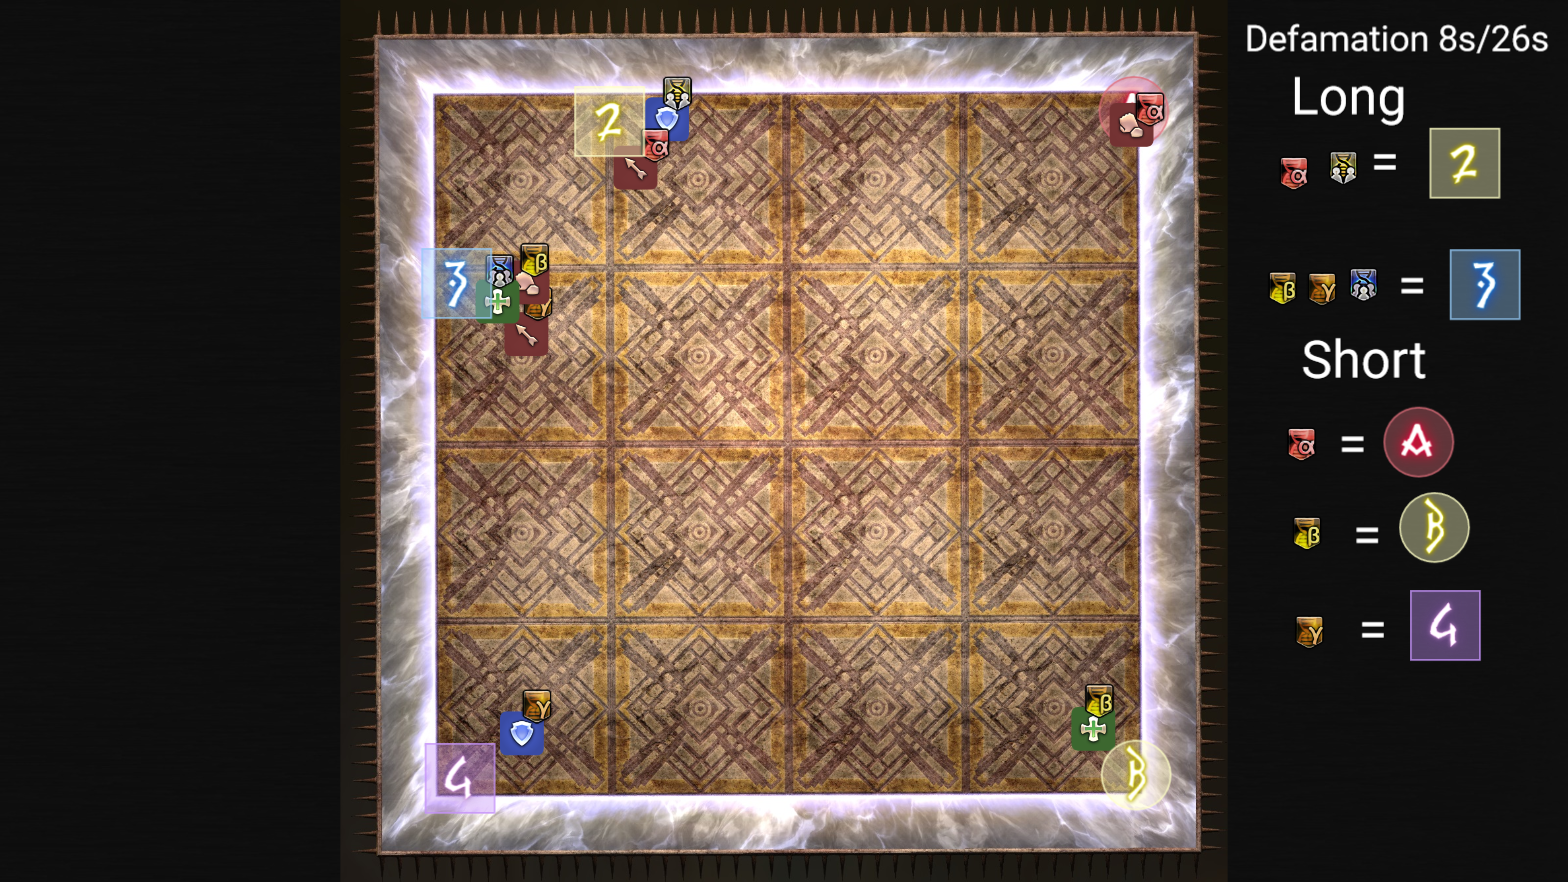
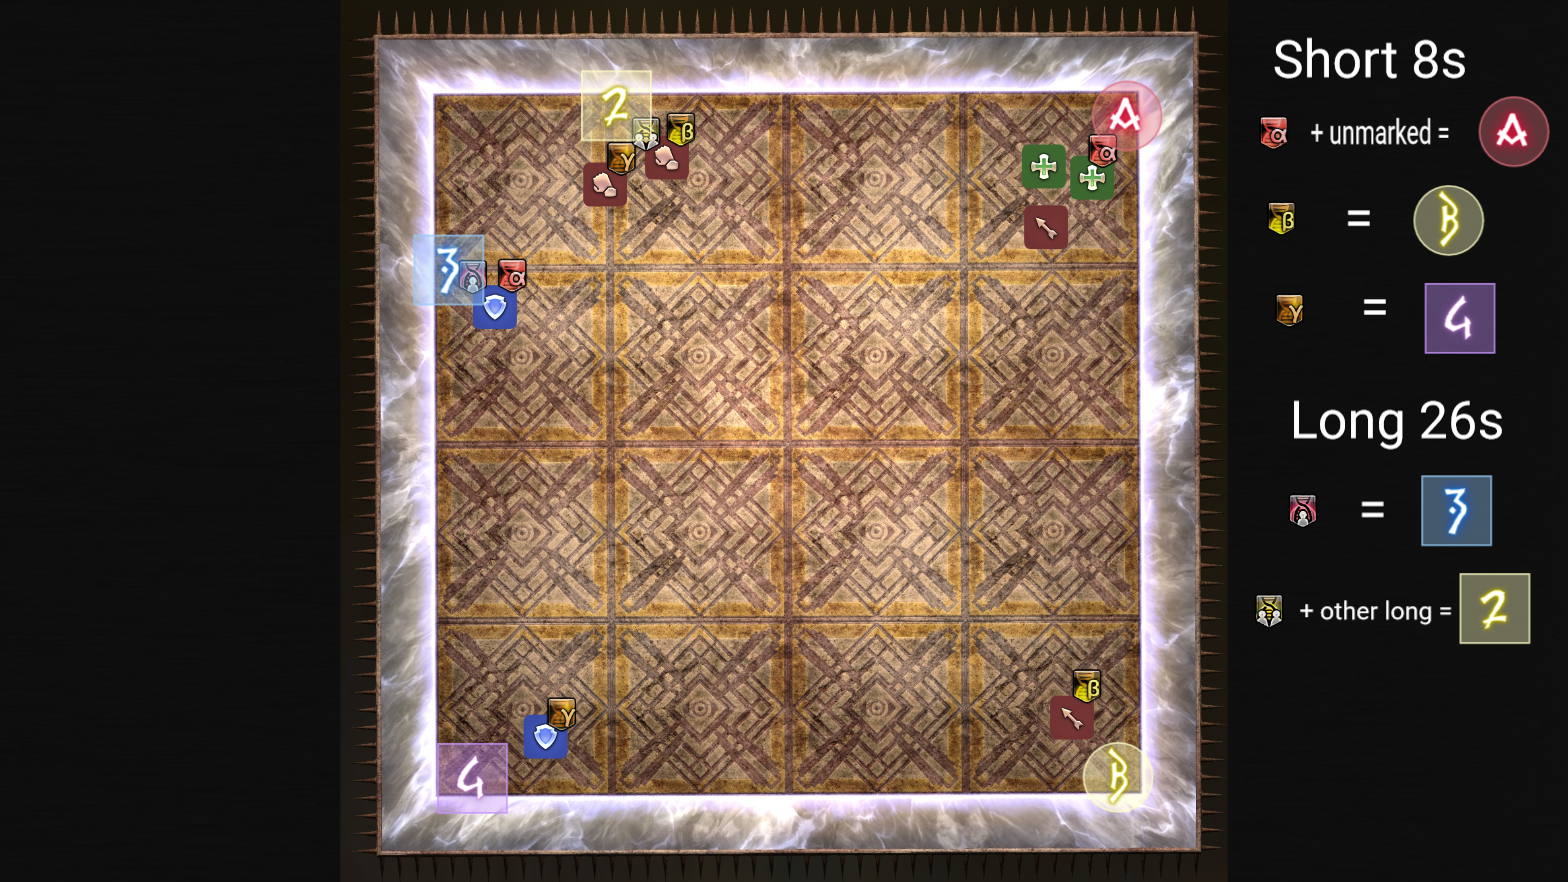
- Two players will be inflicted with Imperfection: Alpha, one at 8 seconds and the other at 26 seconds.
- Two players will be inflicted with Imperfection: Beta, one at 8 seconds and the other at 26 seconds.
- Two players will be inflicted with Imperfection: Gamma, one at 8 seconds and the other at 26 seconds.
- One player will be inflicted with Multisplice which requires two players total in the stack.
- One player will be inflicted with Supersplice which requires three players total in the stack.
- Arcane Control: Summons towers in the middle of the arena in a vertical line. Players are required to have a Conception buff of the matching element to stand in and soak the tower, or else they will take a massive DoT. Towers that are not soaked will explode.
- Deconceptualize: Removes all High Concept buffs and debuffs.
The goal of High Concept 1 is to conceptualize creations to deal with Arcane Control towers. When players are damaged by Imperfection explosions, they will receive a Perfection buff corresponding to the type they were damaged by. After a few seconds, standing close to another player with a Perfection buff for around two seconds will fuse the alchemical creations, creating a Conception. However, overlapping Imperfection hits, creating incorrect Conceptions, and fusing Perfection debuffs and Conceptions will all result in a wipe.
- When fusing Alpha and Beta, a Winged Conception (green) is created.
- When fusing Beta and Gamma, a Shocking Conception (purple) is created.
- When fusing Gamma and Alpha, an Aquatic Conception (blue) is created.
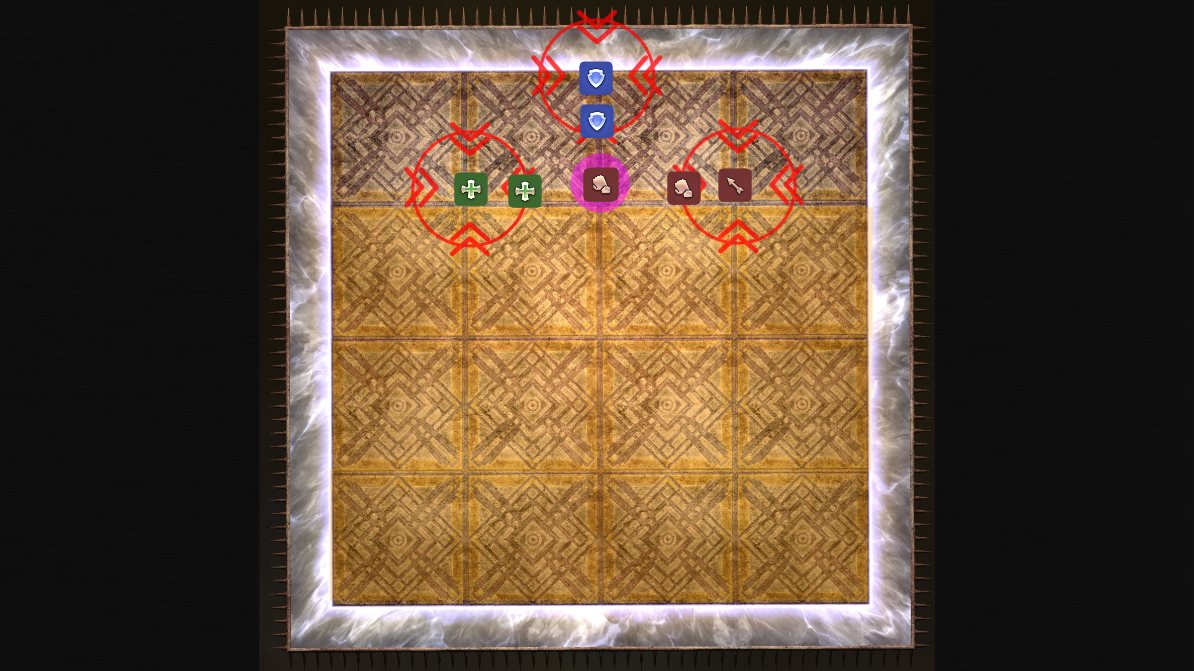
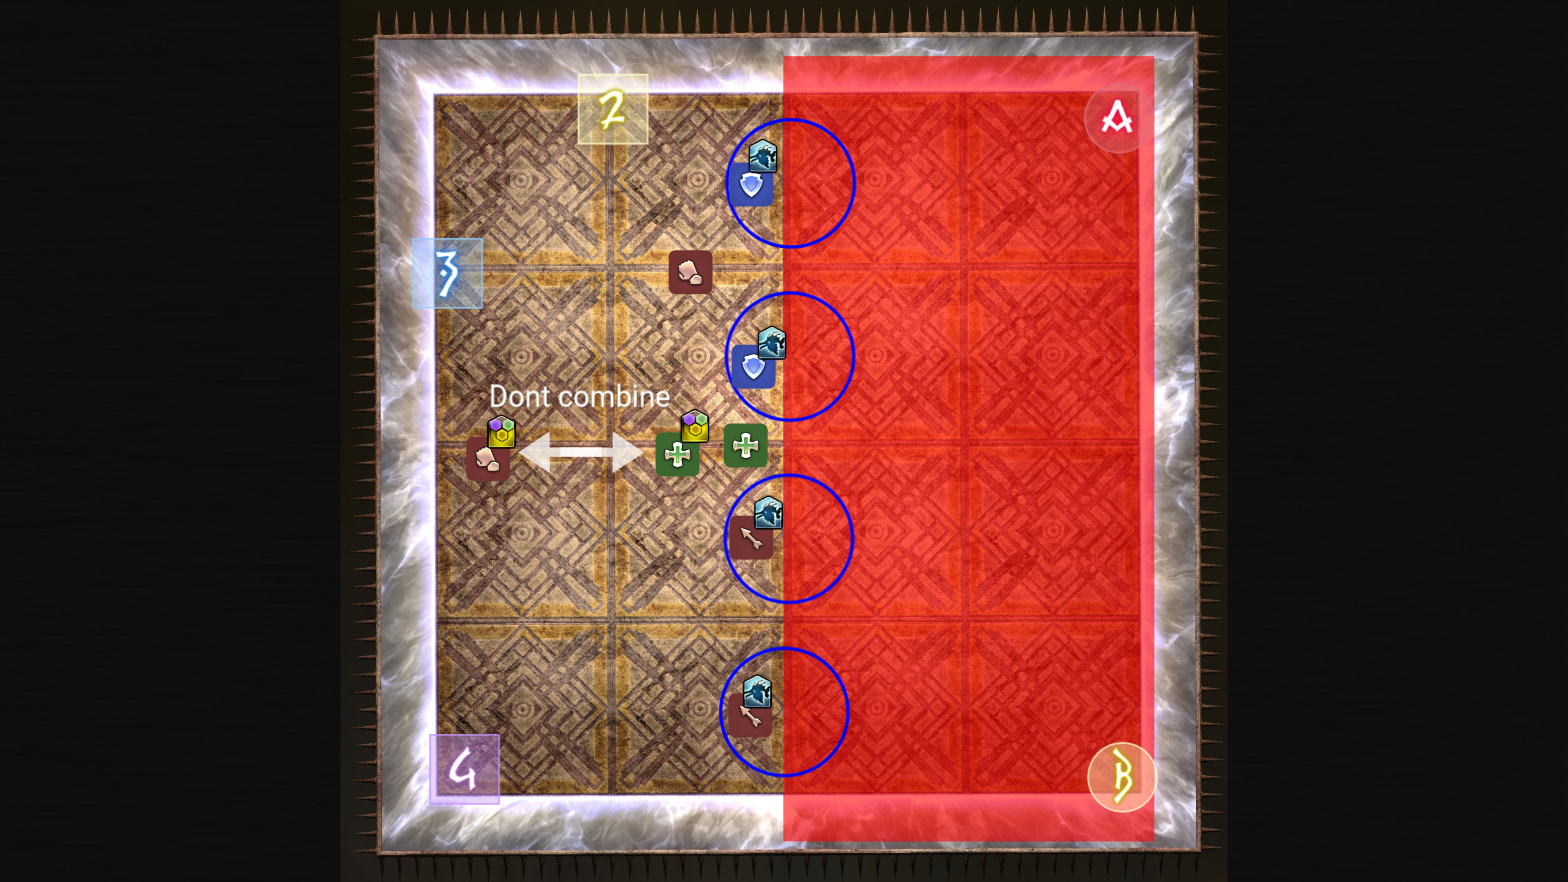
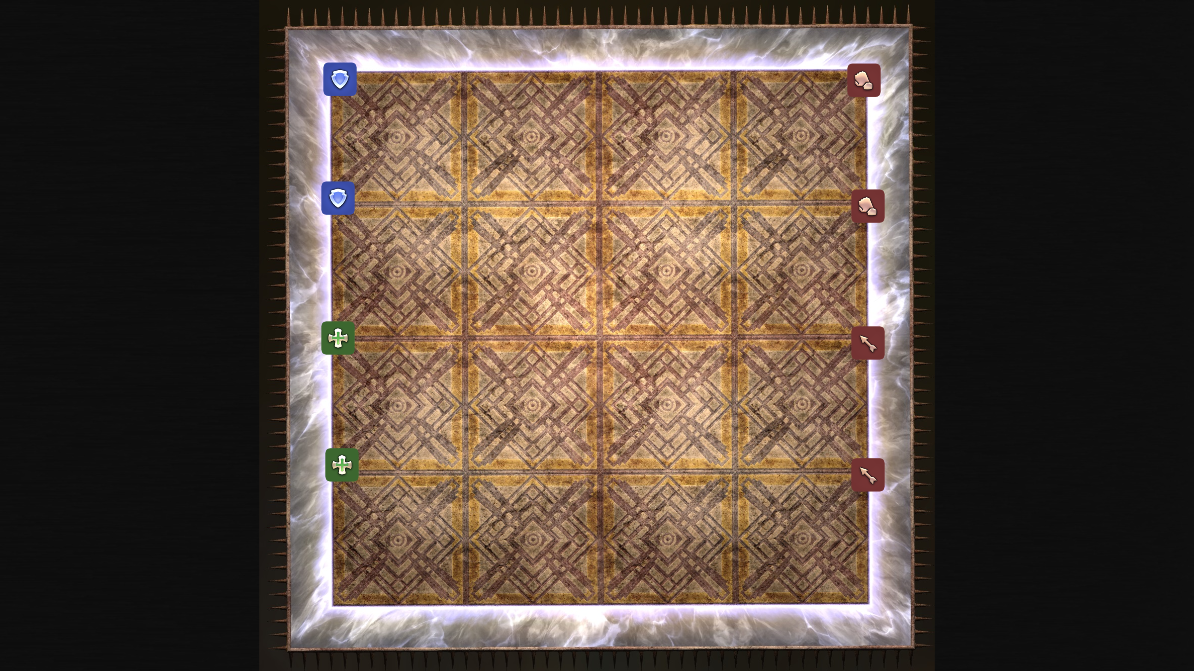
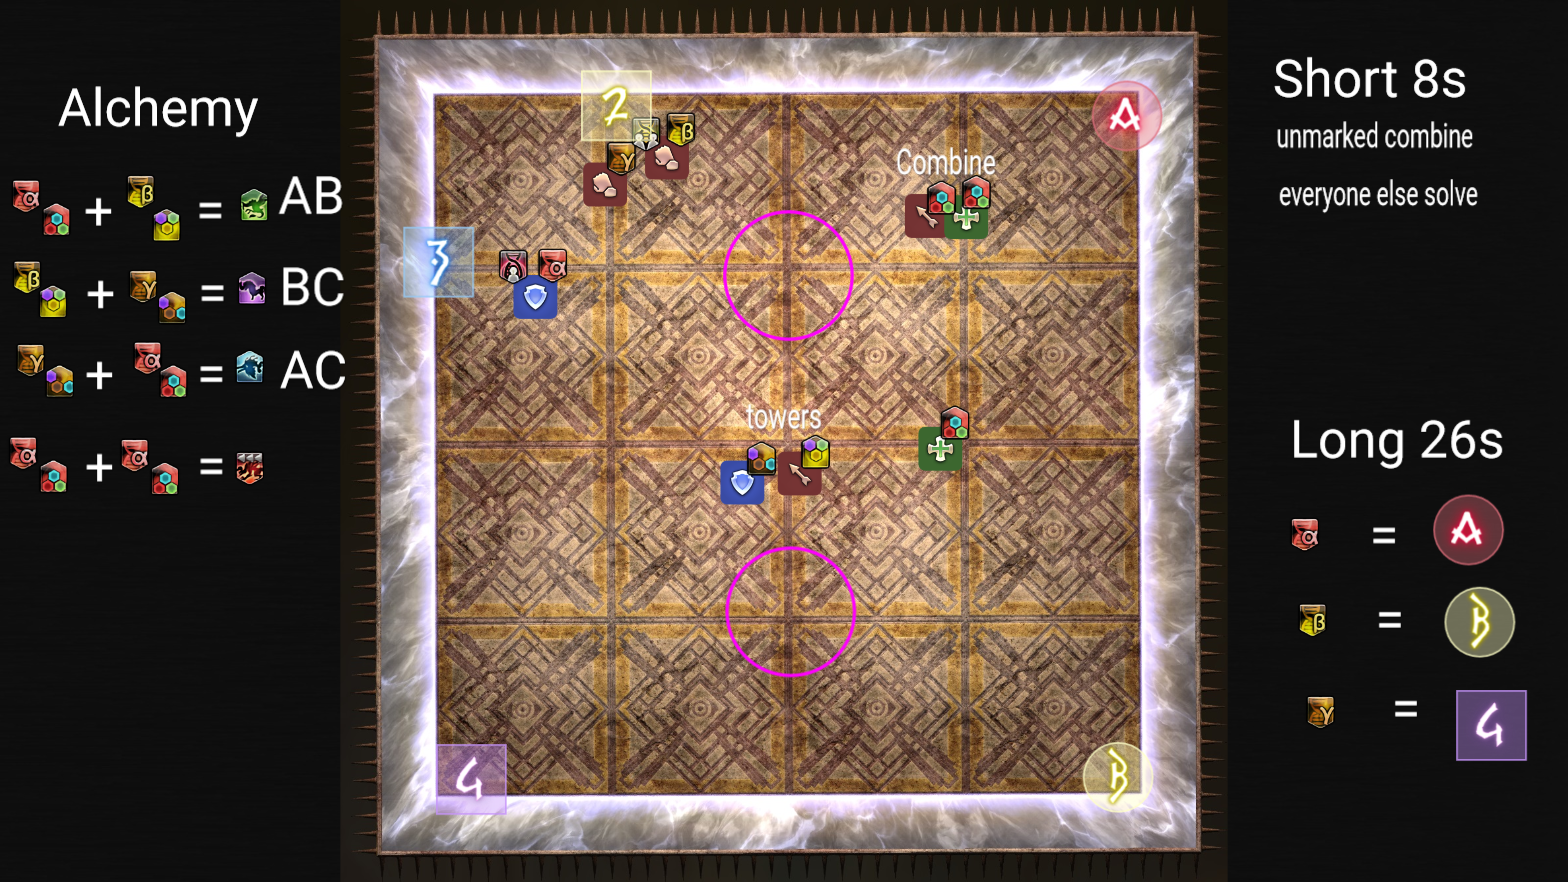
First, all players will spread to their pre-determined positions based on what debuff they originally received. Stay in the middle for a second to cast and receive heals before fanning out to the corners of the arena.
- The players with short Imperfection debuffs will go to the assigned corners. Alpha will go to A, Beta will go to B, and Gamma will go to 4.
- Splicers will stand on the same numbered marker as the number of players required. Multisplice will go to 2, and Supersplice will go to 3.
- The players with long Imperfection debuffs will stack with Splicers. Alpha will stack at 2, while Beta and Gamma will stack at 3.
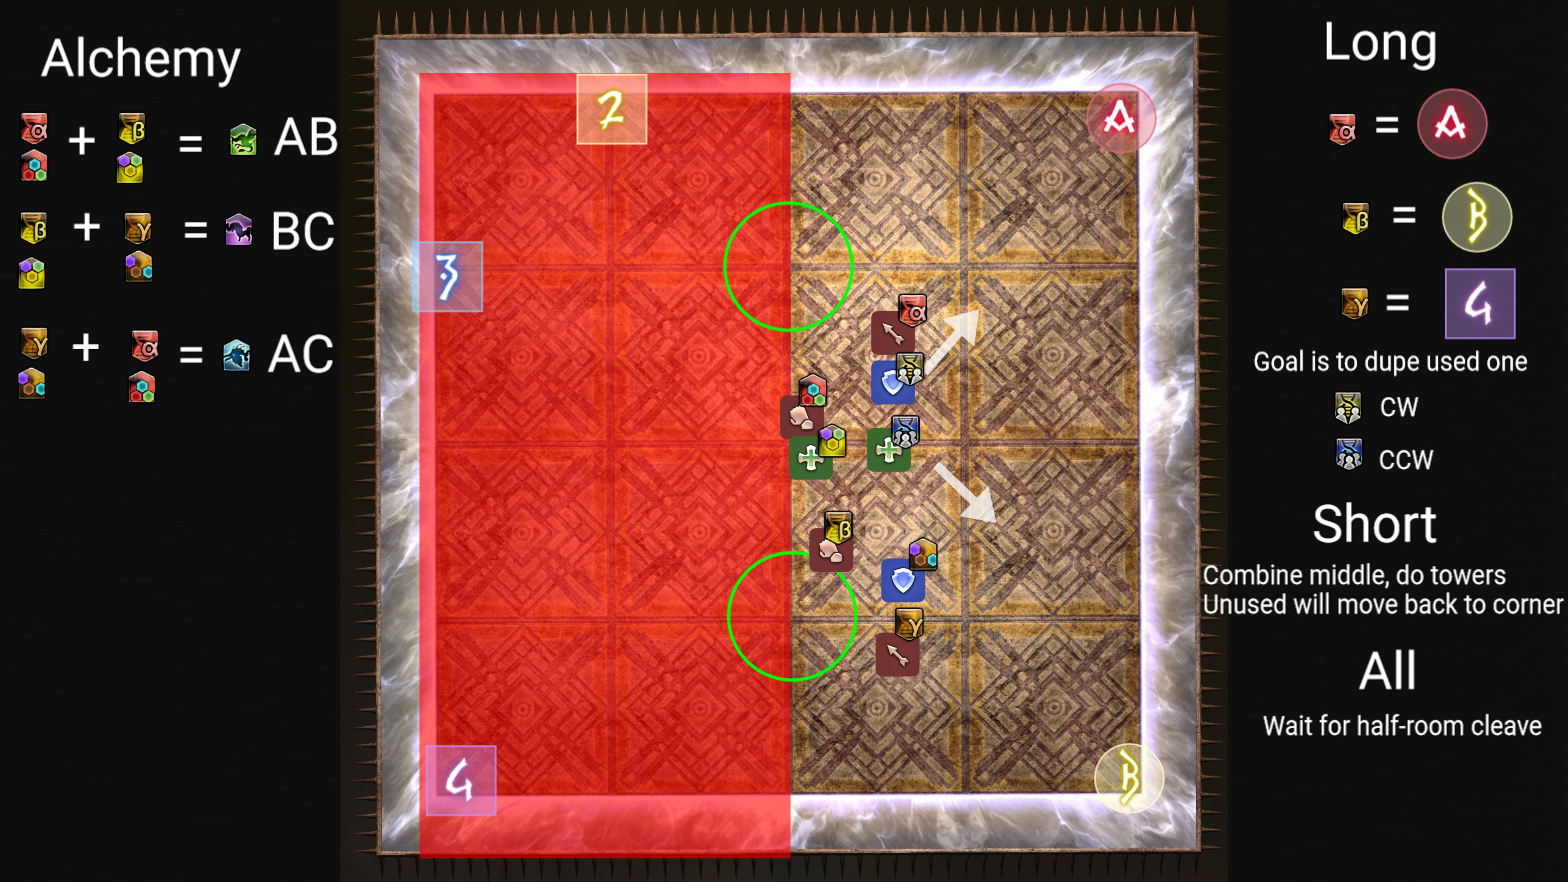
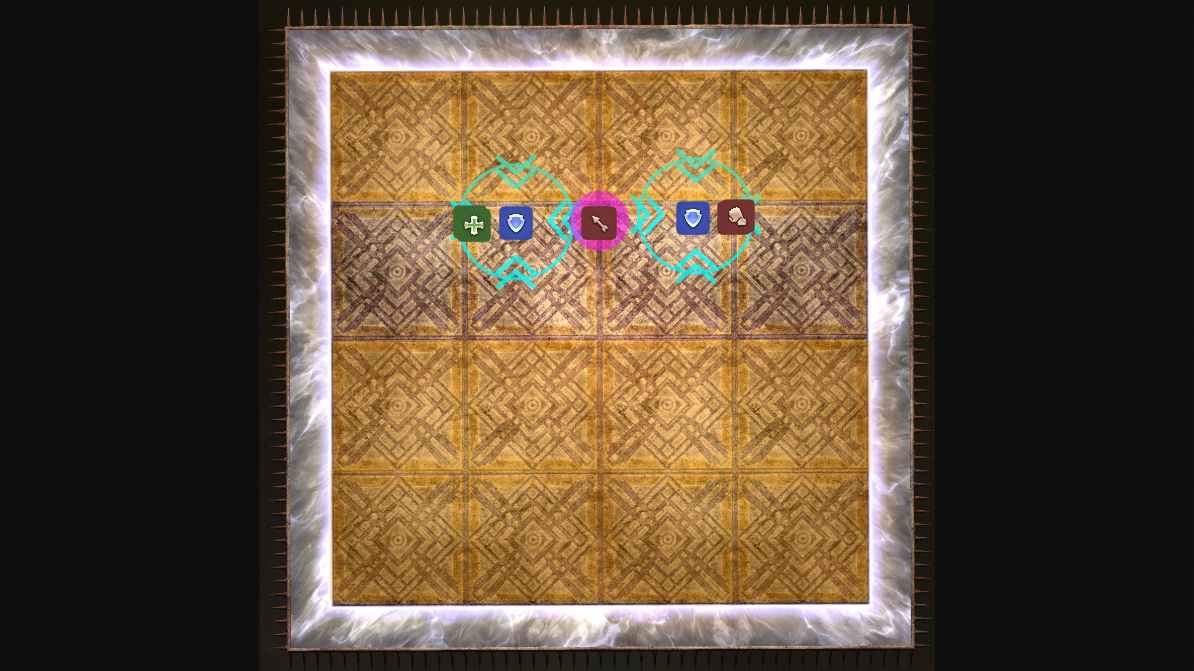
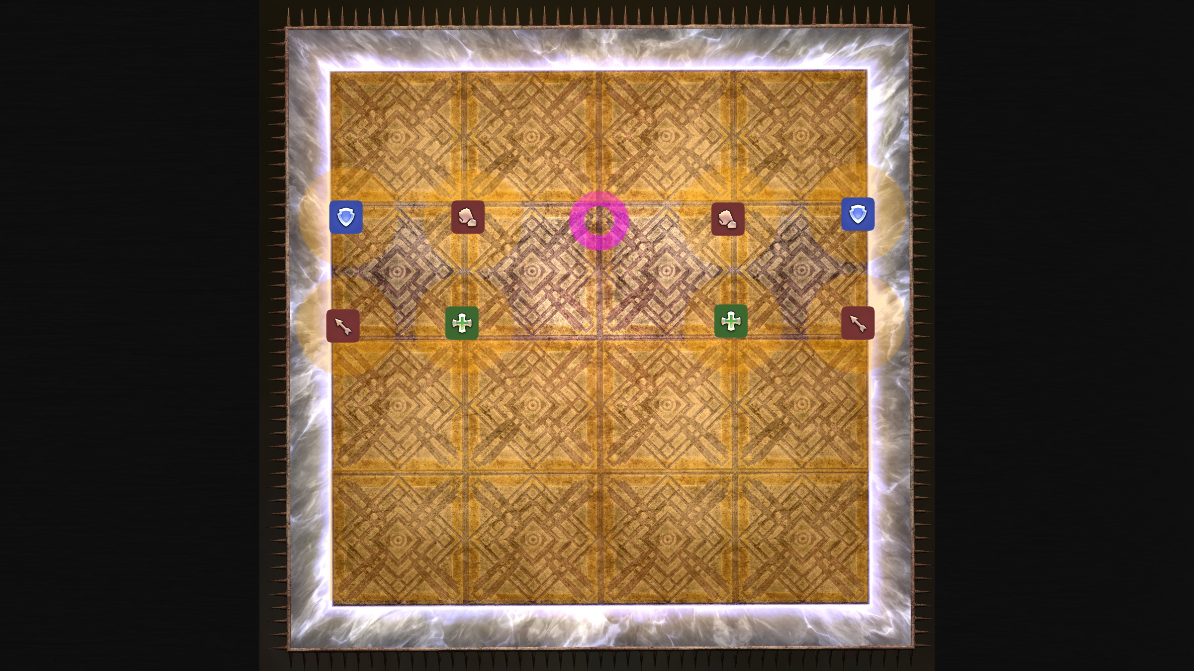
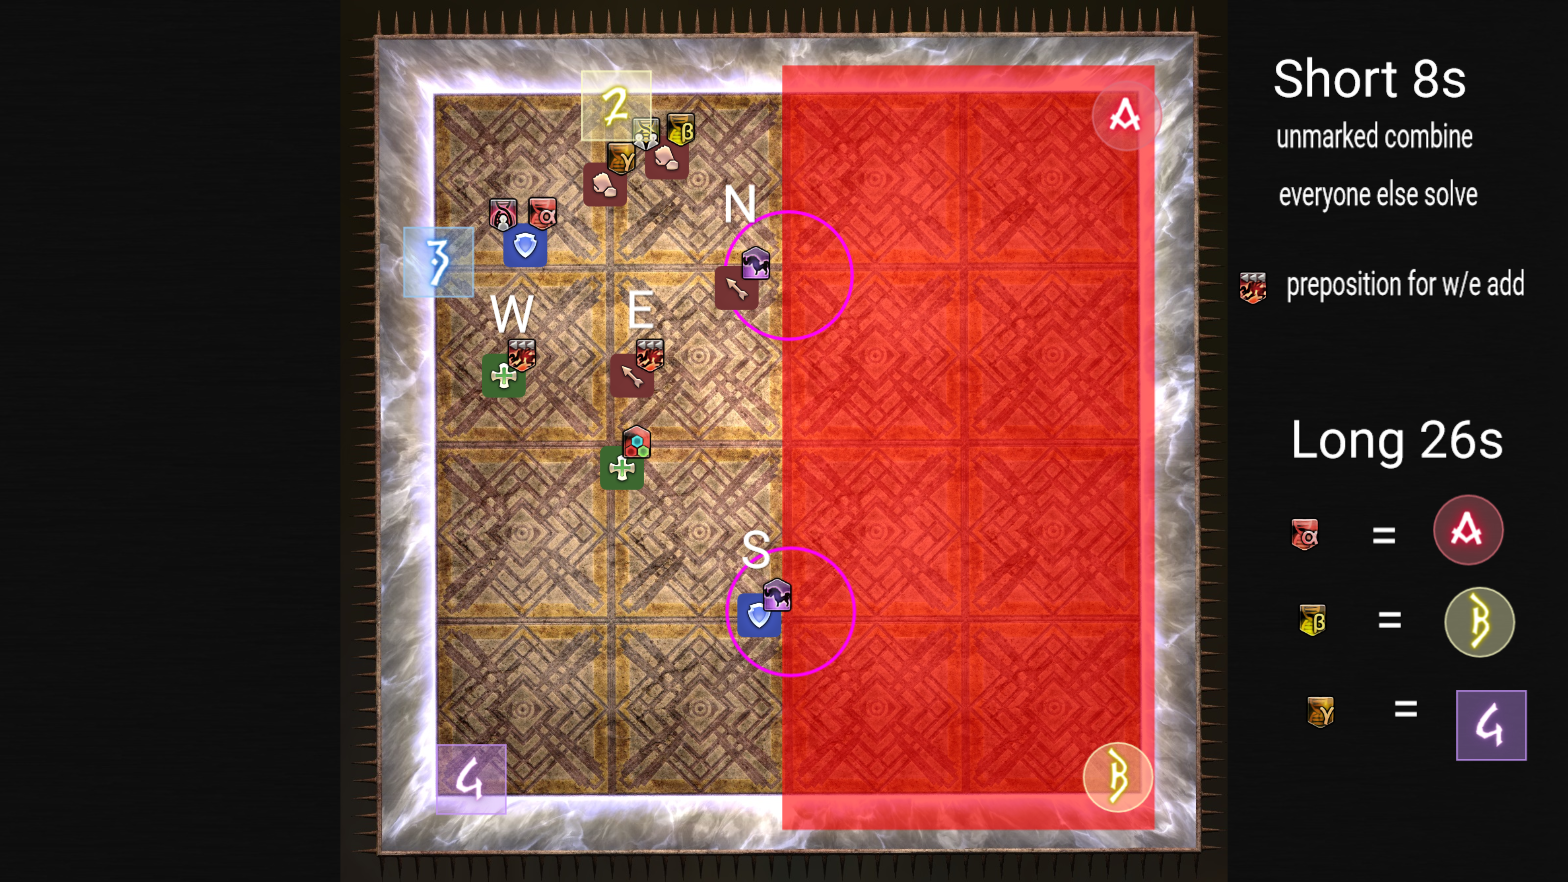
Next, two players with Perfection buffs will need to conceptualize the correct Conception buff to soak the Arcane Control tower. At the same time, the boss will cast Ashing Blaze, so all players must stand on one side of the arena. To see which players are fusing buffs in the middle, look at the graphic on top of their head. If one of their three elements matches, they will go fuse. Spread out loosely to coordinate who is going to the North tower and who is going to the South tower.
Additionally, players need to keep track of what Perfection buffs were used to fuse. This is because the goal of the Splicer players is to be hit by an Imperfection explosion to duplicate the Perfection buff. The Multisplicer player will stack with the first one clockwise, and the Supersplicer will stack with the first one counterclockwise. The player that had the unused Perfection will go back to their original spot. Finally, the two players in the tower will move to the safe corner to not get hit by any explosions. Once the towers have been soaked, head to the second explosion spots.
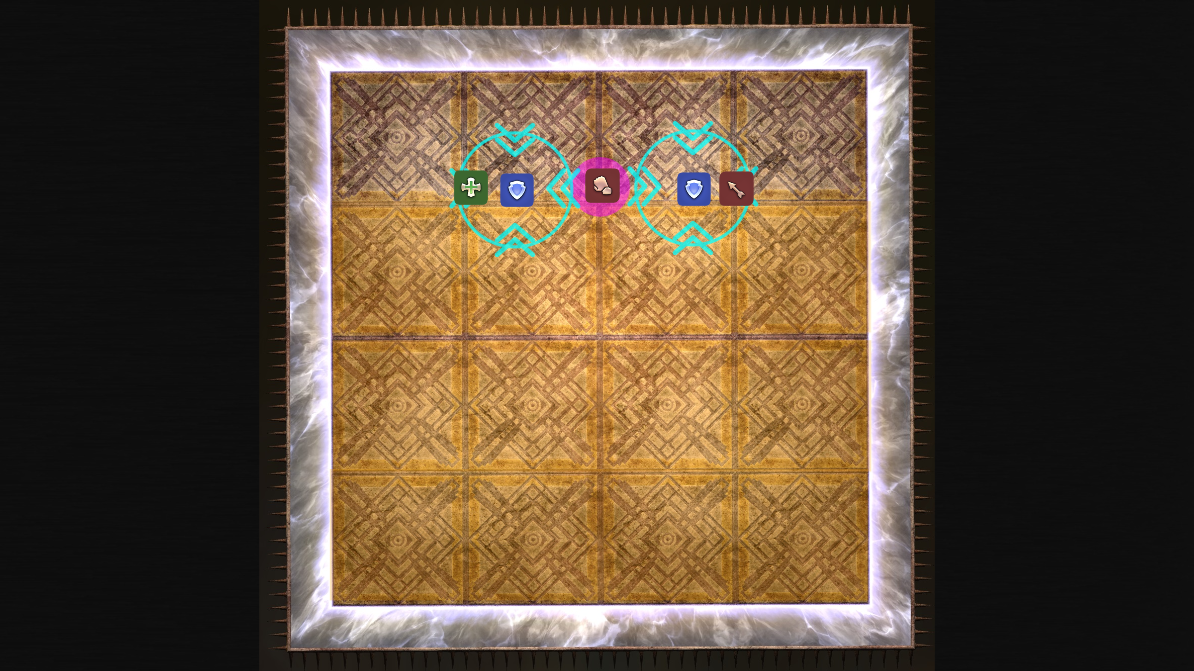
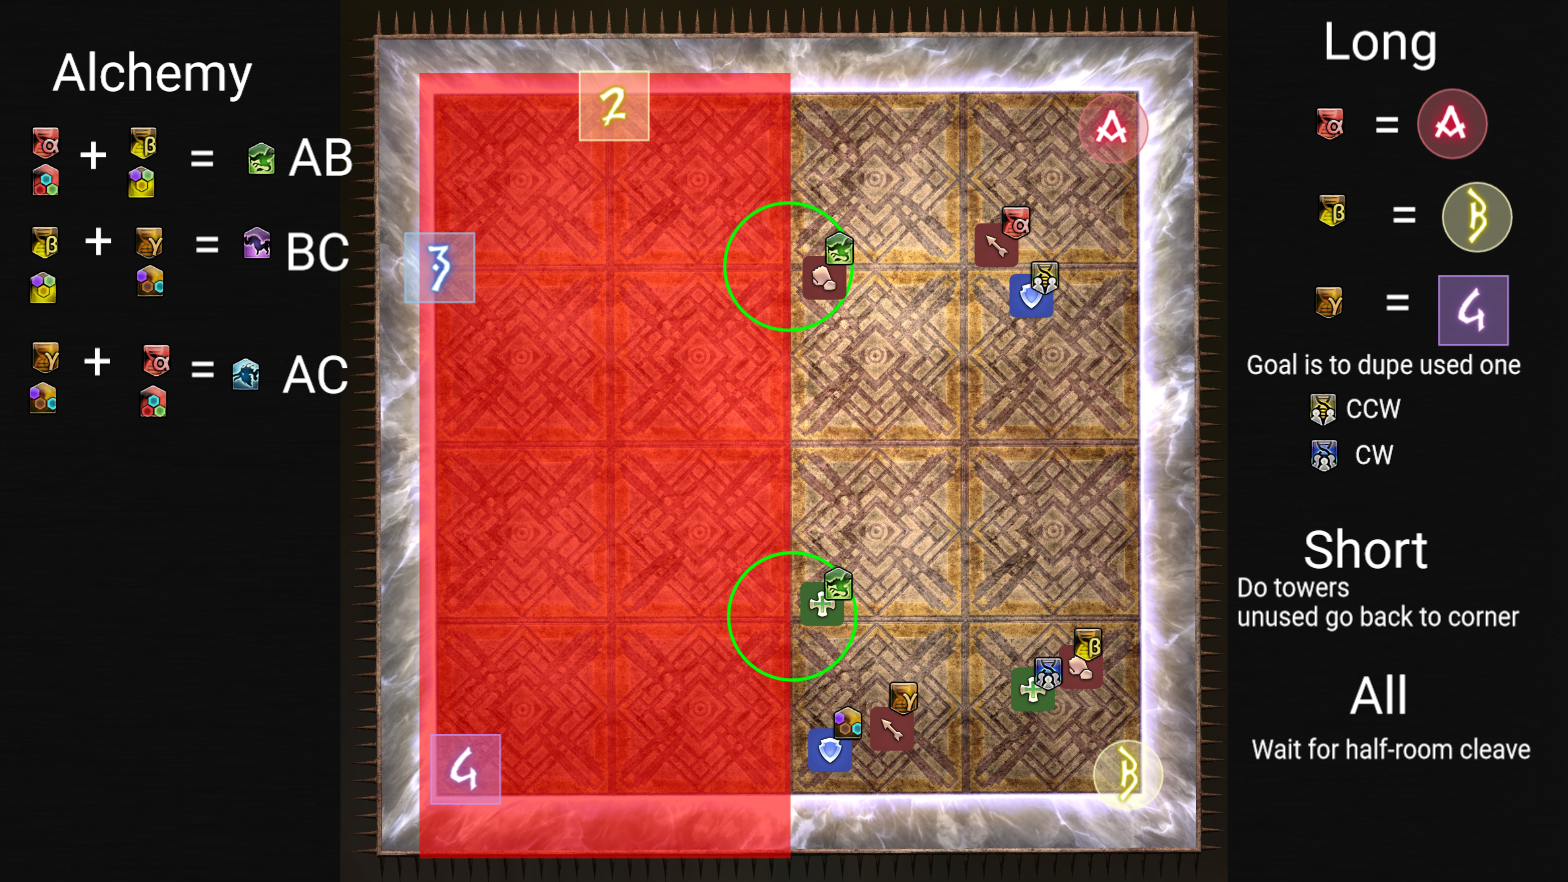
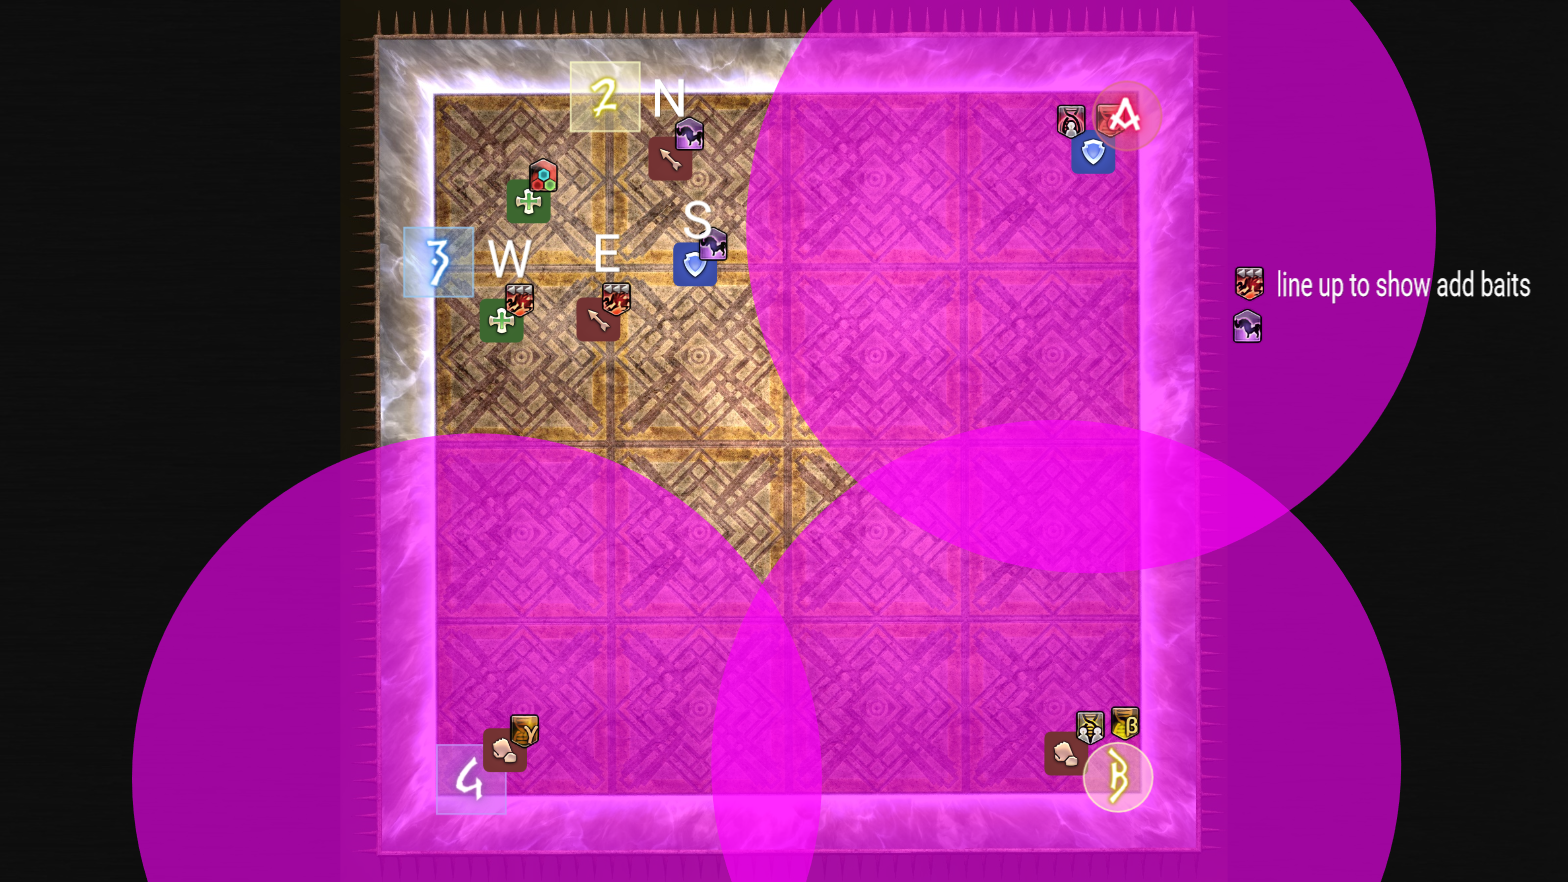
Again, players with Perfection buffs will need to conceptualize the correct buff. However, this time there are four towers of the same element. As the same Perfection buff cannot combine with each other, players will need to fuse with someone with a different buff. To do this, have the players with long Imperfection buffs take the South two towers and the players who did not have the long Imperfection buffs take the North two towers. This will ensure that the correct buffs are created. After fusing, soak the towers and dodge Ashing Blaze. Make sure the other players are spread out to not accidentally create another Conception.
After the second set of Arcane Control towers go off, the boss will become targetable and cast Deconceptualize, removing all buffs and debuffs.
Phase 3: Natural Alignment 2
Hephaistos introduces the following abilities in this phase:
- Limitless Desolation: Four players, one in each role, are targeted with an AoE in succession. Eight towers will spawn on the arena in pairs, divided into two halves. Players who took an AoE are targeted with a large ground AoE in the same order before having to soak the towers, again in the same order.
- Inverse Magicks: Players affected with the Inverse Magicks debuff have their Twist Nature mechanics reversed: stack becomes spread and vice-versa, and ice becomes fire and vice-versa. This only applies if the player has the debuff.
After casting Deconceptualize, the tanks should stack and the party needs to heal up for Aioniopyr. For Limitless Desolation, spread into quickmarch positions on both sides of the arena at the edge, with supports left and DPS right. This mechanic requires some on-the-fly adjustments, and all players have to obey traffic laws that mandate whether they can move or not.
Each player is targeted by an AoE in order. This will inflict a magic vulnerability up debuff that expires right before a tower explodes. However, as it expires they will additionally be targeted with a large ground AoE. Therefore, each player takes an AoE, baits a ground AoE, and soaks a tower in the order. The baited AoE should be baited in the corner of the square the tower spawns in, and towers can spawn in the first three rows only.
Players should only move once they have been hit by their AoE in order, and they should move closer to their tower in order on the inside two columns. It is impossible to have an AoE cover someone else's tower, so ensure that you dodge other player's AoEs before baiting yours. Additionally, avoid baiting these AoEs where a player's path to the inside would be blocked off.
After all towers have been soaked, return to the middle with tanks stacked for another Aioniopyr. This is followed by two autos into Tyrant's Unholy Darkness, so make sure to mitigate and move apart. Again, an invuln can be used to save single-target cooldowns for the next Natural Alignment. Stack together again afterwards.
The second Natural Alignment differs slightly from the first one. The stack or spread mechanic is cast with End of Days instead of Ashing Blaze, and the mechanics can be reversed via Inverse Magicks. What this means is that when a player with both the Natural Alignment and the Inverse Magicks debuffs shows a mechanic over their head, it will be the opposite one. Either one player or both players are inflicted with the Inverse Magicks debuff, so make sure to check if the mechanic set is inverse or not.
The first set of mechanics will always be spread and stack in one row, and then the other mechanic in the other row. For spread, use pre-assigned positions. The positions from Octaflare from phase one work, or assign new positions. For stack, make sure all players are far away from the Natural Alignment debuffed players. Check if the mechanic is inverse before doing it.
The second set of mechanics will be the same fire and ice as the first one, but it can be inverse. It will be resolved the same way, but if it is inverse and one mechanic is shown first, then it will be the opposite mechanic first. Keep in mind that the safe row by End of Days may change from the first set of mechanics.
After both fire and ice are resolved, the boss will cast an Ashing Blaze, so head to the safe side of the arena. Stack together to receive heals for Aioniopyr, and again the tanks needs to stack for autos, spread for Tyrant's Unholy Darkness, and stack together again for autos. Mitigate and heal up for High Concept 2.
Phase 4: High Concept 2
Hephaistos introduces the following abilities in this phase:
- High Concept: The same concept as the first High Concept, except
that inflicted debuffs are different now.
- Two players will be inflicted with Imperfection: Alpha, one at 8 seconds and the other at 26 seconds.
- Two players will be inflicted with Imperfection: Beta, one at 8 seconds and the other at 26 seconds.
- Two players will be inflicted with Imperfection: Gamma, one at 8 seconds and the other at 26 seconds.
- One player with a long Imperfection debuff be inflicted with Multisplice which requires two players total in the stack.
- One player with a long Imperfection debuff be inflicted with Solosplice which requires them to be by themselves.
- Two players will not be inflicted with any debuff.
- End of Days: Four illusions spawn at the cardinal edges of the arena. These will tether to the closest player, and move to the same row or column as the player. After a while, the tethered player will be inflicted with Bind, and the illusion will shoot a line AoE at them.
- Ego Death: Destroys the party unless they have the power of the Immortal Conception.
The goal of High Concept 2 is to conceptualize creations to deal with Arcane Control towers, as well as conceptualize the Immortal Conception to survive Ego Death, granting the Everburn buff that doubles damage dealt.
- When fusing Alpha and Beta, a Winged Conception (green) is created.
- When fusing Beta and Gamma, a Shocking Conception (purple) is created.
- When fusing Gamma and Alpha, an Aquatic Conception (blue) is created.
- When fusing Alpha and Alpha, a Fiery Conception (red) is created. This deals damage over time to the player.
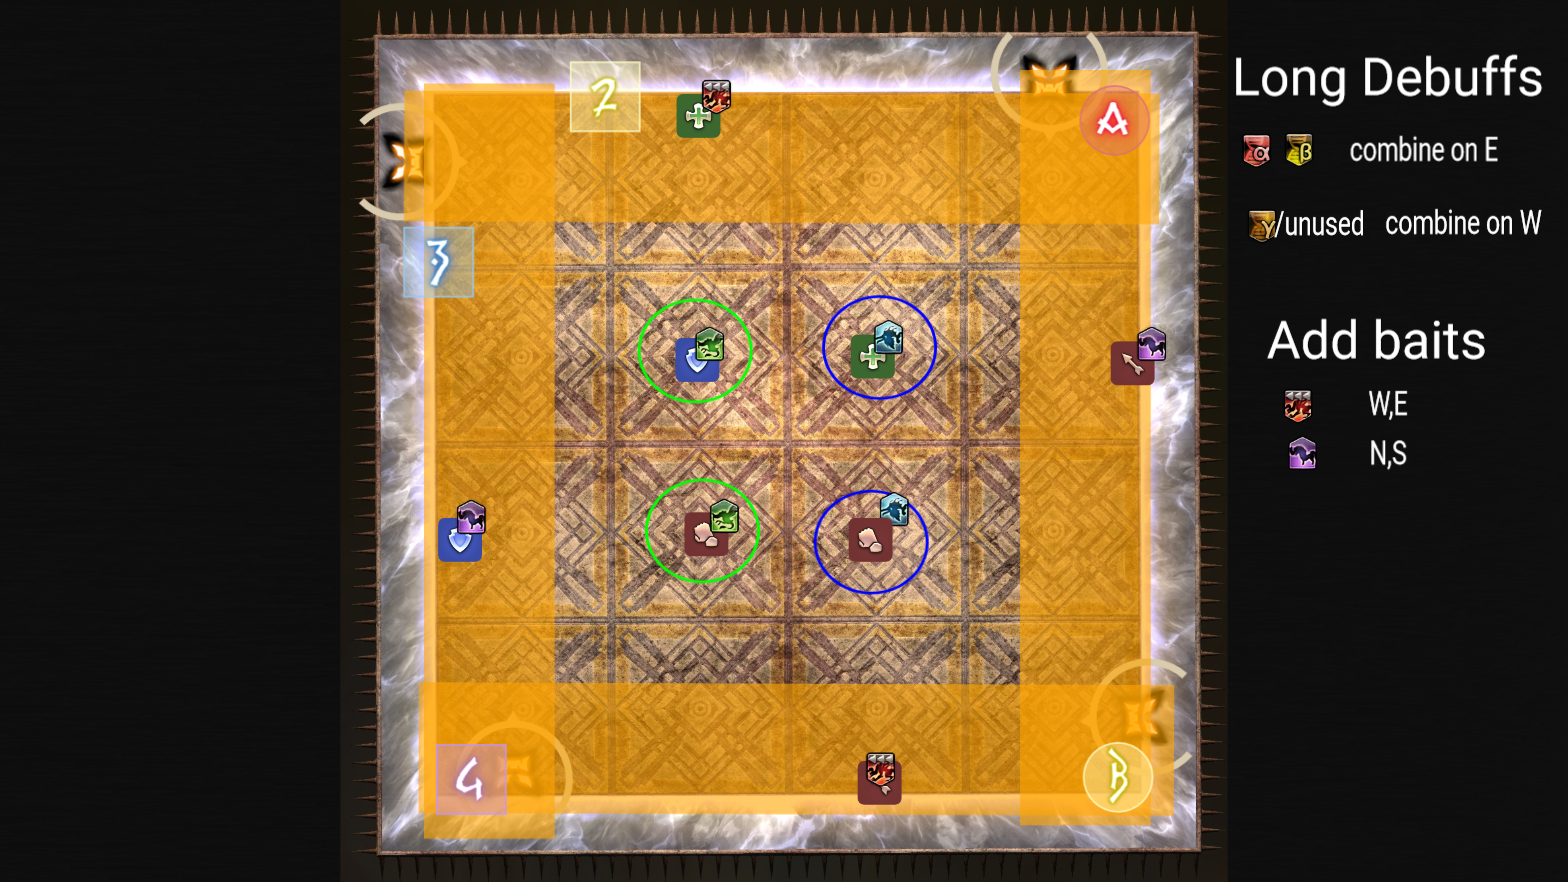
First, all players will spread to their pre-determined positions based on what debuff they originally received. Stay in the middle for a second to cast and receive heals before fanning out to the corners of the arena.
- The players with short Imperfection debuffs will go to the assigned corners. Alpha will go to A, Beta will go to B, and Gamma will go to 4.
- Splicers will stand on assigned marker. Multisplice will go to 2, and Solosplice will go to 3.
- The players with long Imperfection debuff and NO Splicer debuff will stack with Multisplice at 3.
- The unmarked player will go to A to receive Imperfection: Alpha to create the Fiery Conception.
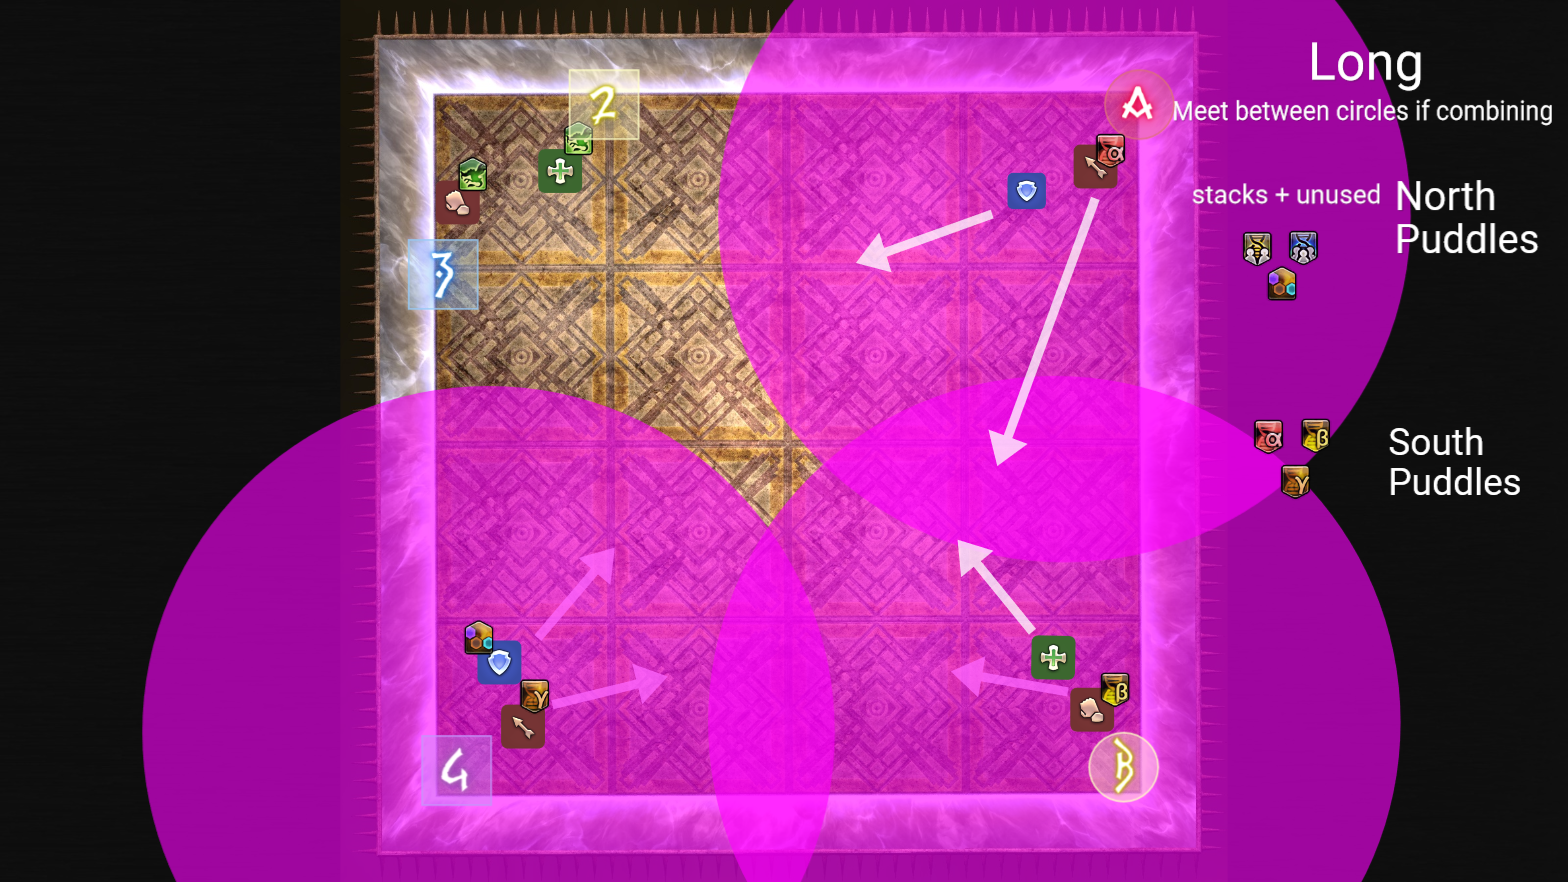
Again, two players with Perfection buffs will need to conceptualize the correct Conception buff to soak the Arcane Control tower. At the same time, the boss will cast Ashing Blaze, so all players must stand on one side of the arena. To see which players are fusing buffs in the middle, look at the graphic on top of their head. If one of their three elements matches, they will go fuse. Spread out loosely to coordinate who is going to the North tower and who is going to the South tower.
The two unmarked players who received Perfection: Beta will need to stand together to create the Fiery Concept. These players should preposition with one towards the West side and one towards the East side to bait End of Days later in the phase. All other players will simply stay on the safe side of the arena from Ashing Blaze.
For the second spread, the long Imperfection debuffs will head to their assigned corners. The five other players will head to the safe corner and loosely spread, making sure not to Conceptualize while location their position to bait End of Days.
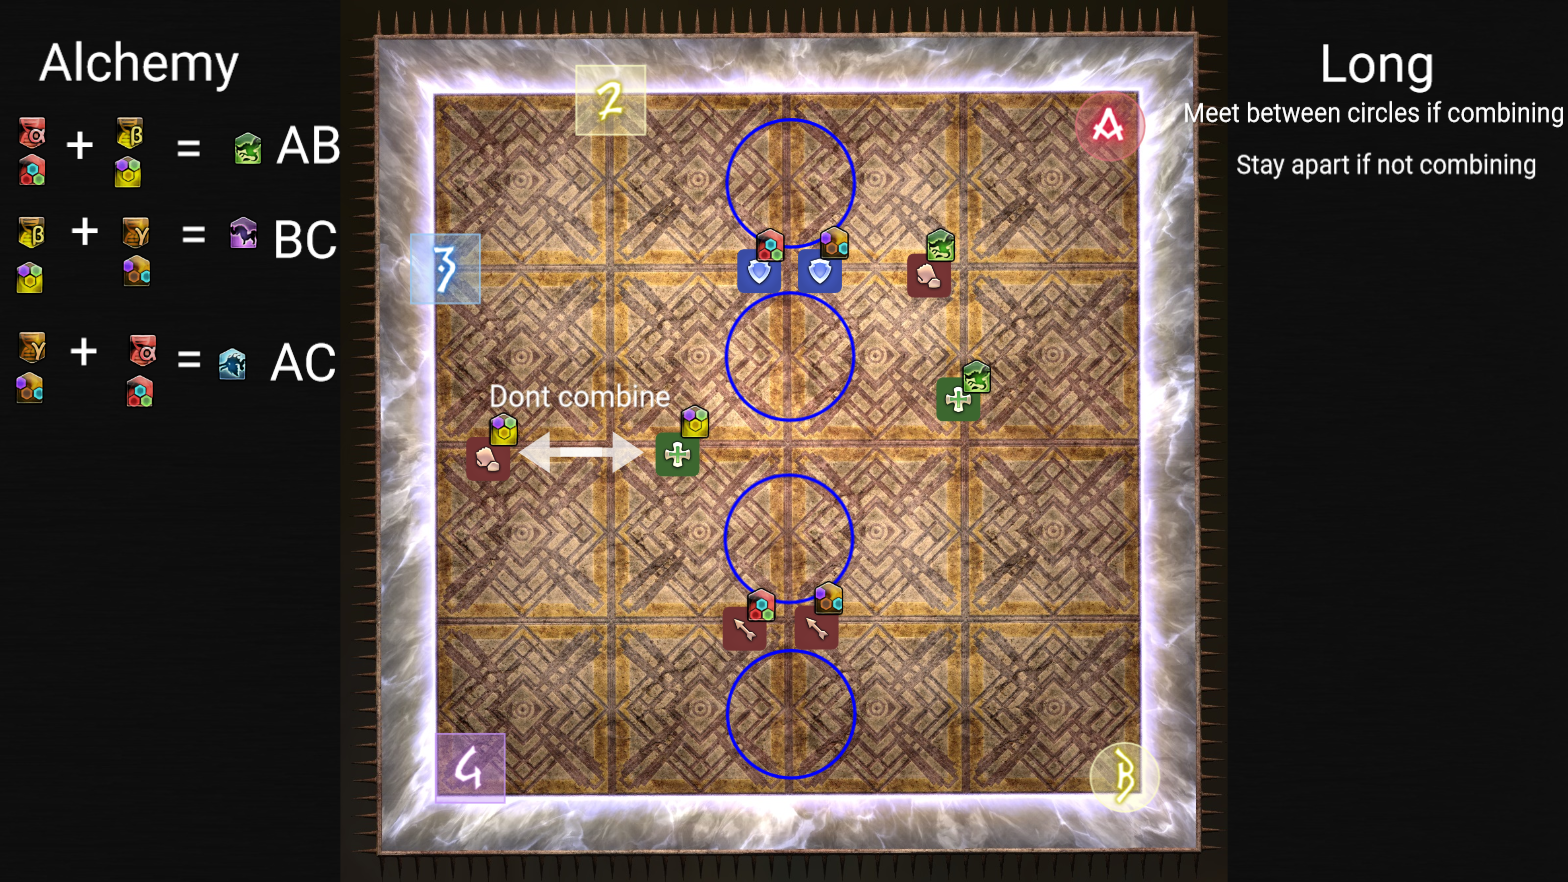
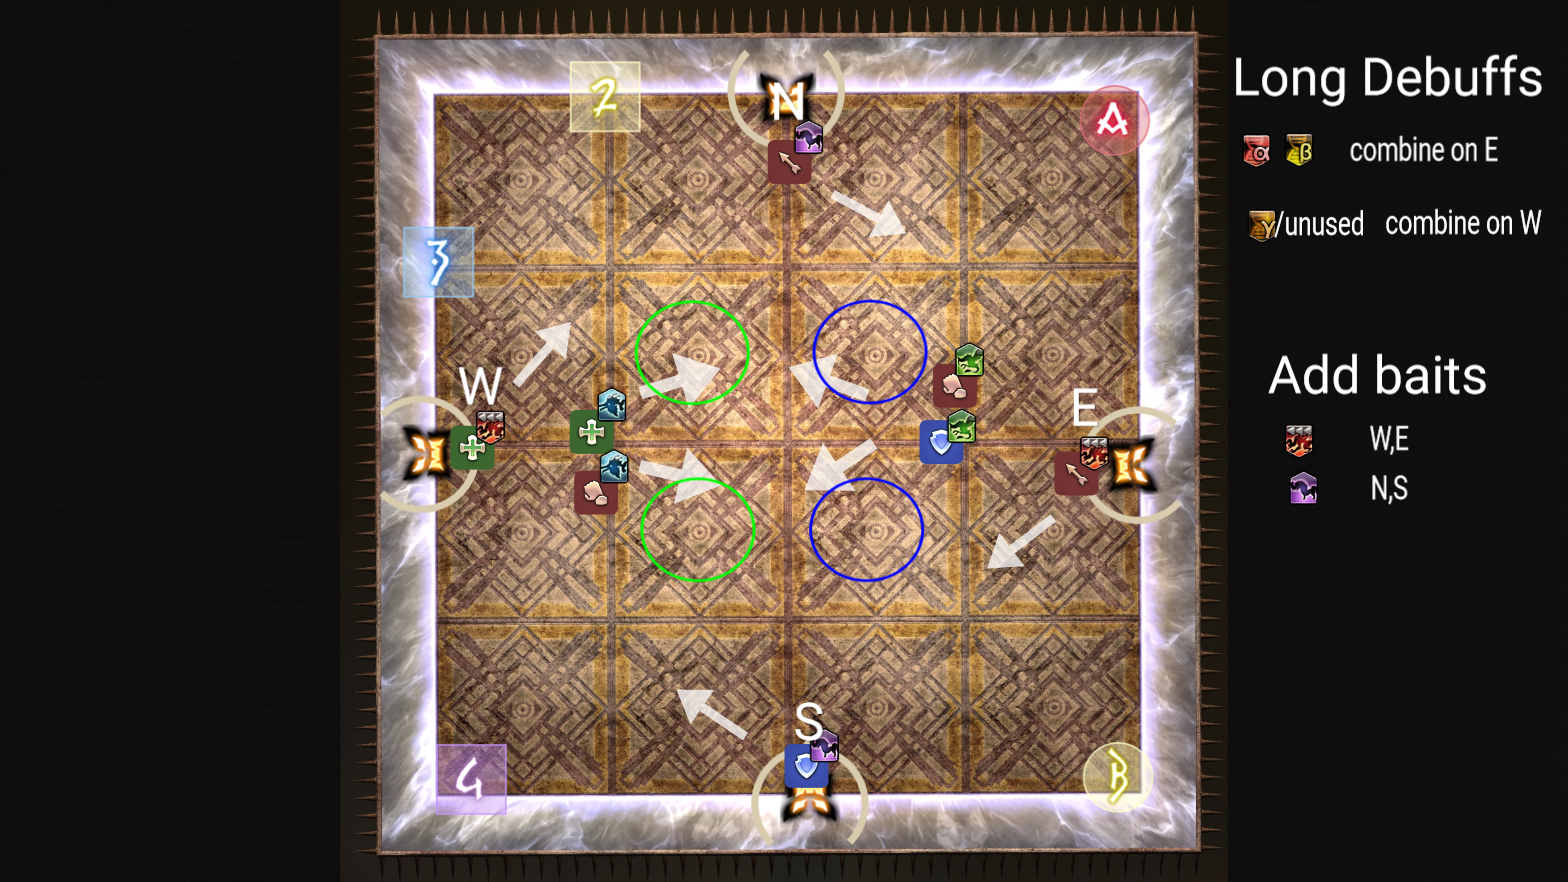
Arcane Control will spawn four towers at intercardinals in the centre. However, all players will already know the other player they are fusing with as it is pre-determined. Alpha and Beta will fuse on the East side of the arena to create a Winged Conception, while Gamma and the unused buff from the previous set will fuse on the West side of the arena. Loosely spread to coordinate which player is heading to which tower.
At the same time, the four players with Conceptions from the previous set will have to bait End of Days tethers. They will have to run to the very edge of the cardinal they were designated: the North tower takes North, the South tower takes South, and the Fiery Conception players take East and West. Once tethered, go two squares counterclockwise to ensure that the AoE does not hit any player in the middle soaking towers.
After the second set of Arcane Control towers go off, the boss will become targetable and begin casting Ego Death. At this point, all players need to return to the middle and be healed. The Fiery Conception players need to fuse with the Winged Conception players to create the Immortal Conception, with the North fire fusing with North wind and South fire fusing with South wind. All other players should be loosely spread in the middle, making sure they are not stacked with any other player. All players must be at maximum HP after fusing; any player not topped will die. If done correctly, all players will be at 1 HP and have the Immortal Conception, allowing them to survive Ego Death. After the phoenix cutscene, players will gain the Everburn buff and transition into the final phase.
Phase 5: Everburn
Hephaistos introduces the following abilities in this phase:
- Aionagonia: Massive raid-wide magical damage that inflicts a bleed DoT for 6 seconds. Each cast of this gives Hephaistos a stack of a damage up buff.
- Dominion: Massive raid-wide physical damage. Each cast of this gives Hephaistos a stack of a damage up buff.
- Orogenic Deformation: Four players, two from each role, are targeted by a small AoE that inflicts an Earth Resistance Down debuff at the same time as Dominion.
- Orogenic Shift: Four towers spread out from the middle to the North edge of the arena, which must be soaked by one player each. This deals moderate earth damage, meaning that players hit by Orogenic Deformation cannot soak these towers until their debuff runs out. There are two sets of Orogenic Shift.
Once the phoenix cutscene transition ends, all players will gain the Everburn buff, doubling their damage dealt. Death will remove this buff, making any death extremely punishing in this phase. Be sure to have a mitigation plan in this phase, as there is a high amount of incoming damage. Hephaistos will begin by casting Aionagonia, so mitigate and heal through it. Each AoE cast gives him a damage up buff, so save the strongest mitigation towards the end of the phase.
Next, the boss will cast Dominion. As this does physical damage, casters and healers will be hit harder so make sure to put mitigation on that helps them. Spread out to ensure that multiple players are not hit by Orogenic Deformation. To figure out which players are taking which tower from Orogenic Shift, supports will take the leftmost two towers and DPS will take the rightmost two towers. Keep in mind that more than two towers can spawn on the same side.
The two players on each role that did not receive the Earth Resistance Down debuff will take the two towers closer to their side. After soaking the tower, return to the middle. The other four players with debuffs can already be in the centre and loosely spread in a line to make sure they know where which relative tower they will be soaking during the second set of Orogenic Shift. After soaking the second set of towers, return to the middle to heal up.
The phase then repeats, with another cast of Aionagonia as well as another cast of Dominion. Do this set the same as previously. Keep in mind these hits will do more damage as Hephaistos will have more damage up buffs. Once the second set of towers are soaked, return to the middle and heal up the final Aionagonia of the phase.
At this point, Hephaistos will begin casting his enrage, Ego Death, over 15 seconds. After making sure the party survives the bleed DoT, DPS the boss down with your Everburn buff!
Loot
When Hephaistos is defeated, treasure coffers will appear depending on how many players have already defeated the fight for the week. The first coffer will contain a Abyssos Chest Gear Coffer and a random Abyssos Weapon, while the second one will contain a Abyssos Weapon Coffer, Sunforged Crystal, the White Stone Black Orchestrion Roll, and a Wind-Up Erichthonios minion. When opened by a player, these coffers contain gear for the job the player is currently on.
Players who defeat the encounter for the first time during the weekly reset will also receive an Abyssos Mythos IV token. Eight of these can be traded in for an Abyssos weapon or chest of your choosing at a Pandaemonium gear vendor.
Changelog
- 22 Oct. 2022: Guide added.
More FFXIV Content

This guide has been written by Lyra an accomplished raider in FFXIV and has written raid guides for the game for the past five years. You can follow him on Twitter and he streams raids on Twitch.
- Last Chance For THE PRIMALS x Download Festival T-Shirt!
- Team DN Claims #WorldFirst in FFXIV’s Dancing Mad!
- FFXIV Players Blown Away By Store Updates!
- Support #WorldFirst in FFXIV Dancing Mad Ultimate — Now Available!
- Calling FFXIV Fishers To Catch The Rainbow For Charity!
- Last Chance To Enter FFXIV x Jollibee Sweepstakes!
- The Senor Otters Make Their Grand Debut in FFXIV
- Don’t Miss the FFXIV x FFXI Collab Event Ending Soon!