The Eighth Circle Phase 1 (Savage): Hephaistos Raid Guide
This guide aims to prepare players for the door boss in Abyssos: The Fifth Circle (Savage) by providing detailed explanations of the fight's mechanics, as well as consistent strategies for the purpose of farming.
Introduction to The Eighth Circle (Savage)
As your journey into the depths of Pandæmonium concludes, you are left with nearly more questions than answers. Professor Claudien has disappeared, and Pandæmonium has drifted into the modern age upon the currents of the aetherial sea. Even so, the glint in Nemjiji's eyes shines brighter than ever, and she seems more than eager to provide her own answers as she hears your story. Whether those will give rise to ever more questions, however, remains to be seen...
Unlock Requirements
The Eighth Circle (Savage) can be unlocked at level 90 after completing the Normal difficulty of the Abyssos raid and talking to Nemjiji in Labyrinthos (x8.4, y27.4). It requires a minimum item level of 610 to queue, but this requirement can be bypassed when entering with a full party.
Raid Guide
Hephaistos has a hard enrage of 7:45 and has a DPS check of roughly 59,800 raid DPS.
If you would prefer to watch a video that covers the fight, take a look at Hope Productions visual guide.
Raid Preparation
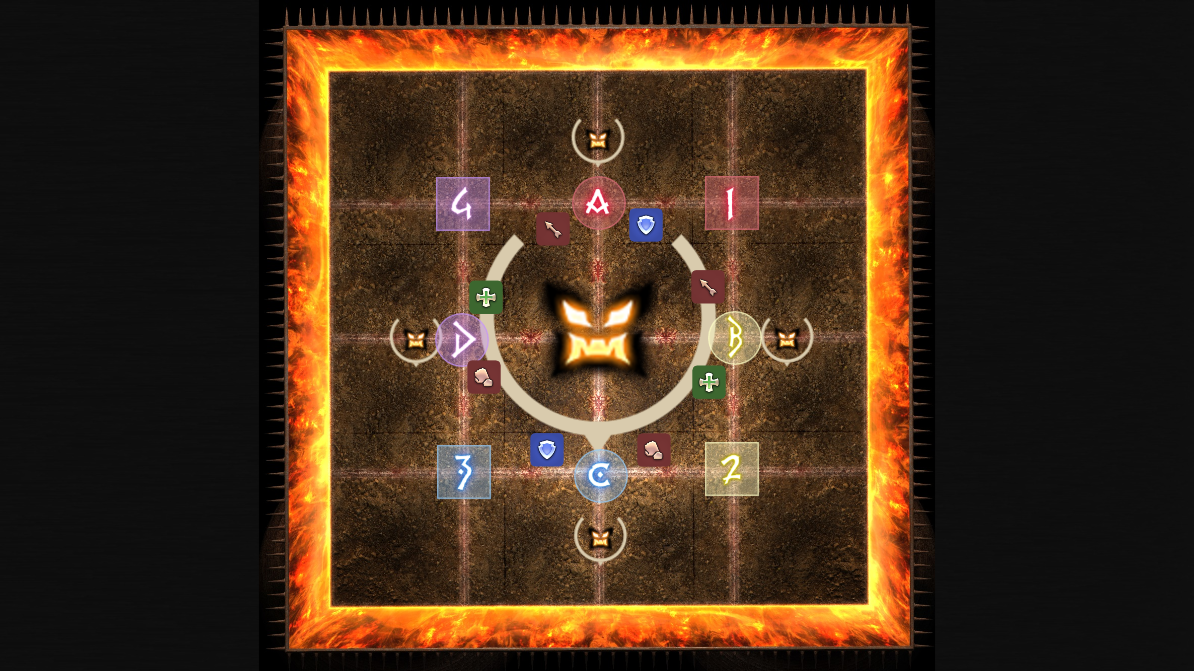
All players should be assigned a clock spot, with tanks north and east, healers south and east, and DPS on intercardinals. The raid also needs to be split into light parties of one tank, one healer, and two DPS each. Rotate clockwise one spot to find your role partner and quadrant. Some parties may opt to keep the tank south to keep things consistent, but this sacrifices uptime for that tank on certain mechanics.
The fight is divided into two sets of Gorgon mechanics, two sets of Dog mechanics, and two intermissions in between.
The arena is divided into sixteen squares by white lines, and nine squares by black lines. These lines indicate the safe spots of certain mechanics.
Hephaistos's Main Abilities
When an ability is prefixed with "Conceptual", the ability will not go off immediately. Instead, it is paired up with a mechanic later in the phase. Tetraflare, Octaflare, and Diflare can all be Conceptual.
- Genesis of Flame: Heavy raid-wide magic damage.
- Tetraflare: An AoE that needs to be shared with one other player on either DPS or supports. Inflicts a magic vulnerability debuff.
- Octaflare: An AoE that inflicts a magic vulnerability debuff on all eight players.
- Diflare: An AoE on both healers that needs to be shared with three other players. Inflicts a magic vulnerability debuff.
- Flameviper: A magic line AoE tank buster that hits #1 on aggro twice and inflicts a magic vulnerability debuff on both hits. Tanks will need to swap twice.
- Reforged Reflection: Hephaistos transforms into a creature, taking on the form of a snake (watch his arms) or a dog (watch his feet).
- Snaking Kick: After Reforged Reflection is cast and Hephaistos becomes a snake, he will do an AoE inside his hitbox that instantly kills any player standing inside.
- Footprint: After Reforged Reflection is cast and Hephaistos becomes a dog, he will knockback all players from the centre of the arena.
Phase 1: Introduction
Hephaistos introduces the following abilities in this phase:
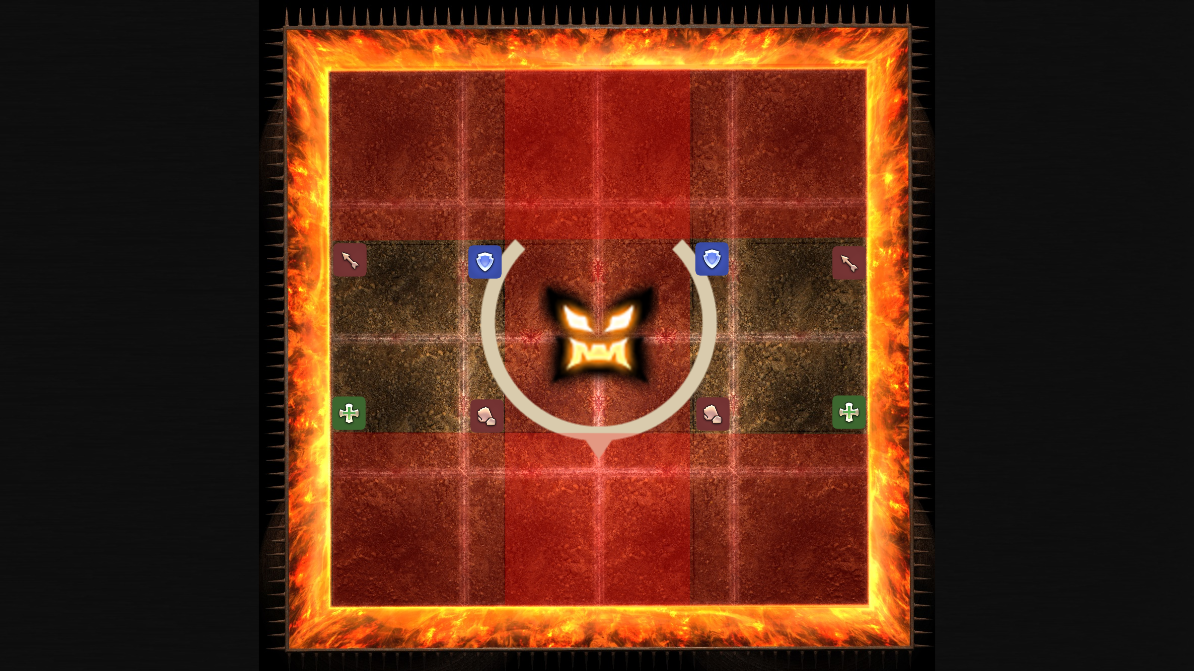
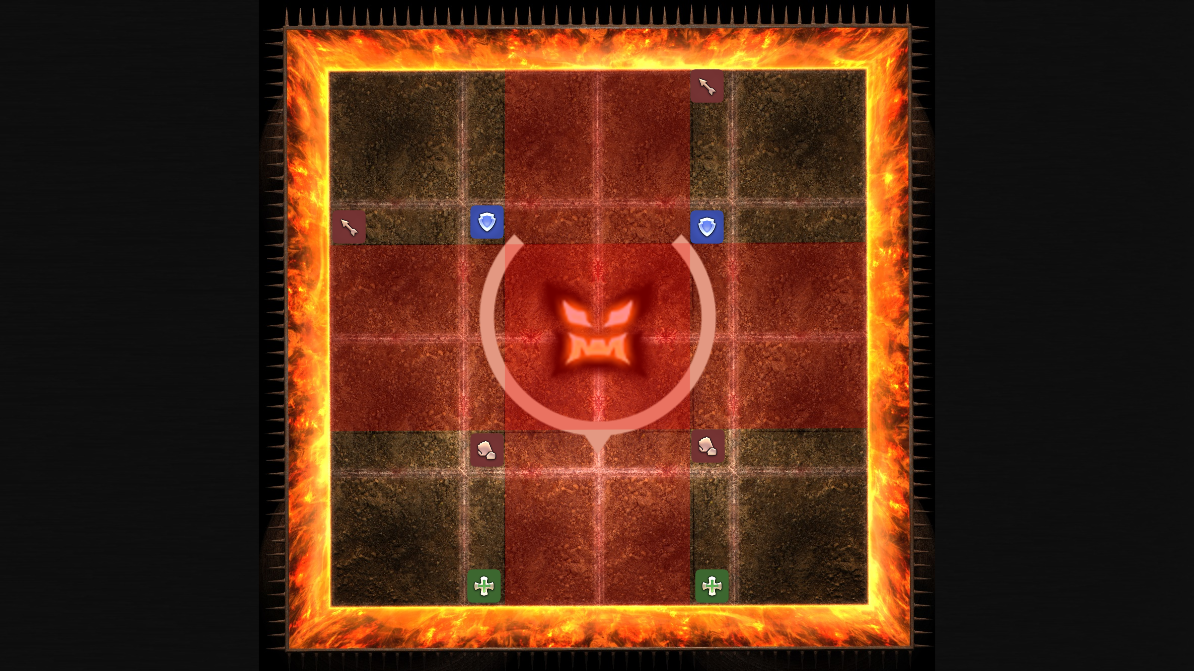
- Volcanic Torches: Blue flames spread across the white lines, creating an AoE on three squares on each quadrant. Watch where the blue lines envelop, and stand on the safe square.
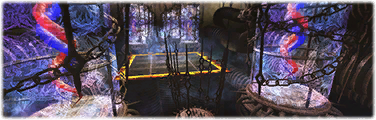
- Sunforge: Hephaistos will summon either a snake or a phoenix. If a snake is summoned, he will cleave the middle of the arena in a line. If a phoenix is summoned, he will cleave the outside of the arena in a line. The black lines indicate the safe spots.
The fight starts with Genesis of Flame seven seconds in, so make sure to shield before the pull and mitigate. Hephaistos will cast either Conceptual Tetraflare or Conceptual Octaflare, and this will go off after the next set of mechanics.
Hephaistos will cast Volcanic Torches next. Each player will split off into their quadrant and look for the safe tile. The easiest way to do so is to stand in the middle of the four squares and look where the flames turn after they reach the wall for the first time. The corner squares are never safe, so by process of elimination players can find the safe square after the first turn.
After the flames go off, he will cast Sunforge. This will go off at the same time as the Conceptual cast from earlier. Players will either need to be inside or outside of the black lines, and stack with their partner if it was Tetraflare or spread out along the line if it was Octaflare.
The phase ends with a tank buster, Flameviper. The offtank needs to stand way from the party and Provoke during the cast, and then Shirk back or have the other tank provoke after they are hit. It deals magic damage, and both tanks should mitigate this heavily.
The order of the next phase is dependent on the Reforged Reflection that is cast. Therefore, the entire fight's timeline branches from this point into either snakes first or dog first.
Phase 2: Snakes 1
Hephaistos introduces the following abilities in this phase:
- Gorgomanteia: Players are inflicted with Eye of the Gorgon or
Blood of the Gorgon. In addition, they are inflicted with First in Line
or Second in Line, indicating the order of which these mechanics
will resolve.
- Eye of the Gorgon will shoot a petrifaction cone towards where the player is facing when it resolves.
- Blood of the Gorgon will drop a poison AoE on the player when it resolves. This AoE will kill any petrified Gorgon.
- Into the Shadows: Hephaistos summons snake adds from the centre that spiral out in two sets of two each. They will spawn at either cardinals or intercardinals. When the they spawn, they will cast Petrifaction from their location, and will enrage if not destroyed by Blood of the Gorgon.
- Ektothermos: Heavy raid-wide magic damage.
If Reforged Reflection turned Hephaistos into a snake, he will cast Snaking Kick immediately after transforming. Gorgomanteia will inflict all players with debuffs. Check whether you have Blood of the Gorgon or Eye of the Gorgon, and check whether you have First in Line or Second in Line. All players of the same role will be resolving their debuffs at the same time. Players must use these debuffs to destroy the Gorgon adds spawned by Into the Shadows. Two players in each role will petrify one add each with their conal debuff, and the other two players in each role will destroy them by dropping the AoE on top of them.
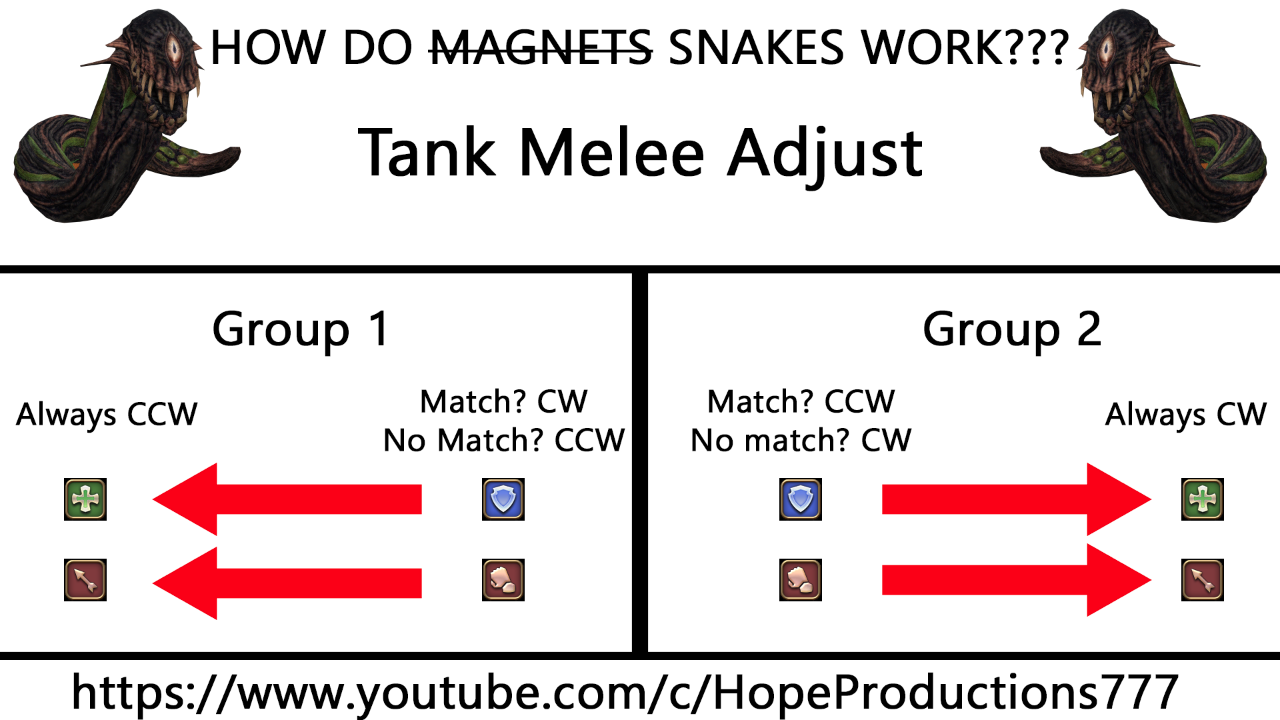
Resolving this mechanic requires players to look at the debuff of their role partner. As snakes can spawn cardinally and intercardinally, we must use the Heavensfall method of starting at a fixed location and looking clockwise or counterclockwise to find the snake assigned to you. The simplest method is to have two roles fixed: healers and ranged DPS. The healer and ranged DPS in light party 1 will always start looking Nort-West and take the first counter-clockwise add, while the healer and ranged DPS in light party 2 will always start looking North and take the first clockwise add.
The other two roles, tank and melee DPS will have to flex. Essentially, they will go opposite of their healer and ranged DPS in their light party unless both have the same debuff. The tank and melee DPS in light party 1 will start looking north and take the first clockwise add, and the tank and melee DPS in light party 2 will start northwest and take the first counterclockwise add. However, if they match debuffs with the other person in their role in their light party, then they will do the opposite of what they normally do.
The sequence of events is as follows. After Into the Shadows is cast, all players will look for where the first set of snakes spawn. They can be opposite each other or 90 degrees away. Look away from both snakes - the easiest way to do so is to stand in the centre of the boss's hitbox and look away or perpendicular to both of them. Find the snakes assigned to each player in the first role, and the Eye of the Gorgon player should look at them. immediately afterwards, the players with Blood of the Gorgon should move beside the add to destroy it. Those players need to look away from the second set of adds that are spawning in the other two cardinal or intercardinal spots. The second role will repeat the same thing.
After the second set of AoEs has been dropped, meet back in the middle to heal up for Ektothermos and get ready for the next phase: Manifold Flames or Fourfold Flames depending on if this was the first mechanic or the second mechanic.
Phase 2: Dog 1
Hephaistos introduces the following abilities in this phase:
- Rearing Rampage: Hephaistos stomps four times, dealing heavy physical raid-wide damage each hit.
- Uplift: Two players will take light physical damage and be inflicted with an Earth Vulnerability debuff during each set of Rearing Rampage. This deals damage in an AoE, so all players must spread out.
- Stomp Dead: Hephaistos jumps to the furthest player four times, dealing massive physical damage that must be shared with one other player. This deals earth damage and inflicts a physical vulnerability up debuff.
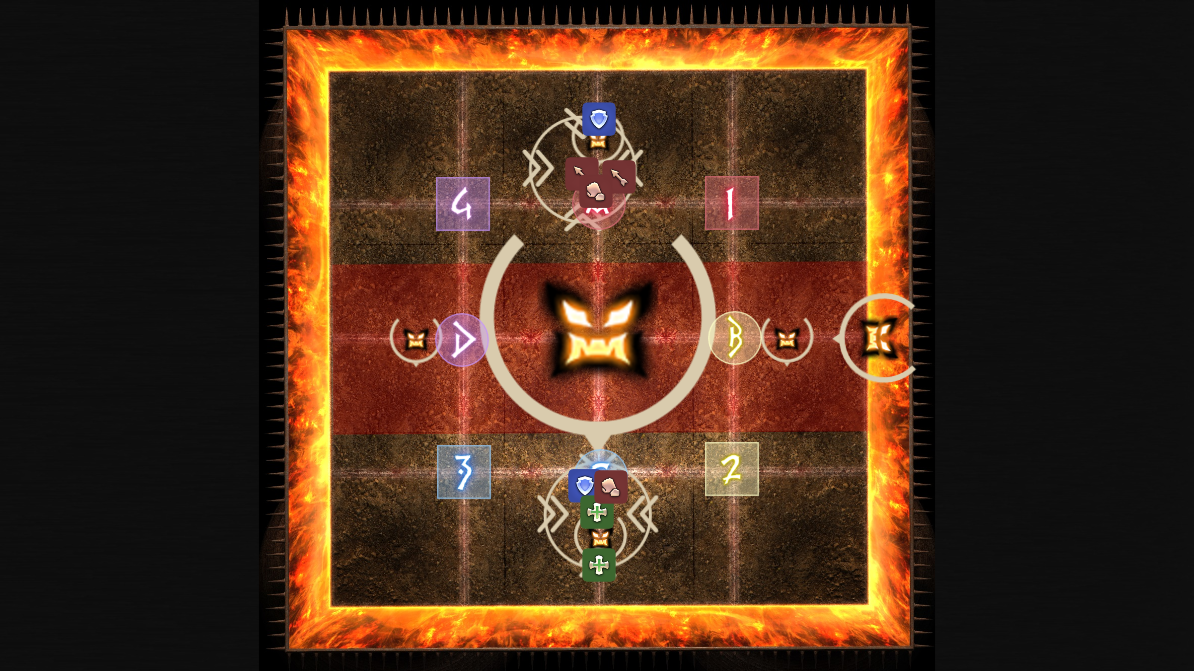
If Reforged Reflection turned Hephaistos into a snake, he will cast Footprint immediately after transforming. Knockback prevention abilities do work on this mechanic. All players need to head to their clock spots and mitigate Rearing Rampage. Note what order players received Uplift in. Physical mitigation is required for both Rearing Rampage and Stomp Dead, as it will kill casters and healers with physical damage if not mitigated properly.
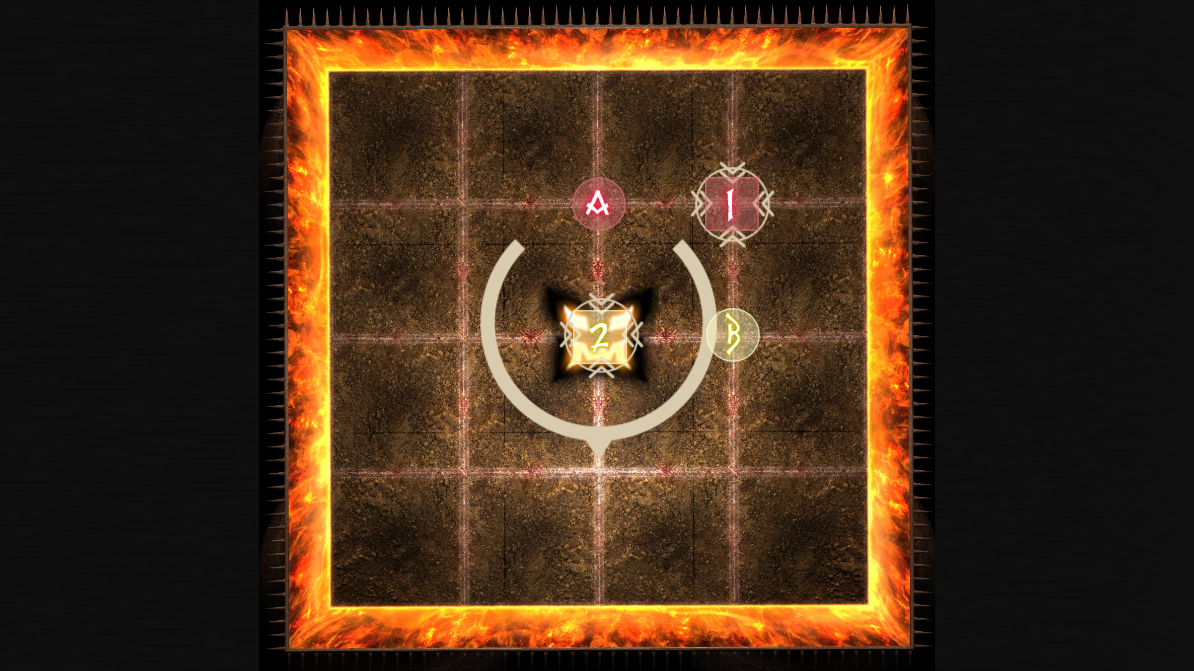
Immediately after, the boss will begin cast Stomp Dead. As the AoE itself is fairly small, players can achieve full uptime on this mechanic by using the two corners of a single white square. The players will bait the proximity jump in the order they took damage from Uplift earlier. Players can also see when they are supposed to bait as their debuff runs out right before. The first two players will move to the far corner, and the second two players will stay in the middle of the arena. The third and fourth sets of players will stay at either A or B in the diagram in the beginning. The third set will replace the first set after the first jump, and the fourth set will replace the second set after the second jump.
After the fourth Stomp Dead, get ready for the next phase: Manifold Flames or Fourfold Flames depending on if this was the first mechanic or the second mechanic.
Phase 3: Manifold Flames
Hephaistos introduces the following abilities in this phase:
- Illusory Creation: Hephaistos summons stationary clones at the cardinal edges of the arena. These will do a Sunforge mechanic.
- Creation on Command: Hephaistos commands the clones to do either Sunforge mechanic.
- Manifold Flames: Hephaistos will cast Hemitheos's Flare on one role and Nest of Flamevipers afterwards on the other. Both hits inflict a magic vulnerability debuff. Afterwards, Volcanic Torches will spawn, leaving one corner tile of the room safe.
- Hemitheos's Flare: Magical AoE damage.
- Nest of Flamevipers: A magical line AoE. As a part of Manifold Flames, it hits the four closest players. When casted by the boss, it will hit all eight players.
Hephaistos will begin this dance-like phase with Illusory Creation and Creation on Command. Find the add that has a Sunforged Phoenix - the line with that add will be safe. Players should stand in their quadrants, with melee in melee range and ranged on the outside. When the Sunforge AoE goes off, four players of one role will be hit by Hemitheos's Flare. The role that was not hit will need to go inside the boss's hitbox to bait Nest of Flamevipers, so have all players go to their clock spots.
Immediately afterwards, another set of adds will begin to cast Sunforge. However, these will be the same add. If it is phoenix, all players will need to stand in the middle black square, and if it is snake, all players will need to stand on the outside four squares. Hephaistos will cast either Tetraflare or Nest of Flamevipers. If it's the former, stack with your partner in your quadrant. If it's the latter and inside is safe, go to your clock spots. However, if outside is safe and it's Nest of Flamevipers, clock spots don't quite work. Have the melee stay in melee range, and the ranged in each quadrant will go to an edge to bait the line AoE away from them. The line is thin enough for the inside melee to not get hit.
Finally, a set of Volcanic Torches will appear. These blue flames will converge towards the South-West corner. Immediately after they reach that position, the safe spot (always in a corner of the arena) can be identified, and all players need to head there. The boss will cast Genesis of Flame afterwards, so stay in the corner to heal and mitigate.
After Manifold Flames, the boss will jump to the middle and cast Reforged Reflection, transitioning to either Snake 1 or Dog 1, whichever one was not done before.
Phase 4: Fourfold Flames
Hephaistos introduces the following abilities in this phase:
- Fourfold Fires: Hephaistos summons four proximity AoEs on the intercardinal edges of the arena. These will spawn fire puddles.
- Cthonic Vent: Two puddles will start bubbling. From these puddles, Hephaistos summons two snakes that jump to fire puddles. These will do a large AoE from the fire puddle. Use the black lines to find safe spots.
Hephaistos will begin the phase by casting either Conceptual Tetraflare or Conceptual Octaflare. This will be done at the very end of the mechanic set, so type a reminder into chat if necessary. All players need to stack in the middle to mitigate damage from Fourfold Fires and have easy access to the safe spot for the first Cthonic Vent. Look for the puddles that are bubbling and go away from them.
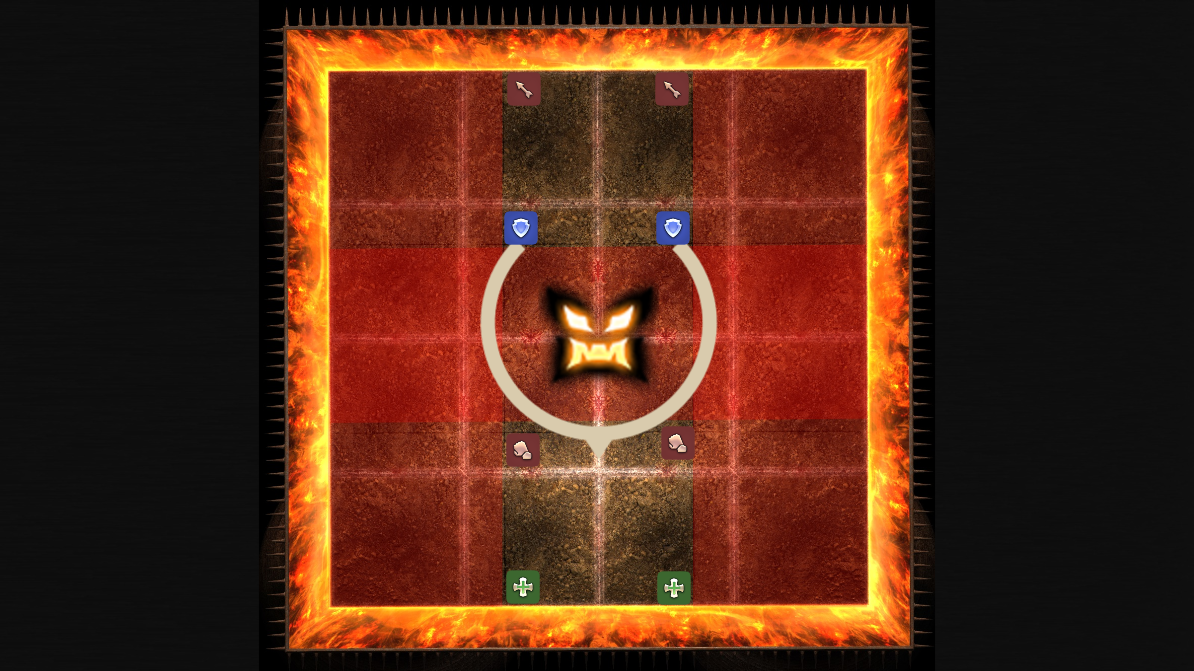
After the first AoE explosion, the fire snakes will jump to different puddles. Hephaistos will cast either Tetraflare or Octaflare. Players will need to stack with their partner or spread relative to the safe spot(s). It is possible for two corners to be safe, or one entire side to be safe. To make this simple, if two corners are safe have one light party always go to the West safe spot and one light party always go to the East safe spot. If one side is safe, one light party will go left facing the middle and the other will go right facing the middle.

For this configuration for Tetraflare, melee should stack with tanks close and ranged should stack with the healer in their light party for melee uptime purposes. For Octaflare, have the melee close, tanks to the sides, and ranged far in the back. Unfortunately, if it is Octaflare in the corner, tanks must lose uptime such as in the configuration shown above.
Finally, dodge the third set of AoEs. Hephaistos will cast Sunforge and cast the Conceptualized mechanic shown in the beginning in the phase. It is done the same as the first Sunforge in the fight, and players need to hurry to their quadrant to ensure they are in the correct position. Afterwards, he will cast Flameviper so tanks will have to mitigate and swap.
The order of the next phase is set in stone based on the sequence earlier. If snake was first, it will be snake followed by dog. If dog was first, it will be dog followed by snake.
Phase 5: Snakes 2
Hephaistos modifies the following abilities in this phase:
- Gorgomanteia: All players are now inflicted with Blood of the Gorgon and Eye of the Gorgon. In addition, two players in one role will be inflicted with Breath of the Gorgon, a stack AoE, and two players in the other role will be inflicted with Crown of the Gorgon, a circular petrifaction.
- Into the Shadows: Now summons all four Gorgon adds at the same time. These Gorgons must be petrified twice in order to be destroyed by Breath of the Gorgon, meaning that Blood does not kill it anymore.
- Illusory Creation: First, summons clones at the edge of the arena that does a line AoE on the outside white tiles. Afterwards, summons one clone at the edge of the arena. This will do a line AoE across the arena. This will always kill two Gorgon adds, leaving two other Gorgon adds to perform mechanics with.
Again, the phase transition, Reforged Reflection will cast Snaking Kick at the end, so be sure to stay outside of the hitbox. Note which players have Crown of the Gorgon and Breath of the Gorgon after the cast, as well as which of Blood of the Gorgon or Eye of the Gorgon resolves first. Players will all head to their quadrant slightly clockwise. Look away from the adds as they still cast Petrifaction. If your Eye debuff is resolving, you look at the add you are closest to. This will happen once more, so the other person needs to look at the add when their Eye debuff is resolving. The Blood debuff resolves naturally in this formation.
Next, look for the clone at the edge of the arena. To resolve this, use the configuration from Snakes 1 to determine which debuff goes where. This should naturally lead to one player with Crown and one player with Breath on each add not being cleaved by the clone. Players without debuffs should spread to the adds as well, as Breath needs to be stacked by four players ideally to survive. To do this, have supports start NW and look CCW, and have DPS start N and look CW. The player with Crown needs to stand behind the add relative to the other add, and the player with Breath and the players with no debuff will stand on the inside. All four players will take damage, not be petrified, and kill the remaining two adds.
Return to the middle. If this was the first mechanic set, the boss will cast Flameviper. If this was the second mechanic set, the boss will cast Genesis of Flame and enrage shortly after.
Phase 5: Dog 2
Hephaistos introduces the following abilities in this phase:
- Quadripedal Crush: Hephaistos will face north or south and jump to the edge, doing a large AoE from that position.
- Quadripedal Impact: Hephaistos will face north or south and jump to the edge, doing a heavy knockback from that position.
- Trailblaze: Hephaistos dashes across the arena, knocking back players from the outside of the black line and killing any player in his path. Standing just outside of the black line is always safe.
- Blazing Footfalls: Hephaistos will show four mechanics in order: a Trailblaze, a Quadripedal Crush or Quadripedal Impact, another Trailblaze, and the other Quadripedal mechanic. This is accompanied with a Volcanic Torches that leaves one row or column safe.
Again, the phase transition, Reforged Reflection will cast Footprint at the end, so be sure to use your knockback prevention ability. Hephaistos will face North or South and begin to cast Quadripedal Crush or Quadripedal Impact - if it's Impact, go to the edge where he is facing, and if it is Crush, go to the opposite edge of where he is facing. He will cast either Conceptual Diflare or Conceptual Tetraflare, and then Blazing Footfalls right after.
Players will have to stand in a line outside the black line for either Diflare or Tetraflare that happens at the same time as the first Trailblaze. Use this knockback to get knocked to the first safe spot that is safe from the first Quadripedal Crush or Quadripedal Impact shown. Afterwards, players will have to either move or get knocked back to the correct side for second Trailblaze into Crush or Impact. Finally, players will have to move or get knocked to the safe row or column for Volcanic Torches. An example is given below.
- Conceptual Diflare is cast first, so stand in light parties for the first knockback.
- It is Crush (AoE) first at west, and then Impact (knockback) at north. Therefore, we are getting knocked back east first with Trailblaze which dodges the Crush. We move north for the second Trailblaze, and get knocked back to the safe side for Torches.
- After getting knocked back and dodging the AoE in light parties, move to the black line north for the second Trailblaze.
- After getting knocked back, you can see that the west side is safe. Get knocked southwest for Volcanic Torches by Impact.
The boss returns to the middle. If this was the first mechanic set, the boss will cast Flameviper, and make sure no other players are on the North side. If this was the second mechanic set, the boss will cast Genesis of Flame and enrage shortly after.
Loot
As this is a door boss, no loot is dropped from the encounter until the second phase is defeated.
Changelog
- 12 Oct. 2022: Guide added.

This guide has been written by Lyra an accomplished raider in FFXIV and has written raid guides for the game for the past five years. You can follow him on Twitter and he streams raids on Twitch.
- New Framer’s Kit With Return Of Breaking Brick Mountains
- Last Chance For THE PRIMALS x Download Festival T-Shirt!
- Team DN Claims #WorldFirst in FFXIV’s Dancing Mad!
- FFXIV Players Blown Away By Store Updates!
- Support #WorldFirst in FFXIV Dancing Mad Ultimate — Now Available!
- Calling FFXIV Fishers To Catch The Rainbow For Charity!
- Last Chance To Enter FFXIV x Jollibee Sweepstakes!
- The Senor Otters Make Their Grand Debut in FFXIV