The Sixth Circle (Savage): Hemegone Raid Guide
This guide aims to prepare players for Abyssos: The Sixth Circle (Savage) by providing detailed explanations of the fight's mechanics, as well as consistent strategies for the purpose of farming.
Introduction to The Sixth Circle (Savage)
You could have sworn that Nemjiji began writing ere you opened your mouth to speak of your battle with Hegemone but pass it off as a unique quirk of the researcher's method of recording dictation. A perusal of her writings afterwards proves to be an exhilarating read, but you wonder whether your account of events was quite so animated...
Unlock Requirements
The Sixth Circle (Savage) can be unlocked at level 90 after completing the Normal difficulty of the Abyssos raid and talking to Nemjiji in Labyrinthos (x8.4, y27.4). It requires a minimum item level of 605 to queue, but this requirement can be bypassed when entering with a full party.
Raid Guide
Hegemone has a hard enrage of 10:39 and has a DPS check of roughly 53,900 raid DPS.
If you would prefer to watch a video that covers the fight, take a look at Hope Productions visual guide.
Party Finder Resources
Raid Preparation
All players should be split into light parties of one tank, one healer, and two DPS each. In addition, each support needs to be paired with one DPS at an intercardinal quadrant. Ideally, one ranged job is partnered with one melee job per quadrant.
There are sixteen tiles on the arena, arranged in a 4x4 grid.
The fight has multiple Aetherial Polyominoid mechanics that are cast in succession. Every two minutes, the boss will cast a tank buster into a raid-wide. This divides the fight into five neat sections of mechanic sets, which are mostly handled differently within the confines of the tiles in the arena.
Hegemone's Main Abilities
Aetheric Polyominoid and Polyominoid Sigma are the main mechanics of the fight. Hegemone will summon either plus-shaped (+) or x-shaped (x) markers on a tile on the arena. After a while, these will explode and deal an AoE on the tile and all tiles indicated in its path.
In addition, certain mechanics can be buffed with Aetherial Exchange. This tethers Aetheric Polyominoid tiles or players together. This will swap the mechanics that the tile or player has when they resolve.
Phase 1: Pathogenic Cells
- Hemitheos's Dark IV: Moderate raid-wide magical damage.
- Chelic Synergy: A physical tank buster that cleaves in a small cone on the current #1 in threat. This inflicts a 12 second Bleed DoT. This buster must be shared by both tanks, or heavily mitigated or invulned by the main tank.
- Synergy: A tank buster that deals magical damage to #1 in threat and physical damage to #2 in threat in an AoE around them. This inflicts a 12 second Bleed DoT and a magic vulnerability debuff on the main tank, necessitating a tank swap.
- Unholy Darkness: A stack marker on both healers that deals magical damage.
- Exocleaver: Conal AoEs from the boss. After the first hit, it will hit again on the spots that were not hit the first time.
- Pathogenic Cells: All eight players are marked in order with blue odd numbers or red even numbers. Hegemone will shoot a conal AoE towards all players in order of the numbers indicated. This AoE deals heavy magic damage and inflicts one stack of the Consumption debuff. Getting hit by more than one is likely lethal and will also turn the player into a glossomoprh.
- Choros Ixou: Hegemone cleaves either her sides, or her front and back. She then cleaves the other area she did not cleave previously. The area to be hit is indicated with red orbs.
- Exchange of Agonies: Players are inflicted with a donut marker, prey marker, or stack marker. In addition, two players of opposing roles will be tethered together due to Aetherial Exchange. When the markers resolve, the mechanic indicated will be executed on each player.
The fight starts off with Hemitheos's Dark IV into Chelic Synergy. For Chelic Synergy, it is recommended for the main tank to either heavily mitigate the hit and/or invuln it if possible, as healers will only have to worry about one tank's bleed.
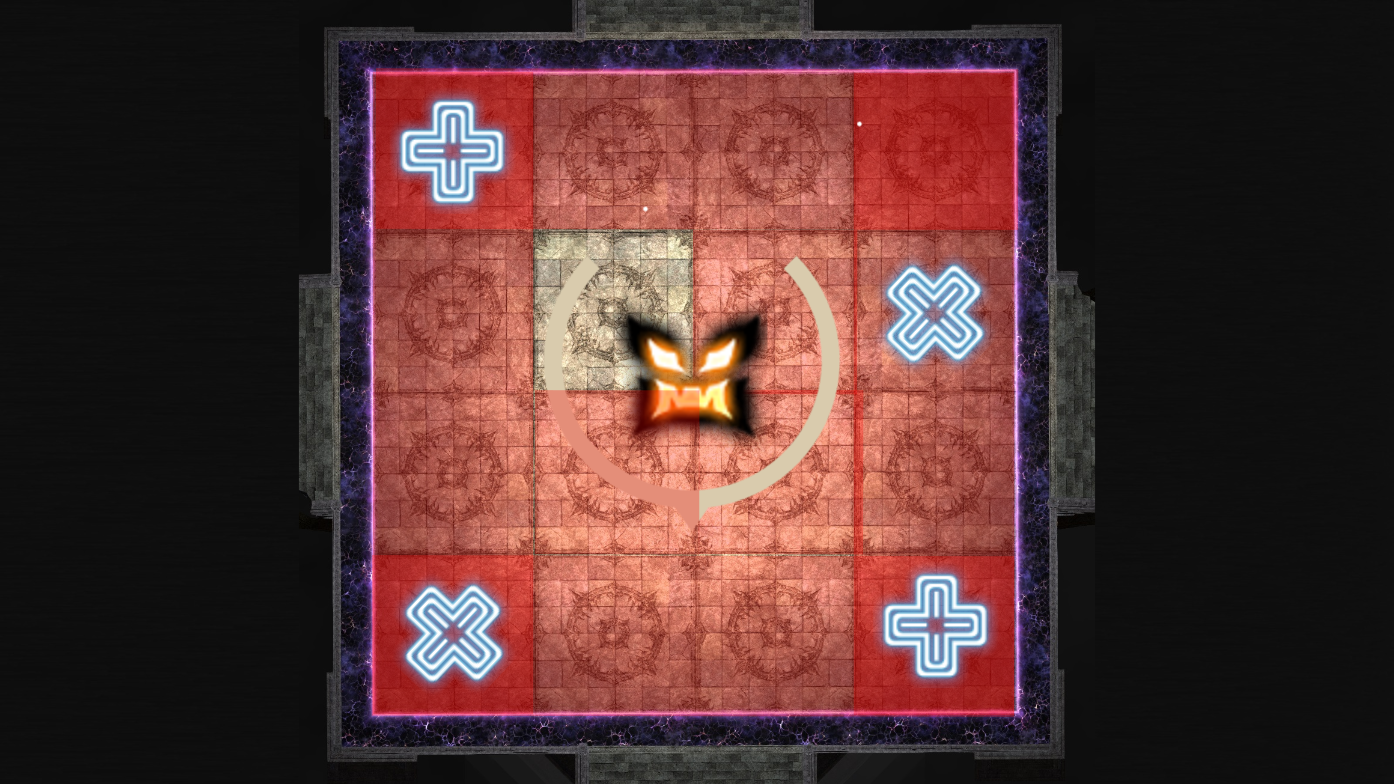
The first set of Aetheric Polyominoid will have two plus-shaped AoEs. This is accompanied with Unholy Darkness and Exocleaver. Have one light party head left and the other head right. Stack with each other on a safe column on the sides of the boss, then move clockwise together to soak the stack and dodge Exocleaver.
The next mechanic is Pathogenic Cells. There are two ways to solve this mechanic, but both methodologies are similar. Designate one spot for odd numbers to go and even numbers to go. Players numbered one and two will start at these positions. When they are hit, they will move out, and the next sequential number will replace them to take a cleave. This ensures that players are never cleaved twice, and the safe spots and unsafe spots are always known. Ideally, the cleave spots are either Northwest and Northeast or North and South. The former leaves the south of the arena safe, and the latter leaves the sides of the arena safe.
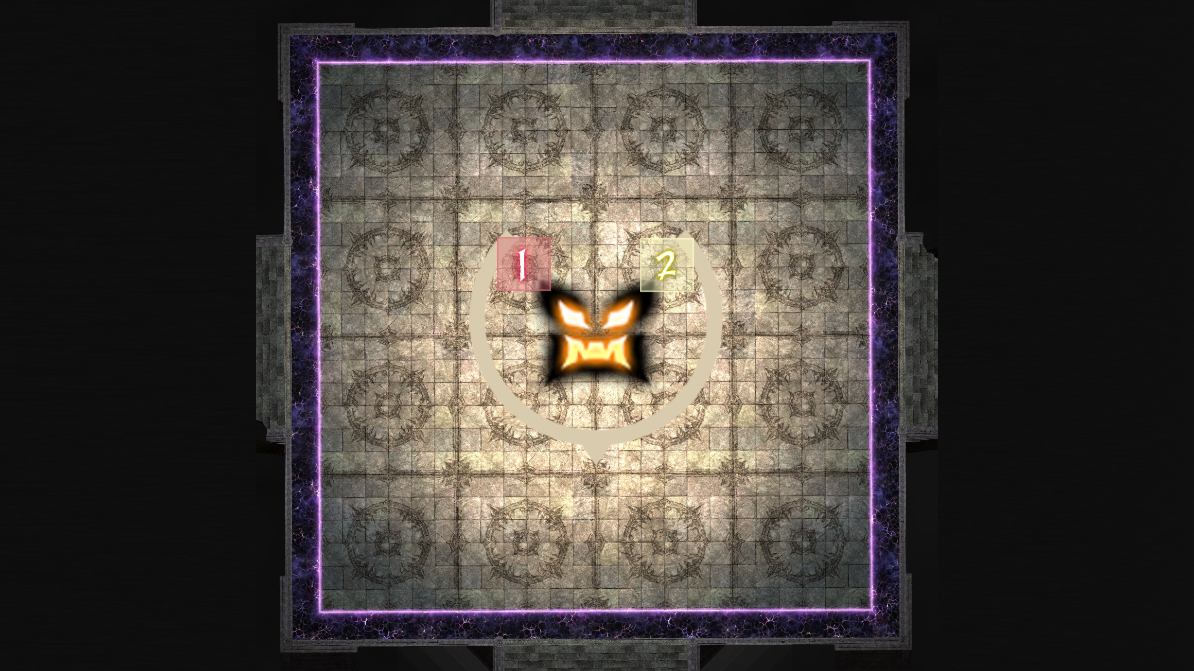
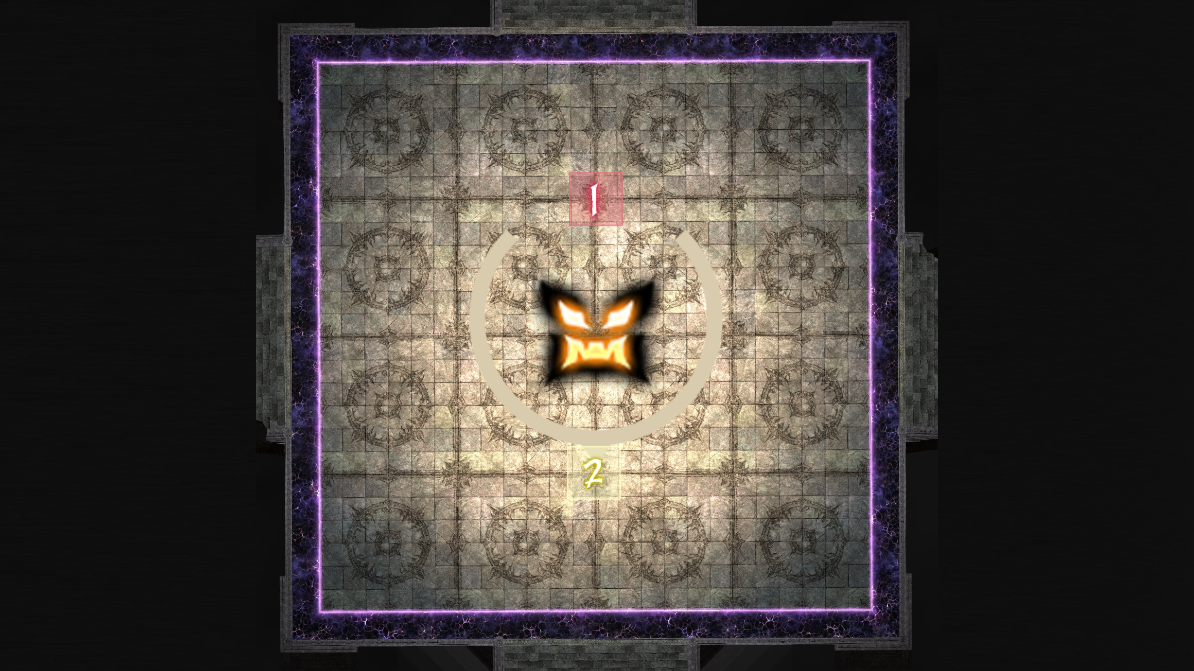
The final mechanic of the phase has players interact with the Aetherial Exchange and Exchange of Agonies combo for the first time. All players are marked with a donut, prey, or stack. There will be one stack, three donuts, and four preys. The players with donut and stack will need to stack in the middle of the arena, and the players with prey will need to go to the edge of the arena at their quadrant, as the prey AoE is quite large.
While Exchange of Agonies is cast, the players in each position are role-based. It will either be supports in the middle and DPS out, or DPS in the middle and supports out. Simply identify which role is in the middle based on who has prey (they have to go out) and either head to your assigned quadrant at the edge or in the middle.
When the mechanics resolve, Hegemone will cast Choros Ixou. This will cleave either her sides, or her front and back, and then the opposite location. Players will have to stand at the safe spot for this, and then move to the other safe spot after all mechanics resolve. This is why we have players on the outside go to their quadrants.
After a Synergy, which necessitates a tank swap, the boss will cast Hemitheos's Dark IV and begin start a new set of mechanics.
Phase 2: Transmission
- Transmission: Players are either tethered to Hegemone's wing or snake. They are inflicted with either Chelomorph or Glossomorph. When this debuff resolves, players with Chelomorph will shoot a conal AoE behind them that inflicts a bleed DoT, and players with Glossomorph will shoot a conal AoE in front of them that turns anyone hit into a Glossomorph.
- Dark Dome: Places invisible AoEs under all players when the castbar resolves. These AoEs will resolve a while later, so players need to move out of the way.
The first mechanic in Phase 2 is a combination of Transmission and Choros Ixou. Players will head to their quadrant alongside their partner and stand beside each other on the safe spot of the cleaves. When their debuff is about to expire, they will look outside of the arena if inflicted with Glossomorph and inside the arena if inflicted with Chelomorph. This will resolve mechanics without hitting any other player by shooting all conal AoEs towards the outside. After you regain control of your character, immediately move to the safe spot for Choros Ixou.
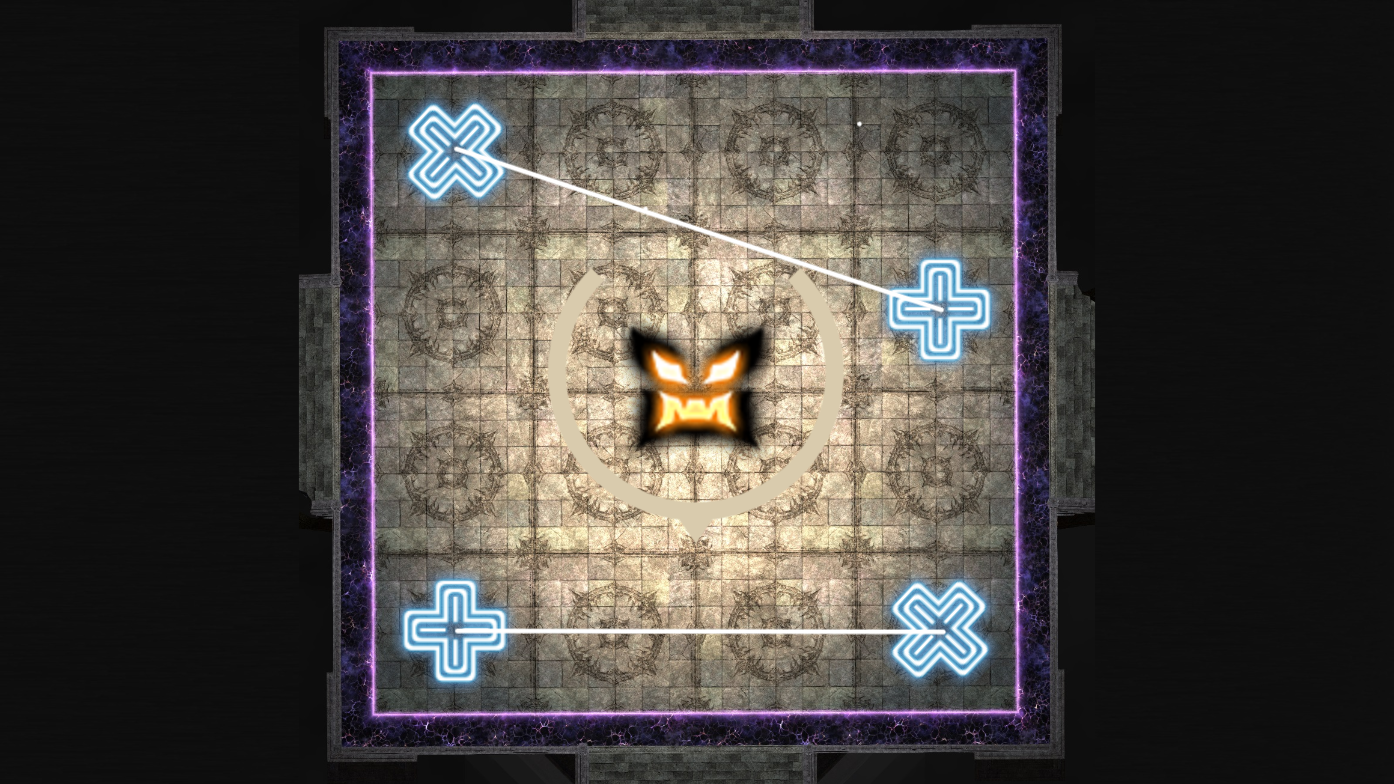
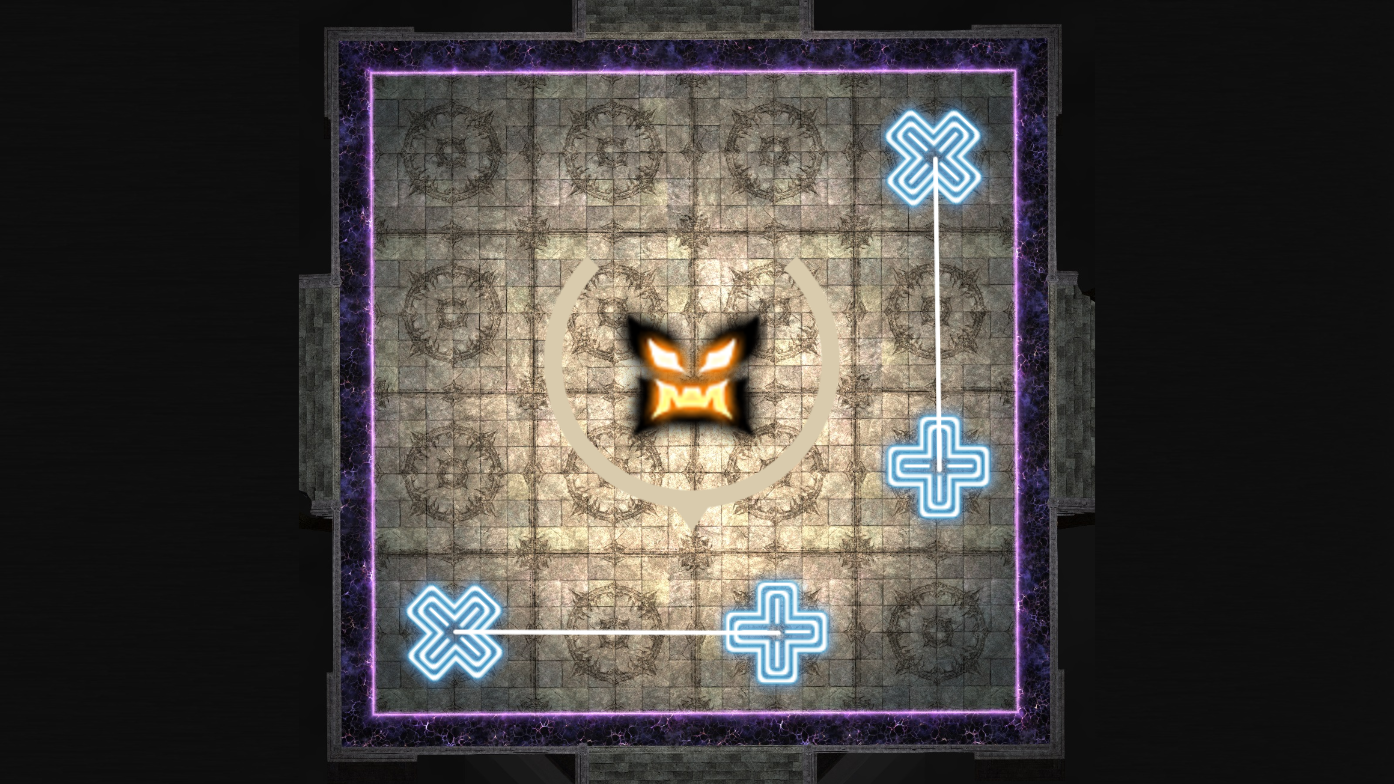
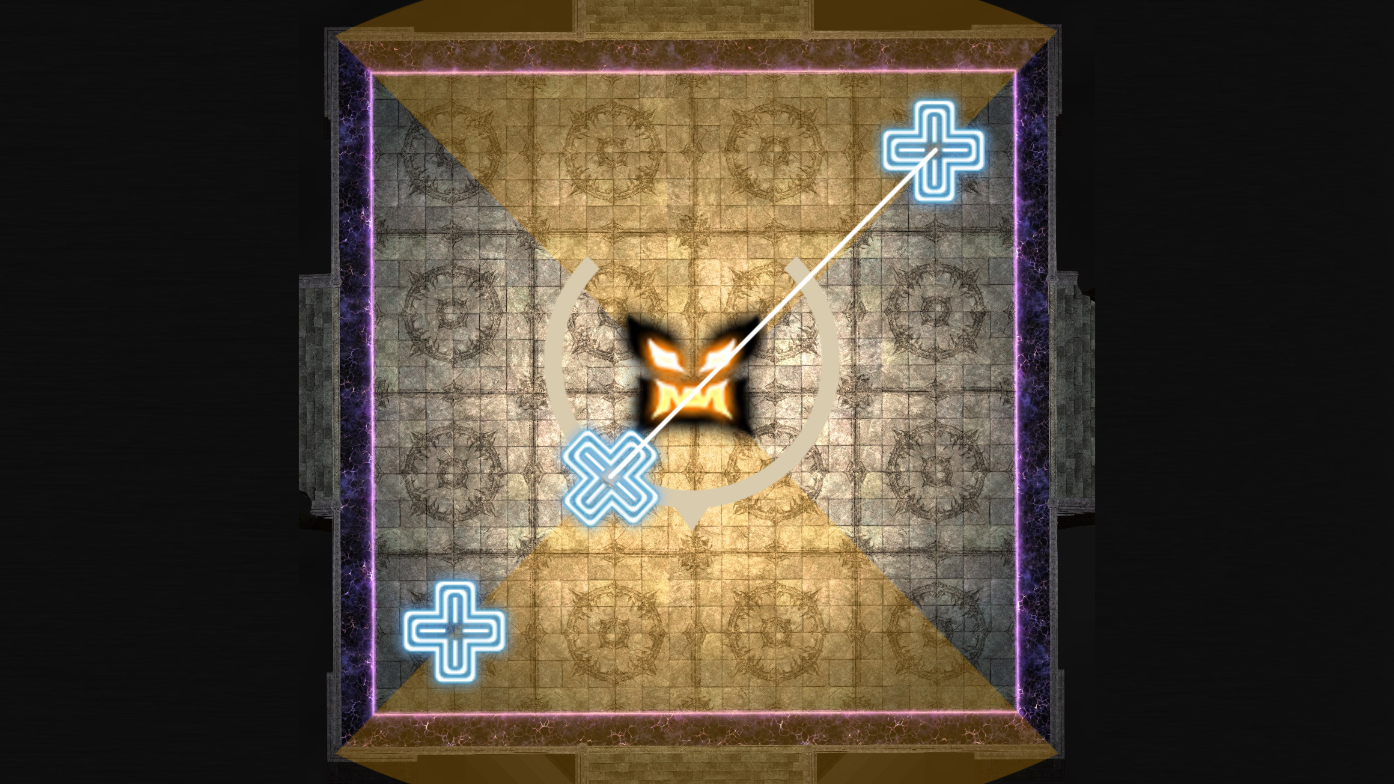
Next, the first instance of Polyominoid Sigma is introduced, where multiple Polyominoid mechanics appear and are swapped. For the first mechanic, players will need to stack in the middle of the arena to bait Dark Dome. While doing so, they must all identify the safe spot for Polyominoid Sigma. Once they have done so, the entire party moves together to the edge of the safe tile, which is one of the four in the middle.
To identify the safe spot, simply look for the x marker that is tethered to the + marker that is not in a corner. The safe tile is the closest tile to that one in the centre.
The next Aetherial Exchange and Exchange of Agonies mechanic set has the party split into roles. Have supports go left and DPS go right. Two players will be tethered to players of the opposite role, and players will have to go Unholy Darkness alongside Exocleaver. Essentially, players with the stack marker will run out for an AoE and players with the prey marker will stay inside to stack with everyone else, as their tethers will swap their mechanics. All other players will stay close to the middle, stack with each other, and move clockwise to dodge Exocleaver.
After a random tank buster and a cast of Hemitheos's Dark IV, the boss will begin a new set of mechanics.
Phase 3: Cachexia 1
- Dark Ashes: All players receive a medium-sized AoE marker which inflicts a Dark Resistance Down debuff, meaning players cannot be hit by more than one.
- Cachexia: Inflicts all players with Aetheronecrosis of varying timers and either the Glossal Resistance Down or Chelic Resistance Down debuff. Aetheronecrosis will explode in an AoE, dealing moderate magic damage. Note that the second time this is cast, Aetheronecrosis will not be inflicted.
- Dual Predation: Hegemone will do an AoE to the two closest players on her left side and her right side four times. The left player will take Chelic Predation, which inflicts Chelic Resistance Down. The right player will take Glossal Predation, which inflicts Glossal Resistance Down. Players with the respective debuff cannot take the same type of hit or else they will die.
- Ptera Ixou: Hegemone will cleave her left side with her wing and her right side with her snake. The left side deals Chelic damage, and the right side deals Glossal damage. This means players must be on the proper side with their Resistance down debuffs.
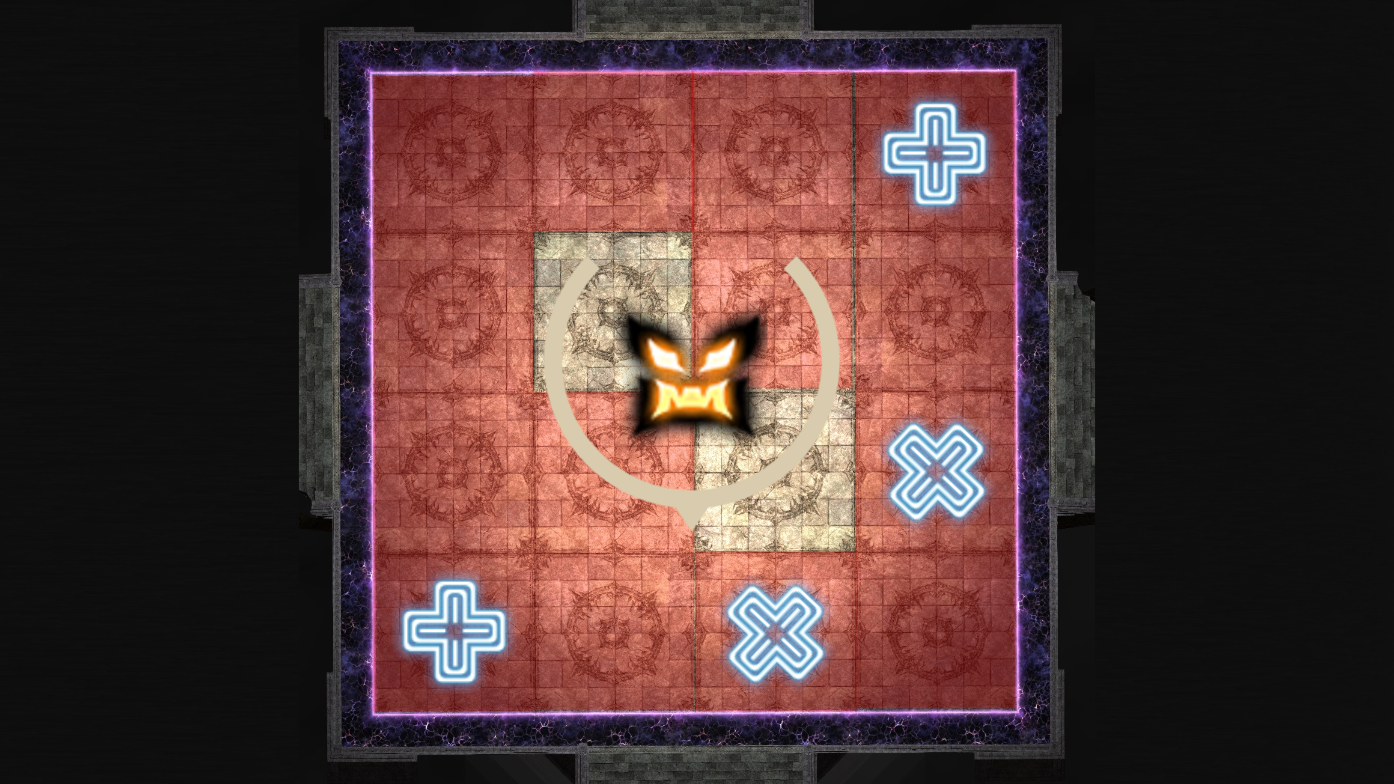
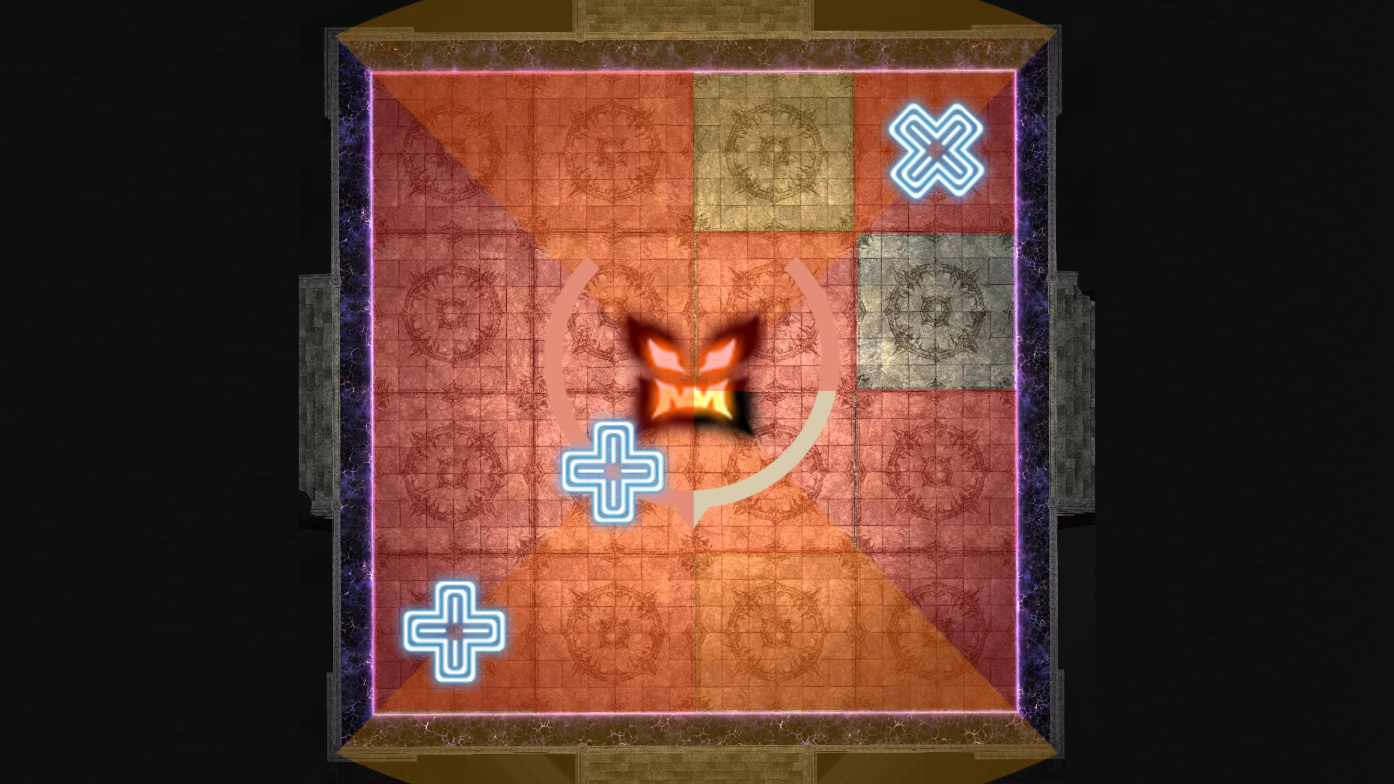
Phase 3 starts off with a Polyominoid Sigma mechanic set. This one is accompanied with Unholy Darkness stack markers on both healers. There will be two safe spots in the middle four tiles across from each other, and players can choose to either stack on the same platform or on opposing platforms. Identify the safe platforms and have one light party go left and one light party go right on both platforms or only one platform.
To identify the safe spots, find the + marker that is not in a corner. It is possible for both to not be in a corner. The tile closest to that one in the middle and the one across from it are safe.
Afterwards, players will have to head to their quadrant. All players will receive Dark Ashes AoEs, and Hegemone will cast Choros Ixou. Spread out with the melee player on the inside and ranged player on the outside on the safe spot of the first hit, and then move into the safe spot of the second hit. Keep in mind that there are other positions possible, such as staying inside the boss's hitbox for minimal movement.
The final mechanic of the phase is the first Cachexia. All players are inflicted with Aetheronecrosis, and either Glossal Resistance Down or Chelic Resistance Down, four of each. The Aetheronecrosis debuff on both sides will have one player with 8 seconds, one player with 12 seconds, one player with 16 seconds, and one player with 20 seconds when receiving the debuff.
Players with Chelic Resistance Down (green wing) need to head to the right side of the arena, while players with Glossal Resistance Down (purple snake) need to head to the left side of the arena. Players should position themselves like so based on the duration of their Aetheronecrosis debuff when it was received, with 20 inside the boss's hitbox, and then 16, 12, and 8 outside of the boss's hitbox from north to south.
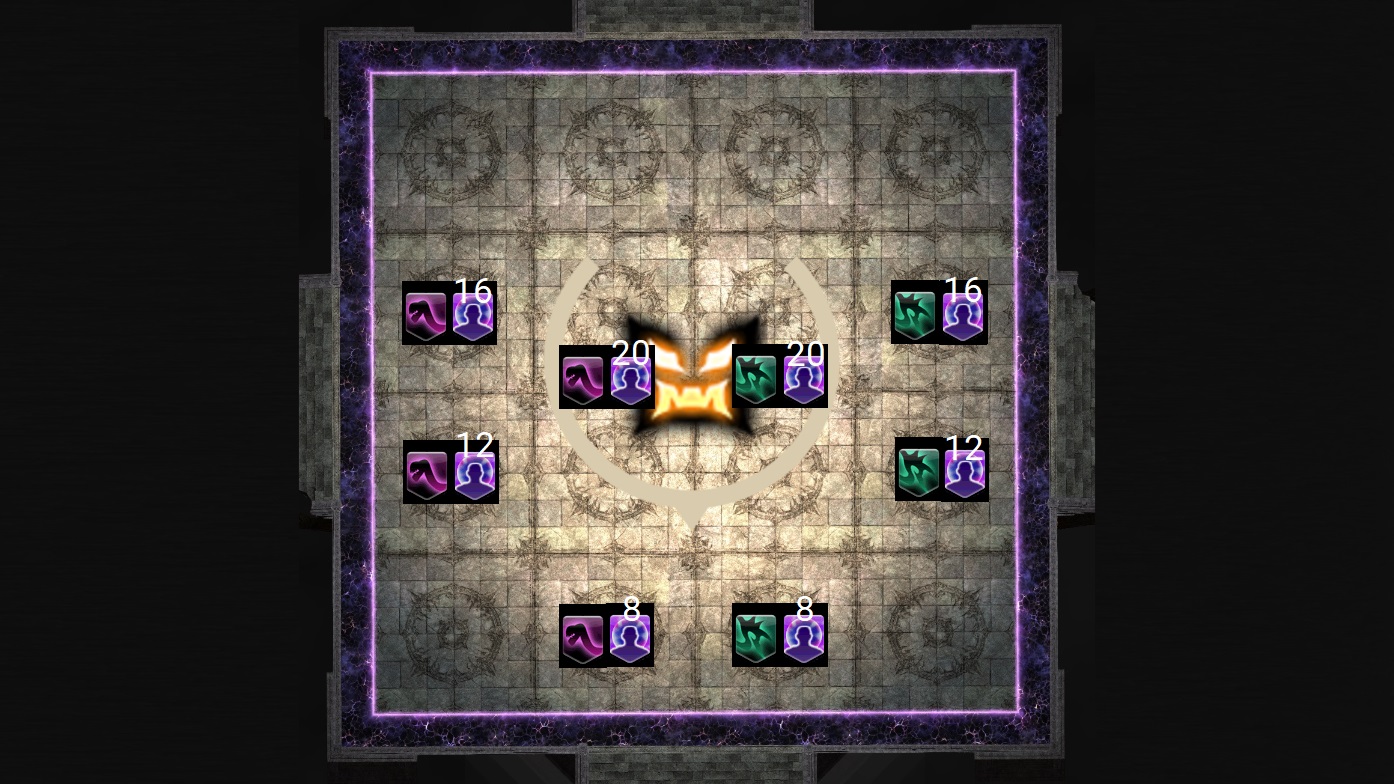
Each player will take damage from Aetheronecrosis in order. Additionally, players will need to soak the damage from Dual Predation by being inside the boss's hitbox in order of 20, 8, 12, and 16. Once initial positions are resolved, this can be simply done by moving into the boss's hitbox in order when the first hit of Dual Predation is finished. After being hit, they will move out, and the next player will come in. This is the same on both sides. The player with 20 will need to head north to avoid clipping other players with the final Aetheronecrosis explosion.
Once all four hits of Dual Predation are finished, the boss will cast Ptera Ixou. Players need to simply go to the opposite side they started on to resolve this mechanic. Make sure players are topped after receiving all the damage in this mechanic set.
After a random tank buster and a cast of Hemitheos's Dark IV, the boss will begin a new set of mechanics.
Phase 4: Dark Sphere
- Dark Sphere: All players receive a large AoE marker which inflicts a Dark Resistance Down debuff, meaning players cannot be hit by more than one.
The phase starts with Aetheric Polyominoid in the centre, with two x markers in the middle tiles. Players will need to spread to their quadrants, with melee close and ranged far. Spread out for Dark Sphere while adhering to the safe spots for the Polyominoid, and keep in mind when Dark Sphere goes off, the x markers will go off and all players will be baiting Dark Dome. After everything goes off, move such that you are in a safe spot from all baited Dark Dome AoEs.
The next Aetherial Exchange and Exchange of Agonies mechanic set is the exact same as the first one in the fight. Identify what role is in the middle and outside, and head to the proper positions while dodging Choros Ixou.
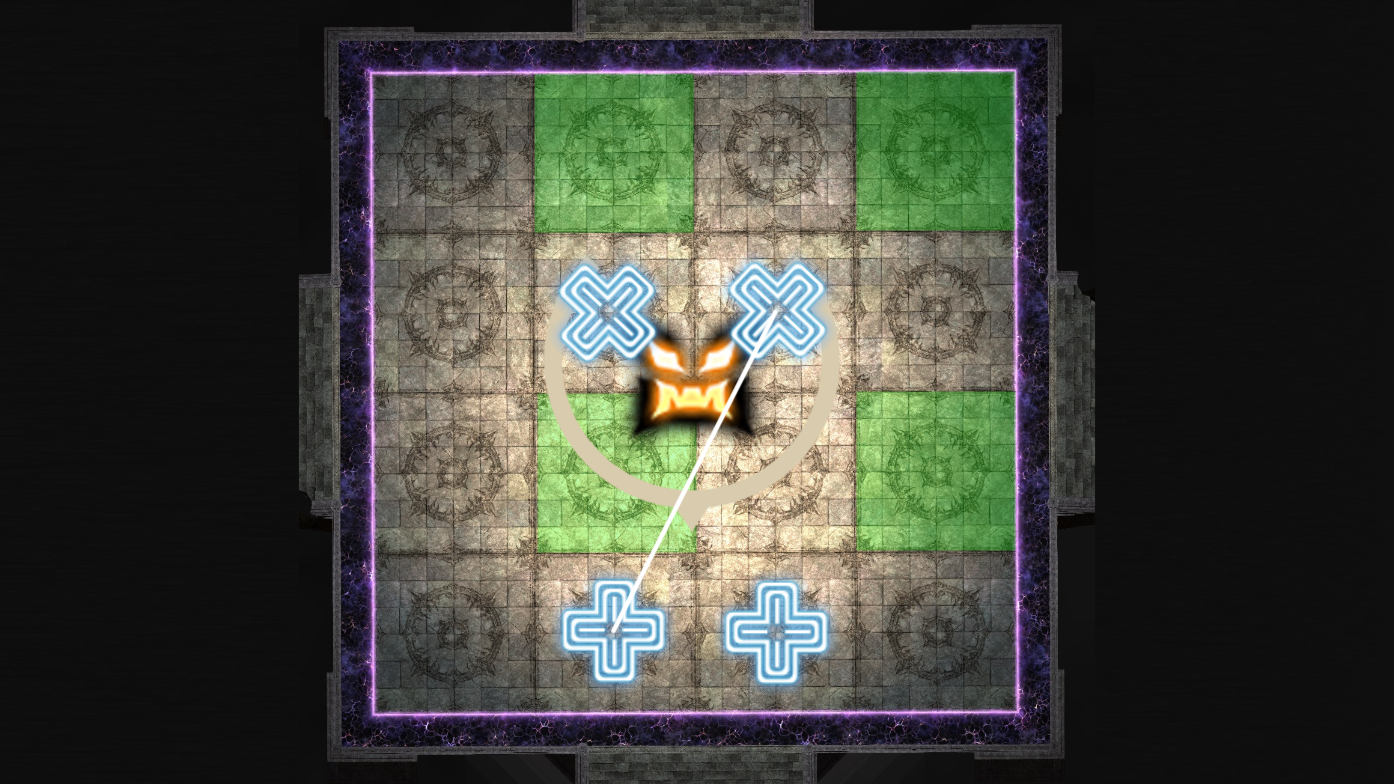
The final mechanic set of this phase has players dodging Choros Ixou while dodging Polyominoid Sigma AoEs for the first hit. To identify the safe spot, go to the opposite side of the + marker in the corner that is not tethered. Look for the x marker that is tethered to a + marker - the tiles adjacent of those are not safe, so the safe tiles will always be the two tiles not in the same column or row of the x marker. Only one of these two safe tiles are safe from the first cleave, so identify it, and then move into the safe spot for the second cleave.
After a random tank buster and a cast of Hemitheos's Dark IV, the boss will begin a new set of mechanics.
Phase 5: Cachexia 2
Hegemone has no new abilities during this phase.
The final mechanic, Cachexia 2, involves almost every mechanic done previously in the fight. It is a combination of the two Cachexia debuffs, Transmission, Polyominoid Sigma, Unholy Darkness, Dark Sphere (on one player), and Ptera Ixou. However, it is fairly easy to solve if everyone knows their positions.
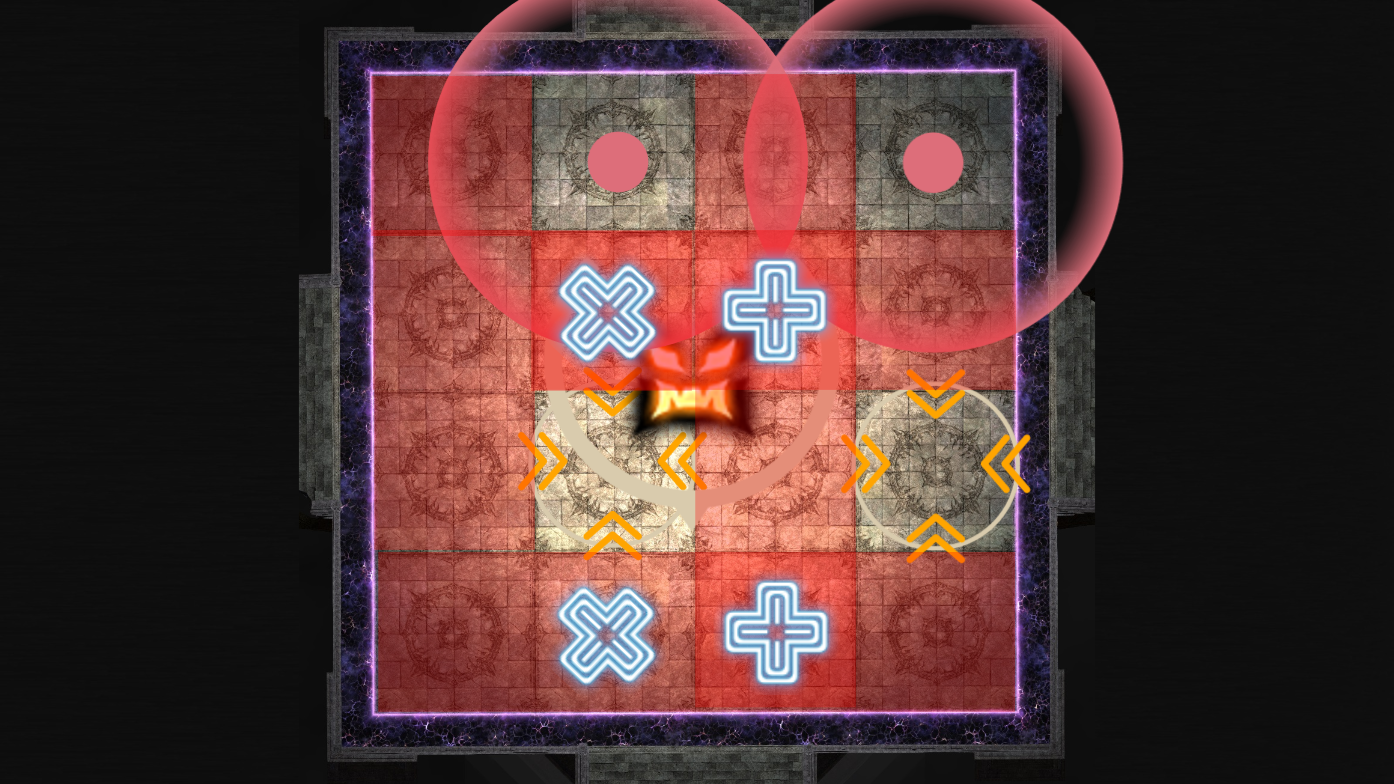
First of all, head to the correct side to resolve Cachexia debuffs and Ptera Ixou: Glossal Resistance Down on the left, and Chelic Resistance Down on the right. Identify the four safe spots for Polyominoid Sigma. Find the + marker in the middle of the arena, or the x marker in the middle tethered to a + marker. The four tiles diagonal of this marker are safe. The four players on each side should head to the southern-most safe tile on each side.
At this point, one player will receive Dark Sphere and another will receive Unholy Darkness on each side as the boss begins to cast Ptera Ixou. The player with the large AoE marker will simply move to the safe tile on the north side of the arena, while all other players will stack together in a line. At this point, resolve your Transmission debuff mechanics - look out of the arena if Glossomorph and inside if Chelomorph. Heavy damage will be taken at this point, so tank LB3 is recommended if you are progressing and do not need the damage.
Next, Hegemone will do an Aetheric Polyominoid mechanic set seen previously. Bait Dark Dome in the middle of the arena, and then move to the safe square.
Finally, Hegemone will do an easy Aetheric Polyominoid set. She will summon two + markers like the first mechanic of the fight, then cast Choros Ixou. Simply dodge the conal cleaves while adhering to the safe columns and rows.
Hegemone will cast one last random tank buster, one last Hemitheos's Dark IV raid-wide, and begin to cast enrage at 10:29. Enrage is a long casted Hemitheos's Dark IV over 10 seconds that will wipe the party at 10:39. Kill the boss before she kills you!
Loot
When Hegemone is defeated, treasure coffers will appear depending on how
many players have already defeated the fight for the week. The first coffer
will contain a ![]() Ultralight Tomestone and an Abyssos Head Gear Coffer,
Abyssos Hand Gear Coffer, or a Abyssos Foot Gear Coffer, while the
second one will contain a Moonshine Shine and another random coffer.
When opened by a player, these coffers contain gear for the job the player is
currently on.
Ultralight Tomestone and an Abyssos Head Gear Coffer,
Abyssos Hand Gear Coffer, or a Abyssos Foot Gear Coffer, while the
second one will contain a Moonshine Shine and another random coffer.
When opened by a player, these coffers contain gear for the job the player is
currently on.
Players who defeat the encounter for the first time during the weekly reset will also receive an Abyssos Mythos II token. Four of these can be traded in for an Asphodelos head, hand, or foot gear of your choosing at a Pandaemonium gear vendor. Additionally, four of these can be traded in for a Moonshine Shine.
Changelog
- 09 Sep. 2022: Guide added.

This guide has been written by Lyra an accomplished raider in FFXIV and has written raid guides for the game for the past five years. You can follow him on Twitter and he streams raids on Twitch.
- New Framer’s Kit With Return Of Breaking Brick Mountains
- Last Chance For THE PRIMALS x Download Festival T-Shirt!
- Team DN Claims #WorldFirst in FFXIV’s Dancing Mad!
- FFXIV Players Blown Away By Store Updates!
- Support #WorldFirst in FFXIV Dancing Mad Ultimate — Now Available!
- Calling FFXIV Fishers To Catch The Rainbow For Charity!
- Last Chance To Enter FFXIV x Jollibee Sweepstakes!
- The Senor Otters Make Their Grand Debut in FFXIV