The Seventh Circle (Savage): Agdistis Raid Guide
This guide aims to prepare players for Abyssos: The Seventh Circle (Savage) by providing detailed explanations of the fight's mechanics, as well as consistent strategies for the purpose of farming.
Introduction to The Seventh Circle (Savage)
The story of Agdistis and her demise is the stuff of legends, and Nemjiji frantically makes notes in the margins of her records as you recount your tale. However, her scrawling makes it difficult to tell whether these are embellishments or scientific musings. Either way, ere your quest is through, parchment and ink may very well become a precious resource in Claudien's workshop.
Unlock Requirements
The Seventh Circle (Savage) can be unlocked at level 90 after completing the Normal difficulty of the Abyssos raid and talking to Nemjiji in Labyrinthos (x8.4, y27.4). It requires a minimum item level of 610 to queue, but this requirement can be bypassed when entering with a full party.
Raid Guide
Agdistis has a hard enrage of 11:13 and has a DPS check of roughly 58,600 raid DPS.
If you would prefer to watch a video that covers the fight, take a look at Hope Productions visual guide.
Party Finder Resources
Raid Preparation
All players should be assigned spread positions for Inviolate Purgation, as well as static Death Harvest spots based on the diagram shown in the section below.
The arena changes from a circle to three circular platforms with interconnecting bridges at times.
Agdistis's Main Abilities
Forbidden Fruit is the main mechanic of the fight. When this is cast, Agdistis will summon seeds with unique markings that spawn into one of three Immature animals: an Immature Io (behemoth), Immature Stymphalide (bird), or Immature Minotaur (minotaur). Each will cast one of two abilities when summoned, are untargetable, and will disappear after they cast their ability.
- Immature Ios will cast Static Path which are line AoEs on one role that inflicts a vulnerability debuff, or Static Moon an AoE on the platform they spawn on.
- Immature Stymphalides will cast either Stymphalian Strike which is a line AoE in the direction they are facing, or Bronze Bellows, which tethers players. They will dash towards the tethered player and knock them back, dealing moderate damage and inflicting a vulnerability debuff.
- Immature Minotaurs will cast either Bullish Swipe, which is a baited conal AoE on the two closest players, or Bullish Slash, which tethers players. They will do a large conal AoE towards that player, and the player must be sufficiently far away to receive non-lethal damage.
Phase 1: Inviolate Bonds and Forbidden Fruit
Agdistis will auto-attack the #1 and #2 in aggro frequently.
- Spark of Life: Heavy raidwide magic damage that inflicts a bleed DoT for 12 seconds.
- Condensed Aero II: A magic tank buster on #1 aggro that must be shared with the other tank, heavily mitigated, or invulned. Inflicts a windburn DoT for 15 seconds.
- Dispersed Aero II: A magic tank buster on #1 and #2 aggro that inflicts a windburn DoT for 15 seconds.
- Blades of Attis: AoEs with arrow indicators appear at the edge of the arena. They will shoot across the arena, Exaflare-style, fanning out until they reach the other side.
- Immortal's Obol: Deals heavy proximity physical damage from the centre of the arena, and changes the arena to the three platforms.
- Hemitheos's Holy III: A stack marker on both healers that inflicts heavy magic damage.
- Bough of Attis: Agdistis slams the front of the arena, and then does a swipe on the side of the arrow indicator afterwards. Alternatively, she will slam the back of the arena, with no swipe afterwards.
- Inviolate Bonds: All players are inflicted with Hemitheos's Aero III, with one role receiving a I mark and the other receiving the II role. One player in each role is inflicted with Hemitheos's Holy III, with one role receiving a I mark and the other receiving the II role. These indicate the order the debuffs will go off. The role with the Aero III must spread, and the role with the Holy III debuff must stack together.
- Roots of Attis: An AoE on a bridge connecting the platforms, destroying it.
- Multicast: Agdistis casts an Aero and Holy spell at the same time.
- Hemitheos's Aero IV: A knockback from the indicator. Knockback prevention abilities do work on this.
- Hemitheos's Holy: AoE markers on all players that deal heavy magic damage and inflicts a vulnerability debuff.
The fight begins with Spark of Life into either Condensed Aero II or Dispersed Aero II. Tanks should make sure to heavily mitigate each tank buster, as the DoT attached to it will be less damaging if strong mitigation is used on the buster. The boss will then cast Blades of Attis into Immortal's Obol. To determine which of the front platforms will be safe, look at the three sets of AoEs and find the one with the larger gap in between. Head to that platform at the edge, and then move up once the arena changes and stay to dodge all the AoEs.
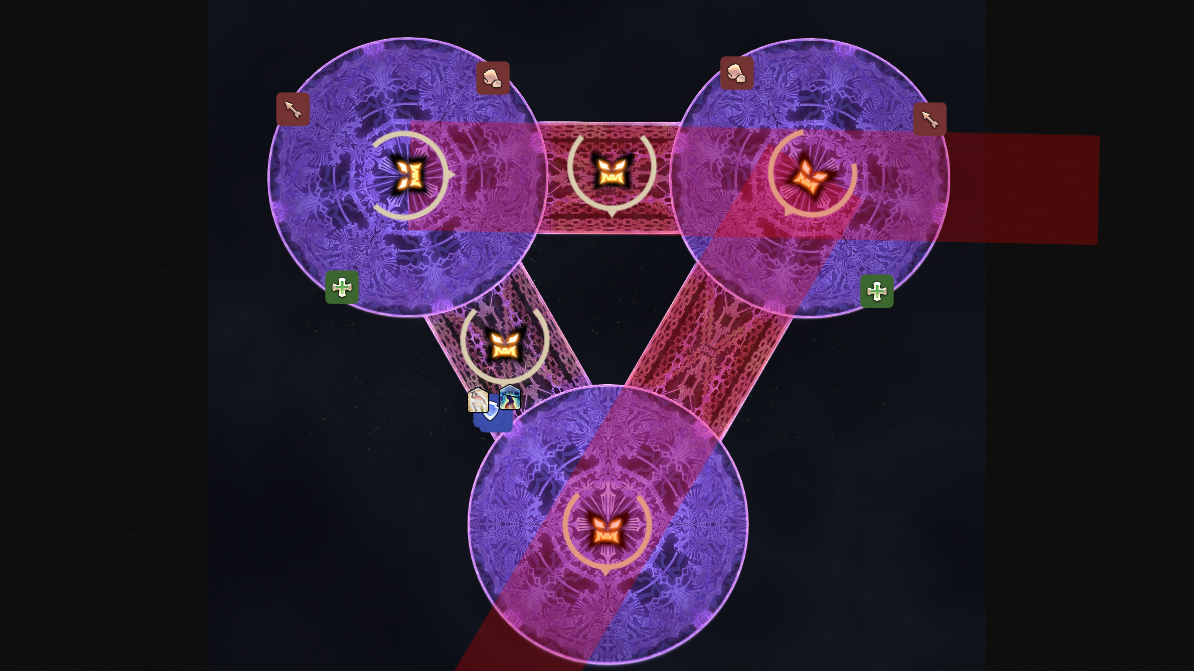
Once the platforms change, bridges connecting the platforms will spawn. The first mechanic set is Forbidden Fruit, with two Stymphalides casting Stymphalian Strike and one Io casting Static Moon. The boss will cast Bough of Attis, slamming the back of the arena, and both healers will get Hemitheos's Holy III. Players will have to identify the front platform that does not have the Behemoth in the centre, then spread out into light parties. One party should be close to the boss, and the other should be far, with both avoiding the AoEs.
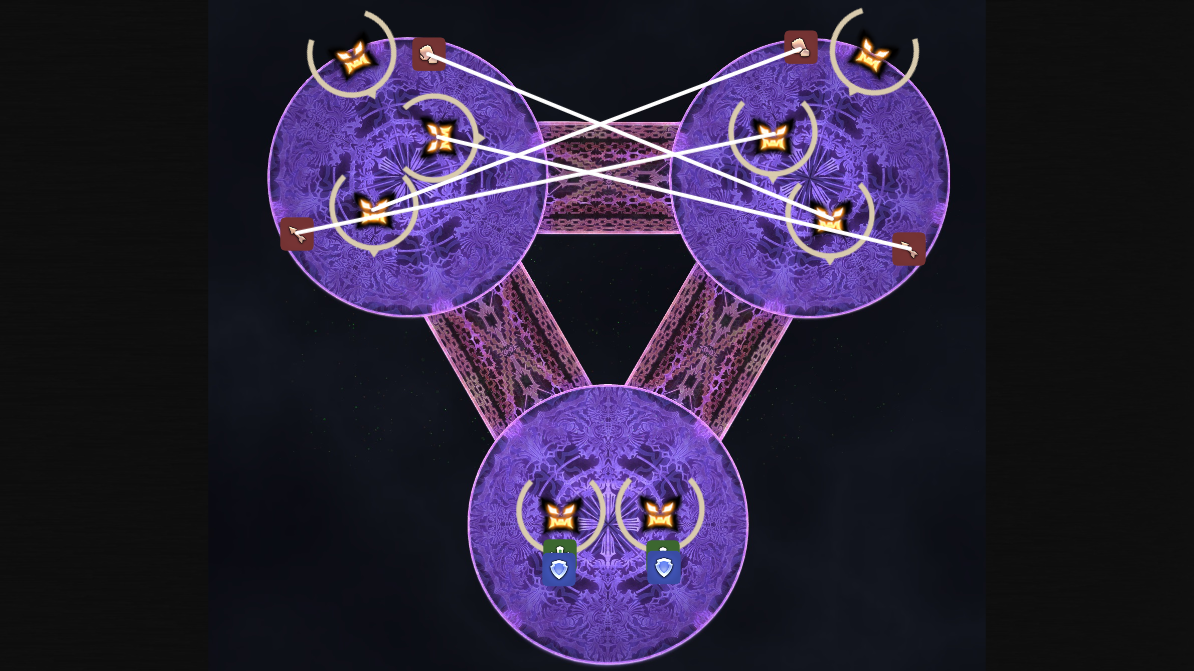
The party should then head to the back platform while the tanks spread out or stack for Condensed Aero II or Dispersed Aero II. Stack on the back platform to heal and mitigate Spark of Life. Agdistis will then cast Inviolate Bonds. One role will be marked with Aero III (I), and the other will be marked with Aero III (II). If players are marked with Aero III (I), they are spreading on the back platform, and if they are marked with Aero III (II), their role will be stacking in the middle of the platform. The boss casts Bough of Attis at the same time, slamming the front platforms.
After the slam goes off, the party needs to heal up and move to the platform that is not being swiped. The role that stacked first will spread on the platform for Aero III, and the role that spread first will stack together in the middle of the platform for Holy III. Head back to the back platform again and heal up, as Roots of Attis will destroy the front bridge.
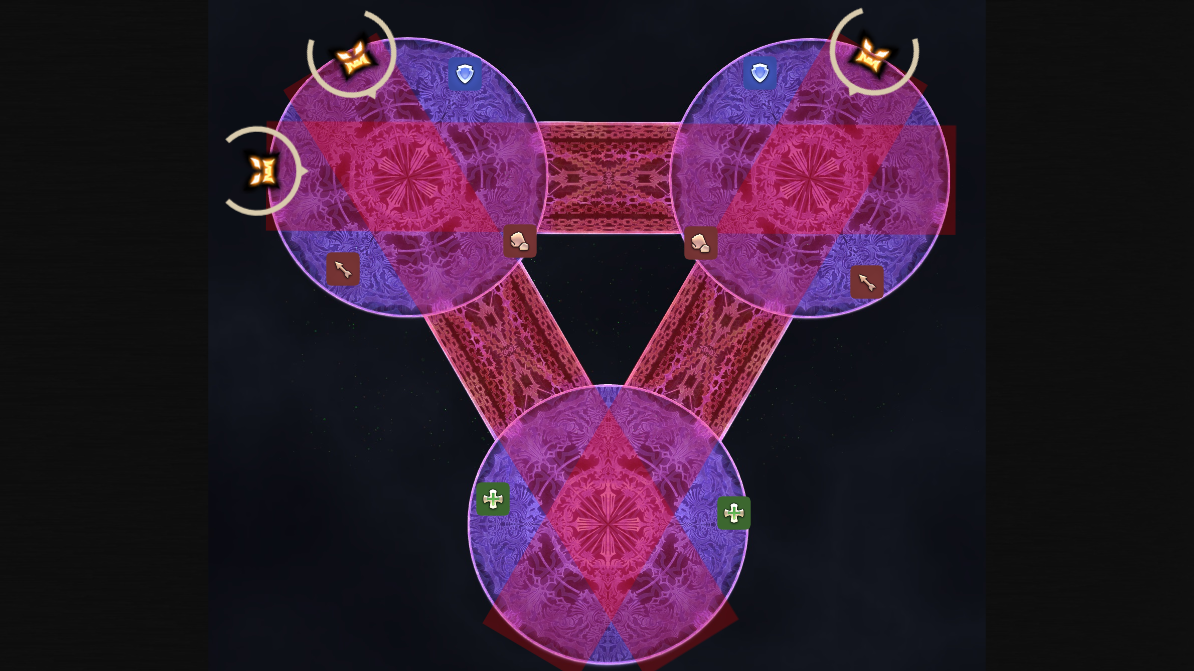
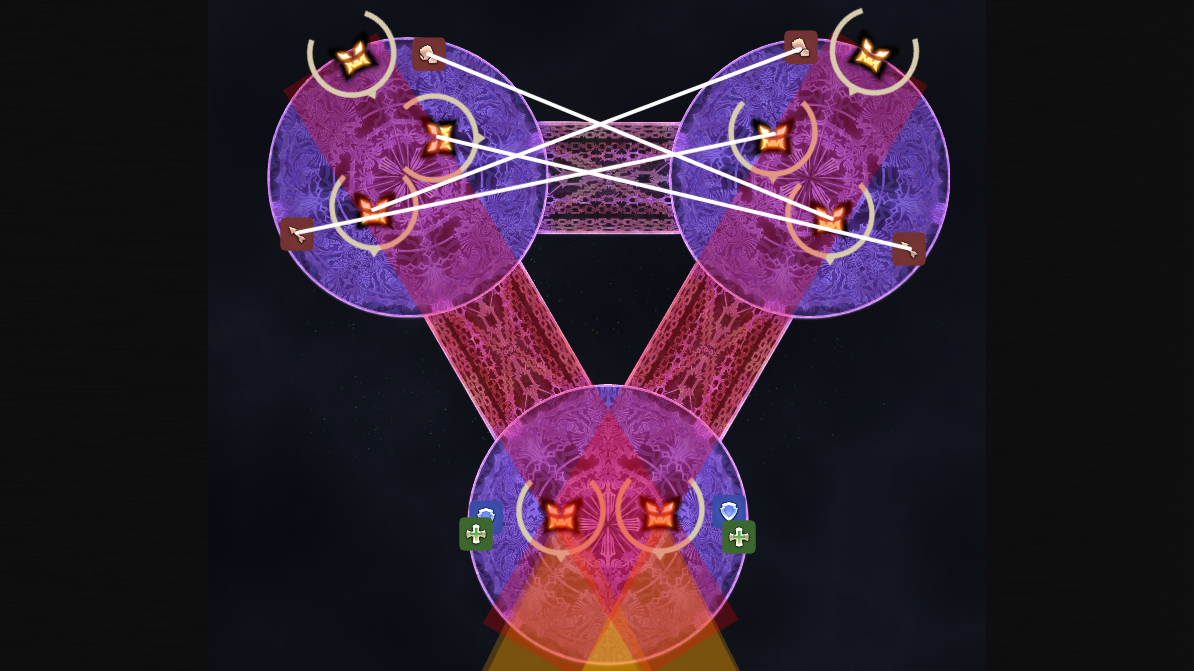
Tanks will need to do another set of Condensed Aero II or Dispersed Aero II before the next set of mechanics. It will consist of a Forbidden Fruit with three Stymphalides casting Stymphalian Strike, and Multicast with Hemitheos's Aero IV and Hemitheos's Holy. Players can spread out on the three platforms where the line AoEs do not hit, and use knockback prevention to avoid being knocked back. This ensures that players do not clip each other with their AoEs. Head back to the back platform to heal up, then split into light parties on the front left and right platforms as Agdistis destroys the remaining bridges with Roots of Attis.
The next Forbidden Fruit will summon Ios on all three platforms that cast Static Moon on the platforms. However, a new bridge will be built in the centre of the arena that connects all three platforms. Stand close to the middle, and once the bridge is built, immediately move into it with your light party to stack for Hemitheos's Holy III and dodge the AoE. Move to the back platform to dodge Bough of Attis, and then move to the correct platform. There is another tank buster here, so tanks should stay in the front platform and stack or spread accordingly.
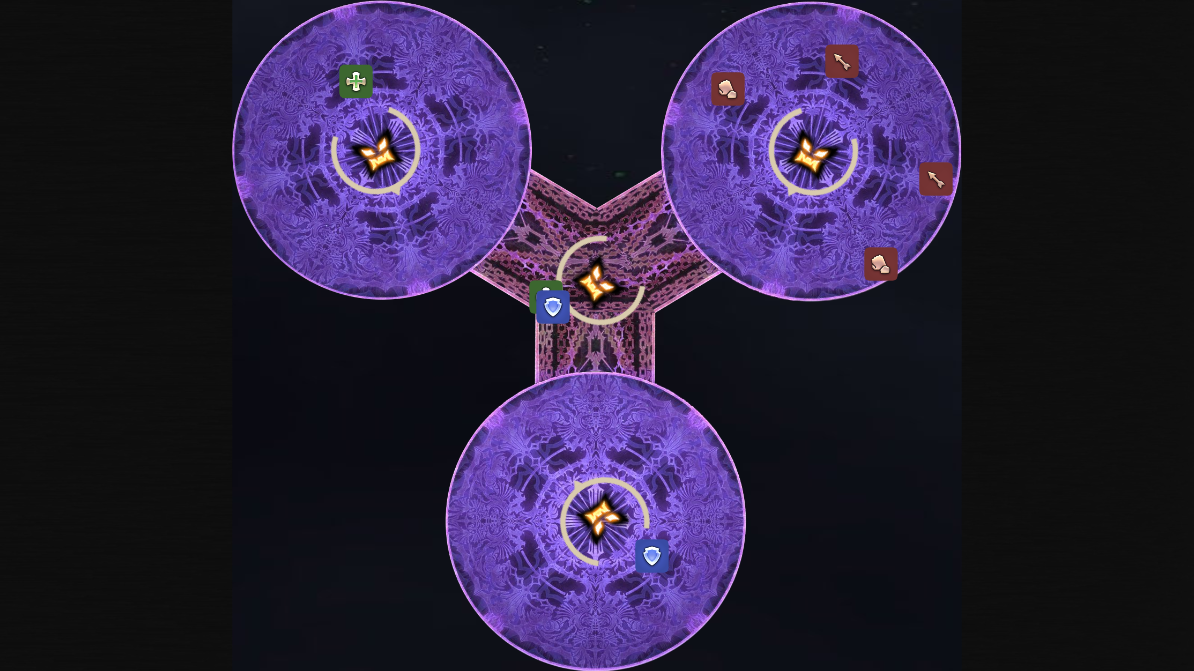
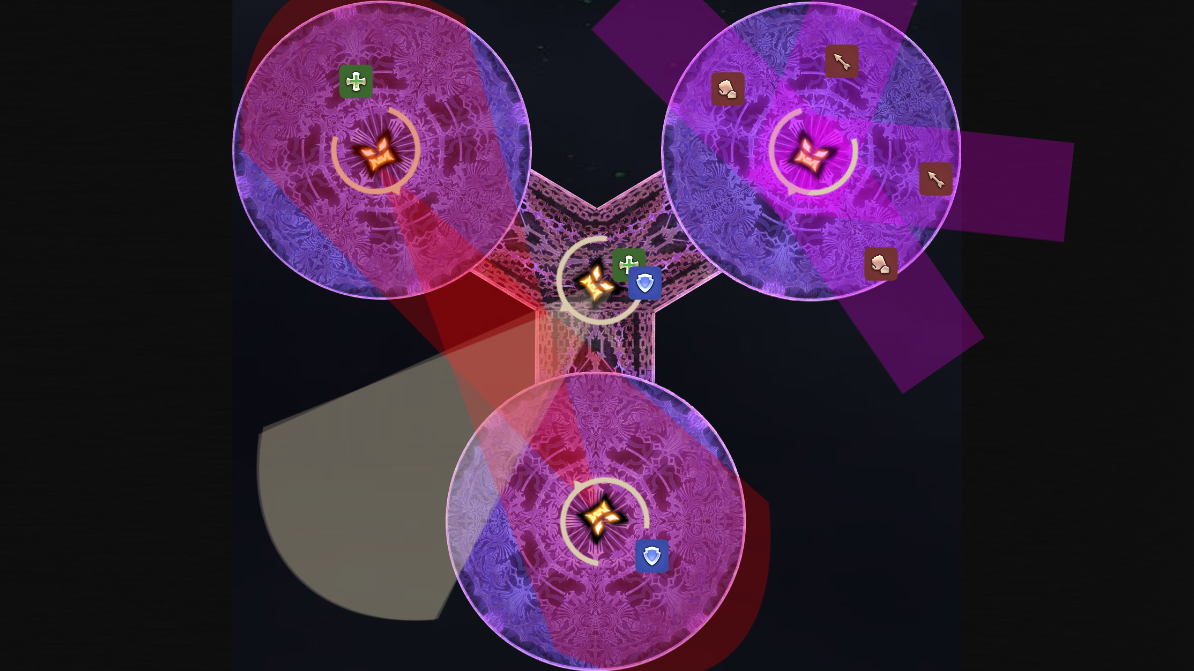
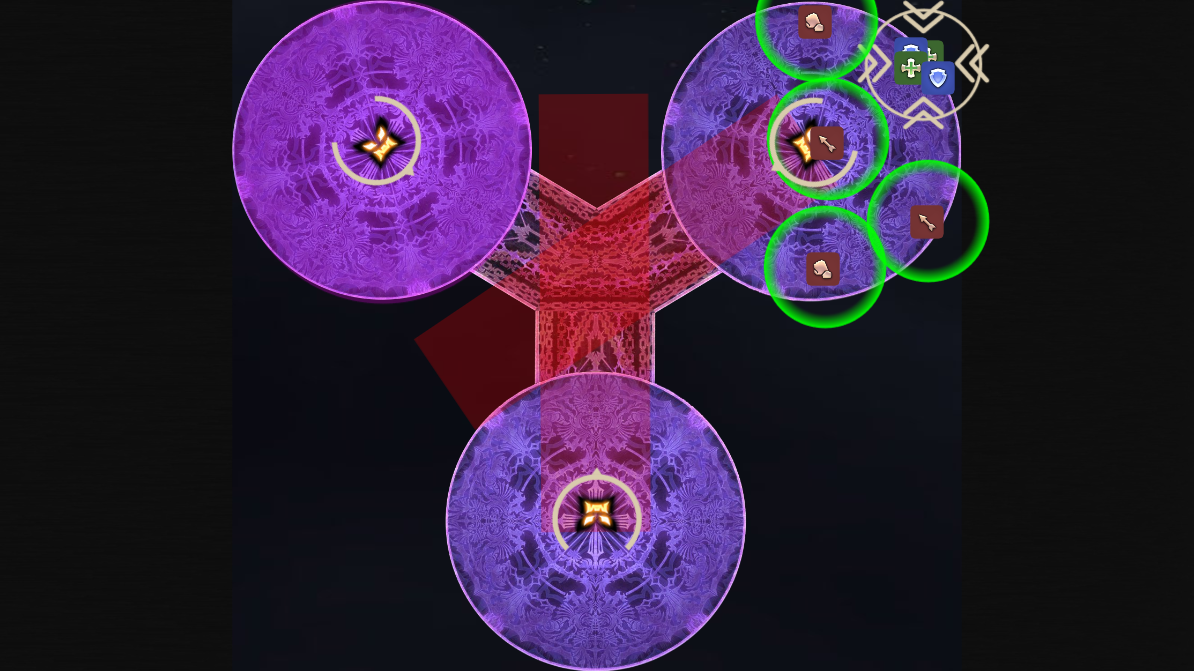
The final mechanic of phase 1 is a Forbidden Fruit mechanic set. Agdistis will summon two Minotaurs and one Behemoth, one on each platform, and one Minotaur on the middle bridge. The Behemoth will tether four players of one role with Static Path, and those players need to head onto the Behemoth platform and spread these out. The Minotaurs on platforms will tether two players of the other role with Bullish Slash. These players need to head to the other Minotaur's platform behind it to stretch the tether out and avoid hitting anyone else with the cleave. Finally, the two unmarked players need to bait Bullish Swipe away from the Behemoth platform, and then move out of the conal AoE. After this mechanic is done, head back to the middle, heal up, and prepare for the transition to phase 2.
Phase 2: Shadow of Attis and Purgation
- Shadow of Attis: Four towers that must be soaked by one player each. Inflicts light damage and a vulnerability debuff.
- Inviolate Purgation: All players are inflicted with two instances of Hemitheos's Aero III marked from I to IV, with each role receiving the same mark. Four players are additionally inflicted with Hemitheos's Holy III, two from each role. These will go off in the order indicated.
- Light of Life: Deals heavy raidwide magic damage.
- Hemitheos's Glare: Baited ground AoE markers on all players. These will follow the player and explode twice in the direction the player is moving.
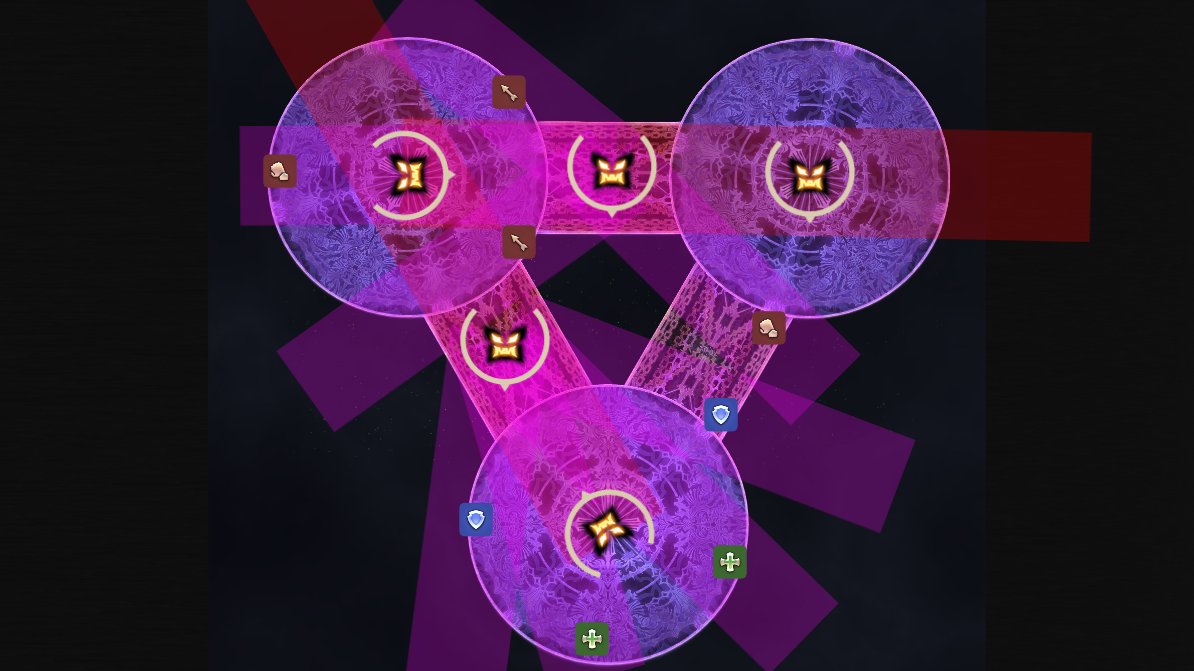
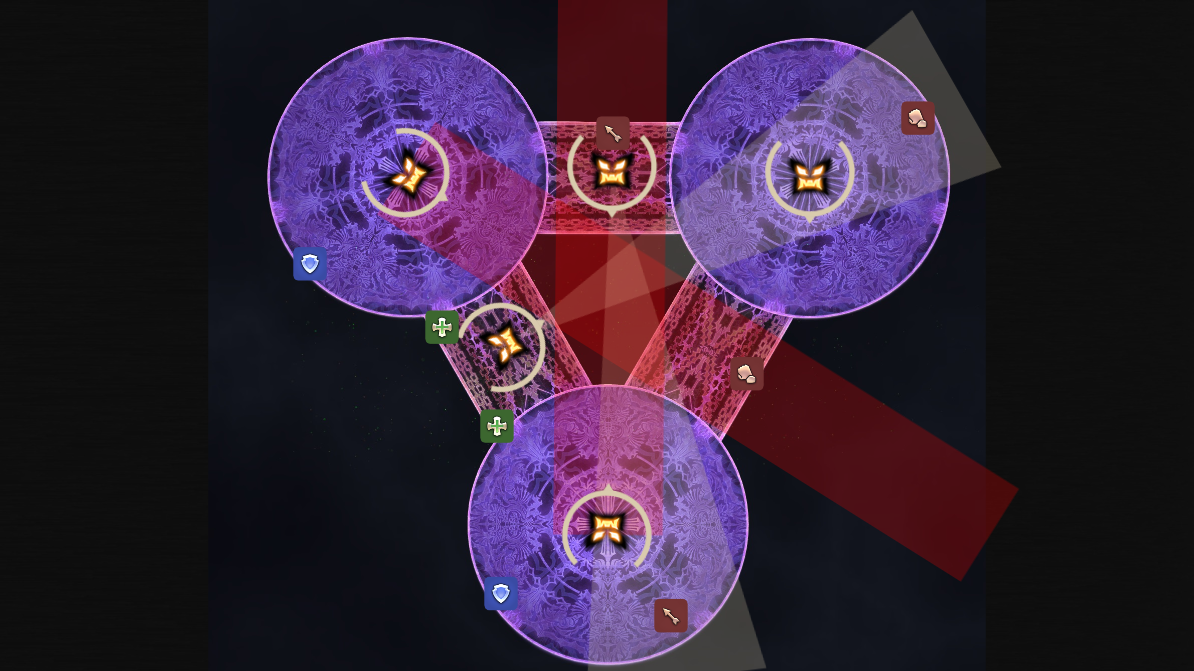
Transitioning back to the singular platform, the boss will cast Blades of Attis and Multicast. This Multicast consists of a Hemitheos's Aero IV from the centre of the arena and Hemitheos's Holy III on both healers. There are two ways to handle this and both work: either get knocked back into the first AoEs northwest and northeast in light parties and stay there, or get knocked back between the AoEs southeast and southwest in light parties and then move northeast and northwest to dodge the AoEs.
Next, the tanks should head close to the centre of the arena and take care of Condensed Aero II or Dispersed Aero II. This is the final tank buster of the fight, so tanks are free to use all the mitigation they have. The party should then split into light parties on the left and right side of the arena. Agdistis will summon four Stymphalides with Forbidden Fruit and four Shadow of Attis towers around the arena. The birds will tether onto four players in one role and do Bronze Bellows on them. The other role needs to spread out and take the towers while avoiding the path of the bird charges. It may be easier to extend the tether to show other players the path of the bird and press knockback prevention abilities.
The entire party should quickly head to the northwest to stack for Spark of Life and heal up. Next is Immortal's Obol, so having all players on the same platform will make healing and mitigation much easier. Once players get knocked up, head to the middle to prepare for Inviolate Purgation.
When Inviolate Purgation is cast, all players will be marked with two Hemitheos's Aero III debuffs. One role will receive two of the same mark from I to IV, and one role will receive two of the other mark from I to IV. For each mark that one role does not have an Aero III debuff, one player of that role will receive a Hemitheos's Holy III with that mark. The marks will indicate what order the debuffs will go off. The boss will also cast Forbidden Fruit, summoning two Stymphalides and one Behemoth. The Stymphalides will cast Stymphalide Strike, while the Behemoth will cast Static Moon.
The easiest way to solve this mechanic is to have the entire party move on one platform back and forth. First, identify the front platform that does not have a Behemoth. The party will be starting there. The role with the I marked Hemitheos's Aero III will be spreading on the platform, and the role that is not spreading will be stacking together.
During this mechanic, the Aero III debuffs will drop large AoEs, and the Holy III stack debuff will drop a large donut AoE. This will render the current platform unusable for the next stack and spread. Therefore, the party needs to heal up while moving to the other platform in the front. At this point, identify whether your role has the next Aero III marked or not. If you have the next Aero III, you will spread on the platform. If you do not, you will stack.
This will repeat four times, as there are four marks. After the II mark and IV mark, the boss will cast Light of Life, dealing massive damage to all players. Therefore, the raid must mitigate and heal up again after the second and fourth set of AoEs.
After Purgation has finished, stay in the middle for the next set of mechanics. Agdistis will cast Forbidden Fruit yet again, and all players need to head to the platform that has no fruit on it all the way to the edge. She will then cast Roots of Attis, destroying the bridges in the middle. Once the Stymphalides spawn, players need to identify the platform that they are not casting Stymphalide Strike towards. Once the AoEs from Hemitheos's Glare appears, all players must head to the edge of the platform they are on close to the platform they are heading to. A bridge will be spawned, and players need to quickly head towards the other platform to dodge the AoEs. Prepare for the final phase!
Phase 3: Harvest
Agdistis has three new abilities during this phase. This phase consists of "trio"-style mechanics with Forbidden Fruit: Famine's Harvest, Death's Harvest, and War's Harvest.
The first mechanic set is Famine's Harvest. Agdistis will spawn six Minotaurs, two on each platform. She will also summon two Stymphalides at the edge of two platforms. The Stymphalides will cast Stymphalide Strike. The Minotaurs on the platform with the Stymphalides will cast Bullish Slash on one role, on one player each. The Minotaurs on the platform without any birds will cast Bullish Swipe, which must be baited towards the outside of the arena away from the other platforms.
To do this, start on the platform with two fruits. The players who are not tethered should go with their light party's player who does not have a tether as well. This will ensure two people are baiting one minotaur each, with an easy left/right spread. The tethered players need to head to the opposing platform and cross their tethers to ensure that they are stretched. Additionally, all players need to dodge the line AoEs from the birds, so the baiters should move to the side after they bait the conal AoE.
Return to the back platform for heals. The second mechanic set is Death's Harvest. Agdistis will spawn three Ios (Behemoths) and two Stymphalides. Two Behemoths will be on bridges and cast Static Path, with one Behemoth tethering to all four players of one role and the other one tethering the other role. The Stymphalides will cast Stymphalide Strike in the direction they are facing. The final Behemoth will cast Static Moon.
There are two ways to do this. The first does not involve tank invulns and players must adjust clockwise or counterclockwise based on the orientation of how the fruits spawn. Players of one role will spread out on one platform, spreading out the tethers to ensure no one is clipped and no one is standing in the path of a bird line AoE. Two players, one of each role, will be assigned to stand on the bridge that is not in the path of a bird line AoE. They will stand on opposite sides, ensuring that their tether does not cross.
The other solution is to have fixed spots and have tanks stack together and use their tank invulns. This allows all players to immediately know where they are going. Angle yourself so that the platform with the behemoth is "south", then use these positions to be 100% safe. Both tanks need to stand on the unused platform and use tank invulns on the tether.
Return to the back platform for heals. The final mechanic set is War's Harvest. This mechanic requires all players to position correctly based on what tether they receive. Agdistis will spawn one Io, two Stymphalides, and two Minotaurs. The Ios will cast Static Path onto all four players of one role. The Stymphalides will cast Bronze Bellows on two players of the other role, and the Minotaurs will cast Bullish Slash on the final two players of the other role.
To do this, the four players tethered to the Behemoth will head opposite of the Behemoth and spread out. The ranged will stay on the bridge behind the Minotaur on the bridge, and the melee will head to the platforms near the Stymphalides. The players tethered to the Stymphalide will head to the bridge opposite of their Stymphalide and use their knockback prevention ability. Finally, the players tethered to the Minotaur will head to the wall to the platform opposite of the their Minotaur.
Once these trio mechanics are done, return to the back platform for heals. Agdistis will cast Spark of Life, and then Bough of Attis on the front platforms and Hemitheos's Holy III at the same time. Stack left and right in your light parties respectively, then head to the front platform that is not being swiped. Use all remaining mitigation and healing tools on the two Spark of Lifes that follow, and then beat the boss before she finishes casting enrage, Light of Life!
Loot
When Agdistis is defeated, treasure coffers will appear depending on how many players have already defeated the fight for the week. The first coffer will contain a Abyssos Leg Gear Coffer, while the second one will contain a Moonshine Twine, Moonshine Brine, and one of a Abyssos Head Gear Coffer, Abyssos Hand Gear Coffer, or Abyssos Foot Gear Coffer. When opened by a player, these coffers contain gear for the job the player is currently on.
Players who defeat the encounter for the first time during the weekly reset will also receive an Abyssos Mythos III token. Eight of these can be traded in for an Abyssos leg gear of your choosing at a Pandaemonium gear vendor. Four of these can be traded in for a Moonshine Twine or a Moonshine Brine.
Changelog
- 12 Sep. 2022: Guide added.
More FFXIV Content

This guide has been written by Lyra an accomplished raider in FFXIV and has written raid guides for the game for the past five years. You can follow him on Twitter and he streams raids on Twitch.
- Last Chance For THE PRIMALS x Download Festival T-Shirt!
- Team DN Claims #WorldFirst in FFXIV’s Dancing Mad!
- FFXIV Players Blown Away By Store Updates!
- Support #WorldFirst in FFXIV Dancing Mad Ultimate — Now Available!
- Calling FFXIV Fishers To Catch The Rainbow For Charity!
- Last Chance To Enter FFXIV x Jollibee Sweepstakes!
- The Senor Otters Make Their Grand Debut in FFXIV
- Don’t Miss the FFXIV x FFXI Collab Event Ending Soon!