The Black Morass Dungeon Guide
The recommended level range to run this dungeon on Normal is 68-70. Heroic
mode will require Level 70 and the ![]() Key of Time to enter.
Key of Time to enter.
The Black Morass will take approximately 15-25 minutes to complete with an average group. This dungeon is commonly abbreviated as "BM" or "dark portal". This dungeon is unique, as players deal with attacking waves of enemies instead of a normal "walkthrough" dungeon.
In this guide, we will cover dungeon quests, the layout of the dungeon, an overview of trash mobs, tactics for each boss, loot that can be obtained, and ideal group compositions.
The Black Morass Quests
Before heading into The Black Morass, we advise you to get all the dungeon quests related to it. To make this process easier, we have written a separate guide for the quests and their chains.
The Black Morass Entrance Location
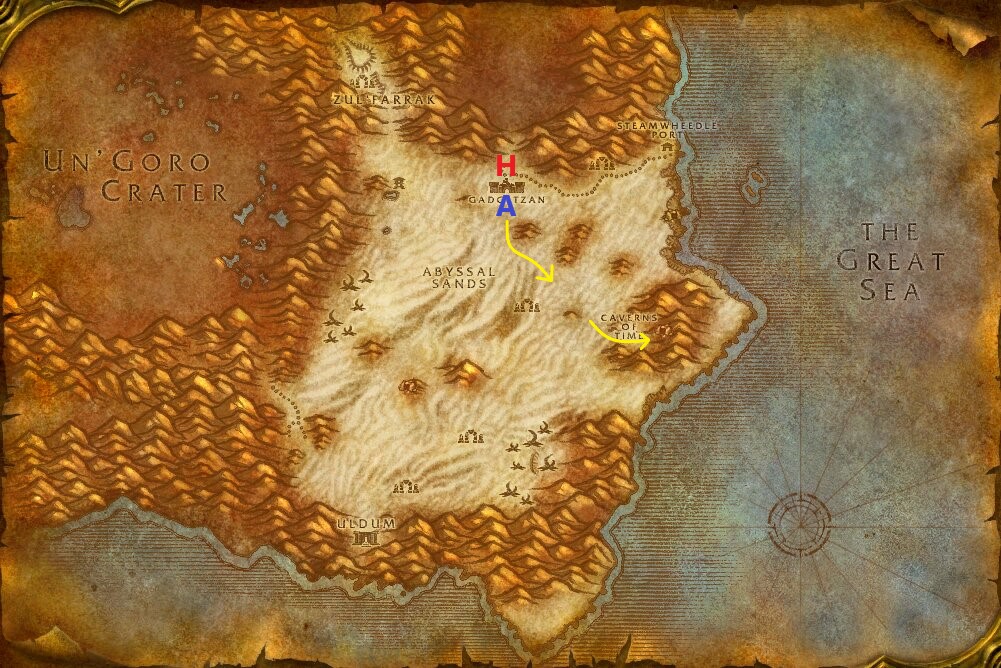
The fastest way to get to the Caverns of Time for both Alliance and Horde will be to fly to Tanaris. From there, follow the image shown above until you find Steward of Time, who will fly you down into the caverns.
When you land, follow the picture below to find the dungeon.
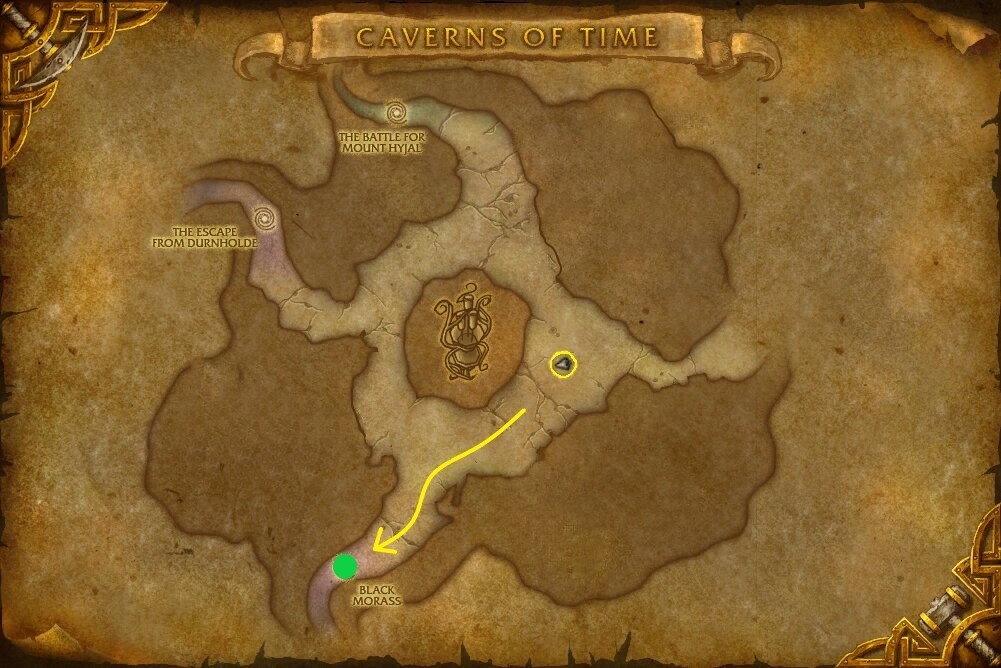
Layout of The Black Morass

The Black Morass is a unique dungeon in its layout. Instead of the standard dungeon where a group will follow a path and fight their way through, The Black Morass has the player standing in a centralized location defending Medivh while he opens the Dark Portal by fighting off waves of incoming enemies.
In the picture shown above, players will start in the north side of the dungeon and head towards the south, fighting Sable Jaguar, Darkwater Crocolisk and Blackfang Tarantula along the way. These are weak creatures that can be killed quickly. When reaching the area marked with an "x", the dungeon encounter will begin.
Periodically, a portal will open at one of the four locations shown in the picture, spawning in a Rift Lord or Rift Keeper and waves of non-elites until the main mob is dead. Shortly after slaying the main rift mob, the portal will close and a new portal will open at one of the other locations. Every 6th wave will spawn a boss instead of a rift mob. This process will repeat for 18 waves at which point the dungeon is cleared.
Sa'at can also give you a ![]() Chrono-beacon, which you can use
to summon a Time Keeper and aid you on a portal. These beacons only
work on the trash; bosses will despawn them.
Chrono-beacon, which you can use
to summon a Time Keeper and aid you on a portal. These beacons only
work on the trash; bosses will despawn them.
Reputation from The Black Morass
Killing mobs in this instance grants Keepers of Time reputation.
Normal Difficulty
- Rift mobs grant 50 reputation each.
- Each boss grants 120 reputation.
- A Normal run of The Black Morass will give around 1,100 reputation.
- Reputation gains in Normal go all the way up to Exalted.
Heroic Difficulty
- Rift mobs grant 65 reputation each.
- Each boss grants 250 reputation.
- A Heroic run of The Black Morass will give around 1,750 reputation.
Overview of The Black Morass Trash Mobs
In this section, we will briefly go over each of the trash mobs that pose a threat to you in this dungeon.
Non-Elites
While the Rift Keeper or Rift Lord is alive, non-elite mobs will pour in periodically to join in the fight. Below is a quick rundown of their abilities.
If any of these mobs get past your party, they will start to damage Medivh's shield, eventually stopping his cast and essentially "wiping" your group.
Infinite Assassin
Infinite Vanquisher
Infinite Chronomancer
Rift Keeper
There are two versions of this mob, a Mage-type and a Warlock-type.
Mage Version
Warlock Version
These are very dangerous in either version as they both have very strong
spells. Make sure to focus them down and interrupt ![]() Shadow Bolt Volley
whenever possible. Dispel any
Shadow Bolt Volley
whenever possible. Dispel any ![]() Fear or
Fear or ![]() Curse of Vulnerability,
if possible.
Curse of Vulnerability,
if possible.
The Mage version of these need to be tanked away from the range players to
prevent ![]() Blast Wave from hitting more people than needed.
Blast Wave from hitting more people than needed.
![]() Pyroblast does very high damage, so make sure to keep the tank
topped up before these land.
Pyroblast does very high damage, so make sure to keep the tank
topped up before these land.
Rift Lord
Make sure to tank these away from the range players to prevent
![]() Thunderclap from hitting more people than needed.
Thunderclap from hitting more people than needed.
Overview of Bosses in The Black Morass
Here we will give you a full rundown of what you can expect from each of the bosses found here on both Normal and Heroic difficulties as well as the items they drop.
Chrono Lord Deja
 Arcane Blast
 Arcane Discharge
 Time Lapse
 Attraction — Heroic only.
This fight has a lot of highly-damaging abilities, especially on the tank.
If you have any major cooldowns such as ![]() Heroism /
Heroism / ![]() Bloodlust,
this is the fight you want to use them on. You should focus on killing the boss as
quickly as possible, ignoring the adds until afterwards. Tanks should try to place
their back against an object to avoid the knockback from
Bloodlust,
this is the fight you want to use them on. You should focus on killing the boss as
quickly as possible, ignoring the adds until afterwards. Tanks should try to place
their back against an object to avoid the knockback from ![]() Arcane Blast.
Arcane Blast.
Loot from Normal
| Item | Required Level | Item Type | Slot |
|---|---|---|---|
| 68 | Head | ||
| 68 | Cloth | Shoulder | |
| 68 | Leather | Shoulder | |
| 68 | Cloak | Back | |
| 68 | Accessory | Finger | |
| 68 | Bow | Ranged | |
| 340 | Leatherworking Pattern | Misc |
Loot from Heroic
As with most endgame Level 68+ dungeons, Rare drops are the same between Normal and Heroic difficulties. In this section, we will list the items specific to Heroic mode only.
| Item | Required Level | Item Type | Slot |
|---|---|---|---|
| BoP | Gem | Misc | |
| BoP | Gem | Misc | |
| BoP | Gem | Misc |
Temporus
 Mortal Wound
 Hasten
 Wing Buffet
 Spell Reflection — Heroic only
Tank the boss in a position where you will not get knocked back far. Remove
the ![]() Hasten whenever possible with spells such as
Hasten whenever possible with spells such as ![]() Shield Slam
or
Shield Slam
or ![]() Spellsteal. Casters need to avoid dealing damage to themselves
during the
Spellsteal. Casters need to avoid dealing damage to themselves
during the ![]() Spell Reflection. Other than that, quickly kill the boss
before
Spell Reflection. Other than that, quickly kill the boss
before ![]() Mortal Wound stacks too high on the tank and they become
unable to be healed.
Mortal Wound stacks too high on the tank and they become
unable to be healed.
Loot from Normal
| Item | Required Level | Item Type | Slot |
|---|---|---|---|
| 68 | Chest | ||
| 68 | Cloth | Legs | |
| 68 | Accessory | Trinket | |
| 68 | One-Handed Sword | Weapon | |
| 68 | Staff | Weapon | |
| 68 | Off-Hand Weapon | Off-Hand |
Loot from Heroic
| Item | Required Level | Item Type | Slot |
|---|---|---|---|
| BoP | Gem | Misc | |
| BoP | Gem | Misc | |
| BoP | Gem | Misc |
Aeonus
Make sure to face Aeonus away from the group to prevent the
![]() Sand Breath and
Sand Breath and ![]() Cleave from hitting players other than
the tank. If you have a Hunter, make sure to remove
Cleave from hitting players other than
the tank. If you have a Hunter, make sure to remove ![]() Frenzy with
Frenzy with
![]() Tranquilizing Shot.
Tranquilizing Shot.
Aeonus also constantly stuns all players with ![]() Time Stop
during the fight. Keep the tank fully healed before this goes out as this can be
very deadly if paired with other abilities, especially the
Time Stop
during the fight. Keep the tank fully healed before this goes out as this can be
very deadly if paired with other abilities, especially the ![]() Frenzy
and
Frenzy
and ![]() Sand Breath.
Sand Breath.
Loot from Normal
| Item | Required Level | Item Type | Slot |
|---|---|---|---|
| 70 | Cloth | Head | |
| 70 | Leather | Head | |
| 70 | Head | ||
| 70 | Plate | Shoulder | |
| 70 | Wrist | ||
| 70 | Leather | Hands | |
| 70 | Leather | Legs | |
| 70 | Plate | Legs | |
| 70 | Plate | Legs | |
| 70 | Accessory | Trinket | |
| 70 | One-Handed Sword | Weapon | |
| 70 | Staff | Weapon |
Loot from Heroic
| Item | Required Level | Item Type | Slot |
|---|---|---|---|
| 70 | Leather | Waist | |
| 70 | Plate | Waist | |
| 70 | Cloth | Legs | |
| 70 | Two-Handed Sword | Weapon | |
| BoP | Gem | Misc | |
| BoP | Gem | Misc | |
| BoP | Gem | Misc |
Recommended Group Composition for The Black Morass
The Black Morass is very straightforward, only having to fight one difficult mob at a time. There are no pulls in this dungeon that require high AoE. High single-target DPS is recommended to quickly deal with the Rift Lords and Rift Keepers.
A Shaman is strong for any Black Morass group. They offer
![]() Tremor Totem,
Tremor Totem, ![]() Grounding Totem and
Grounding Totem and
![]() Bloodlust /
Bloodlust / ![]() Heroism to handle most of the
difficult abilities and bosses found in this dungeon. As this dungeon has many
non-elite adds, Warrior DPS pulls ahead with their consistent
cleave damage and no downtime.
Heroism to handle most of the
difficult abilities and bosses found in this dungeon. As this dungeon has many
non-elite adds, Warrior DPS pulls ahead with their consistent
cleave damage and no downtime.
Changelog
- 29 Jun. 2022: Corrected an incorrect boss ability.
- 26 May 2021: Guide added.
This guide has been written by Abide, TBC veteran for nearly a decade. Abide is a Warrior tank and multi-class expert currently playing on Faerlina as Horde. You can find him in the the Icy Veins Discord. You can also see him live on Twitch.