Hans'gar and Franzok Detailed Strategy Guide (Heroic+Mythic Modes included)
Table of Contents
Introduction
This guide is intended to provide a comprehensive description of the encounter with Hans'gar and Franzok in Blackrock Foundry. It is targeted at anyone who desires to understand the fight mechanics.
This guide is updated for World of Warcraft WoD 6.1.2.
The encounter against Hans'gar and Franzok is the first fight in The Black Forge wing of the Blackrock Foundry raid instance. This is a movement-heavy fight in which the environment plays a large role. The fight is particularly difficult for healers, who will have to manage a lot of unavoidable damage.
General Information
Normal, Heroic, and Mythic Difficulty
This main part of this guide covers both the Normal and Heroic versions of the encounter, as far as mechanics and general strategy is concerned. The only difference between these two modes is found in the tuning, with Heroic being more difficult.
When we speak of extreme situations (such as the difficulty of a soft enrage timer, or damage from a certain source being too high to survive), we mostly refer to Heroic mode.
In addition to this, we have a specific Mythic mode section, where we present all the differences between Normal/Heroic and Mythic, as well as the strategy to defeat the Mythic encounter.
Enrage Timer
We do not currently know what the hard enrage timer for this encounter is. There do not seem to be any soft enrage mechanics in the fight.
Summing Things Up
In this section, we will very briefly summarise what the players belonging to each of the three roles have to do during this fight. This is by no means meant to provide sufficient information to master the encounter, and it is only supposed to give you a very rough idea of what to watch out for.
Tanks
- Each tank should pick up one of the bosses. When a tank's stacks of
 Shattered Vertebrae get too high, perform a tank switch.
 - Tank the two bosses close to each other to allow for cleave damage.
- When
 Body Slam is being cast, move away from the melee group so
that melee players do not get debuffed by Shattered Vertebrae.
Body Slam is being cast, move away from the melee group so
that melee players do not get debuffed by Shattered Vertebrae. - Use a defensive cooldown for each
 Crippling Suplex.
Healers
- Beware of the unavoidable damage in the fight.
- raid-wide damage from
 Aftershock;
 - tank damage from Crippling Suplex;
- damage on random raid members from
 Skullcracker.
- raid-wide damage from
- Beware of the increased damage that the bosses will deal as their health
gets lower, due to
 Pumped Up.
 - In Mythic mode, beware of the extremely high amount of raid damage
towards the end of the
 Smart Stampers phases (particularly if your raid
is performing a strategy where all players stack together in a single
group).
Smart Stampers phases (particularly if your raid
is performing a strategy where all players stack together in a single
group).
DPS
- If both bosses are in the fight, use cleave damage or multi-DoTs, if this results in a DPS increase for you, as the bosses share health.
Everyone
- When a player is targeted by Body Slam, move away from them to
avoid being debuffed by Shattered Vertebrae. If you are targeted
yourself, move away from other players.
- When the conveyor belts become active, make sure to avoid the
 Searing Plates or the metal presses from
  Pulverized.
 - Stay away from the ends of the conveyor belts, since they damage you
through
 Scorching Burns.
 - In Mythic mode, make sure to move together as a unit (or split into
two groups, depending on your strategy) during the Smart Stampers
phases, and avoid being hit by any of the presses.
Overview of the Fight
The encounter against Hans'gar and Franzok is a single-phase fight during which you fight two bosses who share health. The encounter takes place on 5 conveyor belts that sometimes move, and the way that the environment works greatly affects your raid's strategy.
Throughout the fight, one of the two bosses will sometimes leave the fight to activate the conveyor belts and cause a certain type of high or lethal damage to be dealt to players in certain areas of the room. About 30 seconds later, he will return to the fight and the encounter will continue as normal until the other boss leaves to activate the conveyor belts, and so on. This means that the raid will have to avoid the damaging areas, all while contending with the movement of the conveyor belts (which push people in a certain direction) and the abilities used by the bosses.
We do not have a video preview of the Hans'gar and Franzok encounter, but we recommend this video by Method. Note that this is based on footage from the Warlords of Draenor Beta, so things can very well change before the fight reaches live servers.
Abilities
In this section, we will explain the environment where the fight takes place, and then we will describe the abilities used by Hans'gar and Franzok.
The Environment
The room where the raid takes place plays an important role in the fight. The entire floor of the room is comprised of 5 conveyor belts. Each conveyor belt is further divided into 4 sections. By default, these conveyor belts are stationary (meaning that it works just like a regular floor), but when one of the two abilities we describe below is being used, the conveyor belts begin to move, pushing players who stand on them. All the conveyor belts always move in the same direction, and at the same speed.
It is also worth noting that there are very small gaps in between the 5 rows
of conveyor belts, and standing in these gaps causes players not to be affected
by the movement of the belts. That said, however, standing in these gaps does
not protect players from the two abilities we describe below:
![]() Searing Plates and
Searing Plates and ![]() Pulverized.
Pulverized.
The timing and duration of Searing Plates and Pulverized is based on the health percentage of the bosses, as we describe below.
- Between 100% and 85% health, both bosses will be together in the fight, casting their usual abilities.
- Between 85% and 70% health, Hans'gar will be out of the fight, while he activates the Searing Plates. At 70% health he returns to the fight and Searing Plates ends.
- Between 70% and 55% health, both bosses will once again be together in the fight.
- Between 55% and 40% health, Franzok will be out of the fight, while he activates Pulverized. At 40% health he returns to the fight and Pulverized ends.
- Between 40% and 25% health, both bosses will once again be together in the fight.
- Between 25% and 15% health, Hans'gar will be out of the fight, while he activates Searing Plates. At 15% health he returns to the fight and Searing Plates ends.
- From 15% health until the end of the fight, both bosses remain in the arena.
We remind you that the bosses share health, so both bosses lose health at the same rate, even when one boss is not in the fight. We would also like to mention that the above percentages are only loosely followed by the bosses in practice (they sometimes leave the fight up to 6% health later than they should, and return up to 4% later).
Now, let us look at exactly what Searing Plates and Pulverized do.
When Hans'gar uses ![]() Searing Plates, searing metal plates to come into
the room on the conveyor belts. Each plate covers one of the 4 sections of a
conveyor belt.
The plates do not block movement, but players who come in
contact with them take a massive amount of Fire damage every second. The
searing plates come in waves, and there are
two different ways in which the searing plates can be laid out.
Searing Plates, searing metal plates to come into
the room on the conveyor belts. Each plate covers one of the 4 sections of a
conveyor belt.
The plates do not block movement, but players who come in
contact with them take a massive amount of Fire damage every second. The
searing plates come in waves, and there are
two different ways in which the searing plates can be laid out.
One way is that 5 searing plates enter the room, each located on one of the 5 belts, but these plates are not aligned with one another. This means that players can use one of the gaps between the plates to avoid taking damage.

Another way is that 4 searing plates enter the room, each located on one of the 5 belts. These 4 plates are perfectly aligned, but the 5th conveyor belt has no plate and thus provides a large gap through which players can move. With each wave, the gap moves to a different conveyor belt, but the gaps are always located on adjacent belts. Sometimes, however, when the gap is located on a belt that is at the edge of the room, the next gap can be on belt that is on the opposite edge.
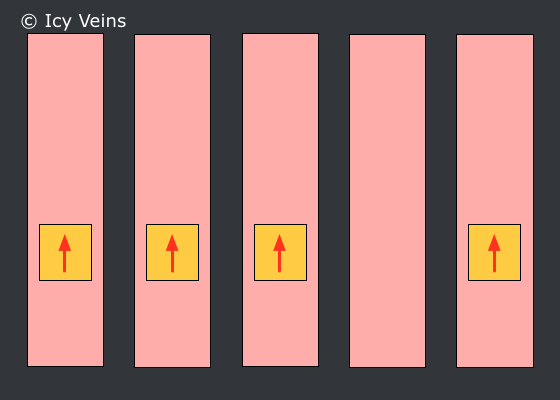
When Franzok uses ![]() Pulverized, a large number of metal presses stamp
marked sections of the conveyor belts, dealing lethal damage to anyone hit by them.
The sections are marked roughly 1-2 seconds in advance, meaning that moving
out is possible. The presses hit a
number of different areas. They also come in waves, and each wave of presses
affects
between 6 and 8 conveyor belt sections. There are certain patterns to the
distribution of these sections. Learning and memorizing them is not something
that we feel is important, but if it turns out to be useful practice, we will
include it. The image below illustrates a possible distribution.
Pulverized, a large number of metal presses stamp
marked sections of the conveyor belts, dealing lethal damage to anyone hit by them.
The sections are marked roughly 1-2 seconds in advance, meaning that moving
out is possible. The presses hit a
number of different areas. They also come in waves, and each wave of presses
affects
between 6 and 8 conveyor belt sections. There are certain patterns to the
distribution of these sections. Learning and memorizing them is not something
that we feel is important, but if it turns out to be useful practice, we will
include it. The image below illustrates a possible distribution.

In addition to these two abilities, players who move too close to either
end of the room (where the conveyor belts enter and exit the room,
respectively, but not the sides) will take a high amount of Fire damage each
second from ![]() Scorching Burns.
Scorching Burns.
Hans'gar and Franzok
Hans'gar and Franzok share health, and they also have 3 shared abilities. In addition to these 3 abilities, Franzok has two extra ones.
Shared Abilities
Hans'gar and Franzok share the following 3 abilities.
- Body Slam is an ability that the two bosses regularly use
throughout the fight. They leap towards a random raid member (appearing to
prefer the farthest away ranged player). When they reach that player, they
debuff them and any other players in a 12-yard radius with
Shattered Vertebrae, increasing the Physical damage that they take by
40%. The boss then leaps back to the tank, debuffing them with Shattered
Vertebrae as well. As soon as this happens, the entire raid takes two ticks of
a small amount of Physical damage from Aftershock. The players
targeted by Body Slam are clearly marked by a circle on the floor around
them. The targeted player and the tank cannot avoid being hit by the boss jumping to them,
which means that this ability requires a tank switch.
- Crippling Suplex is an ability that the two bosses
use to smash the two tanks against each other. This ability is always used by
the boss that remains in the fight, whenever the other boss leaves the fight to
cast one of the two environmental abilities discussed above. Crippling Suplex causes the two tanks to deal Physical
damage to each other equal to their own maximum health pools. For example,
if Tank A has 400,000 maximum health and Tank B has 300,000 health, then Tank
A will take 300,000 Physical damage and Tank B will take 400,000.
In addition to these two abilities, the bosses have a passive ability called
![]() Pumped Up. This causes the bosses to be more dangerous as their health
decreases. Each boss has a Rage bar that increases the lower their health is,
and the more Rage they have, the more the following happens:
Pumped Up. This causes the bosses to be more dangerous as their health
decreases. Each boss has a Rage bar that increases the lower their health is,
and the more Rage they have, the more the following happens:
- their melee damage increases;
- the cast time of
 Disrupting Roar decreases;
 - the number of hammers thrown by Skullcracker increases;
- the number of jumps performed during Body Slam increases.
Specifically, this means that the boss will jump to additional players after
the initial one, and before jumping back to the tank.
We have yet to speak of some of the abilities mentioned as part of Pumped Up, because they are used exclusively by Franzok. You can read about them in the following sub-section.
Franzok
In addition to the 3 abilities that the bosses share, Franzok uses the following abilities against your raid.
- Disrupting Roar is an ability that Franzok regularly uses
throughout the fight. It interrupts the spell casting of all raid members,
provided that they are in the process of casting a spell when
Disrupting Roar is used. The ability has a cast time, which is lower the
less health Franzok has, due to the Pumped Up ability.
- Skullcracker is an ability that Franzok regularly uses throughout
the fight. He throws a hammer at the location of a random raid member (appearing
to prefer melee players), dealing a high amount of Physical damage to
them. As Franzok's health decreases, the number of hammers thrown with each
cast increases, due to the Pumped Up ability.
Strategy
The strategy of the fight, briefly put, is to handle all the abilities that the two bosses throw your way, while surviving the extremely disruptive conveyor belts. We will summarise the tasks your raid has to handle, and then we will discuss them each in detail in the sub-sections that follow.
- Have each tank pick up one of the two bosses. Tank them together for
added DPS from cleave damage (as their health is shared). Perform a tank
switch as needed to handle the Shattered Vertebrae debuff. The tanks
should also use a damage reduction cooldown whenever Crippling Suplex
is being cast.
- Casters and healers should make sure not to be caught in the process of
casting a spell when Disrupting Roar is used.
- Players who are targeted by Body Slam should move away from other
raid members, to ensure that as few players as possible are debuffed by
Shattered Vertebrae.
- Healers must watch out for the unavoidable raid damage caused by
Aftershock, Crippling Suplex, and Skullcracker.
- All raid members must be very careful to avoid the environmental damage
that happens on the conveyor belts ( Searing Plates and
Pulverized).
Due to ![]() Pumped Up, additional players will be targeted by
Pumped Up, additional players will be targeted by
![]() Body Slam towards the end of the fight. These players will have to
do exactly the same thing as players who are normally targeted by Body Slam,
which is to say that they should move away from other raid members. On the
Beta, jumps to these additionally-targeted players were not applying the
Body Slam towards the end of the fight. These players will have to
do exactly the same thing as players who are normally targeted by Body Slam,
which is to say that they should move away from other raid members. On the
Beta, jumps to these additionally-targeted players were not applying the
![]() Shattered Vertebrae debuff, but we imagine that this was
unintentional.
Shattered Vertebrae debuff, but we imagine that this was
unintentional.
Hans'gar and Franzok
Throughout the fight, your raid will have to handle the same abilities over and over again. On their own, none of the abilities are very complicated, and even used together they can be dealt with. The real difficulty comes when you have to handle these abilities while the conveyor belts are in motion and any wrong step can result in a death.
Tanking and Positioning
Every time a boss casts ![]() Body Slam, he will also leap back to his
tank and debuff them (and any players in a 12-yard radius) with
Body Slam, he will also leap back to his
tank and debuff them (and any players in a 12-yard radius) with
![]() Shattered Vertebrae. The tanks will, therefore, need to perform a tank
switch to handle this debuff. You might be wondering how this can happen since
both bosses use the ability, and the answer is that they do not use it
consistently. That is to say, there will typically be a tank whose stacks of
Shattered Vertebrae drop off naturally (while their respective boss is out of
the fight to activate the conveyor belts, for example), and this tank can then
taunt off the other boss to allow the stacks to drop off of the other tank
as well.
Shattered Vertebrae. The tanks will, therefore, need to perform a tank
switch to handle this debuff. You might be wondering how this can happen since
both bosses use the ability, and the answer is that they do not use it
consistently. That is to say, there will typically be a tank whose stacks of
Shattered Vertebrae drop off naturally (while their respective boss is out of
the fight to activate the conveyor belts, for example), and this tank can then
taunt off the other boss to allow the stacks to drop off of the other tank
as well.
Whenever Body Slam is cast, the tank of that boss must be aware that the boss will shortly leap back to them, and so they need to run out of the melee group to avoid having melee players debuffed by Shattered Vertebrae as well.
It is impossible to say where in the room the bosses should be tanked, since the raid's positioning will be very dynamic given all the movement that the conveyor belts cause. Suffice it to say that while both bosses are in the fight, they should be tanked close to each other so that they can be cleaved for maximum DPS.
Finally, both tanks will need to use a defensive cooldown each time
![]() Crippling Suplex is cast. This will deal an extremely high amount of
Phyiscal damage to the tanks, but as the damage is Physical, it will be
reduced considerably. Since the tanks deal their maximum health pool in damage
to one another, it is probably not a good idea to have one tank significantly
better geared than the other, since this way you risk having the lesser-geared
tank die, but this will not be a concern in most situations (the difference in
gear levels would have to be massive).
Crippling Suplex is cast. This will deal an extremely high amount of
Phyiscal damage to the tanks, but as the damage is Physical, it will be
reduced considerably. Since the tanks deal their maximum health pool in damage
to one another, it is probably not a good idea to have one tank significantly
better geared than the other, since this way you risk having the lesser-geared
tank die, but this will not be a concern in most situations (the difference in
gear levels would have to be massive).
Other Concerns
As far the two bosses are concerned, your raid will have a few things to keep in mind.
Whenever ![]() Disrupting Roar is being cast, casters and healers
will have to make sure they are not in the process of casting a spell.
Disrupting Roar is being cast, casters and healers
will have to make sure they are not in the process of casting a spell.
Players (mostly melee) will take unavoidable damage from
![]() Skullcracker, which will simply need to be healed through.
Skullcracker, which will simply need to be healed through.
Healers will be put under a lot of pressure during this fight, especially
towards the end of the encounter when ![]() Pumped Up will make the bosses
more dangerous.
Pumped Up will make the bosses
more dangerous.
Healers have to contend with the following sources of unavoidable damage.
- tank damage from melee attacks and Crippling Suplex, increased
by stacks of Shattered Vertebrae;
- raid-wide damage from Aftershock, increased by Shattered
Vertebrae;
- unavoidable damage on random raid members from Skullcracker.
In addition to this, players might get hit by the ![]() Searing Plates,
taking even more damage.
Searing Plates,
taking even more damage.
The Environment
Handling the two environmental abilities is quite straightforward, but it can be very demanding.
Handling both of them is done in a similar manner. It is all a matter of
quick reactions and good positioning. Regarding the ![]() Searing Plates, by
understanding the pattern in which they happen you can more or less predict
where the next gap will be and move towards it, ensuring that you will not be
caught in a bad position.
Searing Plates, by
understanding the pattern in which they happen you can more or less predict
where the next gap will be and move towards it, ensuring that you will not be
caught in a bad position.
Avoiding the metal presses during ![]() Pulverized is more difficult,
because they are faster to act and their pattern is less predictable. The safest
way of doing it at this time is to always look for a position in between two
conveyor belts, at the intersection of 4 different conveyor belt sections.
While, as stated, standing in the gap between two conveyor
belts does not prevent you from taking damage, it means that you can very
quickly move into a section that is not targeted by Pulverized. There
is no guarantee that there will always be a safe section near you, but whenever
there is one near you (which happens overwhelmingly often), being right on the edge of the safe
section makes it very easy to move there.
Pulverized is more difficult,
because they are faster to act and their pattern is less predictable. The safest
way of doing it at this time is to always look for a position in between two
conveyor belts, at the intersection of 4 different conveyor belt sections.
While, as stated, standing in the gap between two conveyor
belts does not prevent you from taking damage, it means that you can very
quickly move into a section that is not targeted by Pulverized. There
is no guarantee that there will always be a safe section near you, but whenever
there is one near you (which happens overwhelmingly often), being right on the edge of the safe
section makes it very easy to move there.
In the case of both abilities, using any movement-enhancing abilities at
your disposal is extremely beneficial. Make sure to communicate with your raid
so that a strong rotation of ![]() Stampeding Roar is used.
Stampeding Roar is used.
When to Use Heroism/Bloodlust/Time Warp
We recommend using ![]() Heroism/
Heroism/![]() Bloodlust/
Bloodlust/![]() Time Warp at
the start of the fight. The reason for this is that at the start of the fight,
all raid members have their DPS cooldowns available and their potions active.
Additionally, both bosses are in the fight at this time, allowing for greater
DPS due to cleave damage.
Time Warp at
the start of the fight. The reason for this is that at the start of the fight,
all raid members have their DPS cooldowns available and their potions active.
Additionally, both bosses are in the fight at this time, allowing for greater
DPS due to cleave damage.
Alternatively, if the increased damage taken by your raid due to
![]() Pumped Up becomes a problem, you can save
Pumped Up becomes a problem, you can save
![]() Heroism/
Heroism/![]() Bloodlust/
Bloodlust/![]() Time Warp for the end of the
encounter, at a time when both bosses are in the fight.
Time Warp for the end of the
encounter, at a time when both bosses are in the fight.
Mythic Mode
The Mythic mode of the Hans'gar and Frankzok encounter is similar to the Normal/Heroic mode, but a few key changes exist which render the Mythic version considerably more difficult.
Differences From Normal/Heroic Mode
Aside from the additional health and damage of the bosses, something which is typical for Mythic modes, there are two other changes.
Firstly, there is a new ability called ![]() Smart Stampers. This ability
only occurs during the phases of the fight when both Hans'gar and Franzok are
in the arena. Essentially, the ability causes the sections of the conveyor
belt where players are located to be marked, and about 10 seconds after that,
presses fall on the marked locations. These presses deal a massive amount of
damage to any players standing on those sections (effectively
killing anyone that is hit), and they remain there for a long period of time.
Smart Stampers attempts to mark sections every second, but if players are
standing on a section that has already been marked, this has no effect. Smart
Stampers lasts until your raid exits that phase of the fight (by damaging
the bosses enough that one of them leaves the arena).
Smart Stampers. This ability
only occurs during the phases of the fight when both Hans'gar and Franzok are
in the arena. Essentially, the ability causes the sections of the conveyor
belt where players are located to be marked, and about 10 seconds after that,
presses fall on the marked locations. These presses deal a massive amount of
damage to any players standing on those sections (effectively
killing anyone that is hit), and they remain there for a long period of time.
Smart Stampers attempts to mark sections every second, but if players are
standing on a section that has already been marked, this has no effect. Smart
Stampers lasts until your raid exits that phase of the fight (by damaging
the bosses enough that one of them leaves the arena).
The Smart Stamper presses do not block line of sight, but any players who try to walk through a press will be killed, so they do end up restricting your raid's space.
Secondly, ![]() Body Slam now deals much higher damage, but this
damage is split between all players who are debuffed by
Body Slam now deals much higher damage, but this
damage is split between all players who are debuffed by
![]() Shattered Vertebrae (so, all players within 12 yards).
Shattered Vertebrae (so, all players within 12 yards).
Strategy
The strategy for the Mythic mode of this fight is similar in its execution to the Normal and Heroic mode strategy, but your raid will have to put in a considerable amount of effort to deal with the Mythic mode changes.
Most importantly, your raid will have to employ a specific strategy for
handling the ![]() Smart Stampers. The best way to do this is for your raid
to stack up into a single group shortly before Smart Stampers is cast. After
this time, as soon as the conveyor belt on which the raid is standing is
marked by a Smart Stamper, your raid must prepare to move to the next one.
Moving should only be done about 1 second before the press lands, as this will
minimise the overall number of presses that come down throughout the phase.
Smart Stampers. The best way to do this is for your raid
to stack up into a single group shortly before Smart Stampers is cast. After
this time, as soon as the conveyor belt on which the raid is standing is
marked by a Smart Stamper, your raid must prepare to move to the next one.
Moving should only be done about 1 second before the press lands, as this will
minimise the overall number of presses that come down throughout the phase.
A consequence of stacking up in this manner is that all raid members will
be hit by ![]() Body Slam, and they will subsequently all be affected by
Body Slam, and they will subsequently all be affected by
![]() Shattered Vertebrae and take damage from
Shattered Vertebrae and take damage from ![]() Aftershock. You can
expect 4 casts of Body Slam during a Smart Stampers phase, and since
Body Slam is cast often enough that Shattered Vertebrae does not have a chance
to drop off, the entire raid will suffer through a rather large amount of
damage. In fact, this damage becomes so extreme towards the end of the Smart
Stampers phase that your healers will have to use at least one major cooldown
to keep the raid alive (a good combination to use is
Aftershock. You can
expect 4 casts of Body Slam during a Smart Stampers phase, and since
Body Slam is cast often enough that Shattered Vertebrae does not have a chance
to drop off, the entire raid will suffer through a rather large amount of
damage. In fact, this damage becomes so extreme towards the end of the Smart
Stampers phase that your healers will have to use at least one major cooldown
to keep the raid alive (a good combination to use is ![]() Tranquility and
Aspect of the Fox, to allow the Druid to move with the raid while
channeling).
Tranquility and
Aspect of the Fox, to allow the Druid to move with the raid while
channeling).
The raid will move like this, from one section of the conveyor belt to another, as a unit, until the bosses' health is low enough that one of them leaves the arena and Smart Stampers ends.
An alternative strategy, useful for reducing the amount of raid damage during Smart Stampers, is to instead split the raid into two roughly equal groups, and to have each one of the groups use the above-mentioned technique. This way, Body Slam will generally be casting alternatively on the two groups, allowing Shattered Vertebrae to drop off, and resulting in much lower raid damage. The only problem with this strategy is that your raid will have to utilise much more of the arena's floor, so careful planning is required.
Outside of Smart Stampers, the fight will carry on in the same was as in Normal or Heroic mode. The raid should be more or less spread out around the room, but a few players should stack together on anyone targeted by Body Slam, in order to share the split damage that this deals.
Learning the Fight
The only truly problematic part of learning this fight is learning how to
avoid the environmental damage that happens whenever the conveyor belts become
active. Taking occasional damage from ![]() Searing Plates may be survivable,
but players getting hit by
Searing Plates may be survivable,
but players getting hit by ![]() Pulverized is unacceptable.
Pulverized is unacceptable.
These parts of the fight will make or break your raid's chances of success, so as a raid leader you should pay close attention to how players are doing, and you should focus on improving the technique of those players who are having the most trouble. One way to do this is to remind players about various movement-enhancing abilities that their class might have, which it is easy to overlook in the heat of the moment.
Loot
In this section, you will find the loot table for Hans'gar and Franzok. The section is divided in 3 subsections: armor, weapons, and the rest (neck, back, finger, and trinket items).
Armor
| Item Name | Armor | Slot | Secondary Stats |
|---|---|---|---|
| Cloth | Head |
|
|
| Cloth | Shoulders |
|
|
| Cloth | Chest |
|
|
| Leather | Chest |
|
|
| Leather | Wrists |
|
|
| Leather | Waist |
|
|
| Shoulders |
|
||
| Chest |
|
||
| Feet |
|
||
| Plate | Head |
|
|
| Plate | Shoulders |
|
|
| Plate | Hands |
|
|
| Plate | Feet |
|
Weapons
| Item Name | Type | Main Stats | Secondary Stats |
|---|---|---|---|
| 1H Sword | Agility |
|
Amulets, Cloaks, Rings, and Trinkets
| Item Name | Type | Main Stats | Secondary Stats |
|---|---|---|---|
| Amulet | Intellect |
|
|
| Amulet | Strength |
|
|
| Cloak | Intellect |
|
|
| Ring | Intellect |
|
|
| Ring |
|
|
|
| Trinket | Mastery | Armor on use |
Concluding Remarks
This concludes our raid guide for Hans'gar and Franzok. We hope you have found it helpful. Please do not hesitate to post any feedback you may have on our forums.
Changelog
- 10 Apr. 2015: Added Mythic mode strategy.
- 08 Feb. 2015: Updated the guide to state that the timing and duration of Searing Plates and Pulverized is based on boss health.
- Warcraft Returns! 10th Anniversary Edition SteelBook Now Available for Pre-Order
- Insane Solo Ritual Site Farm Is Printing Hero Crests in WoW Right Now
- This Bonus Roll Hack Could Boost Your BiS Chances in WoW This Week
- Class Fixes and Dungeon Tuning: Midnight 12.0.5 Hotfixes, April 28th
- Updating Quel’Thalas: New Blizzard Video on Rebuilding the Zone for Midnight
- How to Obtain All Collectibles From the Broken Throne Ritual Site
- Where Does Your Class Rank in DPS? 12.0.5’s Winners and Losers Are Clear
- WoW Patch 12.0.7 Is Already in Internal Testing and Adds Another One-Boss Raid