Gruul Detailed Strategy Guide (Heroic+Mythic Modes included)
Table of Contents

Introduction
This guide is intended to provide a comprehensive description of the encounter with Gruul in Blackrock Foundry. It is targeted at anyone who desires to understand the fight mechanics.
This guide is updated for World of Warcraft WoD 6.1.2.
Gruul is the first boss in the Slagworks wing of the Blackrock Foundry raid instance. This relatively simple encounter will test your raid's position, and it will especially strain your tanks in this regard.
General Information
Normal, Heroic, and Mythic Difficulty
This main part of this guide covers both the Normal and Heroic versions of the encounter, as far as mechanics and general strategy is concerned. The only difference between these two modes is found in the tuning, with Heroic being more difficult.
When we speak of extreme situations (such as the difficulty of a soft enrage timer, or damage from a certain source being too high to survive), we mostly refer to Heroic mode.
In addition to this, we have a specific Mythic mode section, where we present all the differences between Normal/Heroic and Mythic, as well as the strategy to defeat the Mythic encounter.
Enrage Timer
The encounter has a 6-minute hard enrage timer. There are no soft enrage mechanics in the fight.
Summing Things Up
In this section, we will very briefly summarise what the players belonging to each of the three roles have to do during this fight. This is by no means meant to provide sufficient information to master the encounter, and it is only supposed to give you a very rough idea of what to watch out for.
Tanks
- Perform a regular tank switch to handle the debuffs applied by
 Inferno Slice and
  Overwhelming Blows.
 - When tanking Gruul, tank him at least 10 yards away from any other raid members (including the other tank), and facing him away from anyone else.
- When Inferno Slice is about to be cast, move into one of the two
groups of players so that they split the damage from Inferno Slice, and then
quickly move out again. Move into the two groups alternatively, so that no
group is hit by two Inferno Slices in a row.
- In Mythic mode, each of the two groups must soak two Inferno Slices in a row, instead of 1.
Healers
- Be prepared for sustained raid-wide damage during Phase Two.
- In Mythic mode, be prepared for the much higher damage that
players affected by Inferno Slice take.
DPS
- DPS Gruul.
Everyone
- Split up into two groups of roughly equal size, located on opposite sides of Gruul, in melee range.
- Whenever
 Petrifying Slam is cast, make sure to move at least 8
yards away from raid members affected by Petrification.
Petrifying Slam is cast, make sure to move at least 8
yards away from raid members affected by Petrification. - When
 Cave In is cast, avoid being hit by the falling rocks.
 - Avoid being hit by
 Overhead Smash whenever Gruul casts it (the
affected area is indicated visually ahead of time).
Overhead Smash whenever Gruul casts it (the
affected area is indicated visually ahead of time). - In Mythic mode
- The entire raid must spread out 8 yards apart when Petrifying Slam is cast.
- Everyone must make sure never to come in contact with a
 Flare
fireball, or with the furnaces that spawn the fireballs (located at the
edges of the room). Players who do get hit by a Flare fireball and survive
should avoid soaking Inferno Slice until the debuffs that increases Fire damage
taken expires from them.
Flare
fireball, or with the furnaces that spawn the fireballs (located at the
edges of the room). Players who do get hit by a Flare fireball and survive
should avoid soaking Inferno Slice until the debuffs that increases Fire damage
taken expires from them.
Overview of the Fight
The encounter against Gruul is a single target, two-phase fight. The two phases alternate over and over again, on a fixed timer, regardless of the raid's actions.
- During Phase One, which lasts approximately 70 seconds, Gruul must be tanked, and he uses a number of abilities against the raid.
- During Phase Two, which lasts approximately 30 seconds, Gruul is stationary in the center of the room, where he cannot be tanked and from where he spams a single ability against the raid.
We do not have a video preview of the encounter against Gruul, but we recommend this video by Method. Note that this is based on footage from the Warlords of Draenor Beta, so things can very well change before the fight reaches live servers.
Phase One
Phase One lasts for roughly 70 seconds. During this time, Gruul uses a number of abilities against your raid.
Abilities
- Inferno Slice is an ability that Gruul uses every 16-17 seconds.
This
is indicated by his Rage bar; when Gruul reaches maximum Rage, he uses Inferno
Slice, and his Rage is then reset. Inferno Slice deals a very high amount of
Fire damage to Gruul's tank, and it also deals a massive amount of Fire damage
to all other players in a cone in front of the boss, split among them. Each
cast of Inferno Slice debuffs players to take 20% more damage from Inferno
Slice (a debuff that lasts 30 seconds), and also leaves behind a Fire damage
DoT. Inferno Slice has a short cast time.
- Overwhelming Blows is an ability that Gruul regularly uses against
his tank. It deals a high amount of Physical damage to the target and to any
other players within 10 yards of them. Overwhelming Blows also applies a stacking
60-second debuff to affected targets, causing them to take 10% more damage from
Overwhelming Blows, per stack. This ability requires a tank switch.
- Petrifying Slam is an ability that Gruul uses regularly throughout
the fight. The boss knocks all players back and begins to Petrify several of
them. The
petrification process lasts roughly 5 seconds, during which time a debuff
stacks on the affected raid members, slowing them progressively, and dealing a small
amount of damage to them. When players are fully petrified, they are unable to
move, and this is immediately followed by Gruul casting
 Shatter.
- Shatter causes all petrified players to deal a small amount
of Nature damage to any raid members in an 8-yard radius around them. This
removes Petrification from players.
- Overhead Smash is an ability that Gruul sometimes casts during
Phase One. The boss marks a long line on the floor in front of him, and a few
seconds after that he deals a high amount of Nature damage to all players
standing there.
Strategy
There are two main parts to the strategy for this phase. The first part
revolves around correctly handling ![]() Inferno Slice and
Inferno Slice and
![]() Overwhelming Blows, and the second one is all about how to deal with
Overwhelming Blows, and the second one is all about how to deal with
![]() Petrifying Slam.
Petrifying Slam.
In addition to these two important elements, your raid will have to
occasionally avoid Gruul's ![]() Overhead Smash. When this happens, simply
move out of the affected area (indicated visually on the ground) to avoid
taking damage.
Overhead Smash. When this happens, simply
move out of the affected area (indicated visually on the ground) to avoid
taking damage.
Inferno Slice and Overwhelming Blows
Both ![]() Inferno Slice and
Inferno Slice and ![]() Overwhelming Blows apply debuffs to
the tanks, but they also both affect players in a radius around the tanks. For
these reasons, a very specific strategy should be employed by your raid. We
will quickly summarise it before going into a few details.
Overwhelming Blows apply debuffs to
the tanks, but they also both affect players in a radius around the tanks. For
these reasons, a very specific strategy should be employed by your raid. We
will quickly summarise it before going into a few details.
- Split the raid into two large groups, located in melee range of the boss but quite far from one another.
- Have Gruul's tank stand at least 10 yards away from any other raid members (including the other tank).
- When Gruul is about to cast Inferno Slice, have the tank move into one of two groups, causing these players to split the Inferno Slice damage. Immediately after Inferno Slice, move back out of the group. When the next Inferno Slice is cast, have the other group of players split the damage.
- Have the two tanks regularly perform a tank switch to deal with the Overwhelming Blows debuff.
The two groups formed by your raid should be of (roughly) equal size, and they should ideally be located on opposite sides of Gruul, ensuring that no Inferno Slice can hit both groups.
The tanks will have to wait until the absolute last moment before Inferno Slice is cast to move into a group of players, because it is imperative to avoid other raid members being hit (and debuffed) by Overwhelming Blows. For the same reason, as soon as Inferno Slice has been cast, the tank should move out of the group of players very quickly.
The tank who is not tanking Gruul should position themselves in such a way as to make sure that they do not get debuffed by either Inferno Slice or Overwhelming Blows.
Here is a diagram that illustrates proper positioning.

Petrifying Slam
Whenever ![]() Petrifying Slam is cast, all raid members will quickly
have to move at least 8 yards away from Petrified players (and Petrified
players must spread out at least 8 yards apart). Petrified players will have around 3 seconds to
do so effectively (since they will be very slow during the final 2 seconds,
making it hard to move). If all players succeed in doing this, then the
subsequent
Petrifying Slam is cast, all raid members will quickly
have to move at least 8 yards away from Petrified players (and Petrified
players must spread out at least 8 yards apart). Petrified players will have around 3 seconds to
do so effectively (since they will be very slow during the final 2 seconds,
making it hard to move). If all players succeed in doing this, then the
subsequent ![]() Shatter will deal no damage. The damage of
Shatter is not very high, meaning that even if some players do make mistakes
and fail to spread out, they will not die, but if there are large groups of
players, then Shatter can be fatal.
Shatter will deal no damage. The damage of
Shatter is not very high, meaning that even if some players do make mistakes
and fail to spread out, they will not die, but if there are large groups of
players, then Shatter can be fatal.
Phase Two
Overall, Phase Two lasts for roughly 30 seconds. During this time Gruul is stationary in the center of the room and he cannot be tanked.
Abilities
When Phase Two begins, Gruul moves to the center of the room and casts
![]() Cave In. This causes rocks to fall from the roof of the room. The locations where
the rocks will fall are indicated graphically on the ground. Any players who
are hit by these rocks will be stunned and they will take a very high amount of
damage. Each part of the floor will only be hit by one rock, and the rocks do
not all fall at the same time.
Cave In. This causes rocks to fall from the roof of the room. The locations where
the rocks will fall are indicated graphically on the ground. Any players who
are hit by these rocks will be stunned and they will take a very high amount of
damage. Each part of the floor will only be hit by one rock, and the rocks do
not all fall at the same time.
Once Cave In has been cast, Gruul will cast ![]() Destructive Rampage,
which causes the raid to take a low amount of Nature damage every 5 seconds
for around 25 seconds. During these 25 seconds, Gruul will remain stationary
in the center of the room and spam
Destructive Rampage,
which causes the raid to take a low amount of Nature damage every 5 seconds
for around 25 seconds. During these 25 seconds, Gruul will remain stationary
in the center of the room and spam ![]() Overhead Smash in a number of
random directions.
Overhead Smash in a number of
random directions.
Strategy
The strategy during Phase Two is extremely simple. As soon as the phase starts, players will have to focus on avoiding getting hit by any falling rocks. The best way to do this is to identify the area where the first rocks will fall (this area will be marked first), and move into it as soon as the rocks have fallen there. Since each part of the floor is only hit once, this area will remain safe.
Afterwards, players will simply have to avoid being hit by any of Gruul's
![]() Overhead Smashes, while the healers will have to contend with the
raid damage inflicted by
Overhead Smashes, while the healers will have to contend with the
raid damage inflicted by ![]() Destructive Rampage.
Destructive Rampage.
When to Use Heroism/Bloodlust/Time Warp
We recommend using ![]() Heroism/
Heroism/![]() Bloodlust/
Bloodlust/![]() Time Warp at
the start of the encounter, since this is when all players will have their
DPS cooldowns available, and especially because there are no other, more
suitable moments during the encounter.
Time Warp at
the start of the encounter, since this is when all players will have their
DPS cooldowns available, and especially because there are no other, more
suitable moments during the encounter.
Mythic Mode
The Mythic mode of the Gruul encounter is most likely the first Mythic mode your raid will attempt in Blackrock Foundry. Mechanically, the fight is not very different from the Normal/Heroic mode, but depending on the tuning, it can prove to be brutal.
Differences From Normal/Heroic Mode
As with all Mythic encounters, the boss has more health and deals more damage than in Normal/Heroic mode. In addition to this, there is one new ability, and a few changes to existing abilities.
The new Mythic-only ability is ![]() Flare. On the outside of the
circular room in which you fight the boss there are several furnaces.
Throughout the fight, 3 of these furnaces will continually spawn fireballs
that travel in a straight line, across the room, before finally disappearing
on the other side. You can see the path of the Flare fireballs in the image
below.
Flare. On the outside of the
circular room in which you fight the boss there are several furnaces.
Throughout the fight, 3 of these furnaces will continually spawn fireballs
that travel in a straight line, across the room, before finally disappearing
on the other side. You can see the path of the Flare fireballs in the image
below.
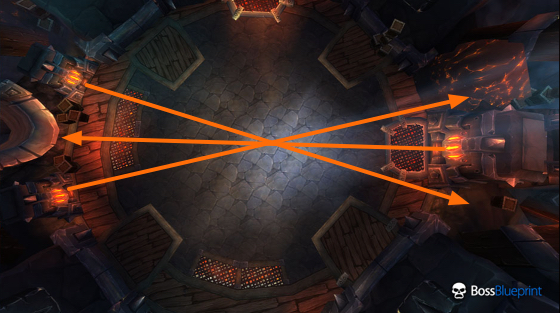
Each fireball deals a very high amount of Fire damage to players it comes in contact with, and it causes them to take 20% increased damage for 15 seconds (an effect which stacks). In addition to this, the furnaces themselves deal a very high amount of Fire damage in a small radius in front of them whenever they fire a fireball.
Aside from this new ability, here are the changes to existing mechanics.
- Gruul now gains Rage at a faster rate, meaning that his Rage bar fills up roughly every 12-14 seconds.
- If Gruul's Inferno Slice does not hit a minimum of 4 players,
Gruul instantly gains 50 Rage.
- Petrifying Slam now affects all raid members, instead of just a
few.
Strategy
The strategy for the Mythic mode of the Gruul encounter revolves around
correct positioning and movement to ensure that no raid member are hit by
any ![]() Flare fireballs. Aside from this, players will have to be
more attentive to
Flare fireballs. Aside from this, players will have to be
more attentive to ![]() Petrifying Slam, since all raid members must now get
8 yards away from one another. Finally,
Petrifying Slam, since all raid members must now get
8 yards away from one another. Finally, ![]() Inferno Slice has to be
handled a bit differently owing to its increased frequency.
Inferno Slice has to be
handled a bit differently owing to its increased frequency.
We will look at all of these aspects in the following sub-sections.
Flare Positioning
As opposed to Normal/Heroic modes, where positioning is quite relaxed,
on Mythic mode this is not the case. The raid will have to find a positioning
that allows the tanks and the two groups of ![]() Inferno Slice soakers to
all stand clear of the paths of the
Inferno Slice soakers to
all stand clear of the paths of the ![]() Flare fireballs.
Flare fireballs.
Looking at the above Flare image, we can see that there are two options.
- The entire raid should be positioned in one half of the room, length-wise relative to the paths of the fireballs. For example, Gruul's tank would be located to the very right (as seen in the image), with Gruul slightly to his left, and the raid spread out in two groups left of that (one group close to the fireball paths, and the other close to the edge of the room). This positioning means that the raid will have virtually no interference from the Flare fireballs, but it also means that space will be very restricted.
- Gruul should be tanked at the intersection of all 3 fireball paths, with
the tank
standing away from the paths of the fireballs in one half of the room, and the
rest of the raid standing in the other half of the room (for example, the tank
stands in the upper half, as seen in the image, and the raid in the lower
one). In this case, the tank will have to move through the paths of the
fireballs in order to face Gruul into one group or another for each
Inferno Slice. Moving through the paths of the fireballs can be very tricky,
especially since Inferno Slice comes in at fixed times so delaying movement is
not an option. On the bright side, this positioning means that the raid has
much more space to spread out (for abilities such as Overhead Smash or
Petrifying Slam.
Players who fail to avoid Flare fireballs but survive the damage should stay out of their Inferno Slice soaking group until the debuff applied by the Flare fireball expires. That is because the debuff causes players to take increased Fire damage, which would make surviving Inferno Slice very difficult.
Petrifying Slam
Handling ![]() Petrifying Slam is much more of a raid effort in Mythic
mode, since all raid members are affected by it. As soon as the raid is knocked
back, everyone will have to spread out at least 8 yards apart.
Petrifying Slam is much more of a raid effort in Mythic
mode, since all raid members are affected by it. As soon as the raid is knocked
back, everyone will have to spread out at least 8 yards apart.
Inferno Slice
Since ![]() Inferno Slice comes in at intervals of 12-14 seconds, and
since its debuff still lasts 30 seconds, it is no longer possible to simply
alternate one Inferno Slice on either of the two groups. Moreover, since
Inferno Slice causes Gruul to gain 50 Rage if it does not hit at least 4
players, having tanks or players with immunities solo soak Inferno Slice is
no longer an option.
Inferno Slice comes in at intervals of 12-14 seconds, and
since its debuff still lasts 30 seconds, it is no longer possible to simply
alternate one Inferno Slice on either of the two groups. Moreover, since
Inferno Slice causes Gruul to gain 50 Rage if it does not hit at least 4
players, having tanks or players with immunities solo soak Inferno Slice is
no longer an option.
Therefore, the only option left for the raid is to have each of the two groups soak two Inferno Slices in a row, instead of just 1. This is possible, but as expected it will cause these players to take considerably more damage, and to require much more healing.
Learning the Fight
The encounter against Gruul is, above all, a matter of correct positioning and movement. The tanks have the most important role in this matter, so it is essential that they understand how to handle their debuffs, and when and where they have to move. You should emphasise this, and make sure that the issue is clear.
Aside from this, you will probably encounter some issues with avoiding all
the rocks that fall when ![]() Cave In is cast. You should stress the
importance of moving into the clear area left behind by the first falling rock,
as this method is by far the easiest and safest. For this to work, it is
important that no raid members be caught at the very edge of the room when Cave
In is cast, since they may have a hard time reaching the first safe zone in
time (if it appears on the opposite side of the room).
Cave In is cast. You should stress the
importance of moving into the clear area left behind by the first falling rock,
as this method is by far the easiest and safest. For this to work, it is
important that no raid members be caught at the very edge of the room when Cave
In is cast, since they may have a hard time reaching the first safe zone in
time (if it appears on the opposite side of the room).
Loot
In this section, you will find the loot table for Gruul. The section is divided in 3 subsections: armor, weapons, and the rest (neck, back, finger, and trinket items).
Armor
| Item Name | Armor | Slot | Secondary Stats |
|---|---|---|---|
| Cloth | Head |
|
|
| Cloth | Waist |
|
|
| Cloth | Legs |
|
|
| Cloth | Feet |
|
|
| Leather | Head |
|
|
| Leather | Chest |
|
|
| Leather | Hands |
|
|
| Head |
|
||
| Shoulders |
|
||
| Chest |
|
||
| Waist |
|
||
| Plate | Wrists |
|
|
| Plate | Wrists |
|
Weapons
| Item Name | Type | Main Stats | Secondary Stats |
|---|---|---|---|
| 1H Sword | Intellect |
|
|
| 1H Sword | Strength |
|
Amulets, Cloaks, Rings, and Trinkets
| Item Name | Type | Main Stats | Secondary Stats |
|---|---|---|---|
| Amulet | Intellect |
|
|
| Amulet | Agility |
|
|
| Cloak | Intellect |
|
|
| Cloak | Strength |
|
|
| Cloak |
|
|
|
| Ring | Agility |
|
|
| Ring | Strength |
|
|
| Trinket | Agility | Haste on proc |
Concluding Remarks
This concludes our raid guide Gruul. We hope you have found it helpful. Please do not hesitate to post any feedback you may have on our forums.
Changelog
- 09 Feb. 2015: Added Mythic mode strategy, and made a few tweaks based on recent hotfixes, such as that only some raid members are affected by Petrifying Slam in Normal/Heroic mode.
- 05 Feb. 2015: Added hard enrage timer, and fixed an error where we claimed that Inferno Slice is cast every 10 seconds, when it is instead cast every 16-17 seconds.
- Mage Class Changes in War Within Alpha Build 54361
- Mythic+ Dungeon Adjustments: April 26th
- Savage Ebony Turtle Mount in Patch 10.2.7
- Earthen Allied Race Dances and Customization Options
- Warband Members in Follower Dungeons?
- Dragonflight 10.2.6 and SoD Hotfixes, April 25th
- Affliction Warlock Changes in War Within Alpha: April 25th
- Windwalker Monk Changes in War Within Alpha: April 25th