Operator Thogar Detailed Strategy Guide (Heroic+Mythic Modes included)
Table of Contents
Introduction
This guide is intended to provide a comprehensive description of the encounter with Operator Thogar in Blackrock Foundry. It is targeted at anyone who desires to understand the fight mechanics.
This guide is updated for World of Warcraft WoD 6.1.2.
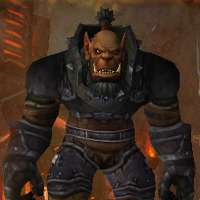
Operator Thogar is a boss encounter in the Iron Assembly wing of the Blackrock Foundry raid instance. The fight is atypical in that the environment plays a large role, with your raid having to constantly avoid trains that come into the fight on 4 tracks. Overall, the fight is about correct add handling and prioritisation, as well as intense movement.
General Information
Normal, Heroic, and Mythic Difficulty
This main part of this guide covers both the Normal and Heroic versions of the encounter, as far as mechanics and general strategy is concerned. The only difference between these two modes is found in the tuning, with Heroic being more difficult.
When we speak of extreme situations (such as the difficulty of a soft enrage timer, or damage from a certain source being too high to survive), we mostly refer to Heroic mode.
In addition to this, we have a specific Mythic mode section, where we present all the differences between Normal/Heroic and Mythic, as well as the strategy to defeat the Mythic encounter.
Enrage Timer
The encounter has a hard enrage timer of 8 minutes and 30 seconds, at which point trains come in on all 4 tracks at once, making it impossible to avoid them and ensuring an instant wipe.
Summing Things Up
In this section, we will very briefly summarise what the players belonging to each of the three roles have to do during this fight. This is by no means meant to provide sufficient information to master the encounter, and it is only supposed to give you a very rough idea of what to watch out for.
Tanks
- Perform a tank switch on Operator Thogar to handle the
 Enkindle Fire DoT.
 - Pick up all of the adds that come in on the trains (except the Iron Gunnery Sergeants, which cannot leave their cannons).
Healers
- Beware of the very high tank damage whenever adds come into the fight. While the Grom'kar Men-at-Arms are alive, there will also be raid damage.
- In Mythic mode, be prepared to heal the large amount of raid damage
caused by
 Burning stacks, particularly when the Deforesters
are active.
Burning stacks, particularly when the Deforesters
are active.
DPS
- Your top priority are always the adds. The Grom'kar Firemenders and Grom'kar Men-at-Arms are the most deadly adds, but all adds should be prioritised over Thogar.
- Ranged DPS players should focus on the Iron Gunnery Sergeants whenever they are alive, giving them a higher priority than any other adds, and than the boss.
Everyone
- Avoid being hit by any of the trains that enter the room.
- Avoid the
 Prototype Pulse Grenade void zones.
 - Be prepared to move to your assigned part of the room when the raid splits up into two groups.
- In Mythic mode
- Interrupt the Grom'kar Firemenders'
 Lava Shock.
 - Move through the jets of fire caused by Deforesters as quickly
as possible, making sure not to acquire more stacks of the
Burning DoT than absolutely needed.
- Avoid coming in contact with the rings of fire caused by
 OBLITERATION, as they also apply Burning.
- Interrupt the Grom'kar Firemenders'
Overview of the Fight
The encounter against Operator Thogar takes place on 4 train tracks. Throughout the fight, trains will enter the room on these tracks, and either pass directly through, or stop and drop off some adds that your raid has to handle. The trains block line of sight and kill any players that they hit, so this element is an integral part of the fight.
Aside from the trains and the adds that they drop off, you have to handle Thogar himself, but the boss has very few abilities, so managing him is not too complicated.
We do not have a video preview of the Operator Thogar encounter, but we recommend this video by Kyuubis. Note that this is based on footage from the Warlords of Draenor Beta, so things can very well change before the fight reaches live servers.
The Environment
Before we talk about the abilities of the NPCs and the strategy for defeating them, it is important that you correctly understand the environment where the fight takes place.
On the floor of the room, there are 4 train tracks (depicted below). At the start of the fight, the room is empty except for Operator Thogar, but throughout the encounter, trains will regularly enter and exit the room.
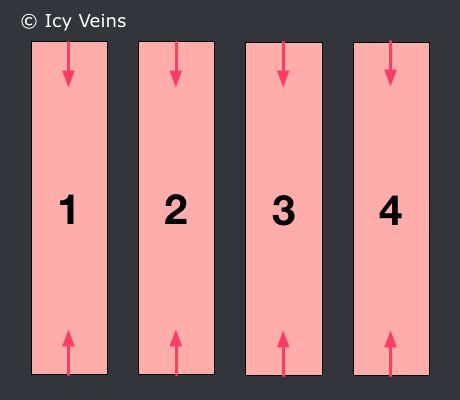
Trains are large solid objects that block line of sight and that deal lethal damage to any players who are hit by them. There are 4 types of train and they can come in two forms: full-length train (train that is as long as a track) and half-length train (train that is half as long as a track).
- Non-add Trains simply pass through the room and never stop. They can come in on any of the tracks and they can be either full-length or half-length trains.
- Iron Gunnery Sergeant Trains bring adds called Iron Gunnery Sergeant into the fight (more on these adds in the Adds section). These trains come only in full-length form and only on Tracks 1 and 4. They stop and remain in place, restricting the space that the raid has, until you kill all the adds they bring.
- Half-Length Add Trains bring several types of adds into the fight: Iron Crack-Shots, Iron Raiders, Grom'kar Firemenders, and Grom'kar Men-at-Arms (more on these adds in the Adds section). These trains can come in on any track and they remain in place, restricting your raid's space, until all the adds they brought have been killed.
- Full-Length Add Trains are special versions of Half-Length Add Trains. They only come in twice per fight: around 2 minutes after the start of the fight and roughly 4 minutes after that. They always come in pair, in both Tracks 2 and 3, effectively splitting your raid in two groups: one group on Track 1 that will fight the adds from the train on Track 2 and one group on Track 4 that will fight the adds from the train on Track 3.
Trains come in based on a fixed pattern that does not repeat itself throughout the fight, but which is always the same for every pull. We recommend the Thogar Helper add-on for helping you handle the trains.
It is also important to note that there is no space between the tracks, so the only way to avoid a train coming your way is to move to a different track.
Abilities
We will begin by looking at the abilities of Operator Thogar, after which we will look at all the trains and the different types of adds that they bring into the fight.
Operator Thogar
Operator Thogar only has 3 abilities.
- Enkindle is a stacking Fire damage DoT that Thogar applies to his
tank. In addition to dealing Fire damage, each stack of this DoT increases the
damage the target takes from Enkindle by 35% for 25 seconds. This ability
requires a tank switch.
- Prototype Pulse Grenade is an ability that Thogar uses regularly
throughout the fight. He throws a grenade at the location of a random ranged
raid member. This grenade forms a sort of void zone at that location. Players
who are within the void zone are pulled towards its center, and they receive
increasing Nature damage from the void zone.
 Berated is an ability that Thogar uses regularly throughout the
fight. This is a stacking buff that is applied to all the adds in the fight,
increasing their damage and movement speed by 10%, their haste by 5%, and
reducing their casting time by 3%.
Berated is an ability that Thogar uses regularly throughout the
fight. This is a stacking buff that is applied to all the adds in the fight,
increasing their damage and movement speed by 10%, their haste by 5%, and
reducing their casting time by 3%.
Adds
There are 5 types of adds present in the encounter, which we listed above when we presented the various types of trains.
- Iron Gunnery Sergeants do not descend from their train.
Instead, they remain on top of it, using a large
cannon to damage the raid, through a single ability called
 Delayed Siege Bomb.
- Delayed Siege Bomb fires a bomb at the location of a random raid
member. The bombs have a long travel time, and they continue to follow the
player while they are in the air, meaning that if players move after they have
been targeted they will affect the final landing location of the bomb. When the
bombs land, they deal high Physical damage in a 4-yard radius, knocking back any
affected players, and then they remain embedded in the ground at that location.
30 seconds later, the bombs explode, dealing high Fire damage in a 9-yard
radius.
- Iron Crack-Shots descend from their train and have two abilities.
 Shoot Rifle deals Physical damage to the Crack-Shot's target.
 Throw Grenade throws a grenade at a random raid member,
dealing Fire damage in an area. This ability is only used when
there is no player in melee range of the Crack-Shot.
Throw Grenade throws a grenade at a random raid member,
dealing Fire damage in an area. This ability is only used when
there is no player in melee range of the Crack-Shot.
- Iron Raiders descend from their train and have two abilities.
 Serrated Slash is a bleed effect that the Iron Raider applies
to his target.
Serrated Slash is a bleed effect that the Iron Raider applies
to his target.- Throw Grenade throws a grenade at a random raid member,
dealing Fire damage in an area. This ability is only used when
there is no player in melee range of the Iron Raider.
- Grom'kar Firemenders descend from their train and have two abilities.
 Cauterizing Bolt is an interruptible AoE heal that the Firemenders
regularly attempt to cast.
Cauterizing Bolt is an interruptible AoE heal that the Firemenders
regularly attempt to cast.- Throw Grenade throws a grenade at a random raid member, dealing
Fire damage in an area. This ability is only used when there is
no player in melee range of the Firemender.
- Grom'kar Men-at-Arms descend from their train and have two abilities.
 Iron Bellow deals a high amount of raid-wide Physical damage.
 Reckless Slash causes the Man-at-Arms to charge the location of
a random player, dealing damage to all targets in a 7-yard radius.
Reckless Slash causes the Man-at-Arms to charge the location of
a random player, dealing damage to all targets in a 7-yard radius.
Strategy
The most important idea behind the strategy for this fight is that you always have to kill the adds as quickly as possible, in order for the train that has brought them in to move and free up its track. If you delay killing the adds for too long, additional trains will come in on the remaining free tracks, further restricting the space in the room, and possibly even killing raid members who have nowhere else to move.
There are relatively few abilities in the fight, and none of them are particularly complex. The true complexity comes from the various combinations of trains that you can encounter. Full-Length Add Trains which come in pair twice during the fight are particularly problematic.
We will begin by explaining how to handle Operator Thogar, because while he is the lowest priority target, he is still the main objective of the fight, and he will always be present there. Then, we will explain how to handle the adds. Finally, we will tell you how to properly handle Full-Length Add Trains.
As a general note, we recommend staying spread out around the room throughout the fight, whenever possible, since this helps a lot with avoiding some of the damage that goes around.
Operator Thogar
Operator Thogar should be picked up by a tank, and the two tanks
should perform a tank switch on the boss throughout the fight, in order to
handle the ![]() Enkindle DoT.
Enkindle DoT.
Raid members will have to avoid the ![]() Prototype Pulse Grenade void
zones, and any players who accidentally are in a void zone should move out
as quickly as possible.
Prototype Pulse Grenade void
zones, and any players who accidentally are in a void zone should move out
as quickly as possible.
Finally, there is not much that can be done about the boss' casts of
![]() Berated. They cannot be interrupted, and your raid's answer to this
will have to be to simply kill the adds quickly, before the buff has a chance
to stack on them.
Berated. They cannot be interrupted, and your raid's answer to this
will have to be to simply kill the adds quickly, before the buff has a chance
to stack on them.
Adds
Handling the adds is the greatest challenge in this fight.
As we explained above, the Iron Crack-Shots, Iron Raiders, Grom'kar Firemenders, and the Grom'kar Men-at-Arms all come into the fight together, on the same train. When this happens, all the adds should be picked up by the tanks and your raid should focus killing them as quickly as possible. Here is how you should handle these adds, in order of priority.
- The top priority are the Grom'kar Firemenders. Their casts
of Cauterizing Bolt must be interrupted, they must be killed as
quickly as possible.
- The second priority are the Grom'kar Men-at-Arms. The raid-wide damage
caused by Iron Bellow is very problematic, so these adds have to die
quickly. Ranged raid members should spread out while these adds are up in order
to minimise the damage taken from Reckless Slash.
- After this, the Iron Crack-Shots and the Iron Raiders are the lowest in order of priority. These adds can be killed mostly through AoE and incidental damage, but you should still focus on killing them off before going back to Operator Thogar.
When a train carrying an Iron Gunnery Sergeant comes in, your
ranged raid members should quickly switch to this target and kill it as
quickly as possible. Melee players cannot reach the Iron Gunnery Sergeant, so
they can continue attacking the other targets.
Handling the ![]() Delayed Siege Bomb ability is not very complicated. As soon
as a player is targeted by it (the boss targets the player in question and
the ability has a cast time), they should run out of the raid, ideally close to
the edge of the room. This will cause the bomb to land and embed itself in
the ground there, meaning that when it explodes 30 seconds later, it will be
out of the way of the raid.
Delayed Siege Bomb ability is not very complicated. As soon
as a player is targeted by it (the boss targets the player in question and
the ability has a cast time), they should run out of the raid, ideally close to
the edge of the room. This will cause the bomb to land and embed itself in
the ground there, meaning that when it explodes 30 seconds later, it will be
out of the way of the raid.
Full-Length Add Trains
As previously said, Full-Length Add Trains come twice per fight: at around 2 minutes into the fight, and roughly 4 minutes after that. They always come in pair, occupying both Tracks 2 and 3.
When this happens, your raid will have to split into two groups, each
one with its own tank and healers. One group will have to move on Track 1
to fight the adds from the train on Track 2 and the other group will have
to move on Track 4 to fight the adds from the train on Track 3.
If your raid fails to split properly, and the adds descend on a track that is isolated
from the rest of the room (blocked off by the train on the adjacent track),
those adds will be stuck there indefinitely, and they will spam
![]() Throw Grenade at your raid, leading to a wipe.
Throw Grenade at your raid, leading to a wipe.
The adds need to be killed very quickly, before trains come in on Tracks 1 and 4, because your raid has nowhere to go to avoid them (unless the adds are killed and Tracks 2 and 3 are freed as a result).
When to Use Heroism/Bloodlust/Time Warp
We recommend using ![]() Heroism/
Heroism/![]() Bloodlust/
Bloodlust/![]() Time Warp
at the start of the fight. At this time, your raid members should have all
their DPS cooldowns and potions active, and there is not much going on in the
fight to distract you.
Time Warp
at the start of the fight. At this time, your raid members should have all
their DPS cooldowns and potions active, and there is not much going on in the
fight to distract you.
Mythic Mode
The Mythic mode of the Operator Thogar encounter is very similar to the Normal/Heroic mode. A new type of train, a new weapon, and a new ability are added, and these changes make the fight more complex and add difficulty.
Differences From Normal/Heroic Mode
All the mobs in the encounter have more health and deal more damage, compared to their Normal and Heroic mode counterparts, which is standard for any Mythic encounter. Aside from this, there is a new train, a new weapon on an existing train, and a new ability.
Deforester Trains
Deforester trains enter the fight several times throughout the encounter. They move slowly through the encounter area, taking around 20 seconds to traverse it. During this time, a fire jet shoots out from the Deforester, towards its left, all the way across the room. This lasts for the entire duration of the train's passage, meaning that the entire part of the room to train's left will be affected (though, obviously, not at the same time, but as the train moves).
Coming in contact with the fire jet applies a 15-second Fire damage DoT
called ![]() Burning to players, and this DoT does stack if players remain
in the jet for longer. Burning cannot be dispelled.
Burning to players, and this DoT does stack if players remain
in the jet for longer. Burning cannot be dispelled.
Deforesters enter the fight at relatively set times, as follows.
- 25 seconds after the start of the fight, on Track 1.
- 3 minutes after the start of the fight, on Tracks 1 and 4 (traveling in opposite directions).
- 4 minutes and 30 seconds after the start of the fight, on Track 1.
- 6 minutes and 40 seconds after the start of the fight, on Tracks 2 and 3 (again, traveling in opposite directions).
- 7 minutes and 15 seconds after the start of the fight, on Track 4.
- 7 minutes and 30 seconds after the start of the fight, on Track 3.
Obliterator Cannon
Iron Gunnery Sergeant trains are also equipped with an
Obliterator Cannon. This cannon targets locations on the floor of the
room, and fires projectiles that land there a few seconds later. This ability,
called ![]() OBLITERATION, leaves a fiery ring at that location for 30
seconds. Any players who come in contact with the edges of the ring are
debuffed by the same
OBLITERATION, leaves a fiery ring at that location for 30
seconds. Any players who come in contact with the edges of the ring are
debuffed by the same ![]() Burning DoT that we mentioned above. The
Obliterator Cannons cannot be attacked or killed.
Burning DoT that we mentioned above. The
Obliterator Cannons cannot be attacked or killed.
It is important to note that Obliteration always targets the same areas of the floor (3 per track) and not the locations of players.
New Ability: Lava Shock
The Grom'kar Firemenders gain a new ability called
![]() Lava Shock. This is an interruptible spell cast that targets a random
raid member, interrupting that player and locking them out of their school of
magic, if they are in the process of casting a spell. Lava Shock also leaves a
3-second Fire damage DoT on that player.
Lava Shock. This is an interruptible spell cast that targets a random
raid member, interrupting that player and locking them out of their school of
magic, if they are in the process of casting a spell. Lava Shock also leaves a
3-second Fire damage DoT on that player.
Strategy
While the strategy for the encounter remains largely the same, the new train
and the new weapon will severely complicate matters. The ![]() Burning DoT
is very unforgiving, and ended up with more than 2 stacks will typically prove
lethal. This means that handling the new train and the new weapon correctly is
very important.
Burning DoT
is very unforgiving, and ended up with more than 2 stacks will typically prove
lethal. This means that handling the new train and the new weapon correctly is
very important.
Before we talk about these two elements, however, we should mention the
![]() Lava Shock ability. There is no great complexity for handling it, and
the best way to do it is to interrupt it whenever it is cast, and to kill the
Grom'kar Firemenders promptly.
Lava Shock ability. There is no great complexity for handling it, and
the best way to do it is to interrupt it whenever it is cast, and to kill the
Grom'kar Firemenders promptly.
The Deforesters are normally easy enough to deal with, when they
come in one at a time. The way to handle them for most raid members is to
run through the jet of fire, which will result in one or two stacks of
Burning, which can then be healed through. Some classes, however, have means of
getting through the jet quicker, getting only one stack of Burning, and other
classes still can avoid getting stacks altogether (such as Mages using
![]() Blink).
Blink).
The real difficulty of Deforesters is when they come in two at the same time, which happens at 3 minutes and 6 minutes and 40 seconds into the fight. When this happens, you will have to find a way to get past both jets without receiving more than 2 stacks of Burning. Typically, this means crossing the jet of an oncoming Deforester as soon as it enters the room, and then running away from the jet of the other Deforester until the Burning DoT has had a chance to drop off.
Whenever Iron Gunnery Sergeant trains enter the room, players will
have to be very careful to avoid getting any Burning stacks from the fire
rings left behind by ![]() OBLITERATION. The area inside each ring is safe,
so players can attempt to remain there from beginning to end, but this is not
usually advised since rings last for 30 seconds, and players might have to move
out of that location earlier than that. Instead, we advise players to stand
outside the rings, because despite the fact that they are large, there is still
plenty of room available around them.
OBLITERATION. The area inside each ring is safe,
so players can attempt to remain there from beginning to end, but this is not
usually advised since rings last for 30 seconds, and players might have to move
out of that location earlier than that. Instead, we advise players to stand
outside the rings, because despite the fact that they are large, there is still
plenty of room available around them.
Learning the Fight
The first thing your raid members must master to get through this encounter is properly moving out of the way of incoming trains. This might sound simple, but it is easy to forget to move when you are busy with other tasks, and the trains are very unforgiving. We recommend having someone calling out where trains are coming from, and when, at least until all raid members learn to move correctly.
The second important part of the fight is when the raid has to split up into two groups, to handle Full-Length Add Trains. This is an intense moment of the fight, because the adds on both tracks 1 and 4 have to die very quickly (before any train comes in on those tracks, since players have nowhere else to move). Maximising DPS during these moments will be crucial, as will splitting the raid's DPS in a balanced way.
Loot
In this section, you will find the loot table for Operator Thogar. The section is divided in 3 subsections: armor, weapons, and the rest (neck, back, finger, and trinket items).
In addition, Operator Thogar can drop tokens needed for the Shoulders items of the Tier 17 set:
 Shoulders of the Iron Vanquisher (Heroic, Mythic);
- Shoulders of the Iron Protector (Heroic, Mythic);
- Shoulders of the Iron Conqueror (Heroic, Mythic).
Armor
| Item Name | Armor | Slot | Secondary Stats |
|---|---|---|---|
| Cloth | Shoulders |
|
|
| Cloth | Chest |
|
|
| Cloth | Wrists |
|
|
| Cloth | Hands |
|
|
| Leather | Wrists |
|
|
| Leather | Waist |
|
|
| Leather | Waist |
|
|
| Waist |
|
||
| Waist |
|
||
| Feet |
|
||
| Plate | Waist |
|
|
| Plate | Legs |
|
|
| Plate | Feet |
|
Weapons
| Item Name | Type | Main Stats | Secondary Stats |
|---|---|---|---|
| 1H Sword | Intellect |
|
|
| 1H Sword | Intellect |
|
|
| 1H Sword | Agility |
|
|
| 1H Sword | Strength |
|
Amulets, Cloaks, Rings, and Trinkets
| Item Name | Type | Main Stats | Secondary Stats |
|---|---|---|---|
| Amulet | Strength |
|
|
| Cloak | Agility |
|
|
| Ring | Intellect |
|
|
| Ring | Intellect |
|
|
| Ring |
|
|
Concluding Remarks
This concludes our raid guide for Operator Thogar. We hope you have found it helpful. Please do not hesitate to post any feedback you may have on our forums.
Changelog
- 13 Apr. 2015: Added Mythic mode strategy.
- 02 Mar. 2015: Added hard enrage timer.
- 06 Feb. 2015: Clarified that the trains do come in on a pattern, and added a link to the Thogar Helper add-on.
- Mage Class Changes in War Within Alpha Build 54361
- Mythic+ Dungeon Adjustments: April 26th
- Savage Ebony Turtle Mount in Patch 10.2.7
- Earthen Allied Race Dances and Customization Options
- Warband Members in Follower Dungeons?
- Dragonflight 10.2.6 and SoD Hotfixes, April 25th
- Affliction Warlock Changes in War Within Alpha: April 25th
- Windwalker Monk Changes in War Within Alpha: April 25th