The Third Circle (Savage): Phoinix Raid Guide
This guide aims to prepare players for Asphodelos: The Third Circle (Savage) by providing detailed explanations of the fight's mechanics, as well as consistent strategies for the purpose of farming.
Introduction
The fiery account of your fight with the phoinix has Nemjiji literally burning a hole through her parchment with the frenzied scratching of her quill. It's impossible to vouch for the accuracy of her story at this point, but at least you can now accurately describe the smell of smoldering ink.
Unlock Requirements
The Third Circle (Savage) can be unlocked at level 90 after completing the Normal difficulty of the Asphodelos raid and talking to Nemjiji in Labyrinthos (x8.4, y27.4). It requires a minimum item level of 575 to queue, but this requirement can be bypassed when entering with a full party.
Raid Guide
This encounter has a hard enrage of roughly 11:03, depending on how fast the adds phase is killed. The minimum required raid DPS check is roughly 42,200 raid DPS.
Raid Preparation
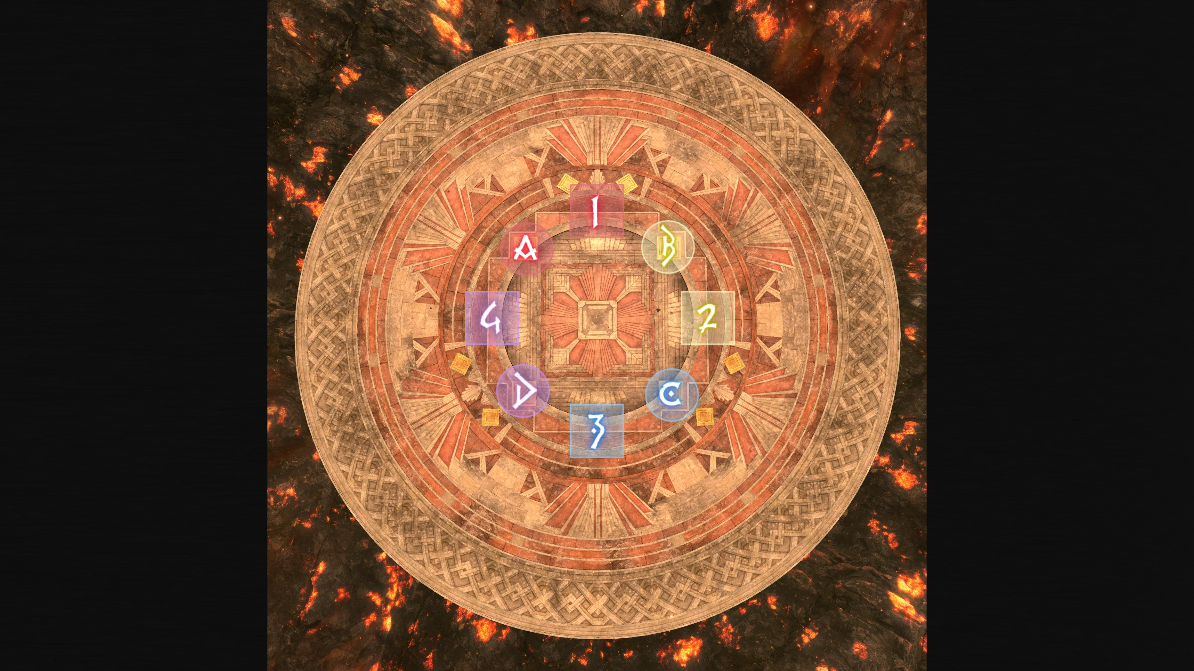
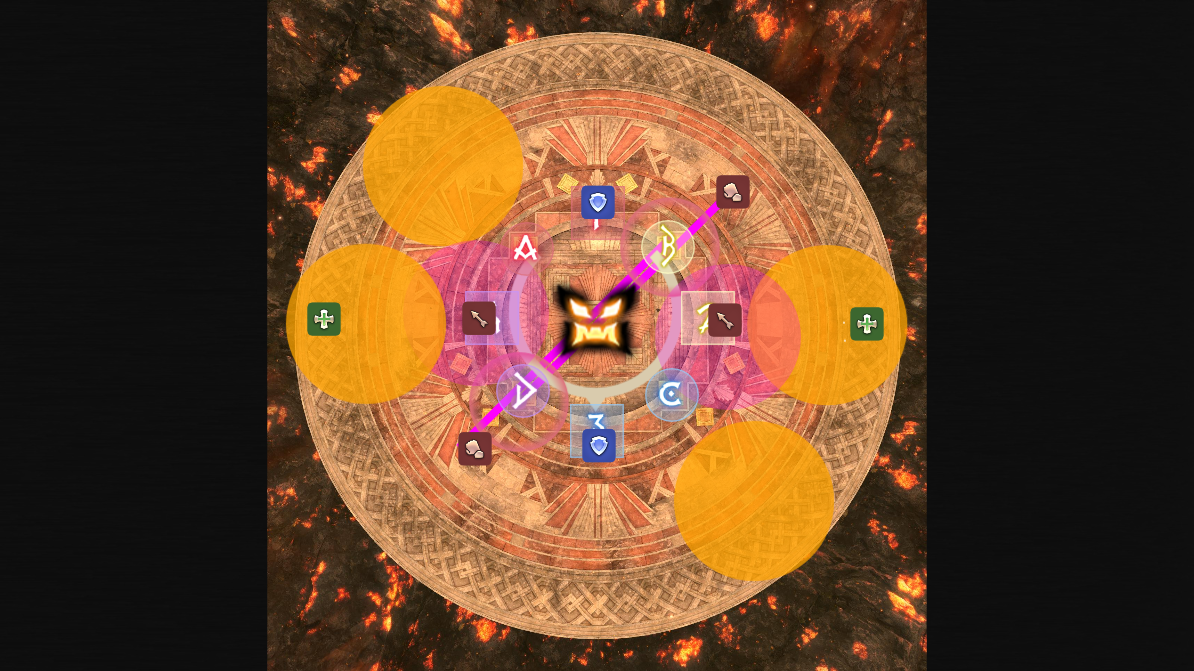
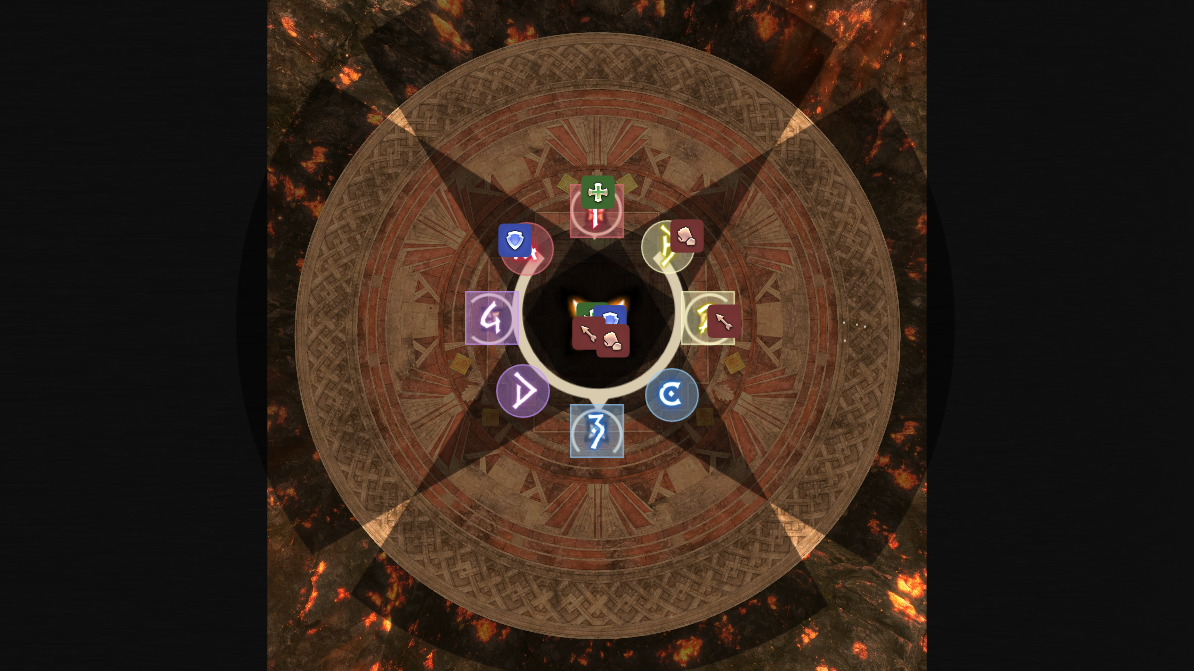
Players will be partnered off, with tanks partnering with ranged DPS and healers partnering with melee DPS. These will be used to form light parties of either one tank, one healer, and two DPS, or two tanks with two DPS and two healers with two DPS. Each partner will have a lettered marker they will stand on (ABCD).
Markers on the arena should be placed according to the image below.
Phase 1: The Phoinix
The Phoinix's Abilities
- Scorched Exaltation: Heavy raidwide magic damage.
- Heat of Condemnation: Two tethers on random players that need to be picked up by the tanks. These will do an AoE tank buster on them.
- Experimental Fireplume: The Phoinix will summon either eight small
fireballs or one large fireball, indicating the mechanic that will be cast.
- Eight small fireballs signals rotating AoEs around the room which end in the center. Stay in the middle and move out to dodge.
- One large fireball signals a giant AoE centered around a random player. Stack in the middle and move out to dodge.
- Left Cinderwing: The Phoinix cleaves its left side.
- Right Cinderwing: The Phoinix cleaves its right side.
- Darkened Fire: The Phoinix spawns a Darkened Fire add under either tanks and healers or DPS. It must be hit by four instances of Brightened Fire to remove its invincibility, and it will begin to detonate shortly after being summoned. If they are placed too close together, they will instantly detonate.
- Brightened Fire: All players are marked with an AoE numbered from one to eight, which deals moderate damage and inflicts a Fire Resistance Down debuff. The Phoinix will breathe fire on all players sequentially based on their number, and these AoEs must hit two Darkened Fire adds each.
- Devouring Brand: Lines of fire will appear at cardinal edges and creep towards the middle of the room, expanding when they do. This divides the arena into four quadrants.
- Searing Breeze: AoEs will appear under all players. Bait these as a group and dodge when they appear.
- Trail of Condemnation: The Phoinix's heads will start glowing,
indicating the mechanic that will be cast.
- If the middle head is glowing, it will do a line AoE across the arena as well as place unmarked AoEs on all players, dealing heavy damage.
- If the two side heads are glowing, it will do a line AoE across the sides of the arena, and players must stack with their partner to share heavy damage.
This encounter is split into four phases: an introductory phase, an adds phase, a mechanic-heavy dance phase, and a final victory lap phase. While the fight has a similar DPS check to the Hippokampos, all players need to be acutely aware of the mechanics to ensure victory in this duty.
Begin by pulling the boss slightly north of center. The fight begins with a raidwide, Scorched Exaltation, and a Heat of Condemnation tank buster. The party should be outside of the boss's hitbox so that the tanks can pick up these tethers, mitigate them, and spread from each other. Immediately after, all players should head to the center of the arena. This is to bait Experimental Fireplume if it is one large fireball or to dodge the beginning of the eight large fireballs. Either way, dodge the AoEs and head back to the center, orienting yourself to the correct position to dodge Left Cinderwing or Right Cinderwing.
The main tank needs to move the boss back to the center of the arena if needed. Players should then stack on their marker with their partner when Darkened Fire is casting, spawning the adds under either them or their partner. Afterwards, spread out loosely to see the numbered AoEs from Brightened Fire. By standing at the numbered markers and hitting two adds each, their invincibility will be removed. Have players numbered 1234 stand at their respective markers, while players numbered 5678 will go to the numbered marker that is four less than their number. This will ensure four AoEs hit each add while not damaging players with a Fire Resistance Down debuff. Quickly kill the adds afterwards.
After the adds are killed, there will be another Heat of Condemnation followed by a Scorched Exaltation. The next Experimental Fireplume has a Devouring Brand accompanying it, so players must move together to an intercardinal. All players should move to A, unless the rotating AoEs started at B, which then they go to B. Head to the very edge to bait Searing Breeze, and dodge back in. Dodge the Left Cinderwing or Right Cinderwing, and move out of the boss's hitbox so that tanks can pick up the tether from yet another Heat of Condemnation. The phase ends with a final Experimental Fireplume, so bait this in the middle. The boss will jump away during this mechanic.
Players need to find where the Phoinix jumped to and line up in order with their ABCD partners. If the middle head is glowing, players will split off to the sides to dodge the line AoE, with tanks and healers going left and DPS going right. If the outer heads are glowing, players can simply stay stacked. Heal up and get ready for the adds phase.
Phase Two: Sunbirds
In this phase, four Sunbird adds will spawn in the center of the arena. When killed, the Phoinix will cast Flames of Undeath, reviving each bird and pulsing out an AoE from their corpse. This AoE must not be allowed to touch another bird, so the adds must be killed far apart from each other.
Sunbirds first appear with 221,400 HP. The first time Sunbirds are respawned, they will grow larger and have 432,500 HP. The second time Sunbirds are respawned, they will become Sparkfledged and attach to the Phoinix, becoming untargetable and performing new mechanics in subsequent phases. The Phoinix is untargetable and invulnerable until this happens.
The following new abilities appear in this phase:
- Fireglide Sweep: Sunbirds, when first respawned, will tether to one player, in addition to tethering that player to another player. When the castbar finishes, the Sunbird will dash to their tethered player, dealing proximity physical damage in a line AoE and inflicting a physical vulnerability up debuff. It will then dash to the subsequent tethered player, doing the same thing.
- Flames of Undeath: The Phoinix deals massive raidwide magic damage and respawns Sunbirds.
- Burning Rain: Periodically in this phase, burning rain will fall onto the arena, dealing light raidwide magic damage to all players.
- Dead Rebirth: Colossal raidwide magic damage.
- Great Whirlwind: A hard enrage that each Sunbird casts after an allotted period of time which instantly wipes the raid.
Start by loosely spreading into light parties north and south. Have one light party's tank grab the north and east Sunbirds while the other light party's tank grabs the south and west Sunbirds. They should pull the adds north and south, respectively, and players should kill the north and south adds first. Once they are dead, the tanks will rotate clockwise, and the party should kill the other two adds at the edge.
Return to the middle for heals, and the Phoinix will cast Flames of Undeath, dealing massive raidwide damage and reviving Sunbirds. Players should start damaging Sunbirds as soon as possible and wait for the cast of Fireglide Sweep to ascertain their tethers.
Since these tethers indicate a dash that deals damage based on proximity, the player tethered to the Sunbird needs to go directly opposite of the Sunbird. The player tethered to the other player needs to go opposite of them, or where their tethered Sunbird is. There should be two players on each side of the add, one with two tethers and one with one tether. As the adds dash, the player being dashed to needs to dodge the second dash by sidestepping or moving behind the add to ensure they are not clipped.
Afterwards, tanks will go north and south again, and all players will kill the birds again, making sure to spread them apart. Rotate clockwise after the first add has been killed, and use cooldowns if necessary to beat their enrage.
The boss then casts two massive raidwides. First, the Phoinix will cast Flames of Undeath once more, turning the Sunbirds into Sparkfledged. It then becomes targetable and begins to cast Dead Rebirth, reviving the Sparkfledged, dealing catastrophic damage that must be shielded and mitigated before transitioning into the next phase.
Phase 3: The Phoinix
Starting from this phase onwards, the Sparkfledged will periodically attack the player second in enmity with four instances of auto-attack damage.
The Phoinix gains the following new abilities:
- Experimental Ashplume: The Phoinix will summon either eight small
dark orbs or one large dark orb, indicating the mechanic that will be cast.
- Eight small dark orbs signal that all players will get an unmarked AoE, dealing moderate magic damage and inflicting a Fire Resistance Down debuff. Spread out to avoid clipping each other.
- One large dark orb signals damage on one tank and one healer that must be shared with three other players each, which inflicts a Fire Resistance Down debuff.
- Experimental Gloryplume: The Phoinix will do a Experimental Fireplume mechanic into a Experimental Ashplume mechanic.
- Fledgling Flight: Each Sparkfledged will drop on a tank/healer or DPS. They will have an arrow and shoot a large conal AoE, Ashen Eye, in that direction.
- Fountain of Fire: The Phoinix spawns four sets of two flame puddles, which must be soaked by a player. These puddles will deal massive damage but buff the player with Trickle of Fire for six seconds, which massively boosts healing potency. These puddles will start on the north/south or east/west edges of the arena and go clockwise.
- Sun's Pinion: Marked AoEs on the closest two players to the Phoinix. This AoE deals moderate magic damage and inflicts a Fire Resistance Down debuff. It will drop a pinion on the player, which tethers to them with a proximity tether and dashes to them shortly after. An instance of this ability is also used as Fountain of Fire is being cast.
- Firestorms of Asphodelos: Catastrophic raidwide magic damage. Spawns three fire tornadoes north, southwest, and southeast.
- Flames of Asphodelos: Three sets of opposing conal AoEs come from the boss in sequence. Dodge into a conal AoE after it goes off.
- Storms of Asphodelos: Each tornado will shoot a conal AoE towards the closest player, and the boss will shoot a conal AoE towards the three closest players. In addition, two Heat of Condemnation tethers will appear, which must be picked up by the tanks. All conal AoEs will deal heavy damage and inflict a Fire Resistance Down debuff.
- Darkblaze Twister: The Phoinix tethers to the three tornadoes. The tornado with the dark tether will do a knockback, while the tornadoes with the fire tether will do a donut AoE around it.
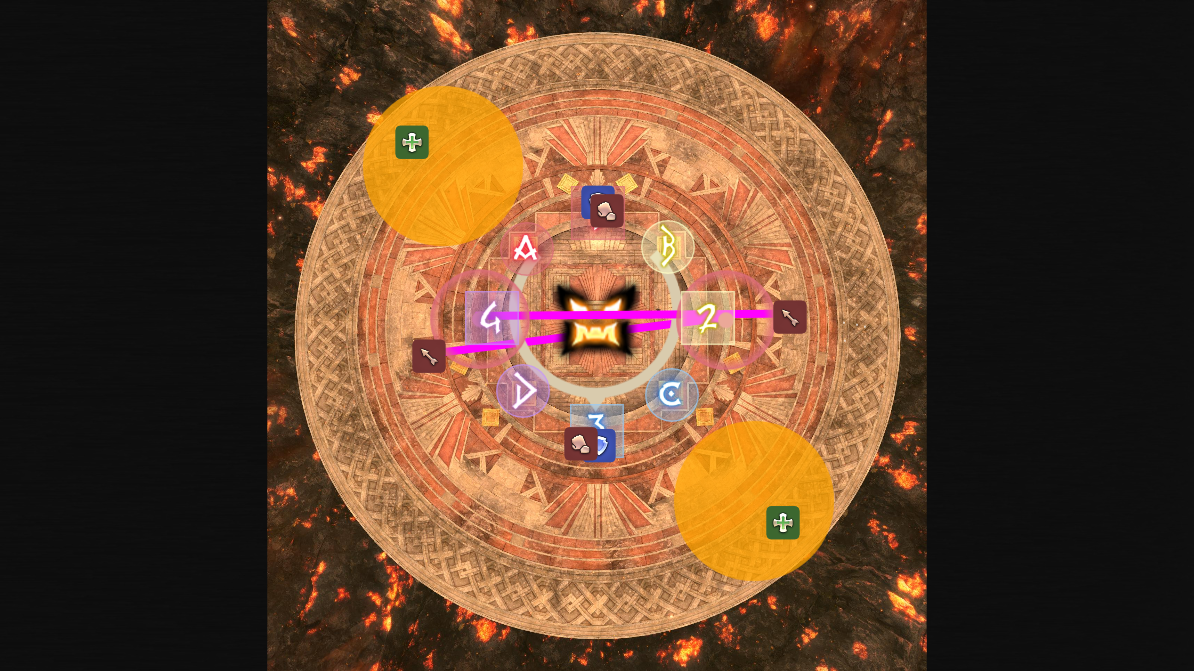
The third phase starts with Heat of Condemnation. Players should orient themselves after the tank buster to ensure tanks can pick up tethers. For the first Fledgling Flight, players marked will simply stand on the numbered markers and point their Sparkfledged Ashen Eye towards the outside of the arena.
The first difficult mechanic of the phase is Experimental Gloryplume. This first Gloryplume will always be eight small fireballs and a random Ashplume mechanic. Players will have to move to the outside of the arena while dodging AoEs and then spread or stack in light parties based on the Ashplume mechanic. For this one, tanks and melee DPS should always head towards the north side of the arena, while healers and ranged DPS should always head towards the south side of the arena.
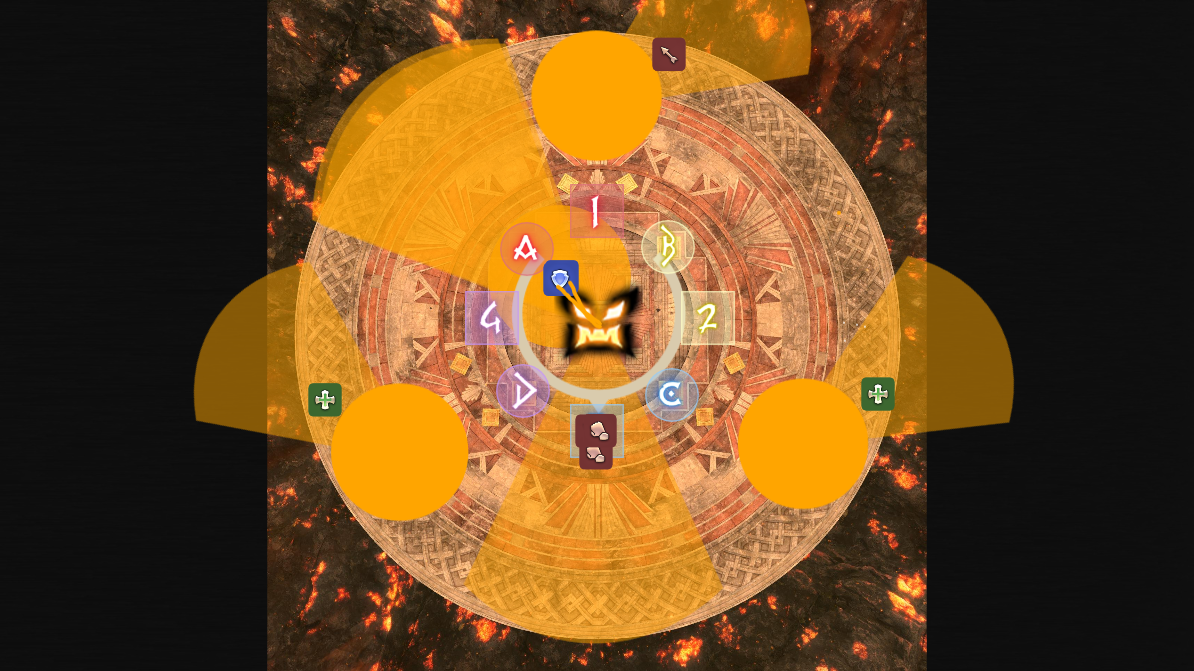
Position the boss back into the middle for Fountain of Fire. For this mechanic set, healers will have to soak towers and heal themselves through the damage, while tanks and DPS will bait an AoE that drops a pinion on them and then move far away from the pinion, taking proximity damage.
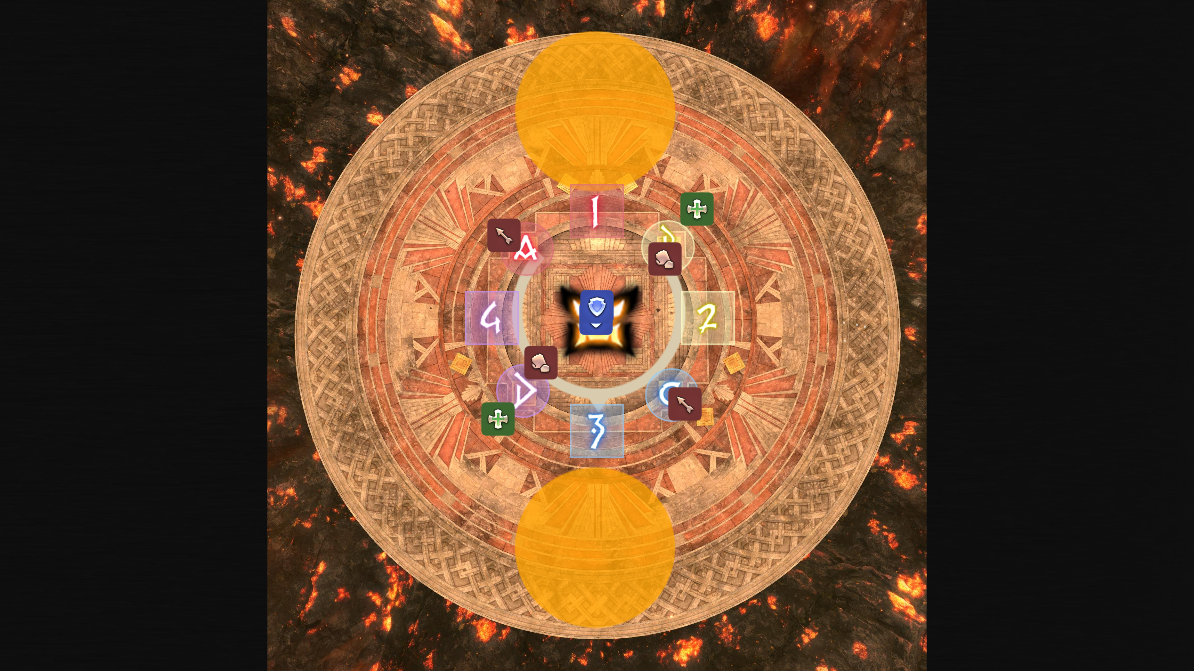
First, note where the fountains first appear. They will either spawn north and south or east and west before going clockwise. Tanks will stay in the middle of the boss's hitbox to bait the first Sun's Pinion AoEs. Healers will go soak their respective puddles, and tanks will place their AoEs directly between the boss and the puddle, as shown below.

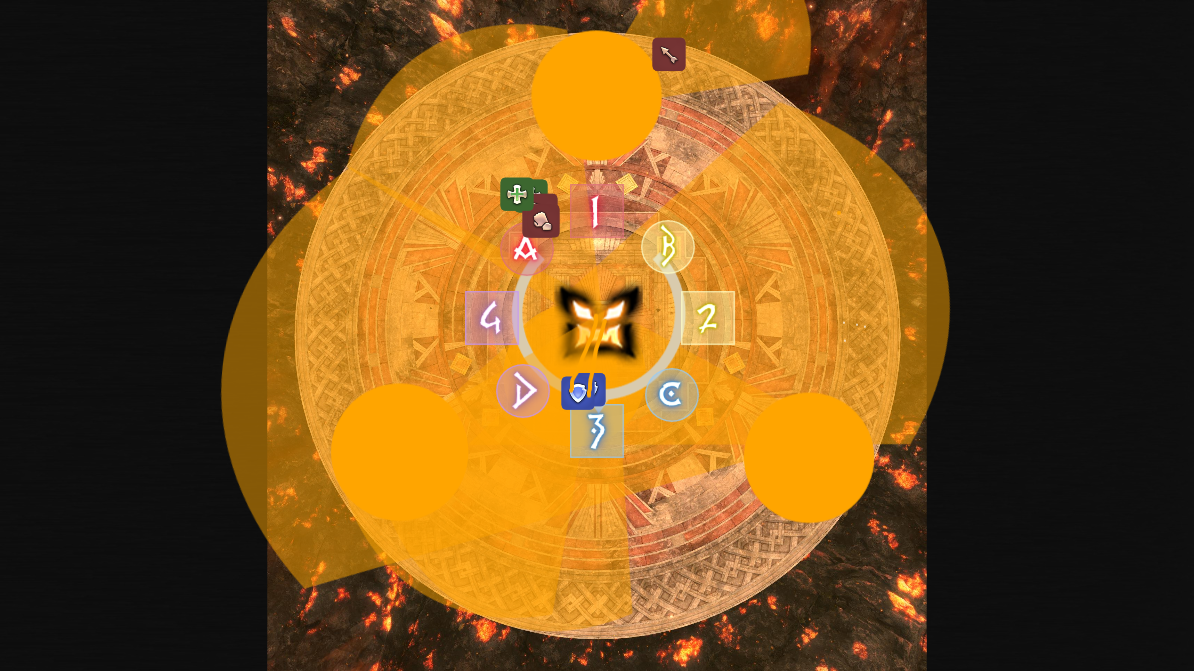
After tanks receive their AoEs, melee DPS will move inside the boss's hitbox to bait the second Sun's Pinion AoEs. Afterwards, the tank's AoEs and the first healer puddle will go off. Tanks will need to run across the arena behind the opposing tank's pinion to ensure the pinion tether is long enough, staying at max melee range. Healers need to top themselves and the party up using the increased healing from the Trickle of Fire buff and rotate to the next fountain. Melee DPS will place their AoE in front of the second healer puddle. Ranged DPS will also receive their AoE.
Tanks will stay where they are at max melee range. Melee DPS will wait until the tank's pinion goes off and then move to the opposing side. Ranged DPS will place their AoEs in front of the third healer puddle. Healers will do the same movement as before and heal themselves up. Finally, healers will soak the fourth and final tower, and ranged will move to the opposing side with their pinion damage. After the mechanic dance is over, return to the middle.
All images seen above for this mechanic can be viewed in this raidplan diagram.
Healers can use the increased healing buff to shield the party through two Scorched Exaltations. The party will position themselves for another Heat of Condemnation, and the boss will return to the middle for the next mechanic sequence with Firestorms of Asphodelos. Make sure to mitigate this ability, as it does colossal raidwide damage.
Have tanks and ranged DPS start at the 3 marker, and healers and melee DPS start at the 1 marker. First, players will have to dodge three conal AoEs from the boss, Flames of Asphodelos. As players are dodging, the boss will cast Experimental Ashplume, which will indicate that players need to stack with their light parties or spread out. Stack in light parties if it is the former, and have the ranged players move towards the outside and melee players stay on the inside if it is the latter.
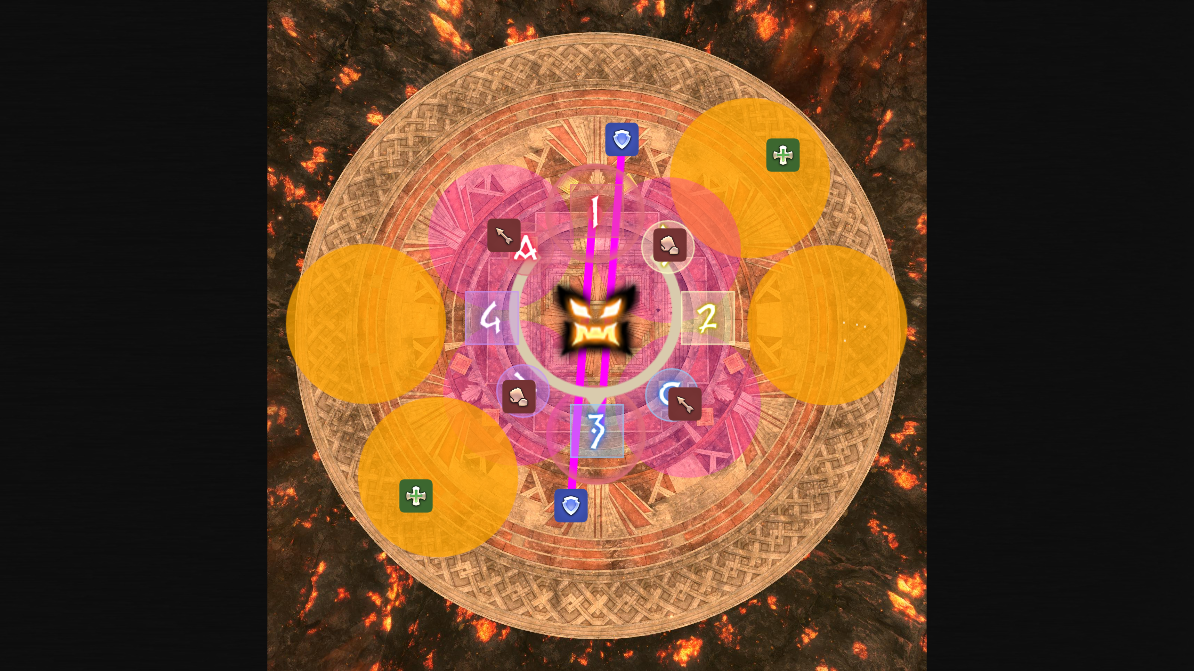
Next, players will have to do another set of Flames of Asphodelos into Storms of Asphodelos. Dodge the conal AoEs (this time everyone can dodge by themselves) and position accordingly. There are two generally accepted strategies for this, and both involve both tank immunities. For the first, healers will bait conal AoEs from the southwest and southeast tornadoes, and a ranged DPS will bait the conal AoE from the north tornado towards the northeast. Tanks will pick up both tethers and stand northwest inside the boss's hitbox and use their invulnerability cooldowns. This will take care of both tethers and two boss conals. All other DPS will stand to the south outside of the boss's hitbox for the final boss conal.
For the second, tanks will pick up both tethers and stand inside the boss's hitbox to the south. They will take two tethers, two boss conal AoEs, and the southwest and southeast conal AoEs. One ranged will bait the north tornado to the northwest, and all other players will stand at max melee towards the northwest to bait the final boss conal.
No matter the strategy used, return to the middle and heal up afterwards. The Phoinix will start casting Darkblaze Twister, tethering one tornado with a dark tether and the other two with a fire tether. All players should stand in front of the dark tethered tornado and wait until Searing Breeze is cast. Players will bait four AoEs together, moving clockwise. During this, the boss will cast another Experimental Ashplume, and it will go off after the knockback. All players will return to the dark tethered tornado and stand on two groups: tanks and ranged DPS will be on the left facing the tornado, and healers and melee DPS will be on the right facing the tornado. Stand on the diamonds on the arena right in front of the arena. Players will be knocked back near but not into the two other tornadoes, which will do a donut AoE around them. After the donut AoE goes off, either spread or stack based on the Ashplume mechanic. Return to the center and heal up for Scorched Exaltation. The hardest part of the fight is over, and now it is time for the final phase.
All images seen above for this mechanic can be viewed in this raidplan diagram.
Phase 4: The Phoinix
The Phoinix gains the following new abilities:
- Death's Toll: Inflicts players with one, two, or four stacks of the Death's Toll debuff. Players must remove this debuff by getting hit by the Ashen Eye ability from Sparkfledged. Having this debuff removed completely will also inflict players with a HP Recovery Down debuff.
- Life's Agonies: Colossal raidwide damage.
This phase begins with Death's Toll, inflicting all players with either one, two, or four stacks of the debuff. Players should note how many stacks they have received, as it indicates where they have to stand later. Next, the Phoinix casts Fledgling Flight. However, instead of pointing the arrows out, this time, marked players need to point them towards the center, still standing on the numbered markers. Players will remove their Death Toll stacks by standing on a specific spot and getting hit by one, two, or four conal AoEs.
Players with one stack will stand behind any Sparkfledged and only get hit by
the opposite one's conal AoE. Players with two stacks will stand on an
intercardinal and get hit by the two opposing Sparkfledged's conal AoE. Players
with four stacks will stand in the middle of the arena and get hit by all four.
After all players remove their stacks, the raid needs to heavily mitigate and
heal up to full through the HP Recovery Down debuff, as Life's Agonies
finishes casting soon afterwards. Note that an Astrologian can use
![]() Macrocosmos to trivialize this mechanic.
Macrocosmos to trivialize this mechanic.
The Phoinix will then cast another Experimental Gloryplume. This one will always be one large fireball and a random Ashplume mechanic. Players should immediately move to the north and south edge of the arena once the fireball comes out and either spread or stack in light parties based on the Ashplume mechanic. Again, tanks and melee DPS should always head towards the north side of the arena while healers and ranged DPS should always head south.
The rest of the fight has mechanics previously seen before. The Phoinix will become untargetable, jump to a random edge, and use Trail of Condemnation again. After returning, it will cast Devouring Brand and Experimental Fireplume, so stay in the middle of the arena until it comes out and dodge to the north side of the arena. Another Searing Breeze is cast with Left Cindering or Right Cinderwing, so bait and dodge. Finally, the boss will cast two Scorched Exaltations before casting a long hard enrage over ten seconds, Final Exaltation. Pump damage and defeat the boss before then!
Loot
When the Phoinix is defeated, treasure coffers will appear depending on how
many players have already defeated the fight for the week. The first coffer
will contain a ![]() Asphodelos Leg Gear Coffer, while the second one will
contain a
Asphodelos Leg Gear Coffer, while the second one will
contain a ![]() Radiant Twine,
Radiant Twine, ![]() Radiant Roborant, and one of a
Radiant Roborant, and one of a
![]() Asphodelos Head Gear Coffer,
Asphodelos Head Gear Coffer, ![]() Asphodelos Hand Gear Coffer, or
Asphodelos Hand Gear Coffer, or
![]() Asphodelos Foot Gear Coffer. When opened by a player, these coffers
contain gear for the job the player is currently on.
Asphodelos Foot Gear Coffer. When opened by a player, these coffers
contain gear for the job the player is currently on.
Players who defeat the encounter for the first time during the weekly reset will
also receive an ![]() Asphodelos Mythos III token. Eight of these can be traded
in for an Asphodelos leg gear of your choosing at a Pandaemonium gear vendor.
Four of these can be traded in for a
Asphodelos Mythos III token. Eight of these can be traded
in for an Asphodelos leg gear of your choosing at a Pandaemonium gear vendor.
Four of these can be traded in for a ![]() Radiant Twine or a
Radiant Twine or a ![]() Radiant Roborant.
Radiant Roborant.
Changelog
- 19 Jan. 2022: Guide added.
More FFXIV Content

This guide has been written by Lyra an accomplished raider in FFXIV and has written raid guides for the game for the past five years. You can follow him on Twitter and he streams raids on Twitch.
- FFXIV’s Berlin Fan Festival Schedule Is Out!
- Pre-Order FFXIV Nendoroids Y’shtola & G’raha Now!
- From Action to Tab Targetting — How Did You Start FFXIV?
- Developing FFXIV Big Fish Together With Ryuta Suyama
- These Changes Will Make You Think Twice Before Tanking in Evercold
- Complete Dawntrail’s Art Book Collection With – Relics of Eternity –
- New Framer’s Kit With Return Of Breaking Brick Mountains
- Last Chance For THE PRIMALS x Download Festival T-Shirt!