The Omega Protocol Ultimate (TOP) Phase 5 Run: Dynamis Sigma Guide for FFXIV
This page contains detailed information and strategy about the high-end Duty "The Omega Protocol (Ultimate)", commonly abbreviated as TOP. This section of the guide will cover the Phase 5 trio, Run: Dynamis Sigma, which pits players against all forms of Omega while interacting with Dynamis.
Run: ****mi* (Sigma Version)
Due to the sheer length of this phase and how many details each trio mechanic has, we've decided to split these pages up into three sections. If you'd like information on either of the other two phases, feel free to use the buttons below.
Feel free to follow along with this text guide using this Toolbox, specifically catering to Run: Dynamis (Sigma Version).
After Delta is resolved, Omega-M will reappear and perform another set of Solar Ray busters. This uptime segment is also where your two minute buff window will land in conjunction with potions. As with Delta, Sigma is a very hard hitting raid-wide that will require heavy mitigation. Due to how the timeline works out, you will likely have every form of mitigation you used in Phase 4 available here.
Once Omega-M disappears for the trio, all players are assigned markers above
their heads exactly like in Party Synergy from Phase 2 - players that have
identical marks are tethered to each other with either Mid Glitch or Remote Glitch.
These also work exactly the same way they did in Phase 2. One of each
![]() Hello, Distant World
and
Hello, Distant World
and ![]() Hello, Near World will also be assigned to two random players, though you do
not need to care about them for now.
Hello, Near World will also be assigned to two random players, though you do
not need to care about them for now.
Two Arm Units will spawn that will each tether to the player farthest from them; This is a dynamically updating tether that will always jump to whoever is currently farthest. Omega-M himself will spawn opposite of the two Arm Units, becoming our new relative North, with the two Arm Units being South-West and South-East.
Final Omega will spawn in the middle of the arena, and six prey markers will then appear on random players' heads, such that there will always be two tether pairs with two prey markers, and two tether pairs with one prey marker each. Any player marked with prey will be hit with a Wave Cannon beam from Final Omega, and the two Arm Units will also fire Hyper Pulse at the two players they are tethered to at the same time.
In the meantime, Beetle Omega also assigns Looper debuffs to all players, and spawns towers in the arena after the Hyper Pulse and Wave Cannons are resolved. He will either spawn five towers in the case of Remote Glitch, or six towers in the case of Mid Glitch. Omega-F will spawn in the middle of the arena and do a knockback shortly before towers resolve, requiring players to ride the knockback into their towers.
Omega-F teleports again and reappears in a random cardinal or intercardinal, becoming our new relative North. Similar to the first part of the mechanic, two Arm Units will spawn relative South-West and South-East of Omega-F. A huge spinning ring will also appear in the center of the arena with either a clockwise or counter-clockwise indicator. This ring will fire a laser starting from the relative North-South cardinal line and rotate it in the direction of the indicator. Omega-F herself will spawn with either a staff or scythe legs, and perform the corresponding attack shortly after the laser begins its rotation. The laser will rotate a little bit short of 180 degrees, stopping right at the second intercardinal, and the Hello World debuffs will resolve after the laser disappears at the same time as Arm Units.
Mechanic Resolution
Line up in front of Omega-M in pairs. You may find it convenient to simply reuse your lineup for Mid Glitch in Party Synergy, treating Omega-M as North instead of the Optical Unit in Phase 2. Once you have performed this line up, you can forget about your initial symbol entirely, it will no longer be relevant for the rest of the mechanic.

Take note of the prey markers that spawn above your head, as that will determine your positioning for this mechanic. Since six out of eight players will be marked for Wave Cannon, we want the two unmarked players to bait Hyper Pulse from Arm Units. We will then assign positions as follows, starting from North:
- The first pair with two prey markers: left player goes North, right player goes South.
- The second pair with two prey markers: left player goes West, right player goes East.
- The first pair with only one prey marker: unmarked player goes North-West, marked player goes South-East.
- The second pair with only one prey marker: unmarked player goes North-East, marked player goes South-West.
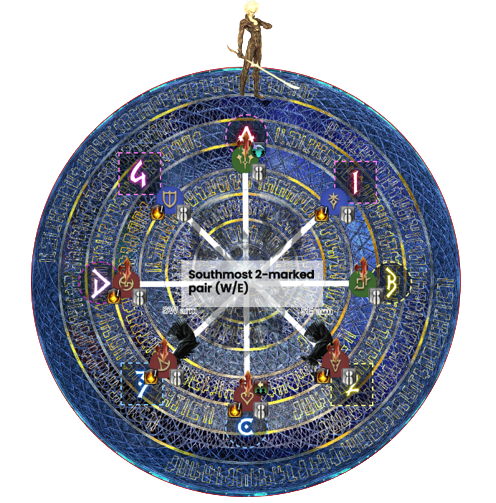
At the same time, we must resolve our Glitch debuff as we will be taking damage from the Wave Cannons and Hyper Pulses. For Mid Glitch, stand in front of the waymarks at your intercardinal/cardinal as in the image above. For Remote Glitch, go all the way to the wall. While you're waiting for the attacks to go off, take note of the waymark you are currently on, this will determine your tower position.
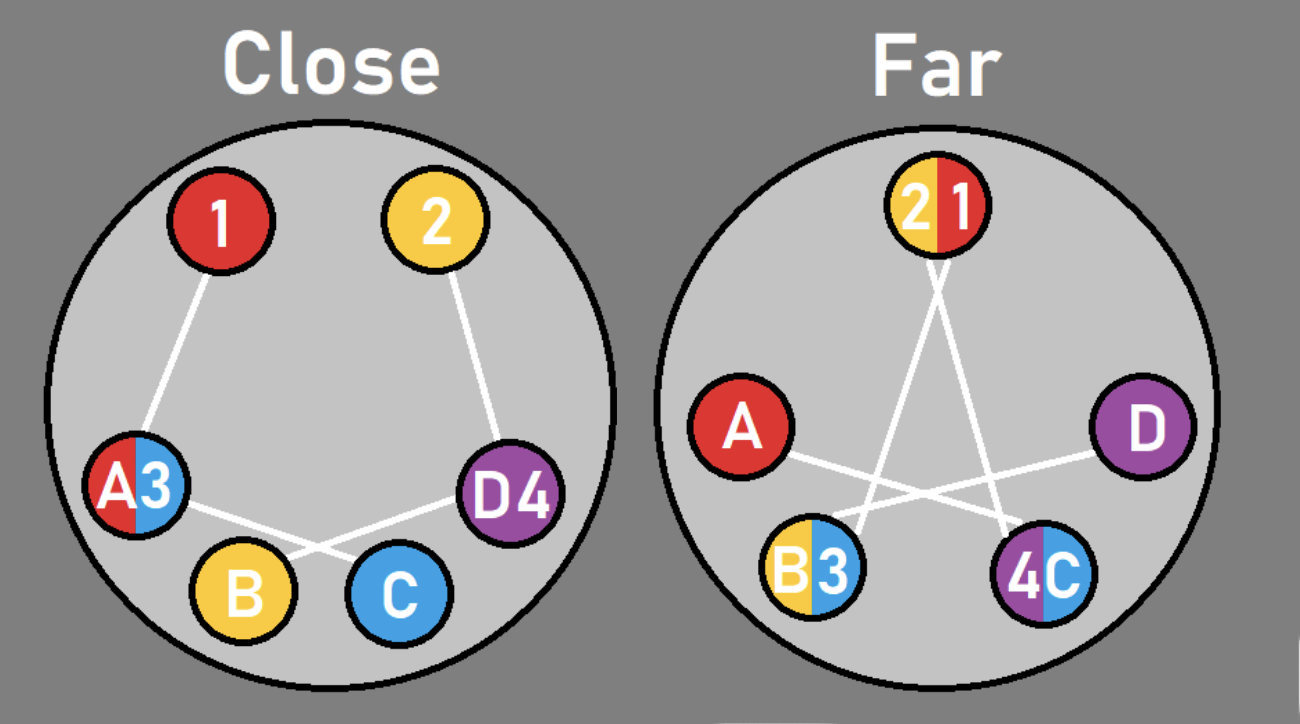
You will then aim to get yourself knocked into the tower corresponding to your waymark during the initial spreads. For example, if you ended up on the A waymark during Wave Cannon/Hyper Pulse, you will be knocked in the leftmost bottom tower in both configurations. If you were on the 2 waymark, you will be knocked into the singular top tower for Remote Glitch, and right top tower for Mid Glitch. To resolve Mid Glitch, simply stand in the center of your towers. Resolving Remote Glitch is slightly trickier as simply going to the wall is not enough - you will need go to the edge of your tower away from your tether partner.
You can find in-game macros for both tower configurations in this Pastebin.
After towers resolve, the party will split into two groups, with three players going towards Omega-F and the remaining five players going opposite of her. The three players should be selected using the following criteria:
- Does not have Near/Distant World.
- Players with one stack of
 Dynamis.
The reason we have this priority is to ensure that all zero stack players will get
a guaranteed ![]() Dynamis stack in Sigma - which they can only do by going South.
Two of the three players going North will be baiting fists and thus will not
receive a stack, while everyone South either has a Hello World debuff or will be
taking a Hello World bounce.
Dynamis stack in Sigma - which they can only do by going South.
Two of the three players going North will be baiting fists and thus will not
receive a stack, while everyone South either has a Hello World debuff or will be
taking a Hello World bounce.
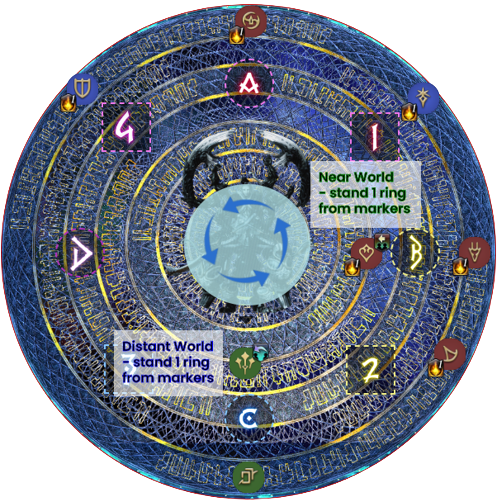
Once players have separated into their 3/5 groups, they should go behind the laser's rotation and start lining up on the wall to telegraph their positions for the upcoming Hello World bounces.

In the above example, the Paladin and Dark Knight will bait the two Arm Units while the Samurai goes directly North to bait Distant World. The players with Near/Distant debuffs will leave the outer ring to the non-debuffed players to sort out their ordering. In this case, the Dragoon and Summoner will be the Near World baits, and the Astrologian the Distant World bait.
Once these positions have been settled upon, check whether Omega-F has scythe legs or is simply holding a staff. In the staff pattern, all players need to wait a few laser pulses for the staff AoE to go off before following the lasers into their final positions. For scythe, we do the opposite where we hug each laser pulse as close as possible so we can make it into the safespot before she performs her attack. Players will then proceed to rotate into their final positions as follows:
- Arm Unit baiters: move to your intercardinals when possible. The baiter that is staying behind needs to wait for the laser to do its final pulse before moving into their intercardinal position or they will be clipped by the laser.
- Distant World baiter on North: simply be at the wall directly North.
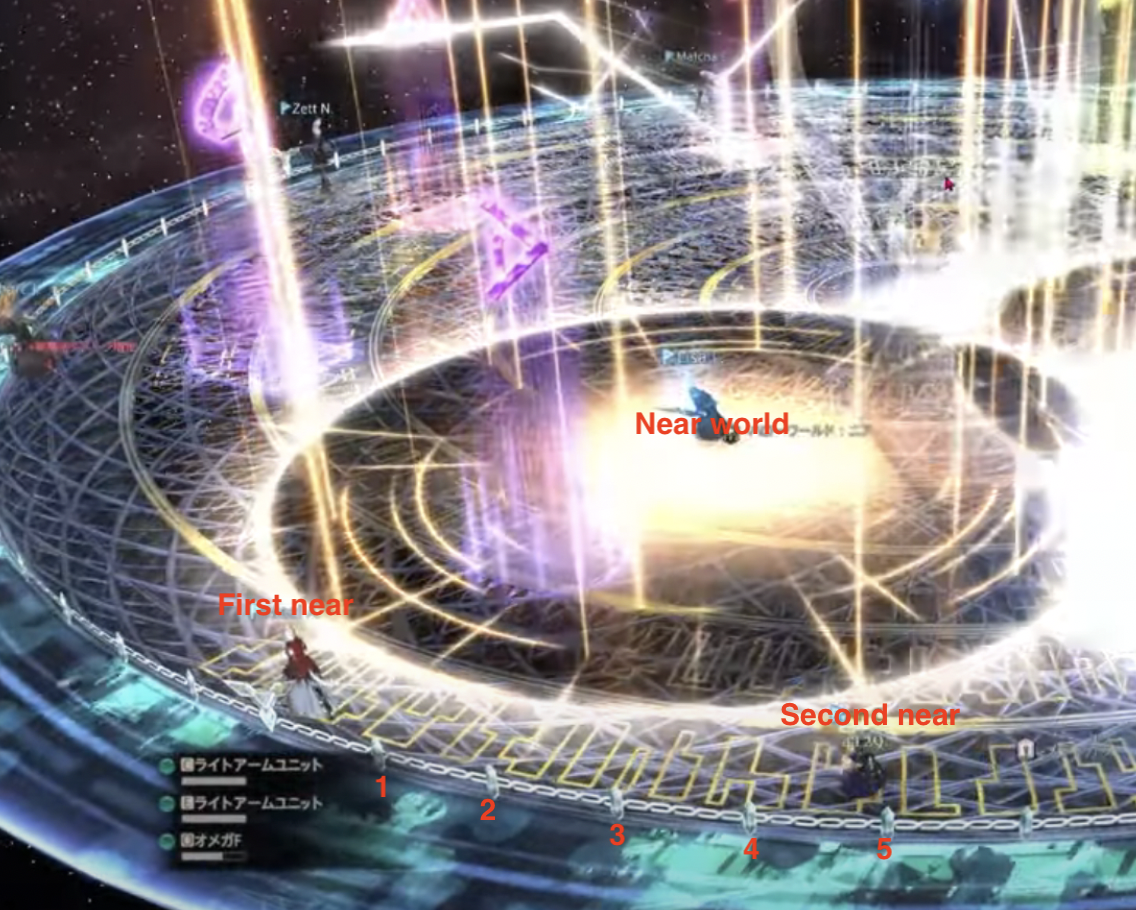
- Near World: Keep following the laser (you will be 'near' the laser) until you rotate 90 degrees into the next cardinal. Then stand one ring further in from the cardinal waymark.
- Distant World: Stay on the original cardinal where the laser started (you will be 'distant' from the laser), again one ring further in from the cardinal waymark.
- First Near World baiter: Follow the laser until you rotate 90 degrees into the next cardinal and stay on the wall.
- Second Near World baiter: Follow the laser until you are between the next cardinal and intercardinal, standing on the wall. You do not want to be on the intercardinal as the Arm Units will be cleaving them. If you want a precise positioning cue, you can be standing on the wall five notches from where the first Near World baiter is; They should be directly on the cardinal.
- Distant World baiter on South: Stay on the original cardinal where the laser started from and be at the wall.
After this mechanic resolves, four players should have two ![]() Dynamis stacks, and four players should have one
Dynamis stacks, and four players should have one ![]() Dynamis stack.
Dynamis stack.
Tips and Tricks
- The Arm Units spawn before Omega-M does in the beginning of the mechanic, and they will always be South-West and South-East relative to him. Players who have trouble finding Omega-M immediately may want to use Arm Units to help in locating him.
- Try to keep the line-up as orderly as you can without squishing players too much as this can easily cause players to mistake prey marker ordering and lead to mispositioning. You can line up roughly according to the rings on the arena floor; The first symbol on the outmost ring, the second symbol one ring further in etc.
- Players who end up South-West and South-East for Mid Glitch should make sure to not accidentally stand in front of the Arm Units, but as long as they are hugging the waymark it should be safe.
- Try to remember where Omega-M was when spreading for Wave Cannon and keep your camera facing it, because the tower spawn orientation will be based off Omega-M. The towers will either spawn with the top side where Omega-M was, or they will be flipped 180 degrees.
- It may be tempting to run ahead as the Near World, especially if you had to wait for Omega-F's staff AoE to go off. However, there is plenty of time to walk to your spot before your Near World resolves as long as you are walking on the ring you're supposed to end up on. Don't try to get ahead of yourself and run into the rotating laser.
- Similarly, if you are baiting the back fist, make sure that you wait for the laser to finish its rotation before stepping into the intercardinal, as prepositioning too early will cause you to get cleaved. You can also be slightly off with your bait and not affect the rest of the mechanic, so there's no real hurry to get into position.
- Near World bait players should always walk on the outer ring when moving to their positions. Again, there is plenty of time to move there, and trying to cheat your distance by using inner rings to move may risk getting clipped by the Near World AoE.
Changelog
- 07 Mar. 2023: Guide added.
More Final Fantasy XIV Content

Meru has been raiding since early Stormblood and has done high end content in a variety of roles. She has a lot of experience reading and analyzing logs and has done extensive testing on a variety of mitigation related issues. She hangs out in the Balance Discord and is often pinged in multiple channels for mitigation questions, but sadly very little fishing questions.
- Same-Region Matching Starts this Fall. But There’s a Catch
- Have Your First Look At Evercold’s Realmships & Dungeons
- How Character Action Skins Will Give You More Ways to Customize
- How Auto Content Balancing Will Change How You Play Evercold
- This Rare FFXIV Minion Secretly Became Sellable in Patch 7.55
- The Yo-kai Watch Event Returns Again to Eorzea
- Best Crafting Rotations for 7.55 Phantom Occultum Relics
- FFXIV Hits the Switch 2 Soon! Here’s What We Know About the Release Date