AAC Heavyweight M1 Savage Raid Guide
Welcome to our guide to AAC Heavyweight M1 Savage (M9S), the first encounter in the final raid tier of The Arcadion. This guide aims to prepare players for the raid so they will know what to expect, with detailed mechanic instructions for clearing and consistent weekly farming.
Introduction to Vamp Fatale (Savage)

Vamp Fatale is the first boss fought in AAC Heavyweight (Savage).
How to Unlock Vamp Fatale
AAC Heavyweight M1 (Savage) can be unlocked at level 100 after completing the Normal difficulty of the Heavyweight raid and talking to Gabbro in Solution Nine (x22.3, y17.1). It requires a minimum item level of 770 to queue, but this requirement can be bypassed when entering with a full party.
Lore
Having heard your direct account of your rise through the heavyweight division, Gabbro's imagination runs wild once more. Indeed, he now envisions a world where Vamp Fatale's spectacle of slaughter were a further nightmarish affair. Had her punishment been even more severe, would she have brought you to your knees?
Video Resources
Video resources for this encounter will be posted when available.
Raid Guide
Vamp Fatale is fought on an arena with four columns and four rows. Players can fall off the arena, and the arena will change from phase to phase.
Vamp Fatale's enrage occurs at roughly 10:05 into the fight and requires roughly 211,770 raid DPS, though there are adds that may change the exact amount required.
Raid Preparation
Begin by dividing the raid into two light parties of one tank, one healer, and two DPS each. All players will get assigned a clock spot with tanks and melees at cardinals and healers and ranged at intercardinals.
Every time a player is killed, hit by certain mechanics, or Vamp Fatale casts Crowd Kill, she gains stacks of Satisfied. This increases Vamp Fatale's damage dealt, and at 8 stacks the size of certain abilities increase.
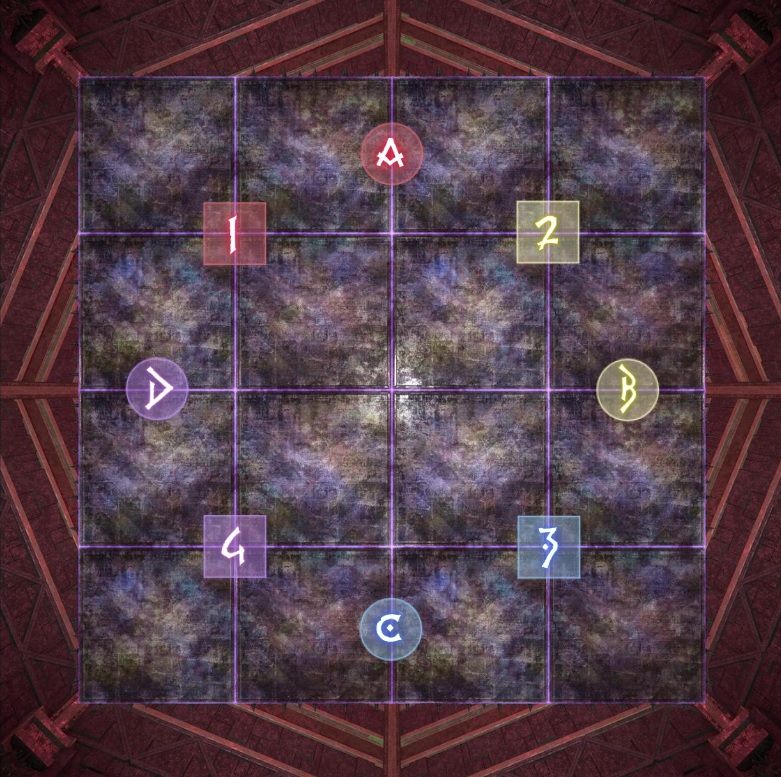
Place waymarks with letters on outer cardinals and numbers on outer intercardinals.
Waymark Code
Strategy Boards
All diagrams in this guide are available as Strategy Boards here together, or use the codes below to import individual strategy boards.
Vamp Stomp
Aetherletting
Hell in a Cell
Phase One
In phase one, you face Vamp Fatale and the Coffinmaker.
Phase One Mechanics
The following mechanics are introduced in the first phase.
- Killer Voice: Raidwide magical damage.
- Hardcore: Tank buster on #1 and #2 on aggro. The size increases at 8 stacks of Satisfied.
- Vamp Stomp: Vamp Fatale jumps to the middle with a large AoE. Bats spawn around the arena that start rotating, and all players are afflicted with Curse of the Bombpyre. The AoE emits a slow-moving shockwave that does a circle AoE that inflicts magic vuln when it hits a bat or player.
- Brutal Rain: A multi-hit stack marker on a healer. Hits 3 times, but will increase the number of hits based on the amount of Satisfied stacks.
- Sadistic Screech: Raidwide magical damage. Changes the arena or returns it to normal.
- Coffinfiller: Two columns of the Coffinmaker will glow in succession, and do a line AoE in order.
- Dead Wake: The Coffinmaker moves forward another row, killing all players standing in its path.
- Half Moon: Vamp Fatale prepares to cleave half the arena with her orb, then the other half. The size increases at 8 stacks of Satisfied.
- Crowd Kill: Raidwide magical damage. Vamp Fatale gains 4 stacks of Satisfied.
Phase One Strategy
The fight begins with a raidwide and tank buster in #1 and #2 in aggro. Have both tanks pull with tank stance and mitigate Hardcore. The first real mechanic of the fight is Vamp Stomp, and this happens thrice throughout the fight so mastery is required. All players need to spread out to their clock spots and get hit by the shockwave while avoiding both other players and the bat explosions. Have the MT stand in the middle to pop first then run away. The first two bat AoEs will be rotated 90 degrees from where the spawn, so the melees can sit on the bat on their side and wait for the explosion. The OT will be south and adjust to the melees. Finally, the ranged DPS and healers can pop whenever it's safe when the shockwave is nearing the outside and the melees move into the centre.

Return to the middle and heal up for Sadistic Screech. This will change the arena, removing the east and west columns. Vamp Fatale will become untargetable and spawn the Coffinmaker add from the north of the arena. This phase is similar to normal mode, except the Coffinfiller AoEs are untargeted. Additionally, with each set of AoEs, Vamp Fatale will be at one side of the arena casting Half Moon, indicating that either the front or back will be safe. Therefore, for two iterations players will have to dodge both the line AoEs and half-room cleaves, then move into the safe spot for the second set.
Once the Coffinmaker reaches the final row, Vamp Fatale will instead cast Half Moon from the rear of the arena. Players will have to again dodge the first set of AoEs and move into the safe spot for the second set. It does two sets of AoEs at the end, then casts one final Dead Wake pushing all players off the platform if not killed in time.
Vamp Fatale will cast Sadistic Screech, turning the arena back to normal before going to the middle and casting Crowd Kill, increasing her stacks of Satisfied by 4. If there were multiple deaths and her stacks are 8 or above at this point certain attacks will be enhanced.
Phase Two
In phase two, Vamp Fatale will summon new adds and change the arena multiple times.
Phase Two Mechanics
The following mechanics are introduced or changed in phase two.
- Finale Fatale: Raidwide magic damage. Changes the arena to a circle. Drops AoE puddles on the ground.
- Aetherletting: Vamp Fatale jumps to the middle and shoots four conal AoES going clockwise or counterclockwise. She then marks two players in each role sequentially to drop an AoE that creates a plus-shaped or X-shaped AoE.
- Insatiable Thirst: Raidwide magical damage. Returns the arena to normal.
- Buzzsaws: Two large buzzsaws will spawn northwest and southeast of the arena and continuously run back and forth. Two small buzzsaws spawn north and south and continuously circle around the arena. Colliding into one of these will give players a bleed damage-over-time debuff.
- Deadly Doornail: An AoE on the arena spawns a Deadly Doornail add, which starts with a small AoE which inflicts a DoT. This slowly expands.
- Fatal Flail: A tank tower on the arena spawns a Fatal Flail add, which starts casting Barbed Burst. This must be killed before it finishes casting.
Phase Two Strategy
Heal up for Finale Fatale and dodge the AoEs. For Aetherletting, all players need to be acutely aware of their clock spot. The mechanic can be done in static spots by offsetting the plus and X drops and dodging all line AoEs in the middle.

All players will dodge the conal AoEs. Drop prey markers in-between the conal AoEs, which will be at your clock spots slightly offset counterclockwise. Once all Aetherletting preys are dropped, all players will move to the exact middle of the arena to dodge all AoEs. If everyone placed their prey properly the middle will be completely safe.
This is followed by Hardcore, Vamp Stomp, and Half Moon. Again, note if Vamp Fatale's stacks are 8 or above (her orb will be larger as well). The size of both these abilities will be increased just like the end of the normal difficulty. Vamp Fatale will then cast three instances of raidwide damage: Brutal Rain, Insatiable Thirst, and Sadistic Screech. This will once again remove the east and west columns of the arena.
In this adds phase, players have to dodge the buzzsaws while soaking towers and killing adds. There will be three sets of adds, each spawning two tank towers with Fatal Flail and one AoE puddle with Deadly Doornail. The MT will soak all towers in the north half of the arena and the OT will soak all towers in the south half of the arena. These only require a short mit.
Melee players should first attack the Doornail until the AoE is too large to hit it inside melee range, then swap to the close Fatal Flail. Ranged players should attack the Doornail and the far Fatal Flail. Tanks will hit their own Flail. Often both adds will spawn in two middle squares, so attempt to cleave all three at the same time to increase damage. Every set of adds Vamp Fatale will cast Killer Voice, so mitigate and heal.
After the adds phase is done, Vamp Fatale will cast Sadistic Screech and return the arena to normal. She casts one final Crowd Kill, guaranteeing she will have at least 8 stacks of Satisfied.
Phase Three
The final phase has new mechanics that are relatively simple but need to be performed to ensure damage checks are met.
Phase Three Mechanics
The following mechanics are introduced in the third and final phase.
- Hell in a Cell: Vamp Fatale spawns four towers around the arena. Players must soak these towers, then kill the add that spawns to free them from the tower. They also receive the Hell Awaits debuff indicating that they are unable to soak another tower.
- Ultrasonic Amp: A wide conal stack AoE on a random player not in a cell.
- Ultrasonic Spread: Conal AoEs on a tank, healer, and DPS not in a cell. The tank AoE is wider and acts as a tank buster.
- Undead Deathmatch: Two large towers spawn north and south. Players need to soak these towers to share damage, and when they do they become tethered to a bat which will rotate clockwise or counterclockwise around the arena. Bats will cast either a donut AoE or a point-blank AoE after rotating 180 degrees, and rotate again.
- Sanguine Scratch: Conal AoEs on the ground. These will repeat and hit the previous safe spots every cast with conal AoEs. five times per set.
Phase Three Strategy
Players will have to soak towers and free themselves by killing the Charnel Cell add only they can damage. Players not soaking towers will have to either spread or stack based on the mechanic Vamp Fatale is casting.

Light party 1 will do the tower soaks first. Since the towers spawn in a semi-random formation, they will take the towers in order of tank, healer, melee DPS, and ranged DPS from north clockwise. Another way to remember this is that tank and healer are 1st and 2nd north clockwise and ranged DPS and melee DPS are 1st and 2nd northwest counterclockwise.
While they soak their tower and kill their add, the players on the outside have to watch Vamp Fatale's castbar. Ultrasonic Spread means that they have to spread for conal AoEs, and Ultrasonic Amp means they have to stack to share damage. The tower formation creates one large gap and two small gaps as shown above: the stack and tank cone will always be taken in the large gap, while DPS will go one gap counterclockwise and healer go one gap clockwise. Another way to remember this is healers right relative to the tank cleave, and DPS left relative.
The other cast will follow the first one, so be prepared to move, heal, and mitigate. Once all players have broken free of the cell, the mechanic will repeat. This time, light party 2 has to do the tower soaks and light party 1 will do the outside mechanics. Once this is finished, dodge the ground AoEs and prepare for Undead Deathmatch.
Light party 1 soaks the tower that spawns north, and light party 2 soaks the tower that spawns south. Dodge the initial Sanguine Scratch conal AoE, then move in the direction the bat is going. On the fourth AoE set, the bat will indicate either a donut AoE or a point-blank AoE on its head. Dodge this by either standing on the bat (max melee range) for the donut or on the boss's hitbox for the point-blank. This will repeat and the bat will rotate again with conal AoEs.
After the second set of rotations, she will cast Brutal Rain, Vamp Stomp, Hardcore, and Sanguine Scratch which are all mechanics seen previously. She will proceed to cast one final Crowd Kill, amplifying one final Finale Fatale as a hard enrage at 10:05. Kill the boss before she kills you!
Party Finder Strategies
Amendments to the guide above based on popular strategies used in party finder will be used here.
- This guide is compatible with the Toxic Friends Raidplan at https://raidplan.io/plan/c2L5iJfuYIWXk1v7.
- The Aetherletting strategy described in this guide is called Static Aetherletting. Most groups will use this strat, but certain groups will rotate with role stacks and drop AoEs out, though that strategy is largely becoming obsolete.
Loot
When Vamp Fatale is defeated, a treasure coffer will appear that contains Grand Champion's Accessory Coffers. When opened by a player, these coffers contain an item level 790 Grand Champion accessory for the job the player is currently on. The amount of coffers that appear depend on how many players have already cleared during the weekly lockout. If no players have cleared yet, all four accessory coffers will appear. If one to four players have already cleared, two accessory coffers will appear. If five or more players have already cleared, no treasure coffer will appear.
Players who defeat the encounter for the first time during the weekly reset will also receive an AAC Illustrated: HW Edition I token. Three of these can be traded in for a Grand Champion accessory of your choosing at an Arcadion gear vendor.
Changelog
- 10 Jan. 2026: Guide added.

This guide has been written by Lyra an accomplished raider in FFXIV and has written raid guides for the game for the past five years. You can follow him on Twitter and he streams raids on Twitch.
- FFXIV’s Berlin Fan Festival Schedule Is Out!
- Pre-Order FFXIV Nendoroids Y’shtola & G’raha Now!
- From Action to Tab Targetting — How Did You Start FFXIV?
- Developing FFXIV Big Fish Together With Ryuta Suyama
- These Changes Will Make You Think Twice Before Tanking in Evercold
- Complete Dawntrail’s Art Book Collection With – Relics of Eternity –
- New Framer’s Kit With Return Of Breaking Brick Mountains
- Last Chance For THE PRIMALS x Download Festival T-Shirt!