The First Circle (Savage): Erichthonios Raid Guide
This guide aims to prepare players for Asphodelos: The First Circle (Savage) by providing detailed explanations of the fight's mechanics, as well as consistent strategies for the purpose of farming.
Introduction
Nemjiji sequesters you in Aporia for what she insists will be a simple session of dictation, but what the glint in her eye promises will be so much more. Whether or not her written account of your triumph over Erichthonios at the Gates of Pandaemonium will be strictly veracious...well, a little creativity never hurt anyone, right?
Unlock Requirements
The First Circle (Savage) can be unlocked at level 90 after completing the Normal difficulty of the Asphodelos raid and talking to Nemjiji in Labyrinthos (x8.4, y27.4). It requires a minimum item level of 570 to queue, but this requirement can be bypassed when entering with a full party.
Raid Guide
This encounter has a hard enrage of 10:20 and has a DPS check of roughly 39,700 raid DPS.
Raid Preparation
All players should be assigned a clock spot.
Phase 1: Erichthonios
Erichthonios's Abilities
- Heavy Hand: A tank buster on the main tank which deals physical damage.
- Warder's Wrath: Moderate raidwide magic damage.
- Gaoler's Flail: Two weapons will be brought out in succession. Erichthonios
will do two mechanics in succession based on what weapons were used in which order.
- Sickle: A 270 degree cleave on the side in which the sickle was brought out.
- Morningstar: A point-blank AoE.
- Chakram: A donut AoE.
- Pitiless Flail of Grace: Knocks the main tank back, dealing moderate damage and inflicting a magic vulnerability debuff. Afterwards, the player first on the enmity list will have a group stack, forcing a tank swap.
- Pitiless Flail of Purgation: Knocks the main tank back, dealing moderate damage and inflicting a magic vulnerability debuff. Afterwards, the player first on the enmity list will have a flare marker, forcing a tank swap.
- Aetherial Shackles: Marks a random player with Shackles of Loneliness (red)
and a random player with Shackles of Companionship (purple). Once these debuffs expire,
they will inflict the player with Inescapable Loneliness and Inescapable Companionship,
respectively.
- Inescapable Loneliness: The marked red player and the three furthest players will have a large AoE on them.
- Inescapable Companionship: The marked purple player and the three closest players will have a small AoE on them.
- Intemperance: The arena is divided into nine sections with three Spell Crystals
each. These crystals will explode in order starting from the top or bottom, depending on
if Erichthonios raises or lowers his hand. As the crystals explode, players will be
inflicted with Hot Spell (fire), Cold Spell (ice), or be killed with Disastrous Spell
(purple). If no player is on a section with Hot Spell or Cold Spell, all players
will take extra damage and a damage down debuff.
- Hot Spell: deals light damage and inflicts players with the Hot Spell debuff. If they already have the Hot Spell debuff, they will take massive damage and receive a damage down debuff.
- Cold Spell: deals light damage and inflicts players with the Cold Spell debuff. If they already have the Cold Spell debuff, they will take massive damage and receive a damage down debuff.
- Intemperate Torment: Erichthonios commands the crystals to start exploding from top to bottom or bottom to top depending on if his hand is raised or lowered.
- Shining Cells: Massive raidwide damage. Additionally, this changes the arena to a different layout.
The encounter mainly consists of three different phases. The shackles and elements mechanics are introduced in phase one and expanded on in later parts of the fight. The goal is to resolve these mechanics in a way that does not wipe the raid.
The fight begins with a tank buster, Heavy Hand, which needs to be mitigated by the main tank. Immediately after is the first Aetherial Shackles of the fight. This mechanic is solved by each player standing at their clock spot, with intercardinal players outside of the boss's hitbox and cardinal players on the very inside. However, if an outside player is inflicted with Inescapable Companionship or an inside player is inflicted with Inescapable Loneliness, they will need to swap positions with the player directly clockwise of their clock position. If there is a swap, players must stay in their new position until the mechanic is resolved.
Gaoler's Flail is a mechanic that will appear many times throughout the fight, and it will later be combined with other mechanics, meaning the beginning of the fight is a good time to learn it. One of the combinations is two Sickles, requiring players to go left to right or right to left inside the boss's hitbox. The other combination is Morningstar and Chakram, which requires players to go in then out or out then in.
The boss will use either Pitiless Flail of Grace or Pitiless Flail of Purgatory after. The main tank needs to position themselves not to get knocked back into the wall, and the off-tank needs to provoke during the tank buster. If the mechanic was Grace, the off-tank (now main tank) needs to stand with the party in the center, and if the mechanic was Purgatory, they need to run far away from both the party and the other tank.
Another Gaoler's Flail and Warder's Wrath will follow this. Erichthonios will then cast Intemperance. This will be the first elements phase of the fight. Players will have to first head to their clock spot on the outside of the arena to soak a Hot Spell or Cold Spell. They will then have to note the final element of their Spell Crystals. All players will have to "fix" their debuff so that they have the opposite one of the third crystal. This is done by using the north crystal, middle crystal, or south crystal on the second set of crystal explosions. Finally, all players should return to their clock spot to soak the third crystal.
The boss will cast several Warder's Wraths during this sequence. In addition, sometimes the north player, usually a tank, has to soak a crystal of the same color. To remedy this, the player north and the player northeast should start on their square, but fix their debuff and swap places with each other for the third explosion. This will prevent any damage downs.
After another Pitiless Flail, the boss will then cast Shining Cells, transitioning into the second phase. This deals heavy damage, meaning party mitigation is necessary.
Phase 2: Erichthonios
Erichthonios gains the following new abilities:
- Aetherchain: Erichthonios summons red orbs and white orbs. Red orbs mean the red sections of the arena will explode, while white orbs mean the white sections of the arena will explode.
- Aetherflail: Erichthonios will use Aetherchain, one Sickle Gaoler's Flail, and one Morningstar or Chakram Gaoler's Flail. Players need to be on the left or right of the arena, inside or outside of the boss's hitbox, and on red or white.
- Shackles of Time: Erichthonios inflicts a random player with the Shackles of Time debuff. All players standing on the same color as that player when the debuff expires will take damage and a heavy DoT.
- Slam Shut: Deals heavy raidwide damage. This also changes the arena back to its original form.
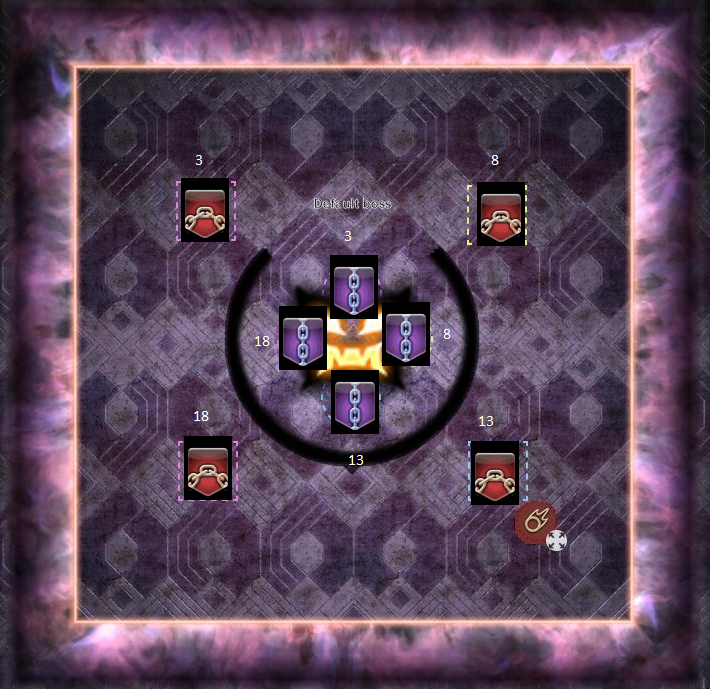
- Fourfold Shackles: Erichthonios inflicts four players with Shackles of Loneliness and four players with Shackles of Companionship, previously seen in Aetherial Shackles. Each of these debuffs starts with a different duration: 3 seconds, 8 seconds, 13 seconds, or 18 seconds.
Erichthonios starts this phase with an Aetherflail. For example, if it is white orbs, left Sickle, and Morningstar, players will have to be outside the boss's hitbox, on the right side of the arena, and on a red panel. Another Pitiless Flail of Grace or Pitiless Flail of Purgatory follows this. The tank needs to ensure they are close to the center to not get knocked back into the wall.
Another Aetherflail is followed by Shackles of Time. The player debuffed should plant on a spot, and all other players need to be standing on the opposite color. Mitigate Heavy Hand and Slam Shut. Afterwards is the second shackles phase.
Fourfold Shackles is cast next. This can be resolved by all players moving to the correct spot and staying there for every debuff resolution. Players marked with Shackles of Loneliness will need to go to the outside intercardinals based on their debuff duration going clockwise. Players marked with Shackles of Companionship will need to go on the inside cardinals based on their debuff duration, again going clockwise. See the diagram posted below for details.
Afterwards, heal up. The final elements phase will begin. For this one, after the second set of crystals explode, Erichthonios will do a Gaoler's Flail with Morningstar and Chakram weapons. Therefore, players will have to go in then out or out then in before going to their final crystal spot. Otherwise, it is done exactly the same as the first one. After the elements phase, another Warder's Wrath and Shining Cells is cast, transitioning into the last phase of the fight.
Phase 3: Erichthonios
Erichthonios does not gain any new abilities in this phase. There are two sets of mechanics Erichthonios can cast, and they will be cast one after the other.
The first set is a Shackles of Time into a Pitiless Flail of Grace or Pitiless Flail of Purgatory. Players will have to resolve the Pitiless Flail mechanic and ensure the debuffed player is standing on the opposite color of all other players.
The second set is an Aetherial Shackles with two Aetherchains. Players will do Aetherial Shackles exactly like the first one in the fight, swapping with another player if necessary. However, they will also have to be standing on the correct colored ground section for both Aetherchain casts.
Finally, Erichthonios will cast three Aetherflails and three Warder's Wraths before enraging with a Lethe, which finishes when the fight duration reaches 10:02.
Loot
When Erichthonios is defeated, treasure coffers will appear depending on how many players have already defeated the fight for the week. The first coffer will contain a random Asphodelos Accessory Coffer, while the second one will contain two random Asphodelos Accessory Coffers. When opened by a player, these coffers contain an Asphodelos Accessory for the job the player is currently on.
Players who defeat the encounter for the first time during the weekly reset will
also receive an ![]() Asphodelos Mythos I token. Four of these can be traded
in for an Asphodelos accessory of your choosing at a Pandaemonium gear vendor.
Asphodelos Mythos I token. Four of these can be traded
in for an Asphodelos accessory of your choosing at a Pandaemonium gear vendor.
Changelog
- 11 Jan. 2021: Guide added.

This guide has been written by Lyra an accomplished raider in FFXIV and has written raid guides for the game for the past five years. You can follow him on Twitter and he streams raids on Twitch.
- Same-Region Matching Starts this Fall. But There’s a Catch
- Have Your First Look At Evercold’s Realmships & Dungeons
- How Character Action Skins Will Give You More Ways to Customize
- How Auto Content Balancing Will Change How You Play Evercold
- This Rare FFXIV Minion Secretly Became Sellable in Patch 7.55
- The Yo-kai Watch Event Returns Again to Eorzea
- Best Crafting Rotations for 7.55 Phantom Occultum Relics
- FFXIV Hits the Switch 2 Soon! Here’s What We Know About the Release Date