The Fourth Circle (Savage) Part Two: Hesperos Raid Guide
This guide aims to prepare players for the second phase of Asphodelos: The Fourth Circle (Savage) by providing detailed explanations of the fight's mechanics, as well as consistent strategies for the purpose of farming.
Introduction
As you approach the conclusion of your tale of Asphodelos, you cast a hesitant glance at the greatly enthused, yet utterly exhausted Nemjiji. Whether or not her writing arm─or the facts of your confrontation with Hesperos─will withstand the inevitable fit of excitement awaiting her remains to be seen...
Unlock Requirements
The Fourth Circle (Savage) can be unlocked at level 90 after completing the Normal difficulty of the Asphodelos raid and talking to Nemjiji in Labyrinthos (x8.4, y27.4). It requires a minimum item level of 580 to queue, but this requirement can be bypassed when entering with a full party.
Raid Guide
Phase two of this encounter has a hard enrage of roughly 8:25, with a minimum required raid DPS check of 47,900. After clearing phase one, the raid will move into phase two, and any subsequent wipes will reset the party to phase two (not phase one) for the remainder of the instance.
Raid Preparation
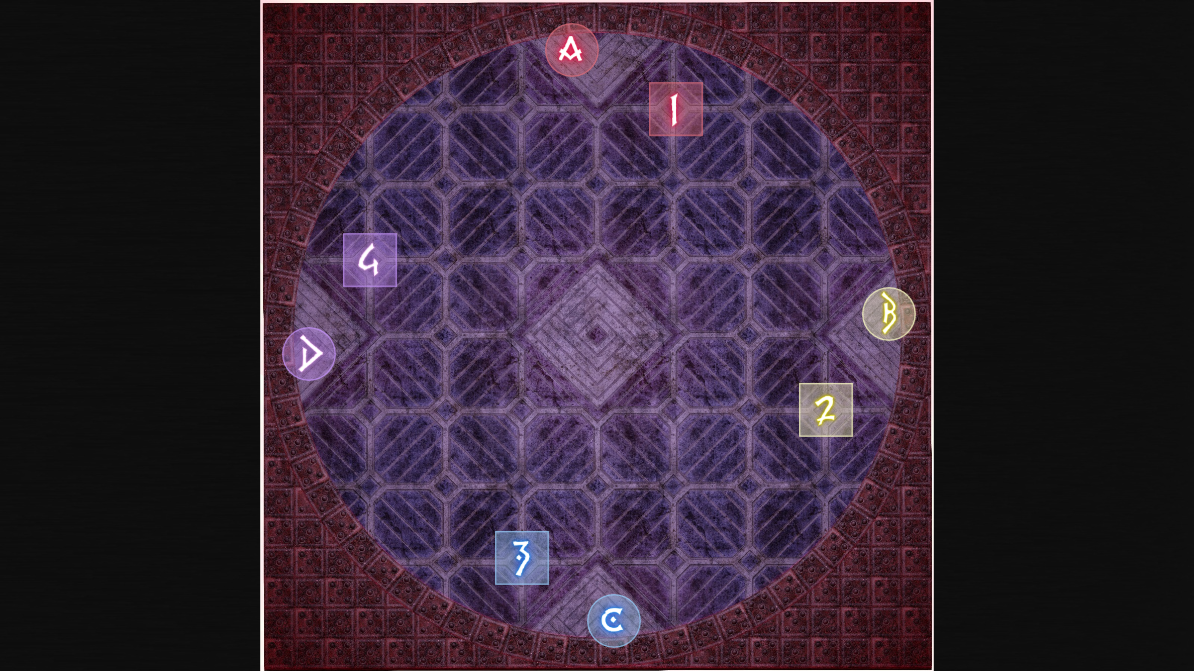
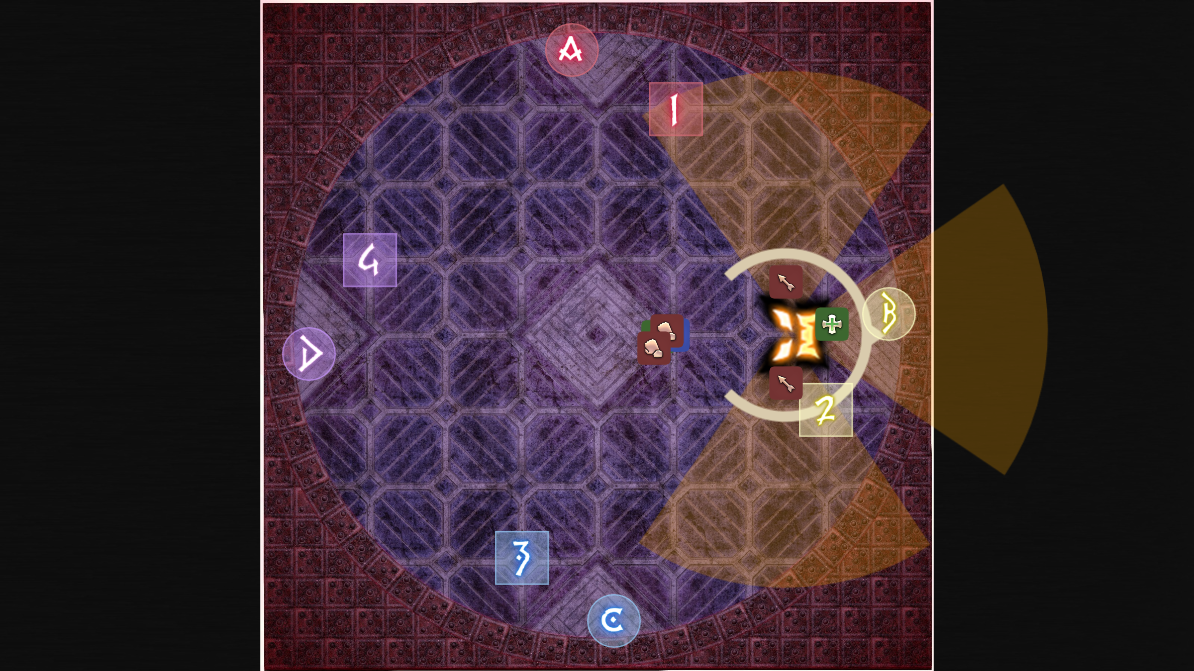
Players will be split into light parties of one tank, one healer, and two DPS each. In addition, each player will have a clock spot. Assign each tank and melee DPS a number from one to four, and each healer and ranged DPS a number from one to four.
Markers on the arena should be placed according to the image below.
Akanthai: Act 1
Hesperos's Abilities
- Wreath of Thorns: Hesperos tethers to the thorns placed by Akanthai Acts, indicating the order in which mechanics will execute.
- Hemitheos's Fire IV: A thorn that explodes in a large semi-circular AoE on the outside of the arena.
- Hemitheos's Thunder III: A thorn tower that must be soaked by one player, dealing moderate damage and inflicting a Lightning Resistance Down debuff and a Magic Vulnerability Up debuff.
- Akanthai: Act 1: Hesperos places four Fire IV thorns at cardinal edges and eight Thunder III thorns at intercardinals, one on the inside and one on the outside.
- Searing Stream: Heavy raidwide magic damage.
- Ultimate Impulse: Colossal raidwide magic damage.
- Nearsight: An AoE tank buster on the two closest players to Hesperos.
- Farsight: An AoE tank buster on the two furthest players from Hesperos.
This encounter is split into Akanthai Acts, where Hesperos will place thorns on the ground. He will tether to these thorns in the order they will execute their mechanics with Wreath of Thorns. There are six Akanthai Acts in total, and completion of each one represents incremental progress in the fight.
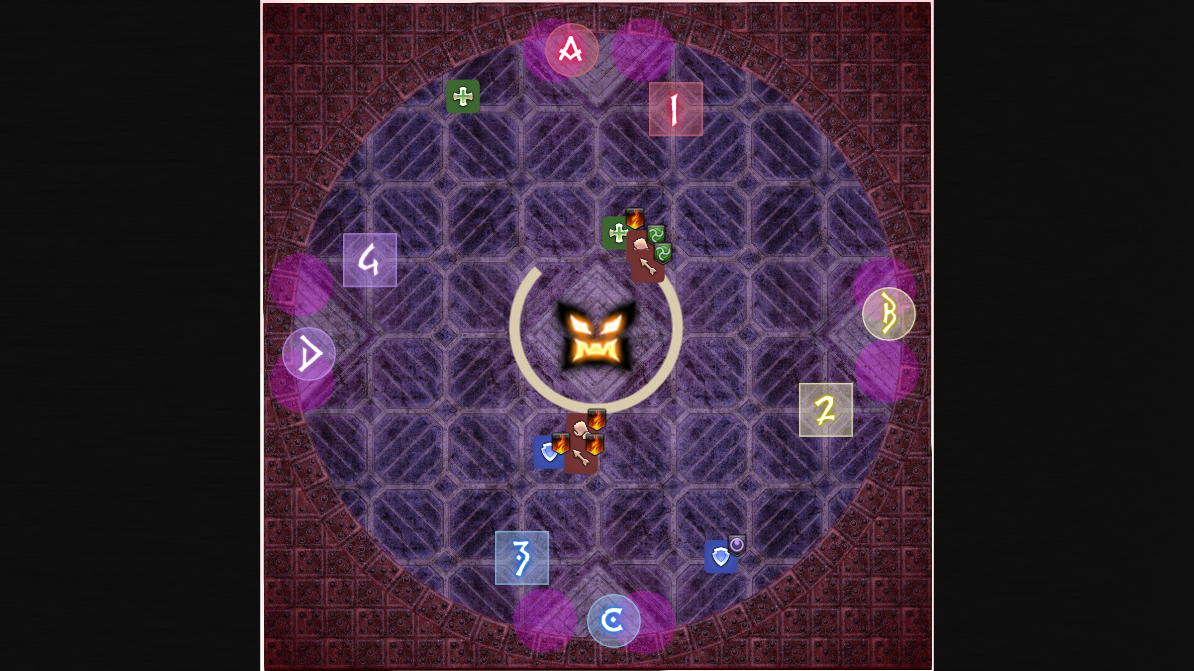
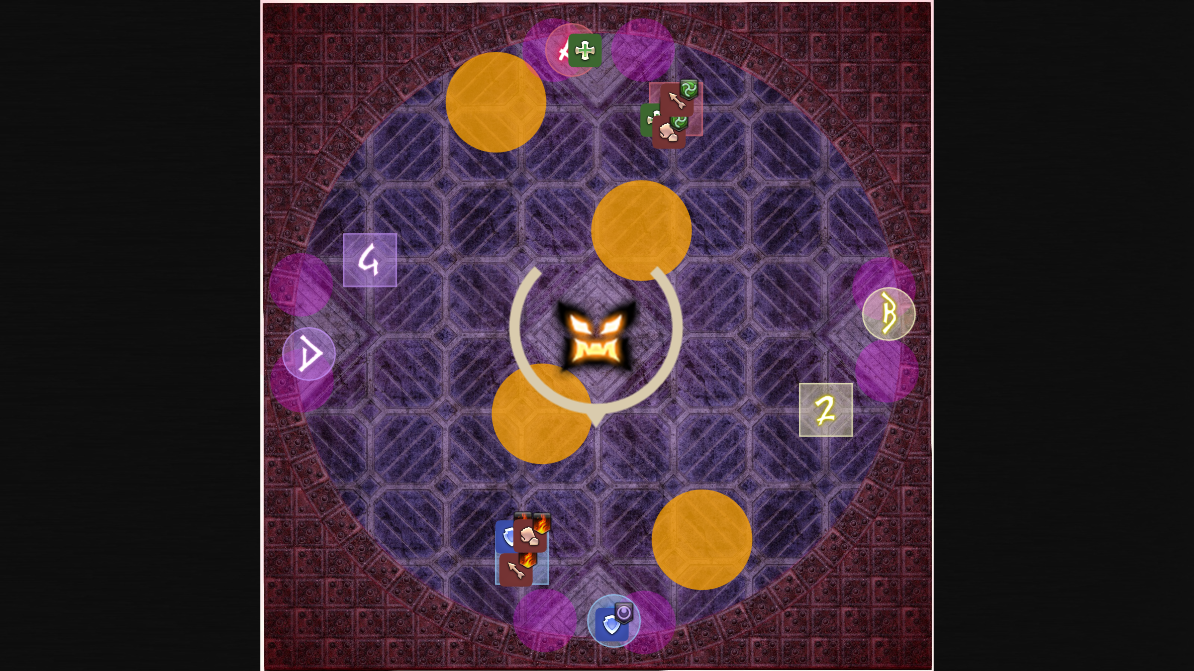
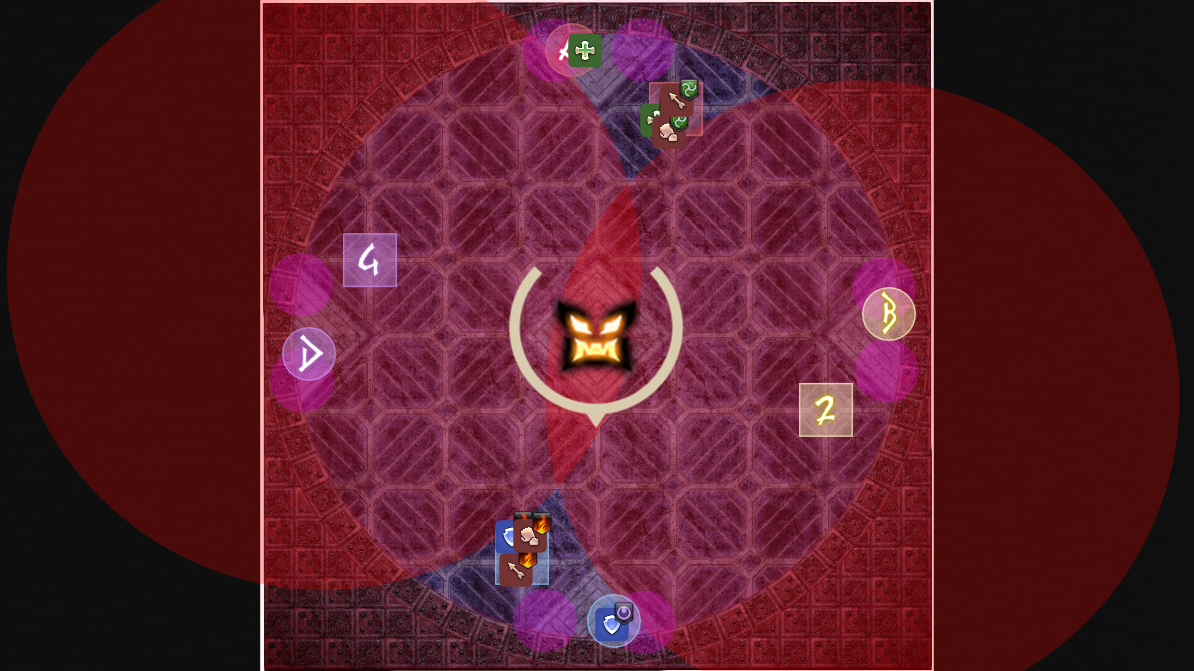
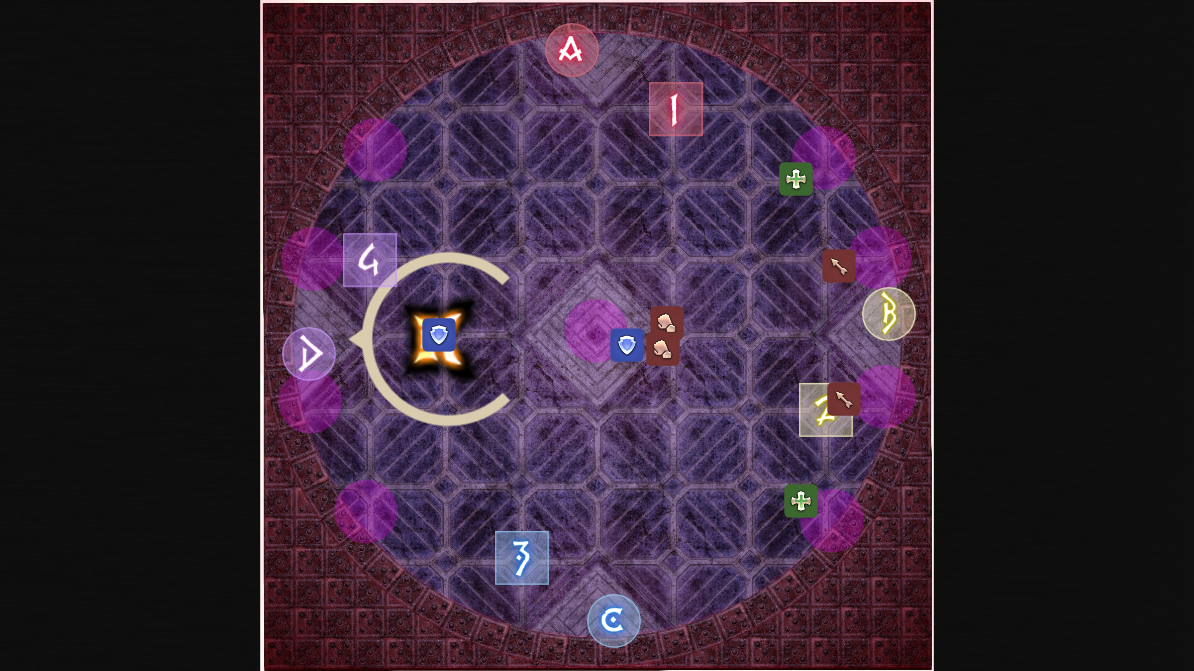
Begin the fight by pulling the boss to the middle. Searing Stream is followed by Akanthai: Act 1. Heal up for the next Searing Stream, and then look at which thorns Hesperos tethers to. If he tethers to north and south, players will start in their light parties east and west. If he tethers to east and west, players will start in their light parties north and south. Stay at max melee range or further, rotate into towers when they go off, and rotate once more into the final safe spot. Immediately after, the party should position for either Nearsight or Farsight. For the former, the party will go at max melee range or further, and the tanks will stay inside the boss's hitbox. For the latter, the party will stay inside the hitbox, and the tanks will be at max melee range.
The execution of Act 1's mechanics can be seen in this raidplan diagram.
Akanthai: Act 2
Hesperos gains the following new abilities:
- Demigod Double: A heavy tank buster on the main tank in an AoE. This must be shared with the other tank to survive without an immunity.
- Dark Design: AoEs appear under all players. Bait together and dodge.
- Hemitheos's Fire III: Tethers two players with a red symbol. When this tether is broken by distance, both players will be inflicted with a Magic Vulnerability Up debuff and take damage which must be shared with other players.
- Hemitheos's Aero III: Tethers two players with a teal symbol. When this tether is broken by distance, both players will die. If this is allowed to resolve without the tether breaking, both players will both dodge the mechanic.
- Hemitheos's Dark IV: Tethers one player to a thorn with a dark symbol. When this tether is broken by distance, all players take heavy magic damage and are inflicted with a Magic Vulnerability Up debuff, and it also triggers the explosion of a tethered thorn's Hemitheos's Fire IV.
- Akanthai: Act 2: Hesperos places four Fire IV thorns at cardinals slightly offset clockwise, in addition to four Thunder III thorns at cardinals slightly offset counterclockwise. One tank or one healer is tethered with Dark IV, a healer and a tank are tethered with Fire III, two DPS are tethered with Fire III, and two DPS are tethered with Aero III.
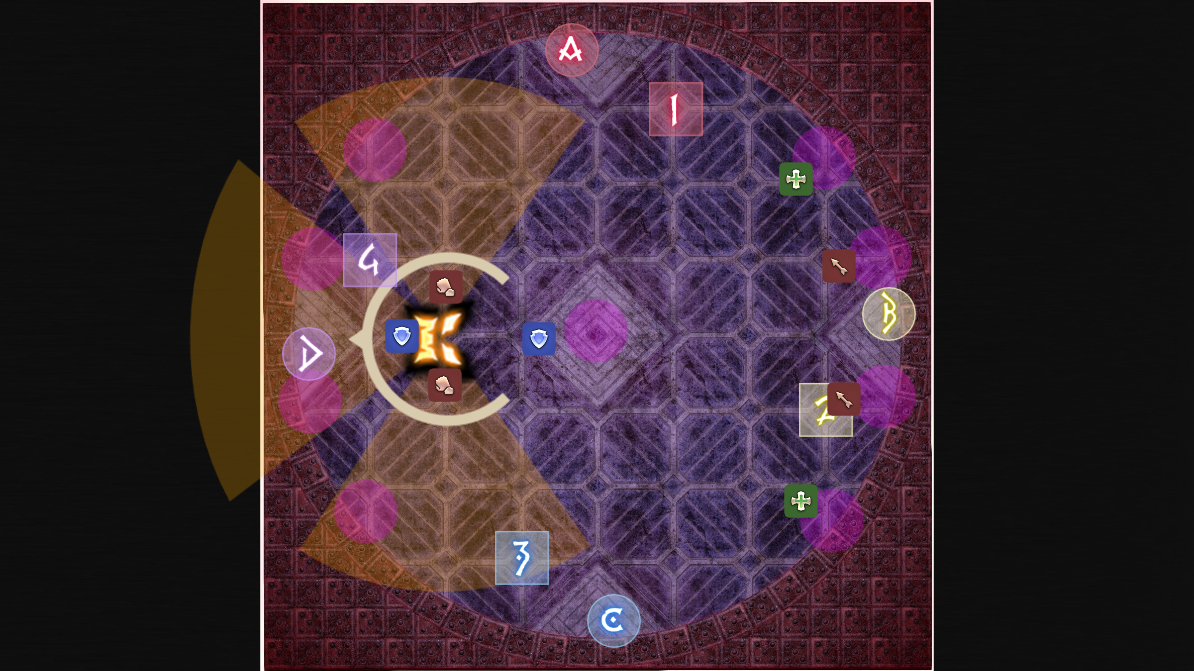
The next Akanthai Act involves breaking tethers and soaking towers as a group while dodging Fire IV explosions. Hesperos immediately goes into Akanthai: Act 2. The main tank should use their invulnerability on Demigod Double, and Hesperos will then cast Wreath of Thorns. To check the initial positioning, look at the north thorns: if the left thorn is tethered, players will go north and south. If the right thorn is tethered, players will go east and west. In Act 2, players will do specific movements based on what tether they have.
Two DPS will be tethered together with a Fire III tether. Two DPS will be tethered with an Aero III tether. One tank and one healer will be tethered together with a Fire III tether. Lastly, one tank and one healer will be tethered together with a Dark IV tether.
Tanks will always go south or east, and healers will always go north or west. All players will bait the Dark Design AoEs before moving to their first positions to soak towers and break tethers. The healer with fire and the DPS with Aero III will head north or west right outside of the boss's hitbox between the boss and the numbered marker. The tank with fire and the DPS with Fire III will head south or east outside of the boss's hitbox between the boss and the numbered marker. The other healer and tank will go near the wall, away from the left thorn and the other party members. This will break the Dark IV tether. As the Dark Design AoEs go off, players will head to their first positions.
This will break the healer and tank's Fire III tether. Additionally, the Thunder III towers will be soaked by a healer and tank, with all players dodging the Fire IV AoEs. After these AoEs go off, all players should head back into the middle to receive heals before heading to their final positions to break tethers and soak towers.
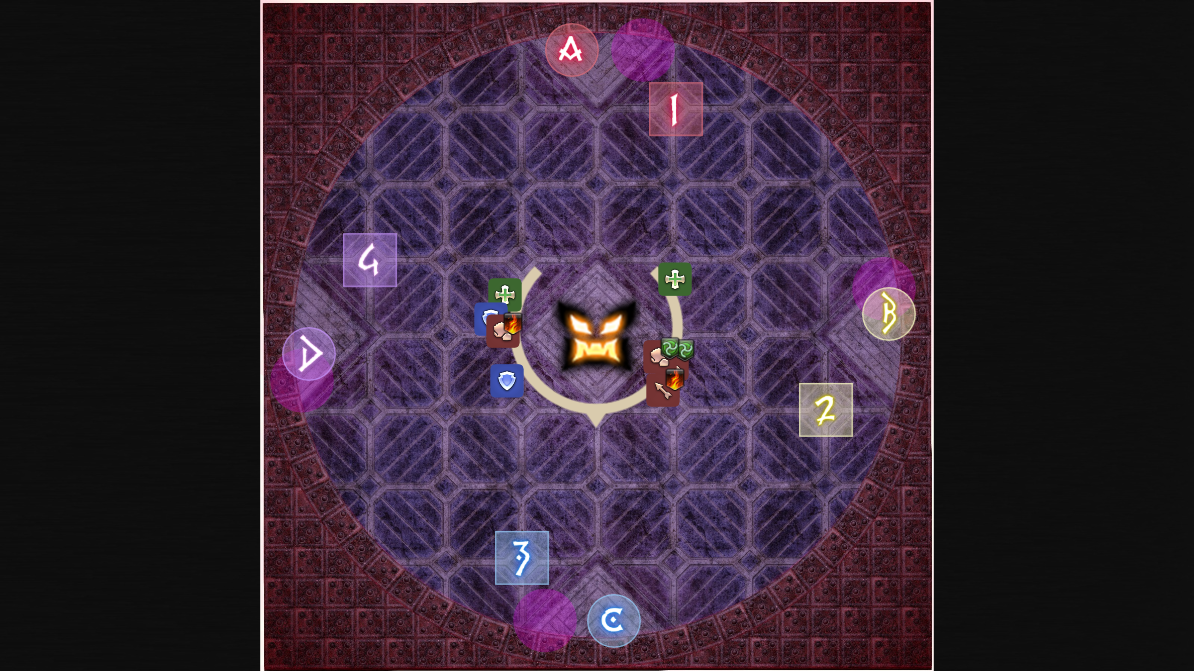
The healer and tank that soaked the first towers will move clockwise to the second towers to soak those as well. The two DPS with Aero III will move clockwise to the next numbered marker together. The healer with fire will go counterclockwise, and the tank with fire will go clockwise to a numbered marker. One DPS with Fire III will go clockwise, and the other one will go counterclockwise to break their tether and stack with either the DPS or the tank and healer. After the Fire IV AoEs go off, all players need to return to the middle to heal up and mitigate for Ultimate Impulse.
The execution of Act 2's mechanics can be seen in this raidplan diagram.
Akanthai: Act 3
Hesperos gains the following new abilities:
- Hemitheos's Water IV: Knocks back players from the center of the arena.
- Akanthai: Act 3: Hesperos places eight thorns with Thunder III at the east and west edge of the arena, in addition to one thorn with Water IV in the middle of the arena.
- Kothornos Kick: Hesperos jumps to the furthest player, knocking back all players in his hitbox at the location except for the targeted player. This deals moderate damage and inflicts a Magic Vulnerability Up debuff.
- Kothornos Quake: Three unmarked conal AoEs shoot from Hesperos to the three closest players to him. This deals moderate damage and inflicts a Magic Vulnerability Up debuff.
- Heart Stake: Deals heavy damage to the two players with the highest enmity and inflicts a bleed DoT for 15 seconds.
The next Akanthai Act involves players soaking towers and baiting conal AoEs and jumps to ensure they do not hit those soaking towers. Afterwards, players with will do the opposite as the remaining towers are soaked. Hesperos goes immediately into Akanthai: Act III, tethering to four Thunder III towers on one side of the arena, the Water IV in the middle of the arena, and then the four Thunder III towers on the other side of the arena.
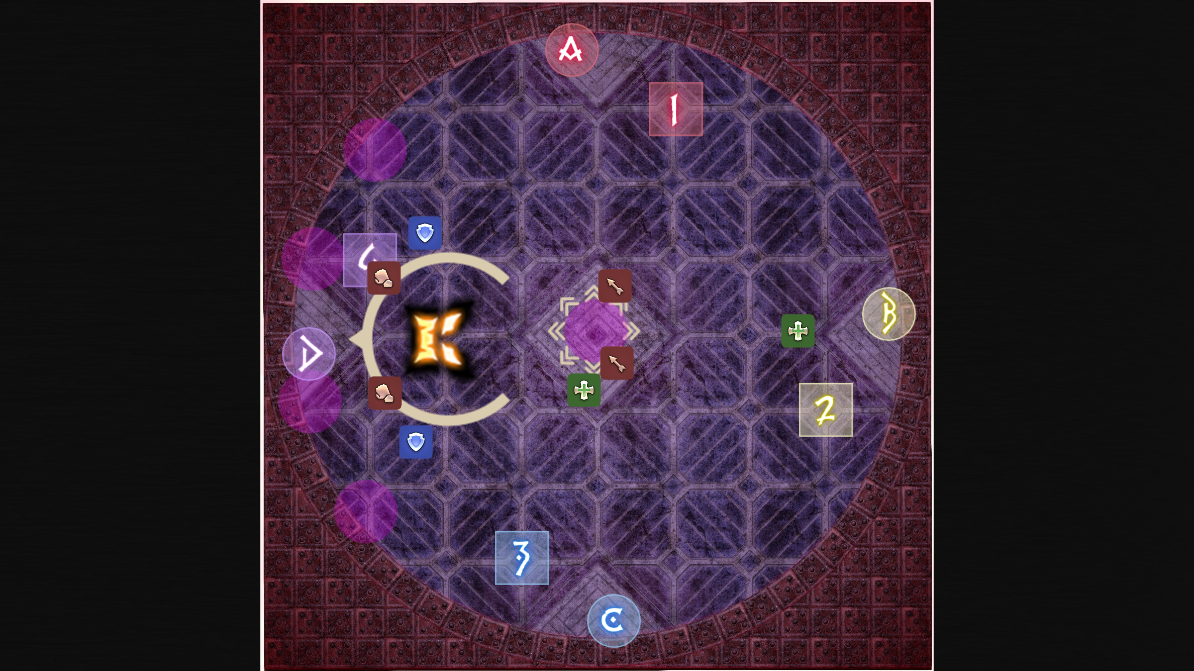
Players will be split into the tank and melee DPS group and the healer and ranged DPS group. One group will be baiting Kothornos Kick and Kothornos Quake, while the other group will be soaking the Thunder III towers. Afterwards, they will switch responsibilities. First, have all players stand inside the boss's hitbox on the side of the first tethered thorns, except for the main tank who will be baiting the Kothornos Kick on the opposite side. They will stand outside of the boss's hitbox. After the boss jumps, the healers and ranged DPS will go to the edge of the arena to soak towers in the order assigned starting from north. Meanwhile, the tank that baited the jump will move through the boss to max melee or further behind him. The other tank and melee DPS will move close to the boss, with the tank in front and the melee DPS on the flanks to bait Kothornos Quake. All players should press their knockback immunity ability when they soak the tower or bait the quake. After, the roles will be reversed - the tanks and melee DPS will soak the towers on their side while one healer baits Kothornos Kick on their side. The other three players should move out of the way to ensure they are not hit by the boss. Once the melee players soak their towers, they can go back to the boss, and the other healer and two ranged will bait the quakes.
Immediately after Act 3's mechanics, Hesperos will cast either Farsight or Nearsight, so players need to position themselves relative to where the boss jumped. Move the boss back to the middle and ensure that the tanks have the highest enmity to ensure they take Heart Stake. Make sure to cycle cooldowns, as both tank busters need mitigation.
The execution of Act 3's mechanics can be seen in this raidplan diagram.
Akanthai: Act 4
Hesperos gains the following new abilities:
- Hemitheos's Water III: Tethers one player to a thorn with a water symbol. When this tether is broken by distance, the player will take moderate magic damage in an AoE around them and be inflicted with a Magic Vulnerability Up debuff. It also triggers the explosion of a tethered thorn's Hemitheos's Thunder III.
- Akanthai: Act 4: Hesperos places eight thorns at the edge of the arena. Four of these at either cardinals or intercardinals will be Thunder III, and four of these at the other position will be Fire IV. In addition, players will be tethered to these thorns with either Water III or Dark IV.
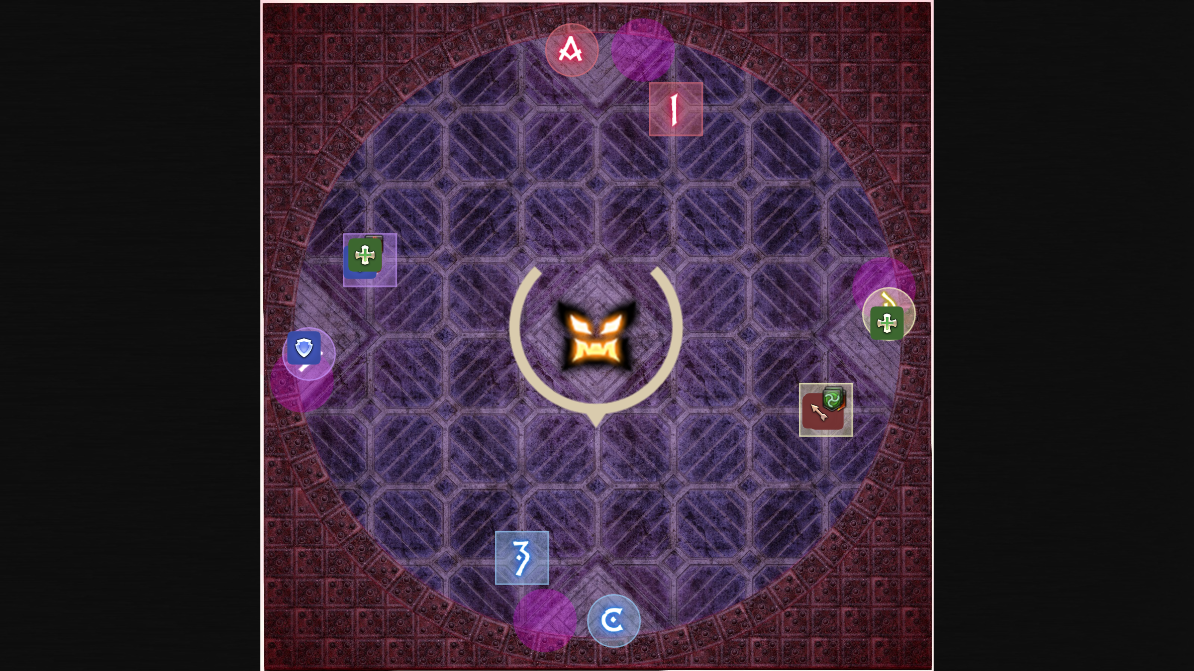
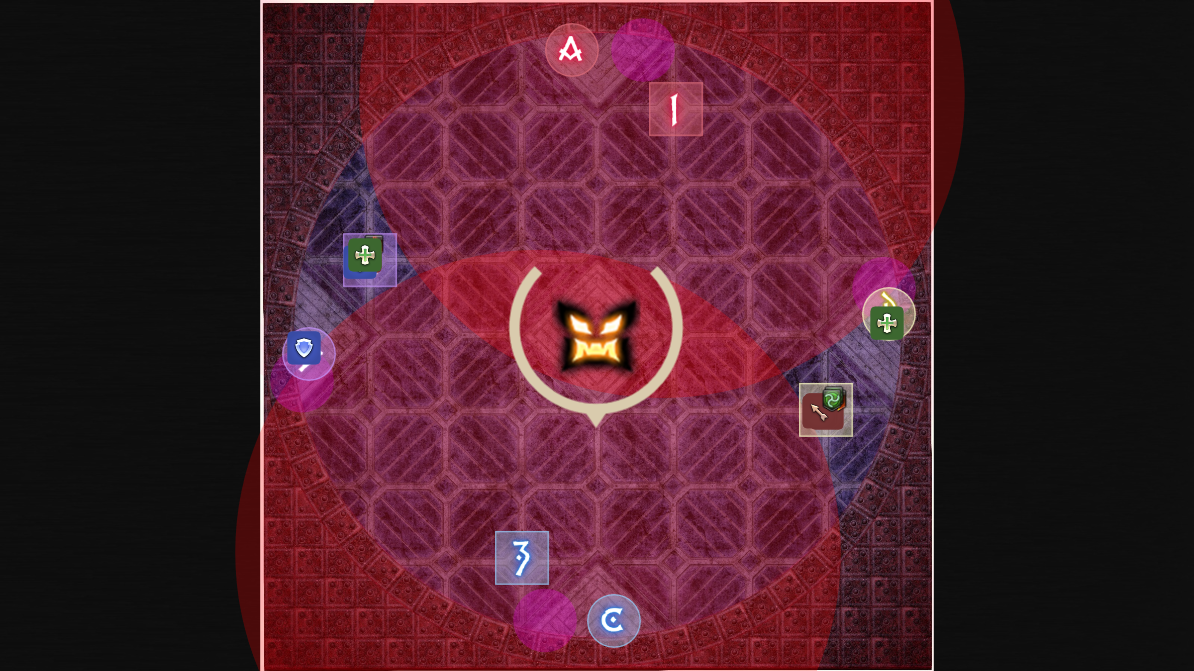
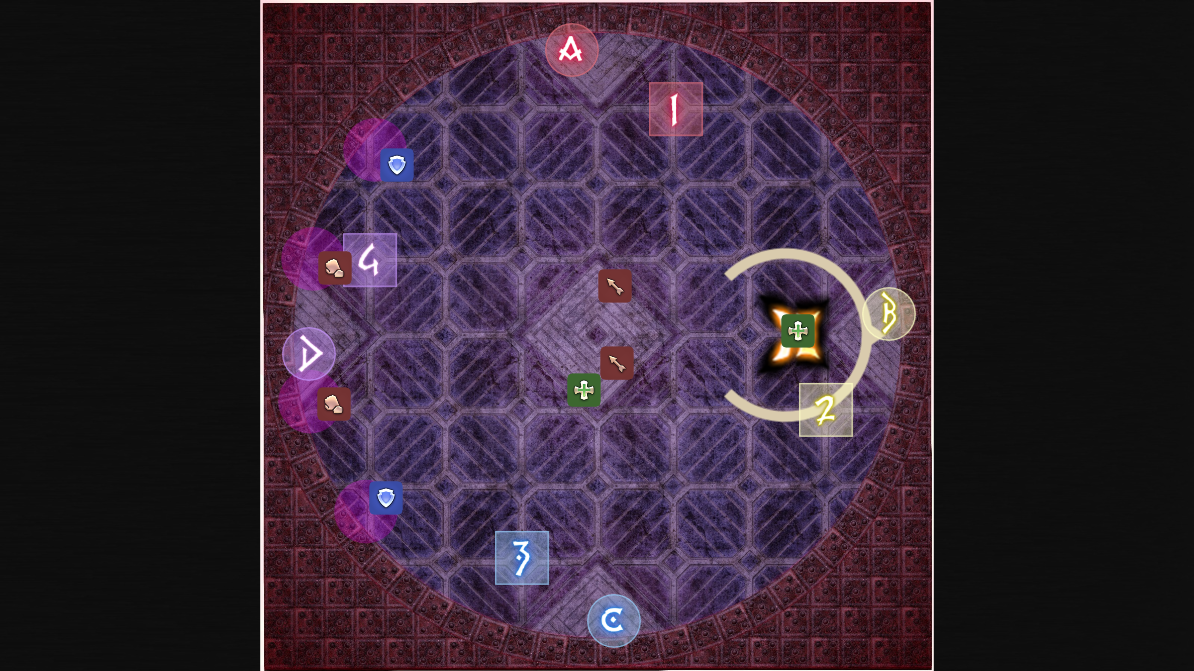
The fourth Act has players break Water III tethers in order to soak towers, and then break four Dark IV tethers in order while moving across the map to avoid Fire IV explosion. This is a very tight sequence of events and has a high healing and mitigation check. First, heal through the Searing Stream. Hesperos will spawn cast Wreath of Thorns, and all players will receive a tether to a thorn and a marker on top of their head. After the next Searing Stream, players will need to head to the edge of the room to either break their Water III tether or soak a Thunder III tower.
The thorn that players need to head to depends on what tether they have. Players tethered with Dark IV will head to one thorn clockwise of their tethered thorn, while players tethered with Water III will head opposite of their tethered thorn and one spot clockwise of that. This will trigger all the water AoEs as well as the towers, which are soaked by players with dark tethers.
Next, players need to return to the middle and heal up for the incoming damage that will occur due to the dark tethers breaking. All four tethers need to be broken in order before Ultimate Impulse is cast. The most efficient way to do this is to start by breaking the north or northeast Dark IV tether, with the party starting on the south side of the arena. Each of these tethers will be broken in a clockwise order, with the party rotating clockwise to dodge the Fire IV explosions. Make sure to heal between each explosion, and stay out to ensure the tether is actually broken. Heal up before Ultimate Impulse is cast and mitigate the hit, as there is a Searing Stream afterwards.
The execution of Act 4's mechanics can be seen in this raidplan diagram.
Akanthai: Finale
Hesperos gains the following new abilities:
- Akanthai: Finale: Hesperos places eight thorns in a circle near the middle of the arena with Thunder III, as well as two thorns at intercardinals which will tether to four players each with Aero III.
- Fleeting Impulse: Hesperos will turn to each player and deal moderate magic damage to them in an AoE. This will also inflict a Magic Vulnerability Up debuff, which prevents them from soaking Thunder III towers until it has expired.
The Finale has players tethered with Aero III to two thorns, making them go near the thorn. However, they will have to spread out to ensure players are not clipped by Fleeting Impulse. Next, players need to soak Thunder III towers in the order they were hit by Fleeting Impulse.
First, Hesperos will cast Akanthai: Finale. Wreath of Thorns will tether to the thorns in order, which tethers tanks and healers to one thorn with Aero III and DPS to the other thorn with Aero III. Players will need to spread out close to the thorn they are tethered to, with melee close to the boss and ranged far away from the boss. One light party's members will go clockwise, and the other will go counterclockwise to ensure everyone is properly spread.
Hesperos will then hit all eight players in order with Fleeting Impulse. The order in which players are hit indicates the order they must soak Thunder III towers later. After the last hit, the Aero III will resolve. Players then have to look at which thorn Hesperos tethers to first. He will always tether to a thorn on a cardinal and go clockwise. Players will have to soak these towers in the order they were hit by Fleeting Impulse. For example, if they were hit by the first one, they will need to soak the tower at the first thorn he tethers to. If they were hit by the fourth, they will need to soak the tower at the fourth thorn he tethers to.
After all towers have gone off, Hesperos will cast either Nearsight or Farsight. This is followed by a Searing Stream and a Demigod Double. If needed, tanks should swap during the raidwide to ensure they are using an invulnerability on the double buster.
Akanthai: Curtain Call
Hesperos gains the following new abilities:
- Akanthai: Curtain Call: Hesperos places eight thorns at cardinal and intercardinal edges. All players are tethered to one thorn with Dark IV, with differing debuff lengths.
- Hell's Sting: Marked conal AoEs will come from Hesperos. After they go off, unmarked conal AoEs will come from him where the first set did not hit. Dodge into the marked AoEs. Getting hit will deal moderate damage and inflict a Damage Down debuff.
The final Act, the Curtain Call, has all players take a bow by breaking Dark IV tethers while dodging Hell's Sting. This phase has a high execution and HPS check.
Begin by pre-positioning inside the boss's hitbox, opposite of the thorn players are tethered to in order to decrease the travel distance. Each tank and healer as well as each DPS will have a different debuff length. This means that a DPS will break first, a tank or healer will break their tether next, and so on. Immediately after the debuff durations come out, the DPS with the lowest debuff duration should immediately go and break their tether. After they break it, the tank or healer with the lowest debuff duration will go and break theirs while dodging Hell's Sting. All players should immediately return to the center after they have broken their tether, as each Dark IV explosion deals a significant amount of magic damage. Healers need to top players off in between explosions and save instant heals for when they need to move out for their tethers.
Continue breaking tethers and healing, with the lowest duration DPS going first and then the lowest duration tank and healer. During the third set of DPS and tank or healer tethers, another Hell's Sting will be cast, so dodge into the conal AoEs. If done correctly, after the final tank or healer tether break, there will be sufficient time to mitigate and heal through an Ultimate Impulse. After this, the phase will repeat, with each player receiving a tether again. Execute it the same way as the first one, with the lowest duration debuff DPS breaking their tether, the lowest duration debuff tank or healer breaking after, and repeating until all tethers have been broken while dodging Hell's Sting.
After the last Ultimate Impulse, Hesperos will cast his hard enrage. This final Ultimate Impulse will wipe the party at 8:25, so ensure high DPS throughout the entire fight to meet the DPS check!
Loot
When Hesperos is defeated, treasure coffers will appear depending on how
many players have already defeated the fight for the week. The first coffer
will contain a random Asphodelos weapon as well as an ![]() Asphodelos Chest Gear Coffer,
while the second one will contain an
Asphodelos Chest Gear Coffer,
while the second one will contain an ![]() Asphodelos Weapon Coffer, a
Asphodelos Weapon Coffer, a
![]() Demi-Phoinix Horn mount, and a
Demi-Phoinix Horn mount, and a ![]() Nosferatu minion. When opened
by a player, these coffers contain gear for the job the player is currently on.
Nosferatu minion. When opened
by a player, these coffers contain gear for the job the player is currently on.
Players who defeat the encounter for the first time during the weekly reset will
also receive an ![]() Asphodelos Mythos IV token. Eight of these can be traded
in for an Asphodelos chest gear or weapon of your choosing at a Pandaemonium
gear vendor.
Asphodelos Mythos IV token. Eight of these can be traded
in for an Asphodelos chest gear or weapon of your choosing at a Pandaemonium
gear vendor.
Changelog
- 01 Feb. 2022: Guide added.

This guide has been written by Lyra an accomplished raider in FFXIV and has written raid guides for the game for the past five years. You can follow him on Twitter and he streams raids on Twitch.
- FFXIV’s Berlin Fan Festival Schedule Is Out!
- Pre-Order FFXIV Nendoroids Y’shtola & G’raha Now!
- From Action to Tab Targetting — How Did You Start FFXIV?
- Developing FFXIV Big Fish Together With Ryuta Suyama
- These Changes Will Make You Think Twice Before Tanking in Evercold
- Complete Dawntrail’s Art Book Collection With – Relics of Eternity –
- New Framer’s Kit With Return Of Breaking Brick Mountains
- Last Chance For THE PRIMALS x Download Festival T-Shirt!