The Ninth Circle P9S (Savage): Kokytos Raid Guide
This guide aims to prepare players for Anabaseios: The Ninth Circle (Savage) by providing detailed explanations of the fight's mechanics, as well as consistent strategies for the purpose of farming.
Introduction to The Ninth Circle (Savage)
The return of Professor Claudien and the beginning of research into the Heart of Sabik has sparked the imaginations of everyone in Aporia, but perhaps Nemjiji's most of all. Emboldened by Claudien's encouragement to explore the very bounds of “theory,” she listens to your account of the battle with Kokytos with a mixture of scientific interest and artistic curiosity, and as her quill hurriedly scratches across parchment, you can hear the wheels of her mind turning as her “theories” pour onto the page.
Unlock Requirements
The Ninth Circle (Savage) can be unlocked at level 90 after completing the Normal difficulty of the Anabaseios raid and talking to Nemjiji in Labyrinthos (x8.4, y27.4). It requires a minimum item level of 630 to queue, but this requirement can be bypassed when entering with a full party.
Kokytos Raid Guide
Kokytos has a hard enrage of 9:58.
Raid Preparation
All players should be assigned a clock spot, with tanks North and South, healers East and West, and DPS on intercardinals. Split the party into two light parties of one tank, one healer, and two DPS each. DPS will rotate clockwise one spot to stack with a partner of the opposite role for certain mechanics. To simplify this, set markers on the arena that have matching colours at the cardinal and intercardinal like below.
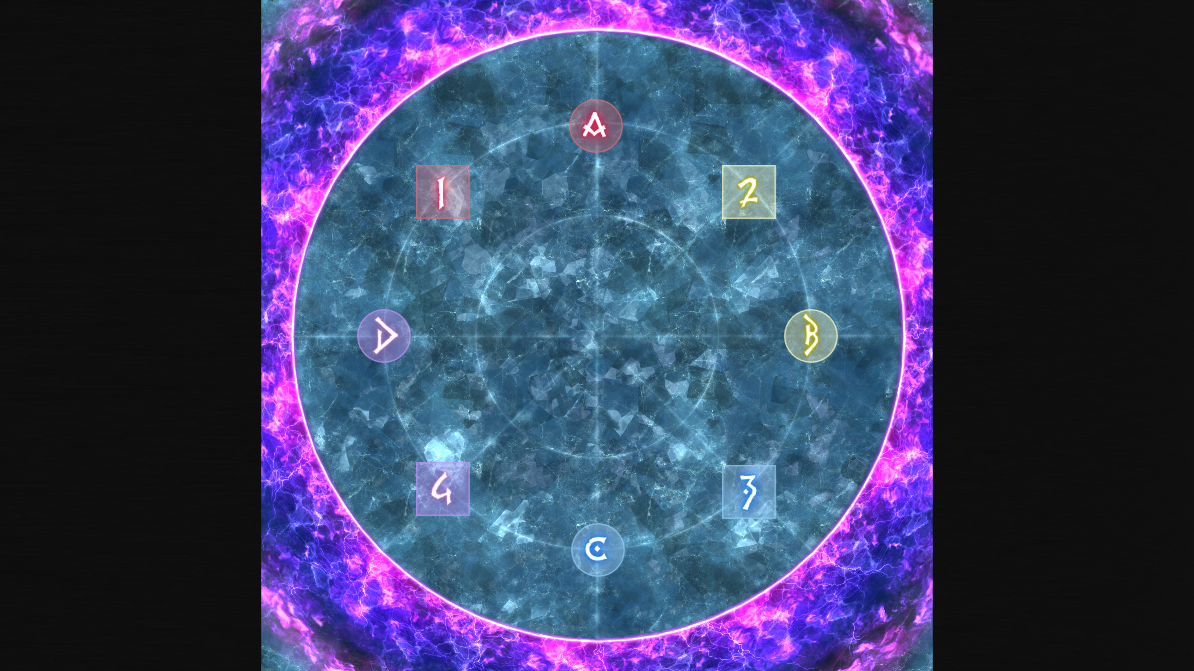
Note the inner and outer ring in the arena, which are used for certain mechanics to go to the safe spot.
Kokytos's Main Mechanics
Throughout the fight, Kokytos will absorb souls with the ability Ravening. It can absorb the souls of the Mage, Martialist, Chimera, and Beast. Each of these soul absorptions consists of one main mechanic set, and the boss will gain a buff indicating what soul it has currently absorbed. The Martialist and Beast will be used once, while the Mage and Chimera are used twice. The Chimeric Soul combines the abilities of both the Mage and Martialist Souls.
Kokytos has a few abilites used independent of all phases.
- Gluttony's Augur: Moderate raidwide magic damage.
- Ravening: Kokytos absorbs a soul. After the soul is completely absorbed, deals moderate raidwide magic damage with Soul Surge. The Martialist and Chimera's Soul Surge will create four walls at the edge of the arena that are removed at the next Gluttony's Augur.
Phase One: Mage and Martialist's Lament
The following abilities are used during the Mage's Lament.
- Duality of Death: A large AoE tank buster on first and second aggro. One deals Fire damage and inflicts a Fire Resistance Down debuff and the other deals Wind damage and inflicts a Wind Resistance Down debuff. The current off-tank must provoke during the middle of the cast.
- Dualspell: Kokytos will wield two elements. One will always be ice,
and the other will be either fire or lightning. It will then flash an element
on the player's screen. This will enhance the element.
- Fire: An unmarked AoE on all four players of one role that inflicts a magic vulnerability up debuff. If flashed, will expand into a very large AoE.
- Lightning: A line AoE on all eight players. If flashed, will expand into a very wide AoE.
- Ice: A donut AoE around the arena that covers the outer ring. If flashed, will expand to cover the outer two rings.
The following abilities are used during the Martialist's Lament.
- Ascendant Fist: A tank buster on the current main tank. Deals physical damage, inflicts a bleed DoT, and inflicts physical vulnerability up which necessitates a tank swap.
- Archaic Rockbreaker: A knockback puddle spawns in the middle of the arena, knocking all players back. Immediately after the knockback, all four players in one role will take an earth stack AoE that they must share with one other player. Archaic Rockbreaker will also spawn lines on the floor which snake out. AoEs will appear at the end of these lines when the fuse reaches the end.
- Front Combination: Kokytos will do either a point-blank or a donut AoE, followed by a frontal cleave, followed by the opposite type of AoE that was done first.
- Rear Combination: Kokytos will do either a point-blank or a donut AoE, followed by a rear cleave, followed by the opposite type of AoE that was done first.
- Archaic Demolish: Unmarked AoEs on both healers. This damage must be shared with three other players each and inflicts a magic vulnerability debuff.
The fight begins with Gluttony's Augur into Ravening. The first soul absorbed will be the Mage's Lament. The Mage will begin by casting Duality of Death, so tanks need to position away from the party and each other and swap during the middle of the cast.
Next is three sets of Dualspell mechanics. One of the elements will be ice, and the order is fire for the first, lightning for the second, and fire again for the last. If it's fire, DPS need to rotate and stack with their partner and if it's lightning, all players need to go to clock positions. Players will also need to identify where to stand based on the ice. For each set of mechanics, if ice is flashed, players need to stand just inside of the inner ring. If ice is not flashed, players need to stand just inside of the outer ring.
Kokytos will disgorge the Mage's soul and consume the Martialist's soul with Ravening. This will summon four ice walls at either the cardinals or intercardinals. Players will need to get knocked back into them with their role partner during Archaic Rockbreaker, taking care not to stand in the puddle. Tank swap during Ascendant Fist right before this.
Next, players will need to dodge the AoEs that spawn from the lines, while dodging either Front Combination or Rear Combination. With how the AoEs are configured, there will always be two safe spots opposite of each other at intercardinals. Dodge the point-blank AoE or donut AoE and the first set of spawned AoEs at the same time, and then go either front or rear to dodge the cleave. Finally, go in or out to dodge the final set of spawned AoEs during the donut AoE or point-blank AoE. It is better to get hit by the front or rear than to get hit by the spawned AoE - the latter gives a damage down, while the former is just a moderate bleed DoT.
Finally, stack up with your light party East and West of the boss for Archaic Demolish. Mitigate the damage from the stack and Gluttony's Augur, and the boss will disgorge the Martialist's Soul and absorb the Chimera's soul, indicating the start of the most difficult mechanic in the fight.
Phase Two: Chimera's Lament I
The following abilities are used during the Chimera's Lament.
- Levinstrike Summoning: Summons four lightning orbs in the middle of the arena, either at cardinals or intercardinals. These orbs will be kicked by the boss across the arena into the wall opposite, which will do an AoE around it and spawn a tower that must be soaked by one player.
- Scrambled Succession: Marks the lightning orbs with 1, 3, 5, or 7 Limit Cut dot numbers and marks four random players with 2, 4, 6, or 8 Limit Cut dot numbers. The boss will kick the orbs and then dash to players dealing a small AoE that inflicts magic vulnerability up in the order of the numbers from 1 to 8.
- Icemeld: The four unmarked players will randomly receive a blue divebomb marker in sequence. These will drop a gigantic ice AoE on them in the order the markers appeared, which deals heavy magic damage and inflicts a long-lasting magic vulnerability debuff.
- Two Minds: Dualspell from the Mage phase, but it resolves faster.
After Kokytos absorbs the soul of the Chimera with Ravening, four ice walls will spawn at cardinals or intercardinals. It will then cast Levinstrike Summoning, which spawns orbs in front of the walls. Scrambled Succession will number four players and four orbs from 1 to 8. The boss will become untargetable, and players will have to soak the four towers that spawn from the orbs while dropping both the Scrambled Succession and Icemeld AoEs away from the party and the towers. Immediately after the mechanic is finished, the boss will become targetable again and start casting Two Minds, so players must find their partner at the correct spot and do the mechanic properly. This is followed by a Gluttony's Augur.
There are multiple ways to do this mechanic, but it boils down to this formula:
- Unmarked players will each get one divebomb marker. This must be placed opposite of where the party and tower currently are to avoid clipping any other player with the gigantic AoE.
- Towers must be soaked in order of marked players, with 6 soaking the first tower, 8 soaking the second tower, 2 soaking the third tower, and 4 soaking the last tower.
- Marked players must go away from any other player and the ice explosion in the order of 2, 4, 6, and 8.
- Any player not soaking a tower, taking the boss's dash, or marked with ice should stay close to the middle on the opposite side of the ice marked player. A good way to find where to stand is to line up with the inner ring.
- Players must avoid the ice wall outside of the outer ring when the orb is kicked, as the ball will explode in an AoE before the tower appears.
There are three popular strategies used in Party Finder to do this mechanic.
Krile LC
- The party stacks together and starts at the fifth orb. The stack will move clockwise or counterclockwise, towards the 7 orb, then the 1 orb, then the 3 orb.
- The marked player will move opposite of the stack and stay there until their marker goes off, then returns to where the stack will go.
- The player soaking the tower will move into the tower once the lightning AoE goes off after the orb is kicked.
- The player getting marked for the dash will move to the intercardinal or cardinal edge towards the location the party is rotating to.
- This repeats for every rotation.
JP LC
- The party stacks between the 5 and 7 orbs, while the initial ice marker goes to the 1 and 3 orbs.
- The first two players soaking towers will move into the tower once the lightning AoE goes off after the orb is kicked.
- The first two players marked for the dash will move to the edge between the 5 and 7 orbs.
- After the first two towers, the stack and ice marker location switches positions. The party will go directly opposite to where the 1 and 3 orbs initially were. The final two ice marker players will go between the 5 and 7 orbs.
- The last two players soaking towers will move into the tower once the lightning AoE goes off after the orb is kicked.
- The last two players marked for the dash will move to the edge between where the 1 and 3 orbs were previously.
Oppo LC
- Similar to Krile LC, except the marked and unmarked players start at opposite sides. Marked players start at 5 and rotate towards 7, unmarked players start at 1 and rotate towards 3.
- The marked player will stay opposite of where the party is, while the rest of the unmarked players will rotate one orb. After their ice AoE goes off, they return to the party.
- The player soaking the tower will move into the tower once the lightning AoE goes off after the orb is kicked.
- The player getting marked for the dash will move to the intercardinal or cardinal edge towards the location the party is rotating to.
- This repeats for every rotation.
Phase Three: Chimera's Lament II
The following abilities are used during the Beast's Lament.
- Charybdis: Summons four tornadoes at either cardinal or intercardinal edges.
- Comet: Proximity AoEs from the intercardinal or cardinal edges where the Charybdis tornadoes did not spawn. These will spawn two cracked rocks and two solid rocks. When a rock is destroyed, it will do a point-blank AoE.
- Beastly Bile: Deals damage which must be shared on the furthest player, which inflicts a Dark Resistance Down debuff.
- Thunderbolt: A conal AoE towards the four closest players, which inflicts a Lightning Resistance Down debuff.
- Ecliptic Meteor: An instant kill ability which must be line-of-sighted by a solid rock on the arena. Destroys all rocks afterwards.
- Beastly Fury: Moderate raidwide magic damage.
The following abilities are gained during the second Chimera's Lament.
- Chimeric Succession: Kokytos marks four random players from 1 to 4 with dotted Limit Cut numbers. This will indicate the order of which Icemeld is afflicted onto players.
- Front Firestrikes: Kokytos will jump to a random non-marked player, dealing damage that must be shared. It then casts Swinging Kick towards the front.
- Rear Firestrikes: Kokytos will jump to a random non-marked player, dealing damage that must be shared. It then casts Swinging Kick towards the rear.
- Swinging Kick: Turns towards the player that was jumped to, then does a frontal or rear cleave depending on what was cast during the previous Firestrikes.
Kokytos will first begin this phase by using Ravening and absorbing the soul of the Beast. Charybdis is cast, and players need to identify where the tornadoes spawn to figure out where to bait Thunderbolt. Stack in the middle to mitigate Comet damage, and then identify where the two cracked rocks spawn. Next, two sets of Beastly Bile and Thunderbolt are cast at the same time.
Have the DPS bait the four conal AoEs first, towards the tornadoes. The easiest way to find their spot is to find the tornado at their colour marker. The tanks and healers will go to the first cracked rock going North and clockwise. They will stack outside of the boss's hitbox within melee range and destroy the rock, then move back to the boss. Repeat this, with tanks and healers baiting the conal and DPS stacking on the remaining cracked rock.
Finally, identify the solid rock without a marker on top of it (as it will be destroyed) and hide behind it for Ecliptic Meteor. Move out of it immediately after as it explodes.
The boss will then cast Ravening once more, absorbing the Chimeric Soul and creating four ice walls. It casts Duality of Death, so tanks must swap once more and mitigate. After this, the knockback marker appears in the middle, and players must once again get knocked back into an ice wall with their role partner.
While the line AoEs still appear, this set of mechanics is different from the first. Players will have to dodge the AoEs that spawn while doing a Dualspell mechanic. Dodge the first set of AoEs while getting into correct positions for Dualspell, and then dodge the second set of AoEs. After that set, go in or out based on whether or not ice was flashed.
This is followed by a Gluttony's Augur, and then Chimeric Succession. Have the 1 marker go northwest, and the 3 marker go northeast all the way to the wall. The 2 and 4 markers will go southeast and southwest, and replace the 1 and 3 marker once their Icemeld AoE goes off. The rest of the party will go North and bait either Front Firestrikes or Rear Firestrikes. If it's Front, move towards the edge in front of the boss after being damaged to bait the cleave outside of the arena. If it's Rear, move behind the the boss to bait the cleave.
Finally, the boss jumps to the middle and casts Two Minds, so quickly get to clock positions or partners and do the mechanic. The rest of the mechanics in the fight are ones seen already. The boss will absorb the Mage's soul a second time with Ravening. It will cast Dualspell multiple times with a mechanic in between each time. After the first one, it casts Gluttony's Augur. After the second one, it casts Duality of Death. After the third one, it will once again cast Gluttony's Augur. After this, it will do a long soul absorption sequence, cast Ravening, and cast its enrage Disintegration at 9:58. Defeat the boss before it kills you!
Loot
When Kokytos is defeated, a treasure coffer will appear that contains Anabaseios Accessory Coffers. When opened by a player, these coffers contain an item level 660 Anabaseios Accessory for the job the player is currently on. The amount of coffers that appear depend on how many players have already cleared during the weekly lockout. If no players have cleared yet, all four accessory coffers will appear. If one to four players have already cleared, two accessory coffers will appear. If five or more players have already cleared, no treasure coffer will appear.
Players who defeat the encounter for the first time during the weekly reset will also receive an Anabaseios Mythos I token. Four of these can be traded in for an Anabaseios accessory of your choosing at a Pandaemonium gear vendor.
Changelog
- 13 Jun. 2023: Updated to reflect proper way to handle Chimeric Succession.
- 02 Jun. 2023: Guide added.
More FFXIV Content

This guide has been written by Lyra an accomplished raider in FFXIV and has written raid guides for the game for the past five years. You can follow him on Twitter and he streams raids on Twitch.
- Developing FFXIV Big Fish Together With Ryuta Suyama
- These Changes Will Make You Think Twice Before Tanking in Evercold
- Complete Dawntrail’s Art Book Collection With – Relics of Eternity –
- New Framer’s Kit With Return Of Breaking Brick Mountains
- Last Chance For THE PRIMALS x Download Festival T-Shirt!
- Team DN Claims #WorldFirst in FFXIV’s Dancing Mad!
- FFXIV Players Blown Away By Store Updates!
- Support #WorldFirst in FFXIV Dancing Mad Ultimate — Now Available!