The Omega Protocol Ultimate (TOP) Phase 1 Guide for FFXIV
This page contains detailed information and strategy about the high-end Duty "The Omega Protocol (Ultimate)", commonly abbreviated as TOP. This section of the guide will cover Phase 1, where players will face off against Omega in his Beetle form.
Introduction to Phase 1 of The Omega Protocol (Ultimate)
This phase has an enrage timer of 2:07 and a decently tight DPS requirement of 66.8k. Potions should be used, and Melee Limit Break is highly recommended for prog. There are two mechanics in this phase, Program Loop and Pantokrator.
For the entirety of this phase, we will follow this Toolbox, so feel free to use this in tandem with the text and video guide provided.
Program Loop
Omega begins by assigning all party members with Looper, a debuff that inflicts confusion when it expires, and can only be cleansed by standing in a tower that Omega spawns in this mechanic. Each party member will also get one of the four X-In-Line debuffs, which simply indicate the order in which their Looper debuffs will expire.
Omega will proceed to spawn four sets of towers in pairs of two, each of them
requiring a player with the ![]() Looper debuff to stand in it. Two Blaster tethers will also
spawn on random party members in the beginning, which will explode in a large
radius around the target at the same time as a pair of towers resolve, inflicting
the target player with a 9 second HP debuff that lowers their max HP by 99%.
Because both the tether explosion and tower resolution inflict a stack of Twice-Come
Ruin, players cannot be hit by both at the same time as two stacks of the debuff
turns into Doom.
Looper debuff to stand in it. Two Blaster tethers will also
spawn on random party members in the beginning, which will explode in a large
radius around the target at the same time as a pair of towers resolve, inflicting
the target player with a 9 second HP debuff that lowers their max HP by 99%.
Because both the tether explosion and tower resolution inflict a stack of Twice-Come
Ruin, players cannot be hit by both at the same time as two stacks of the debuff
turns into Doom.
To resolve this mechanic, two players with Looper will need to stand in two towers while two other players take the tether away from towers. Because of the duration on the Looper debuff itself, the mechanic needs to be resolved in the following order.
- Towers:
 →
→  →
→  →
→ 
- Tethers:
→
→
→
While the ordering of the towers is self-explanatory, the tethers are ordered as such because Twice-Come Ruin lasts for 10 seconds, just a bit longer than the interval between tower and tether sets, thus preventing someone from taking a tower and tether consecutively.
Mechanic Resolution
Since the debuffs are randomly assigned, you will need to set up a priority system to determine which player takes which tower or tether in a given round. For simplicity sake, apply this priority system for all aspects of this mechanic; The tower to take, the tether to take, and where to bring the tethers.
In this guide, we will be using a light party priority system that fixes healers as anchors in each group as an example, but other priority systems will work as well as long as all players are on the same page.
- Group 1: North-West Counter-clockwise
- Group 2: North Clockwise
- Flex priority is Tank → Melee → Ranged → Healer

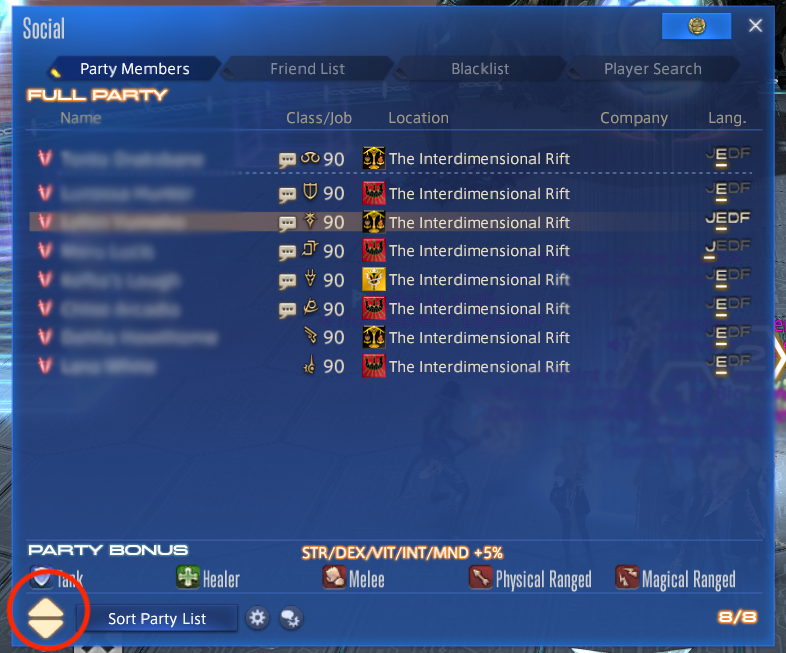
For example, the melee in group one will normally follow a North-West counter-clockwise priority for locating their tower or tether, unless the ranged or healer in their group shares their In-Line number, in which case their priority becomes North clockwise. If you are responsible for flexing, I highly recommend sorting your party list so that the players you need to check are located right beneath your name, making it easy to see whether any of them share your numbered debuff. The party list can be sorted by opening up the Party Member Menu and pressing the up/down arrows with a player's name selected until you achieve your desired sorting.
During the mechanic, healers will need to pay attention to players with the Third-in-Line and Fourth-in-Line debuffs. While their max HP debuff from taking the tether wears off before they need to take their tower, they are left with 1% HP. Soaking a tower can do up to 35k to a non-tank, which is equivalent to about 1400 healer potency. DPS should use their self-sustain skills, and tanks can help out with short cooldowns.
Tips and Tricks
- For the initial tether spawn, have the party stack in a designated spot and have Third-In-Line players step forward into the boss's hitbox so the tethers will automatically be passed to them. Once the tethers have spawned and are visually attached to the Third-In-Line players, the rest of the party can move out. You have 16 seconds to resolve the first tower set, which is plenty of time to get into position.
- If you are waiting to pass a tether, stay still and let the person grab it from you. If a person runs through a tether while the tether holder is moving, it may not always pass.
- Respect the 'tether zone' and 'no tether zone'. If you are not trying to take a tether, do not cut through the boss's hitbox to get to your tower or safe-spot. If you are a tether holder, try to stay tucked inside the hitbox as much as possible and let non-tether players maneuver around you. Do not instantly extend your tether the moment you grab it as that cuts off a large amount of pathing options for non-tether players, and move back onto the boss's hitbox after Blaster goes off.
- Tethers cannot transfer to someone who already has a tether, so it is always safe for tether-holders to run around the middle of the hitbox to get to their spots.
- If you have already taken a tower and do not have your Looper debuff, it is safe to stand in any tower for the rest of the mechanic. You will not take any damage or suffer any adverse effects, and not having to stay out of towers can make it easier to outrange Blaster explosions or preposition better for your next mechanic.
Pantokrator
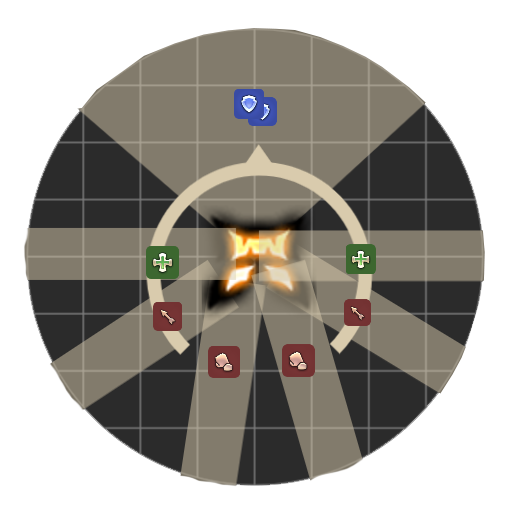
Omega spawns two conal Flamethrower AoEs, splitting the arena into two opposite slices, and will proceed to rotate the Flamethrowers clockwise or counter-clockwise. At the same time, baited puddles will be dropped under all players every few seconds. While all this is happening, players will need to resolve the debuffs given to them at the beginning of the phase.
 Condensed Wave Cannon Kyrios: Omega aims a beam at the designated player when
this debuff expires. This needs to be shared by three players, or it will do
very heavy damage that isn't consistently survivable by non-tanks.
Condensed Wave Cannon Kyrios: Omega aims a beam at the designated player when
this debuff expires. This needs to be shared by three players, or it will do
very heavy damage that isn't consistently survivable by non-tanks. Guided Missile Kyrios Incoming: Omega will fire a missile at the designated
player when this debuff expires, dealing moderate damage and causing a small
AOE around them that will knockback any players caught in it that aren't the
original target.
Guided Missile Kyrios Incoming: Omega will fire a missile at the designated
player when this debuff expires, dealing moderate damage and causing a small
AOE around them that will knockback any players caught in it that aren't the
original target.-
In-Line: Players will get X-In-Line debuffs corresponding to their
Guided Missile Kyrios Incoming timer.
Mechanic Resolution
We only need to care about the timer on our Guided Missile Kyrios Incoming debuff, as players simply needed to be stacked with the rest of their group any time they are not taking a Missile. Just like in Program Loop, the debuff durations are randomly assigned, so players will need to use a priority system to split the party into two groups of four players that all have different In-Line debuffs. We can reuse our priority system from Program Loop, which is as follows as a reminder:
- Group 1: North-West, Counter-clockwise.
- Group 2: North, Clockwise.
- Flex priority is Tank → Melee → Ranged → Healer.

With this priority, the melee in group one will go into the North-West counter clockwise safe-spot unless they share an In-Line debuff with the ranged or healer in their group, in which case they will go into the opposite safe-spot. This priority ensures that each group has a healer, which is highly recommended as each Wave Cannon Kyrios and Guided Missile deal between 58k-62k damage on non-tanks, and each player will need to take four instances of that damage.
One possible complication is the large size of the safe-spots that determine our group splits. In some configurations, it may be ambiguous whether a particular slice belongs to Group 1 or Group 2 as the safe area covers West to North East. There are a few ways of resolving this ambiguity. For example, by using the mid-point of the safe-spot to determine where a slice belongs.
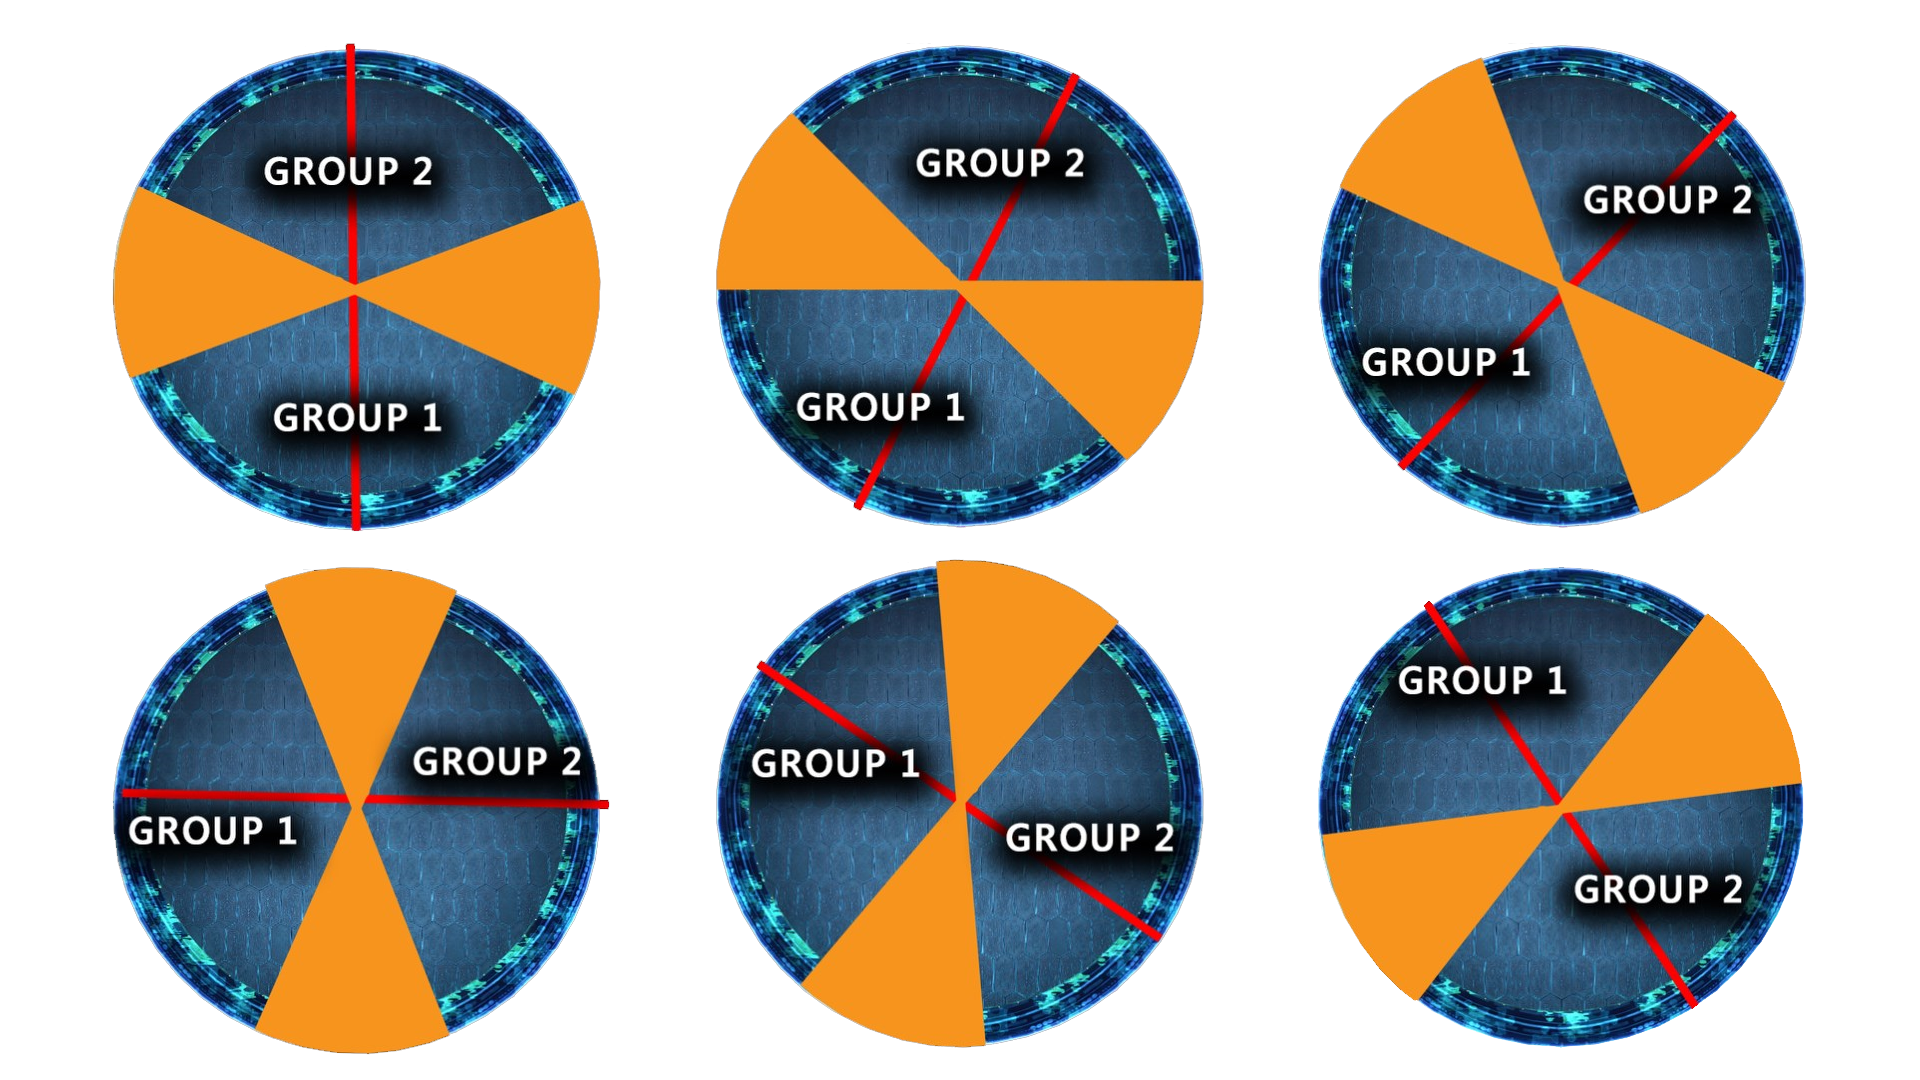
Each group can also start on opposite arena waymarks, and claim whatever safe-spot covers that waymark as their starting position, moving strictly clockwise if a Flamethrower spawns on their respective waymarks. Any method resolving ambiguity will work, as long as everyone in the group is on the same page.
There are two main ways of resolving the movement during this mechanic, each with its own pros and cons, and this guide will cover both of them.
Missile Back, Stack Front
This strategy puts the three-person stack at the front of the rotating safespot, with the stack inching forward against the Flamethrower. The player with the First-In-Line Missile debuff will split off from the party and start at the back of the safe-spot to drop their Missile, then run forward to catch up with the party stack. The Second, Third and Fourth-In-Line players will split off from the party when it's their turn to drop their Missile, falling back while the party continues to inch forward, and catching back up with the party stack once their Missile has gone off.
The advantage of this strategy is that there is some leeway for Missile players to be late in moving. Since the Missile player falls back, there is no risk of them dropping a baited puddle on the path of the party. However, they may have to maneuver around messy baits when trying to rejoin the party if the party is sloppy in dropping their puddles, causing them to be too late to rejoin the next party stack.
Missile Front, Stack Back
The basics of this mechanic don't change by swapping around where the party stacks and where the Missile player drops their AoE. In this strat, the three-person stack will revolve around the boss while getting chased by the Flamethrower, while the Missile player will run ahead, chasing the Flamethrower, dropping their puddles in a way that won't hinder movement required by the rest of the party. Once the Missile AoE drops, that player will then go max-melee distance (or further) from the boss and circle back to the group to take the Wave Cannon Kyrios with the others. As each Missile target takes their AoE, the next player with the In-Line debuff should prepare to move out of the stack, towards the boss, towards the Flamethrower they're now chasing.
The advantages of this strategy are the exact opposite of the Missile Back strategy, as messy baits from the stack group won't hinder the Missile player from getting back to the group, but poorly placed puddle baits from Missile players can get in the way of stack movement, causing panic amongst party members, resulting in less than three players in the next Wave Cannon Kyrios.
Regardless of the strategy you decide to pick as a group, realize that it doesn't matter which you choose, the group as a whole needs to take time to learn the mechanic and gain consistency before any real progress can be made.
Tips and Tricks
- Regardless of which strategy you do, it is important to do a circular movement as the Missile bait. This means that if you go outside the hitbox to drop your Missile, you are using the inside of the hitbox to catch up with the party. Conversely, if you use the inside of the hitbox to path your way to the Missile drop, you will return to the party from the outside of the hitbox. Doing this avoids trapping yourself with your own baits, or potentially interfering with the party or the next Missile player's pathing options.
- The party should agree on how they're moving and where exactly they are starting at the beginning of the mechanic. Ideally, all three party baits should be dropped at the same spot, leaving a lot of free room for the Missile player. Some groups prefer to always move to the very edge of the current baited puddles, and some groups doing stack front may want to always push up against the Flamethrowers.
- For Missile back players, you may have to deal with messy baits on your way back if the previous missile player was slow. If you see a bait spawn right in front of you, it is safe to wait for it to explode before moving on as long as you are not currently standing in a bait. Trying to 'outrun' or maneuver around baits in front of you will often lead to your death.
Diffuse Wave Cannon
After all four beams and Missiles have gone off, Omega will target the two farthest players from him with a large cleave that deals tankbuster levels of damage five times. While this is happening, he will also randomly target three of the six non-tank players with a marker, firing Wave Cannon Kyrios, a thin laser beam, at the designated players that deals moderate damage and inflicts magic vulnerability up. He will then repeat this, targeting the three players that were not chosen in the first round. Because of the vulnerability up, players who have taken the laser in the first round cannot be hit by the second set of lasers without dying.
Tanks need to stand max melee in order to bait the tankbuster cleaves, while the rest of party stands inside Omega's hitbox. Tanks can use their invulnerabilities here, which will allow them to stack on each other and open up a lot of room for the rest of the party to spread. The party can simply use static positions to take their lasers, taking care to not get clipped by the Diffuse Wave Cannon hitting the tanks.
This is the end of the phase, and Omega will soon cast Atomic Ray, the enrage. If you've managed to drop Omega down to 0% health, the fight will transition into Phase 2, Omega-M and Omega-F.
Changelog
- 28 Jan. 2023: Guide added.
More Final Fantasy XIV Content

Meru has been raiding since early Stormblood and has done high end content in a variety of roles. She has a lot of experience reading and analyzing logs and has done extensive testing on a variety of mitigation related issues. She hangs out in the Balance Discord and is often pinged in multiple channels for mitigation questions, but sadly very little fishing questions.
Lavender is a theorycrafter for both Machinist and Reaper in FFXIV. They have been playing since Heavensward, having cleared every raid since the release Stormblood in 2017.
- FFXIV’s Berlin Fan Festival Schedule Is Out!
- Pre-Order FFXIV Nendoroids Y’shtola & G’raha Now!
- From Action to Tab Targetting — How Did You Start FFXIV?
- Developing FFXIV Big Fish Together With Ryuta Suyama
- These Changes Will Make You Think Twice Before Tanking in Evercold
- Complete Dawntrail’s Art Book Collection With – Relics of Eternity –
- New Framer’s Kit With Return Of Breaking Brick Mountains
- Last Chance For THE PRIMALS x Download Festival T-Shirt!