The Unending Coil of Bahamut (Ultimate) Bahamut Prime Guide
This page contains detailed information and strategy about the high-end Duty "The Unending Coil of Bahamut (Ultimate)", commonly abbreviated as UCoB, specifically for the portion of the fight dealing with Bahamut Prime.
Phase 3: Bahamut Prime
The transition to Phase 3 begins with Seventh Umbral Era, a raid-wide AoE dealing damage and doing a knockback, very similar to Heavensfall. There will then be a set of three Calamitous Flames, followed by a Calamitous Blaze, which is just raid-wide damage to the whole party. Calamitous Blaze cannot be survived without a Tank Limit Break, with a Tank Limit Break 3 being heavily preferred. In order to effectively mitigate these, have one of your tanks use Tank Limit Break as soon as you get knocked back by Seventh Umbral Era. (A tank Limit Break 2 should be popped before the first hit, as it has a longer duration.)
Bahamut Prime Toolbox Resource
The following Toolbox should be used in tandem with the following guide. Slides #1 - #53 are specifically for Bahamut Prime.
Bahamut has the following abilities:
- Flare Breath: Conal cleave dealing very significant magic damage. Treat it like a mini-tankbuster.
- Flatten: Physical tankbuster dealing massive physical damage, that must be mitigated.
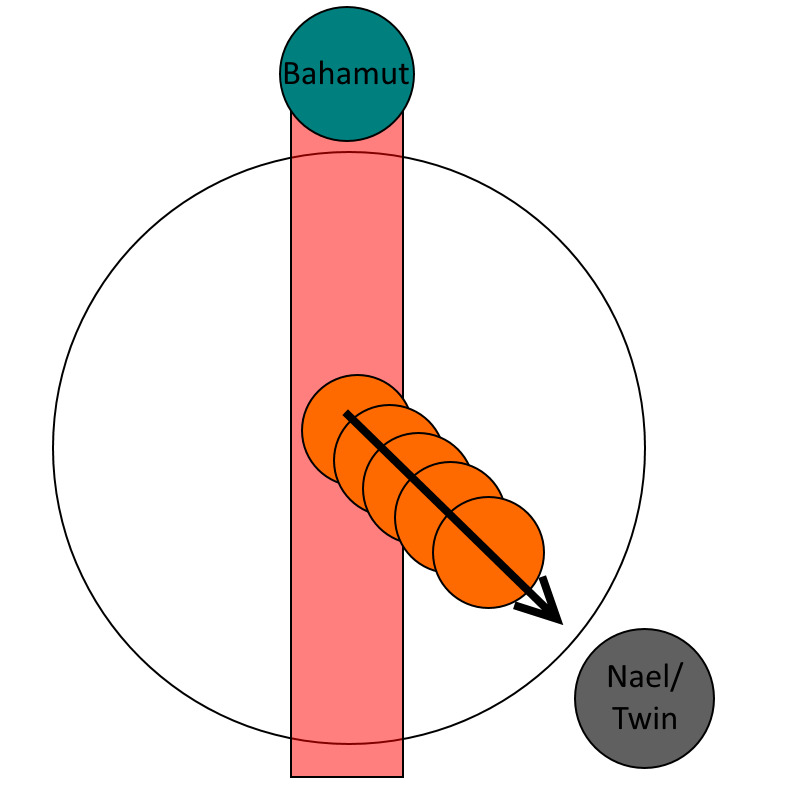
- Earth Shaker: Bahamut will place a marker over a party member, targeting them with a huge conal AoE between Bahamut and his target (The range is approximately a full 90 degree slice of the arena). Deals significant physical damage, and leaves a fire puddle (not unlike Liquid Hell puddles). Standing in the puddle will inflict Sludge, a heavy and severe dot that will likely kill you.
- Tempest Wing: A tether will extend from Bahamut to a random target. This tether can be intercepted by standing between Bahamut and its target. Deals magical splash damage that knocks back and stuns any party member except its target.
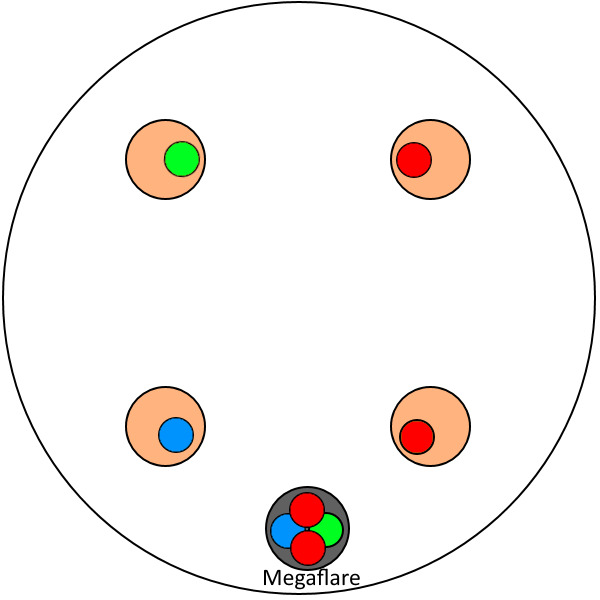
- Megaflare: 2+ players will get marked by a circle surrounding them, indicating them to stack. Splash damage will target random players, so everyone must spread out. Players without splash damage must not get hit by another player's splash damage, as they likely will likely either die, or not have enough HP to survive a later mechanic. AoE circles will also appear on the ground to dodge.
- Gigaflare: Raid-wide AoE dealing massive magic damage.
Bahamut's phase consists of small periods to do damage divided up by large intermissions called Trios. Throughout these trios, Nael, Bahamut, and Twintania will all do a combination of their mechanics at the same time.
The phase begins with Bahamut quickly using a Flare Breath, immediately followed by a Flatten. Afterwards, Bahamut will summon Nael and Twintania, and begin Quickmarch Trio.
Quickmarch Trio
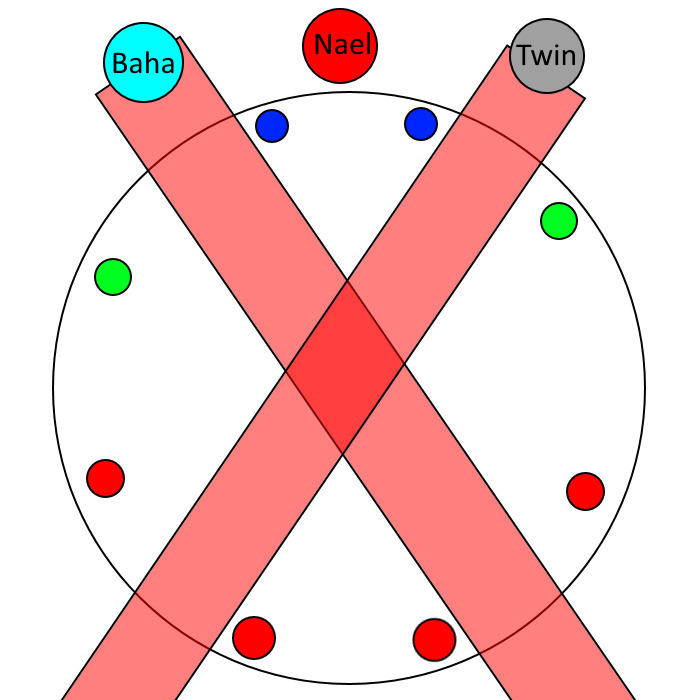
- Bahamut + Nael + Twin Line Divebomb
- Twister + Dodge Dives
- Megaflare (three DPS) + Earth Shaker (two healers, one DPS) + Tempest Wing
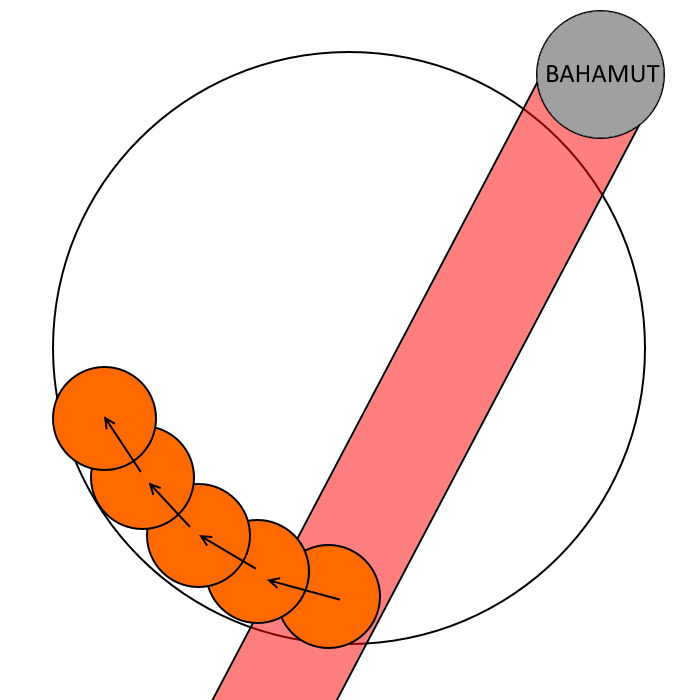
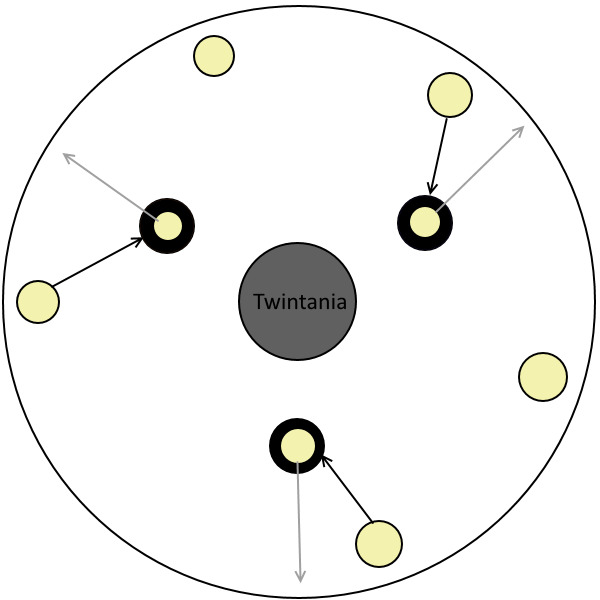
Nael, Bahamut, and Twintania will all appear in a line on the edge of the arena, and will dive across the middle of the arena. This leaves two safe spots in the edges of the arena. Assign each player an assigned position in either the left or right safe spot, and get ready to move to avoid twisters as soon as the trio dive (I would highly recommend using Focus Target to see when the cast finishes, as that is when you have to move. The enemy list also shows the end of the cast). Immediately afterwards, Megaflare begins, marking three random DPS with circles around them, while hitting four random players with unavoidable soak damage, so you must be spread out. Keep in mind players can be targeted by both Megaflare circles and Megaflare splash damage. At the same time, both Healers and the non-marked DPS will receive an Earth Shaker marker over their heads, and two random players will be tethered to Bahamut via Tempest Wing.
The best way to deal with this trio is to assign mechanics to a quadrant of the arena. Have your Megaflare stack in the South West, in max melee range of the boss, with each healer in the North East and North West, accompanied by a tank to intercept the tether. The last DPS with Earth Shakers will go South East. Have your tanks intercept the Tempest Wing tethers and position themselves in front of the two healers, regardless of if they will be hit by Earth Shaker, as it does menial damage to tanks. After this, the first Trio is resolved.
After Quickmarch Trio resolves, Bahamut will repeat the same Flare Breath into Flatten combo done earlier. Once again, Bahamut will summon Nael and Twintania and begin using Blackfire Trio.
Blackfire Trio
- All three bosses appear in a triangle outside the arena.
- Liquid Hell + Divebomb marker
- Thermionic Beam — Comes out during the fourth liquid hell, everyone has to move together
- Megaflare markers (1 tank 1 healer 2 DPS) + 4 pillars
- 4 Hypernovas
This trio begins with a Bahamut divebomb marker appearing over a random player's head. Bahamut's markers work differently than the elemental dragons in the earlier phase, in which Bahamut will dive to where the marker appears, not disappears, so you must bait beforehand. During this time, Twintania will be targeting a random player with Liquid Hells, and Nael will be using Thermionic Beam (during the fourth Liquid Hell). You must be stacked together in movement, making sure nobody receives the burns from puddles left behind.
There are two main strategies to deal with the first part of Blackfire Trio, which I will call the edge method and the center method.
Edge Strat
Begin the trio stacked together as a party in the wall, and find Bahamut. Move along the arena away from Bahamut (i.e. if the party is at 6 o'clock, and Bahamut is at 10 o'clock, move counterclockwise). In the event that Bahamut spawns directly in front or behind the stack, moving in either direction is fine, but I would recommend assigning a default. Move along the wall, making sure nobody gets Burns from Liquid Hell.
Center Strat
Begin the trio stacked together as a party in the center of the arena, and find Twintania or Nael (either can be used as a waymark, just make sure everyone uses the same one). Move toward Twintania or Nael's spawn to make sure the party remains stacked. Be sure to make very small stutter-steps to make sure you do not reach the wall before all five Liquid Hell puddles are placed, but not slow enough so that people are inflicted with Liquid Hell's burns. As long as you just move to the edge of the Liquid Hell puddle every time, you should be fine.
The Edge method requires slightly more thought but removes a line of Liquid Hell puddles that may block off movement. The Center method, however, requires virtually no thought. Choose a strategy that better fits your team.
Immediately after the fifth Liquid Hell, Nael will mark two random DPS, one random healer, and one random tank with Megaflare circles. All Megaflare marked players should stay stacked together where the party finished moving. At the same time, four pillars will appear in each quadrant of the arena, forming a square. These towers spawn based on Bahamut's location (i.e., if Bahamut is north, towers will spawn in North, East, South, and West). A player must be inside a tower when it explodes, or it will deal raid-wide lethal damage. This is where unmarked players come in. Assign one tower to be the unmarked healer's tower, one tower to be the unmarked tank's tower, and have your remaining two unmarked DPS spread out into the remaining towers.
It does not matter which tower each player is sent to, but I would recommend your healers and tanks have an assigned tower on one half of the arena, and have your DPS towers on the other half of the arena, calling to go either close or far. Nael will be using Hypernovas before towers explode, so you must bait them outside the towers. You are safe to move into the towers after the second Hypernova, so wait until you see it before moving in.
Immediately after Blackfire Trio, Bahamut will begin casting Gigaflare, so make sure to mitigate appropriately. Bahamut will follow up with 3 Flare Breaths in a row, and once again summon the other bosses and begin Fellruin Trio.
Fellruin Trio
- All three appear closer to the middle, in a triangle formation. Their location is random.
- Nael uses a random RP attack. All three Neurolinks need to be used. Party on one, MT on one, OT on one.
Tanks need to pick up tethers. Players need to be in Neurolinks by aetheric profusion.
- If Nael says "From on high I descend, the moon and stars to bring!" >> Raven's Dive > Lunar Dynamo > Meteor Stream
- If Nael says "From hallowed moon I descend, a rain of stars to bring!" >> Lunar Dynamo > Raven's Dive > Meteor Stream
- Tempest Wing x2
- Aetheric Profusion (needs Neurolink)
- Meteor Stream
The trio begins with Nael, Bahamut, and Twintania appearing in a triangle formation around the middle of the arena. Their location in the triangle is random. Nael begins by saying one of two quotes, corresponding to either Raven's Dive > Lunar Dynamo ("From on high I descend, the moon and stars to bring!") or Lunar Dynamo > Raven's Dive ("From hallowed moon I descend, a rain of stars to bring!"). I would recommend using the same assigned positions as used in the earlier Ravan's Dive's combo in Phase 2, surrounding Nael. After Nael's first move, Bahamut will tether two random players with Tempest Wing, which each tank must intercept and pick up. Very shortly after, Twintania will use Aetheric Profusion. Your party must use one Neurolink, while your tanks use the other two Neurolinks to avoid the knockback from Tempest Wing. Immediately after Aetheric Profusion resolves, Nael will use Meteor Stream, so your party must spread out as fast as possible.
This trio is immediately followed by a Gigaflare, so make sure to heal and mitigate appropriately. Afterwards, Bahamut will use a Flare Breath, followed by a Flatten, followed by another Flare Breath. Afterwards, Bahamut summons the bosses again and begins Heavensfall Trio.
Heavensfall Trio
- Bahamut + Nael + Twin appear at the edge of the arena.
- Bahamut Divebomb Marker + Twintania Divebomb Marker
- Twister
- Megaflare + 8 Towers spawn (on the edge)
- Heavensfall (rotating circle type) + 3 Hypernovae
- Fireball Stack
The trio begins with Bahamut, Nael, and Twintania jumping to a random edge of the arena. They will always be adjacent to each other, but in a random position (i.e., You may see from left to right [Bahamut, Nael, Twintania] or [Nael, Bahamut, Twintania], or any other combination of the three). Begin by stacking in the middle, to bait Bahamut and Twintania's dives. There are two ways to dodge dives, depending on Nael's position in their configuration.
Side Nael
Dodge this almost exactly like Quickmarch Trio's dive, using the same safe spots.
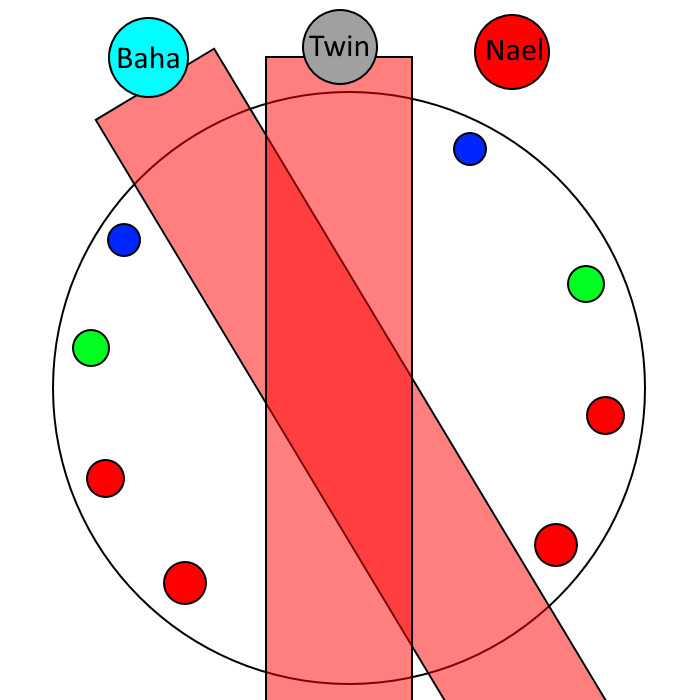
Middle Nael
Have two players dodge toward the north quadrant, two players to the east, two players to the south, and two players to the west. You can use the same safe spots as Quickmarch trio, albeit with small differences. Your members who are the furthest north should just move to the north quadrant, and the southernmost players should move toward the south quadrant. All other players should have the same safe spots.
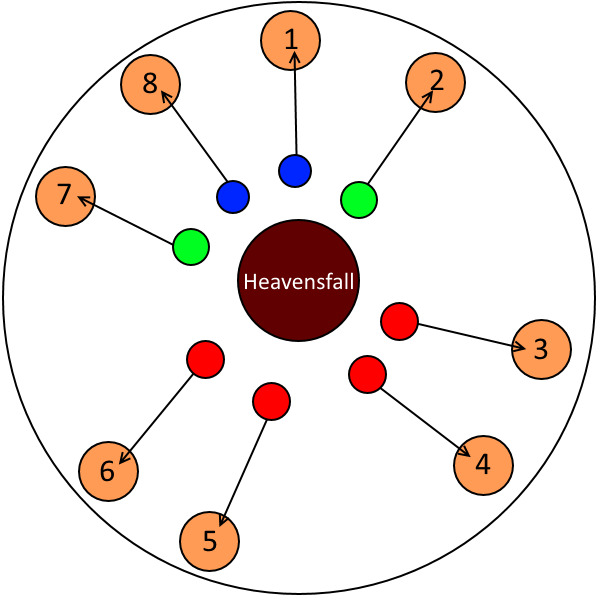
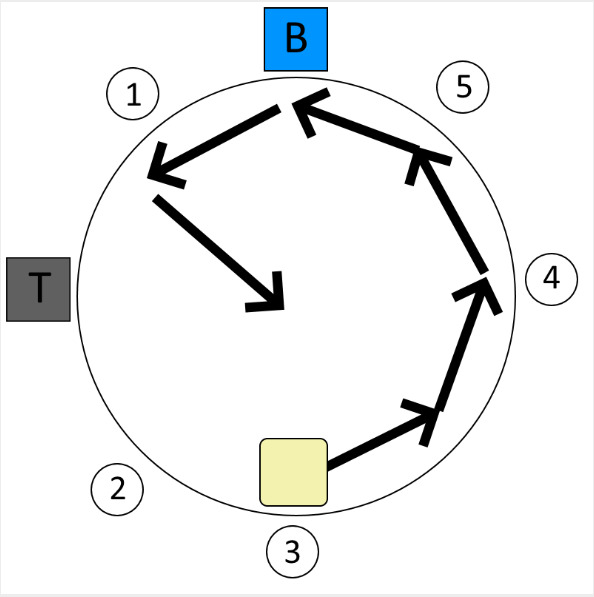
Immediately after dives, Twintania will follow up with a Twister, and Bahamut will spawn eight towers in random areas across the edge of the map. After a short while a Heavensfall will drop. Your goal is to have all eight players use the Heavensfall knockback to knock themselves into each of the eight towers. In order to quickly determine what player should go to what tower, I would recommend using Nael as a waymark (12 o'clock) and assigning each player a number, corresponding to which tower they should take starting clockwise (i.e., player #1 would take the first tower going clockwise, player #2 would take the second tower going clockwise, etc etc). You can use Quickmarch trio safe spots as a basis to determine what number should go on what player.
After towers resolve, get ready to actually dodge Thermionic Burst AoEs caused by Heavensfall. While you are dodging, Nael will throw out three Hypernovae targeted at three random party members, so be sure to bait these at the wall if possible. After the third Hypernovae, when Heavensfall resolves, a random player will be marked with a fireball marker. Have your party quickly collapse in the middle to soak Fireball, and prepare mitigation for the upcoming Gigaflare.
Some groups may decide to just sacrifice the Fireball marked player, and forego all damage caused by it. This should only be done if you have less than six people up, and desperately need to recover.
Immediately after Heavensfall Trio, Bahamut will use Gigaflare, followed by three Flare Breaths. Afterwards, Tenstrike Trio will begin.
Tenstrike Trio
- Triple Generate
- Meteor Stream x4 (four DPS)
- Triple Generate (on same targets)
- Meteor Stream x4 (two healers, two tanks)
- Earth Shakers x4
- Earth Shakers x4
This trio begins with Twintania appearing in the middle, and targeting three random players with Generate, this time sending two hatches at each targeted player. In order to prevent a wipe, you must have another set of three players intercept the second hatch by standing in the Neurolink. At the same time, Nael will also be using Meteor Streams on everyone, one by one. She will always dive on all four DPS first, followed by two healers, followed by two tanks. I would recommend having all players spread out to pre-assigned positions (cardinals and intercardinals) and have each of the marked players move into each of the Neurolinks. You can use your quickmarch positions for this, and they will work pretty well. Keep in mind, you cannot run through the middle of the arena, as Hatches are present. At the same time, have unmarked players call which player's hatch they will be intercepting, and move into the corresponding Neurolink after the first hatch is resolved.
Immediately after, four players will be marked with Earth Shaker markers. Players must spread out to four different sides of the arena, making sure no Earth Shaker hits any other and a safe spot is left for the remaining four players. The second set of four players should be quickly discussing what position they will be going for the second set of Earth Shaker markers, which will appear shortly after the first set resolves.
A common strategy is to mark the safe spot with a square marker [marker 1 or 2], and have each of the remaining four players stand in each of the corners of the waymark. This is a quick way to non-verbally determine what spots people should be going, allowing voice coms to be dominated by the first set of Earth Shakers.
After this Trio resolves, Bahamut will once again cast Gigaflare, followed by a Flatten into Flare Breath, and then following into Grand Octet.
Grand Octet
- Five dragons and three bosses spawn in eight set locations randomly.
- If everyone is alive during the Grand Octet cast, each player will be marked once, and only once.
- Nael dives first.
- Five Dragons dive in succession.
- Bahamut dives.
- Twintania dives + Megaflare stack + Megaflare towers.
There are a multitude of strategies to correctly preform Grand Octet. The strategy I present is one of many, but I think it is the easiest and most consistent strategy out of the ones I have come across. Whenever 'dragons' are mentioned, this does not include Twintania, Nael, or Bahamut.
Here are the basic rules of Grand Octet:
- The eight locations dragons/bosses can spawn is always set, but their configuration is random.
- Nael will always be the first to dive. Her position is locked where the marker appears.
- Five Dragons will dive depending on Bahamut's position. Twintania will always be skipped. Their position is locked when the marker disappears.
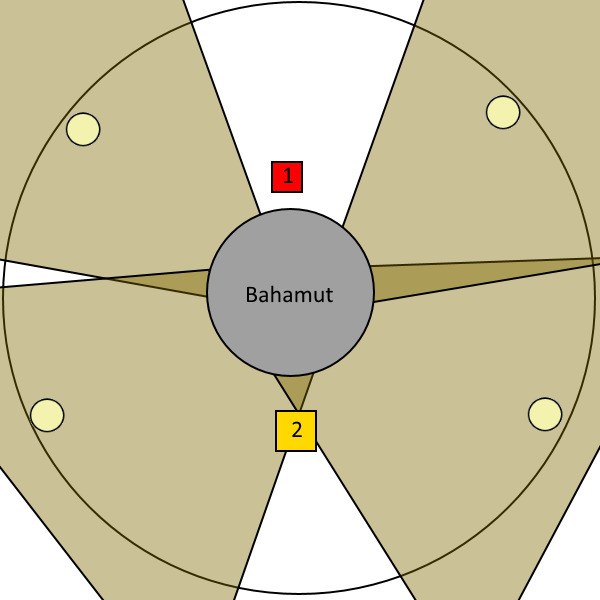
- If Bahamut is in a cardinal position, dragons will dive in a counter-clockwise order, starting from Bahamut's counter-clockwise side.
- If Bahamut is in an intercardinal position, dragons will dive in a clockwise order, starting from Bahamut's clockwise side.
- If Twintania is between two dragons, she will be skipped.
- After all five dragons dive, Bahamut will dive. His position is locked when the marker appears.
- Twintania will dive last, her position being locked when the marker appears. Megaflare will begin at the same time.
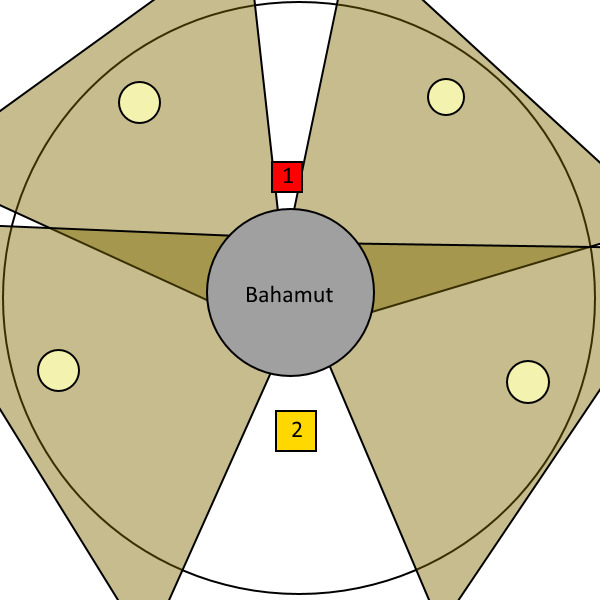
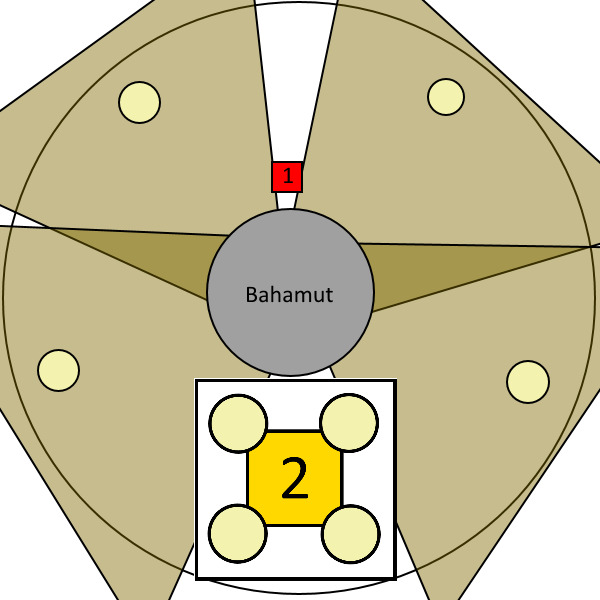
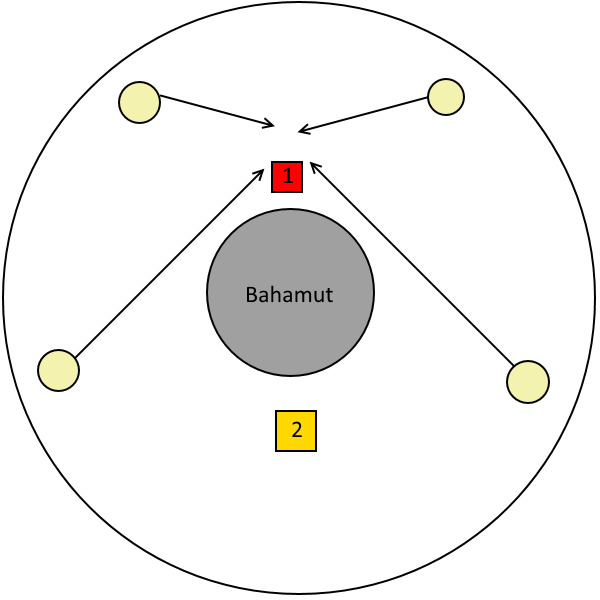
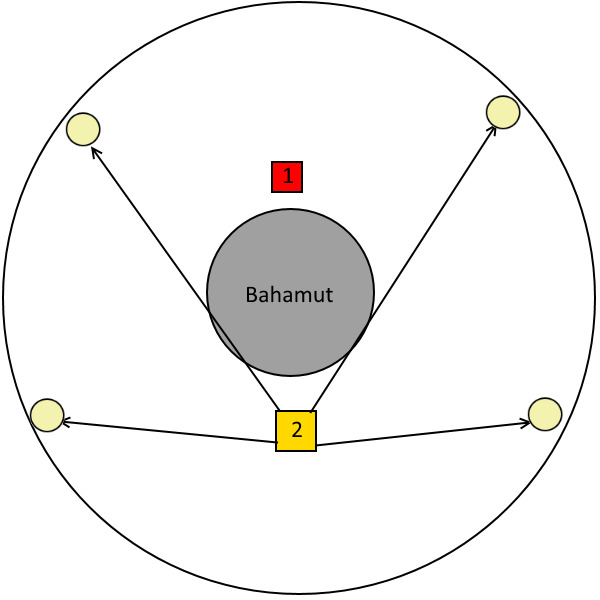
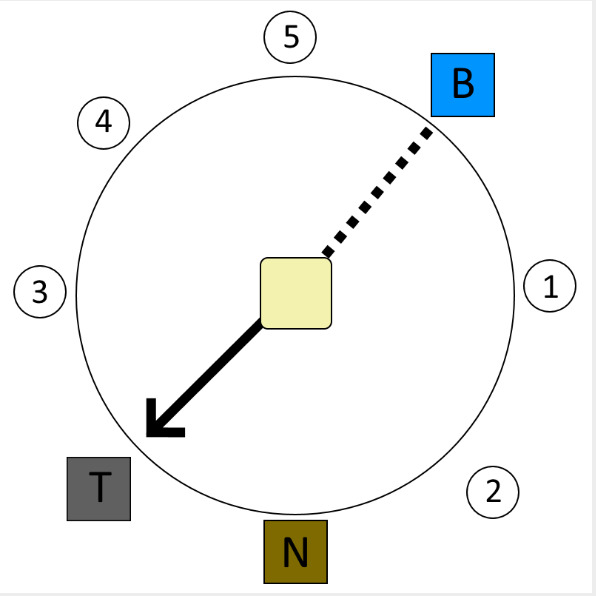
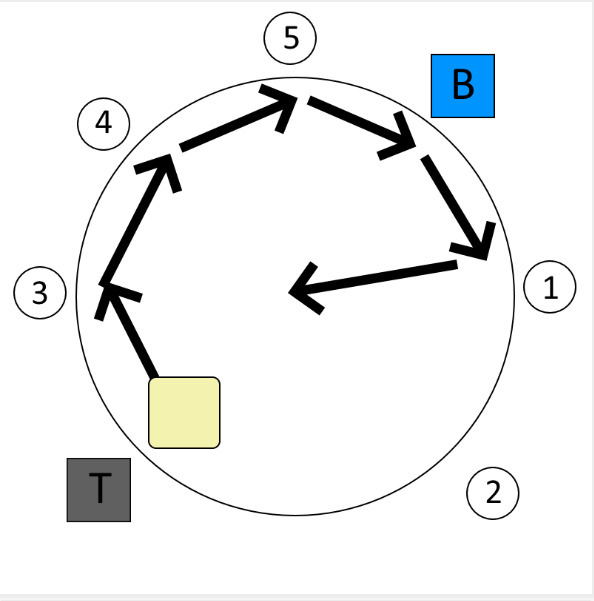
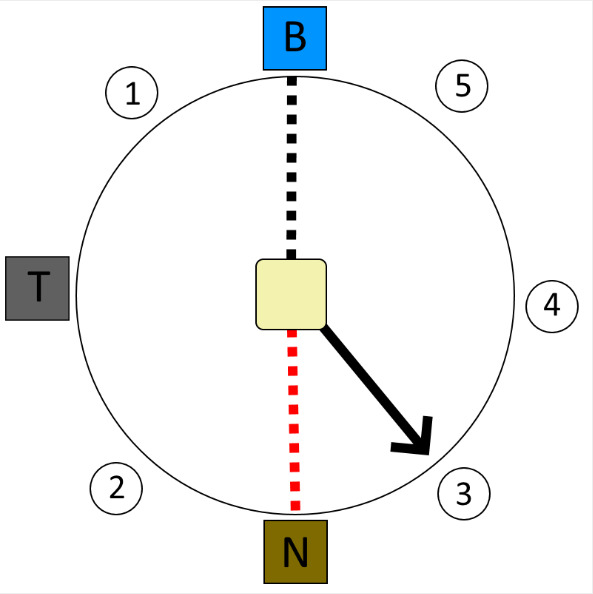
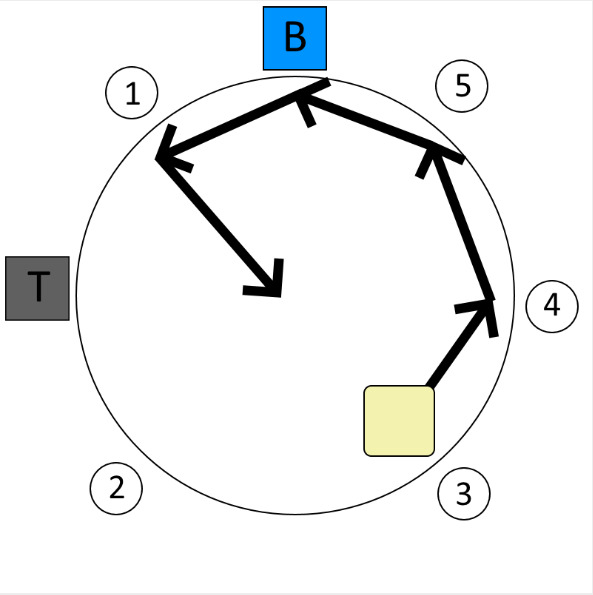
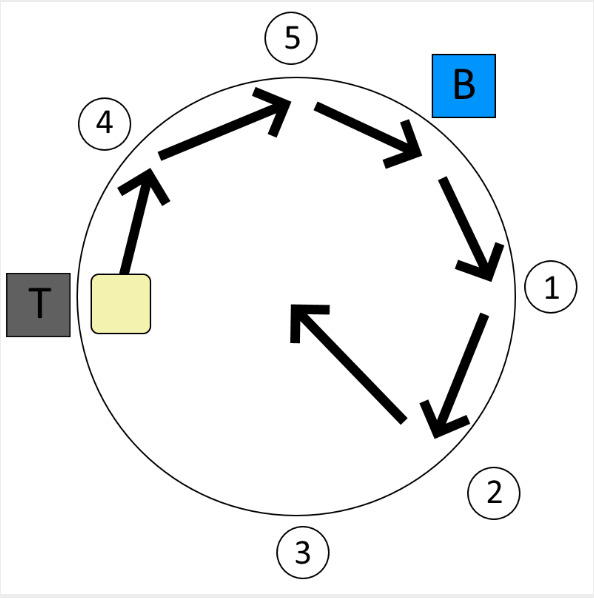
Begin the phase by stacking in the middle. Determine where Bahamut is, and take note if he is at an intercardinal or a cardinal position. Also check to make sure Nael is not across the arena, opposite Bahamut. If Nael is not opposite Bahamut, wait for the initial divebomb marker to appear, and then run to the dragon opposite Bahamut. After Nael dives, you will begin running in a circle. If Bahamut was at a cardinal position, you will be running counter-clockwise (Diagram 1 & 2 shown below). If Bahamut was at an intercardinal position, you will be running clockwise (Diagram 3 and 4 shown below). Do not sprint until all divebomb markers appear, unless you are behind the party. Once the red Bahamut dive marker appears, run straight to the middle.
In the event Nael is directly across from Bahamut: if Bahamut was at a cardinal position, wait for the first divebomb marker to appear, and then run to the first dragon counter-clockwise Nael (Diagrams shown below). If Bahamut was at an intercardinal position, wait for the first divebomb marker to appear, and then run to the first dragon clockwise Nael (Diagrams 3 and 4 shown below). The strategy then plays out exactly as outlined previously.

After all dives except for Twintania are resolved, there should only be one player who has not been marked by any dragon. Have them run to the right of Twintania, to bait her dive. At the same time, Megaflare Towers and markers will appear on random players. The player marked by Twintania can be selected for either mechanic, so they must be prepared to deal with either mechanic. For ease of access, have your Megaflare stack be on the left of Twintania, and have the tower closest to Twintania be for the player targeted by Twintania if they do not have a Megaflare marker. Your remaining members should be taking towers. There is no foolproof method I can think of that makes this tower set easy, so I recommend just calling out which tower you are going to and adjust on the fly. Immediately after the dive, Twintania will begin using Twister, so players inside towers must run inside them as to not trigger Twisters, and players in the Megaflare stack should move out.
Megaflare will similarly target one healer, one tank, and two DPS, which means you can have a general priority system to who goes to which tower. You can usually get away with just winging it, but I would not recommend enforcing a priority system because of the need of having a tower open, as the Twintania bait might have to take a tower.

If you are confident in your adds phase DPS, you can instead opt to Tank Limit Break 3 approximately a second before Megaflare towers spawn to avoid having to coordinate the towers and Megaflare stack after Octet's dives. Make sure the tank who is using Limit Break is in the middle of the arena and prepared to move for twisters. You still have to place Twintania's dive, but this completely nullifies the damage done by Megaflare, allowing any player to take any tower, regardless of if they have any marker. You still have to move to avoid twisters, so be wary.
Immediately after Grand Octet is complete, Bahamut will immediately jump to the background of the arena and begin charging Teraflare.
Changelog
- 13 Apr. 2022: Guide added.
More Final Fantasy XIV Content

To be added...
- New Framer’s Kit With Return Of Breaking Brick Mountains
- Last Chance For THE PRIMALS x Download Festival T-Shirt!
- Team DN Claims #WorldFirst in FFXIV’s Dancing Mad!
- FFXIV Players Blown Away By Store Updates!
- Support #WorldFirst in FFXIV Dancing Mad Ultimate — Now Available!
- Calling FFXIV Fishers To Catch The Rainbow For Charity!
- Last Chance To Enter FFXIV x Jollibee Sweepstakes!
- The Senor Otters Make Their Grand Debut in FFXIV