The Unending Coil of Bahamut (Ultimate) Golden Bahamut Guide
This page contains detailed information and strategy about the high-end Duty "The Unending Coil of Bahamut (Ultimate)", commonly abbreviated as UCoB, specifically for the portion of the fight dealing with Golden Bahamut.
Phase 5: Golden Bahamut
Bahamut gains the buff Lohs Daih, changing his appearance, and gains the following abilities:
- Akh Morn: Tanks split a big tankbuster (multiple times). Starts at x3 and increases by one each cycle.
- Morn Afah: Big party stack dealing massive magic-based damage. Must be mitigated appropriately.
- Exaflare: Spawns a series of AoE circles dealing lethal damage to all players standing inside. More info below.
Remember if Bahamut was not pushed past 60% in Phase 3, Bahamut will also gain a Damage Up buff, and deal unhealable damage, essentially serving as a raid wipe.
This phase is all about Exaflares, in addition to planning out mitigation for Morn Afahs and Akh Morns. Any deaths will result in the player permanently losing Phoenix's Blessing, making deaths early in the phase near-unrecoverable.
The phase begins immediately with a Morn Afah, so have all of your party stack together. This requires extensive mitigation, which I would highly recommend planning beforehand. You will see a total of five Morn Afahs before Bahamut enrages. As party composition is variable, you will have to discuss among your group where mitigation should be placed. The bare minimum needed to survive is three 10% CDs + Succor. More can be added for safety.
Morn Afahs finish casting at approximately the following times (assuming 0:00 is when Golden Bahamut is targetable):
- #1 – 0:06
- #2 – 1:01
- #3 – 1:35
- #4 – 2:25
- #5 – 3:17
These times may vary slightly.
Right after Morn Afah resolves, have only your tanks stand in front of Bahamut, as he will begin casting Akh Morn. Much like Morn Afahs, Akh Morns need to have a planned set of mitigation for the highest chance of success. You will see a total of four Akh Morns before Bahamut enrages. The common CD rotation for tanks goes as follows:
- Akh Morn 1 – Invuln
- Akh Morn 2 – Cooldown
- Akh Morn 3 – Invuln
- Akh Morn 4 – Cooldown (everything you have)
Akh Morns finish casting at approximately the following times (assuming 0:00 is when Golden Bahamut is targetable):
- #1 – 0:12
- #2 – 0:44
- #3 – 1:47
- #4 – 2:37
These times may vary slightly.
After this Akh Morn is resolved, Bahamut will begin casting Exaflare.
Exaflare
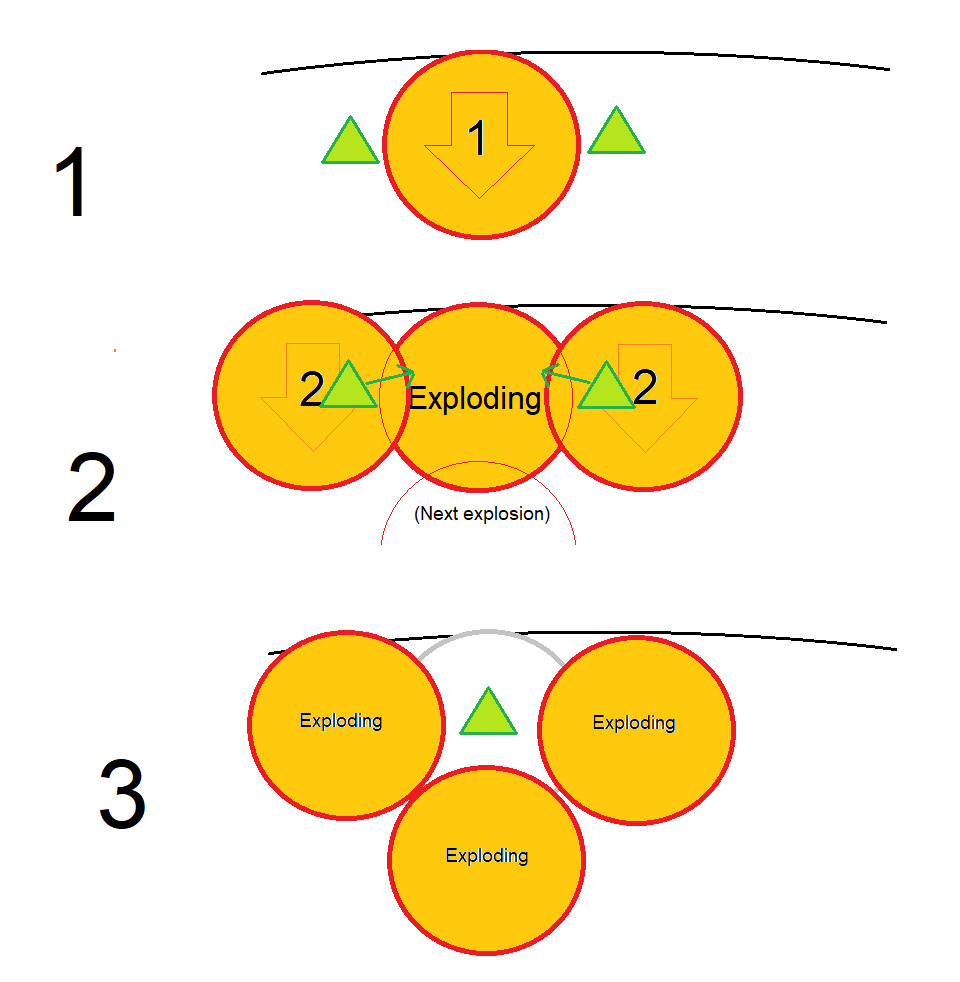
Exaflare is a mechanic at first seeming very similar to Emptiness in O4S, but with key differences. Exaflares creates three waves of two markers across one of the cardinals/intercardinals directions of the map. Exaflares will always spawn in one and only one lane, and all six lanes will be used. Below is a diagram that shows how they come out. They appear at ~50% into the Exaflare cast.
There are three main strategies to dodge Exaflares:
Middle Strat
This is a strat that requires a lot more effort, but is usually very consistent. We can label Exaflare waves in the format ######, wherein # is what wave it is. For example:
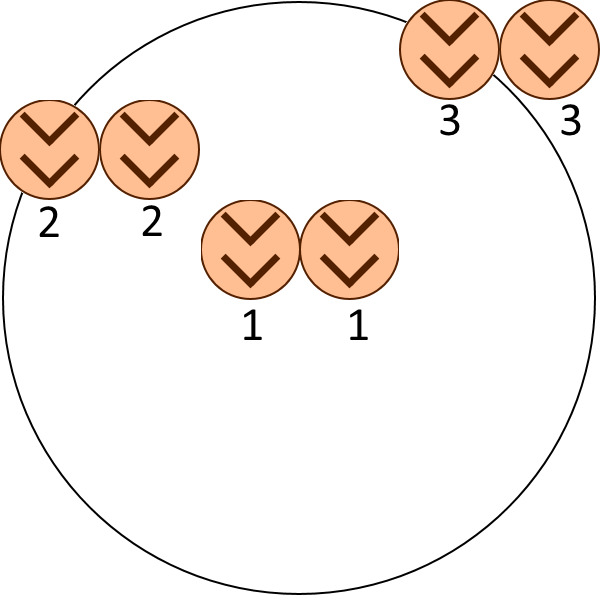
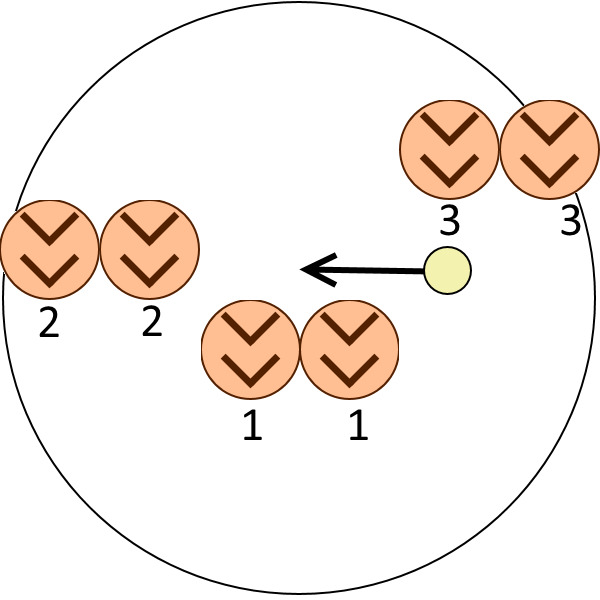
Try to find places where 3 and 1 Exaflares are adjacent to each other. After doing so, stand in the lane with the 3 Exaflare, wait for the 1 Exaflare to pass next to you, and then move into that lane. A diagram is shown below:

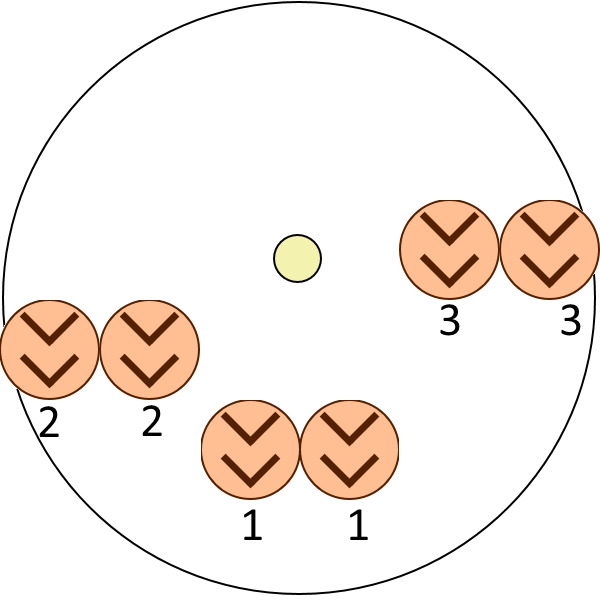
Sometimes, a 3 to 1 dodge will not be available, in which case you will have to make do with a 2 to 1 dodge or a 3 to 2 dodge. The general idea of the dodge is the same, except timing is a lot more strict. Be sure to dodge into the top half of the marker, to make sure you are not clipped by an Exaflare.
Straight Through (Lucrezia Strat)
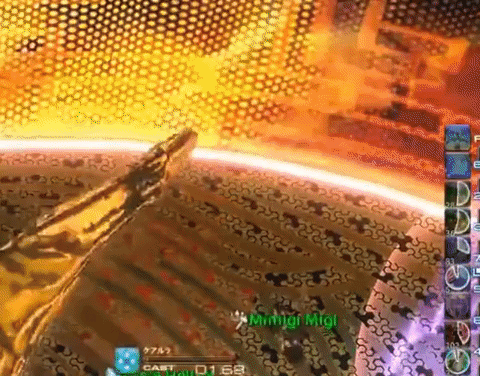
You may have heard this referred to as "JP dodge". This is the riskier strat, but will be very easy if done correctly. Begin by placing yourself in front of an Exaflare puddle marker. As soon as the puddle disappears, run through the puddle, onto the upper edge of the marker. If done correctly, it will look as if you ran into the explosion, but you will still be alive. A GIF of this being executed is shown below:
Wall Strat
Probably the safest and most recommended strat. Begin by positioning yourself near a wall, and stand next to an Exaflare arrow. Wait for the arrow to disappear, and move inside it. It is very similar to the Lucrezia Strat, except moving into the Exaflare from the side. The pros to this strat are you are reacting to the arrow disappearing, giving you more time to find and prepare for Exaflares.
Bahamut will follow up with another Akh Morn, this time adding an extra hit to the end. He will then use Exaflare, followed by Morn Afah, followed by Akh Morn, and repeat these three moves until he enrages.
Bahamut's Enrage will be a series of Morn Afahs dealing lethal damage, regardless of how many players are stacked. In order to gain a few extra seconds have your party spread out so he hits every player individually one-by-one. The order is determined by Bahamut's enmity. You may want to consider having your tanks shirk your healer who does the least DPS to maximize raid DPS.
Changelog
- 13 Apr. 2022: Guide added.
More Final Fantasy XIV Content

To be added...
- Complete Dawntrail’s Art Book Collection With – Relics of Eternity –
- New Framer’s Kit With Return Of Breaking Brick Mountains
- Last Chance For THE PRIMALS x Download Festival T-Shirt!
- Team DN Claims #WorldFirst in FFXIV’s Dancing Mad!
- FFXIV Players Blown Away By Store Updates!
- Support #WorldFirst in FFXIV Dancing Mad Ultimate — Now Available!
- Calling FFXIV Fishers To Catch The Rainbow For Charity!
- Last Chance To Enter FFXIV x Jollibee Sweepstakes!