Sword and Shield Tank PvE Build for New World
This PvE tanking build is one of the only primary tanking options in the game. It can be played defensively or offensively depending on a player's preference and desire to increase damage to finish an expedition more quickly. It has many options for threat management, defensiveness, and crowd-control.
PvE Tank
In PvE combat this is the featured role of a Sword and Shield player. You will be managing threat to maintain aggro and hold an enemy's attention while your DPS focus on doing as much damage as possible. You must properly manage cooldowns, position properly, and block, to reduce as much damage taken as possible and still deal damage to hold threat.
There are two versions of this build:
- Option 1: Light Armor - This has high burst damage and more mobility. This is preferred for speed runs.
- Option 2: Heavy Armor - This will focus on survivability and is best for players learning the tank role.
Sword Builds
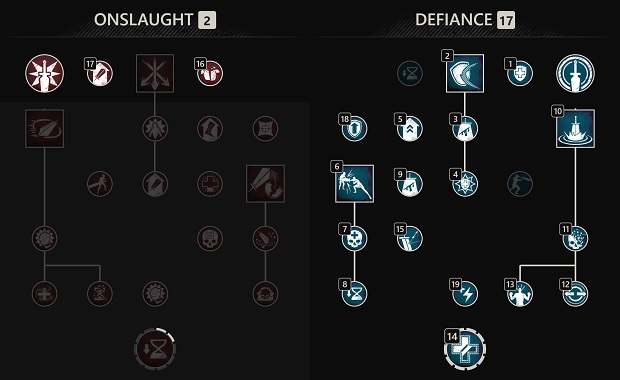
Leadership - Shield Bash (PvE Tank)
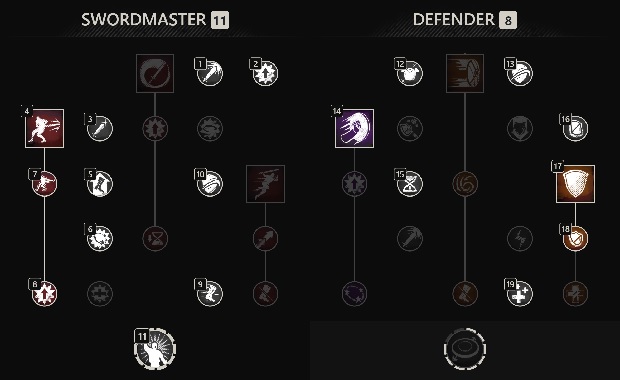
 Upheaval — This is your primary cooldown reduction tool. This should be used only
after your other two abilities are on cooldown. It will also do high damage to your target.
Upheaval — This is your primary cooldown reduction tool. This should be used only
after your other two abilities are on cooldown. It will also do high damage to your target. Shield Bash — This ability is a taunt and CC tool. You do not need its passives as
its damage is not important and it will always taunt the targets it hits.
Shield Bash — This ability is a taunt and CC tool. You do not need its passives as
its damage is not important and it will always taunt the targets it hits. Defender's Resolve — Potent damage reduction tool that should be maintained as
needed, but it also acts as an AoE taunt. Use this to maintain aggro.
Defender's Resolve — Potent damage reduction tool that should be maintained as
needed, but it also acts as an AoE taunt. Use this to maintain aggro.
This is build embraces optimal defensive passives and an ability loadout that add even more
defensiveness, as well as, damage, cooldown reduction, and threat management abilities. It can
be used in PvP if you want to be a point tank, but it would be suggested to take ![]() Leaping Strike
instead of
Leaping Strike
instead of ![]() Upheaval.
Upheaval.
Leadership - Shield Rush (PvE Tank)

 Shield Rush — This ability will apply a weaken to your targets to make them
deal less damage, and it will apply a fortify with its perk.
Shield Rush — This ability will apply a weaken to your targets to make them
deal less damage, and it will apply a fortify with its perk.
Play a build like this allows you to have a consistent way to reduce incoming damage from
one or more enemies, and have a constant fortify. If you prefer having another taunt option
use the ![]() Shield Bash build.
Shield Bash build.
This is the preferred build in the current META.
Secondary Weapons
Hatchet
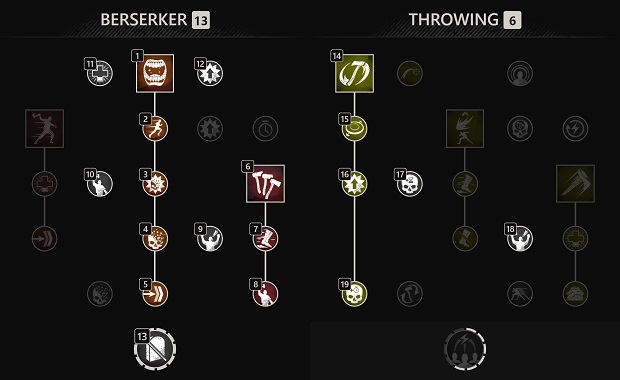
 Berserk — This is your main DPS cooldown. Try to activate this before large burst damage windows.
It will also provide movement speed and self-healing.
Berserk — This is your main DPS cooldown. Try to activate this before large burst damage windows.
It will also provide movement speed and self-healing. Raging Torrent — This will be your only real active weapon ability. It has great single target
damage when used with maximum empower stacks, and does have AoE damage potential as it can hit multiple enemies.
Raging Torrent — This will be your only real active weapon ability. It has great single target
damage when used with maximum empower stacks, and does have AoE damage potential as it can hit multiple enemies. Rending Throw — This is your main source of Rend. It is only able to hit one target at a time, but
it results in increased damage and is great for boss fights.
Rending Throw — This is your main source of Rend. It is only able to hit one target at a time, but
it results in increased damage and is great for boss fights.
War Hammer
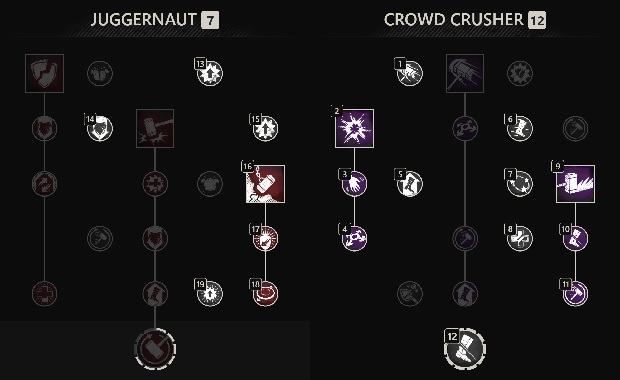
 Wrecking Ball — This is a great tool for defensiveness and crowd-control. When it is used it will
apply a Fortify buff that will help with survivability. Additionally, it has a unexpectedly large AoE knockdown
effect that is essential for starting any kind of crowd-control combo.
Wrecking Ball — This is a great tool for defensiveness and crowd-control. When it is used it will
apply a Fortify buff that will help with survivability. Additionally, it has a unexpectedly large AoE knockdown
effect that is essential for starting any kind of crowd-control combo. Shockwave — This will act as an AoE stun and taunting option. Use it to maintain threat and
apply Rend.
Shockwave — This will act as an AoE stun and taunting option. Use it to maintain threat and
apply Rend. Path Of Destiny — This is perfect for free AoE damage and it does stagger, so you can use it to
interrupt enemies and apply a slow.
Path Of Destiny — This is perfect for free AoE damage and it does stagger, so you can use it to
interrupt enemies and apply a slow.
Great Axe
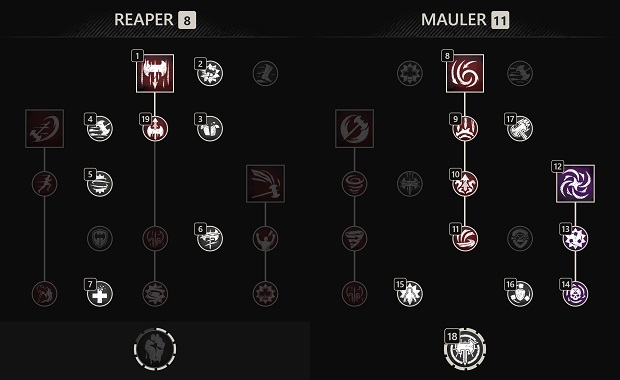
 Reap — This can be used to pull enemies into
  Gravity Well, or be used to start off a
CC combo so that enemies are closer together.
Gravity Well, or be used to start off a
CC combo so that enemies are closer together. Maelstrom — This ability offers single-target and AoE burst. It then deflects all incoming
projectiles, and it pulls enemies within its range. It will also apply a weaken with its perk.
Maelstrom — This ability offers single-target and AoE burst. It then deflects all incoming
projectiles, and it pulls enemies within its range. It will also apply a weaken with its perk.- Gravity Well — This is the best crowd-control ability in New World. It is mostly used
on trash packs so that your group can quickly kill enemies with AoE abilities.
Greatsword
 Steadfast Strike — Use this when you need a quick taunt or way to stagger and pull enemies.
It will also heal and provide cooldown reduction. Try to use this ability when your others are on cooldown.
Steadfast Strike — Use this when you need a quick taunt or way to stagger and pull enemies.
It will also heal and provide cooldown reduction. Try to use this ability when your others are on cooldown. Calamity Counter — This can be used to completely block mechanics, provide burst healing in a pinch,
and will add a DoT to all targets to help with aggro.
Calamity Counter — This can be used to completely block mechanics, provide burst healing in a pinch,
and will add a DoT to all targets to help with aggro. Roaring Rupture — This will mainly act as an AoE taunt, but should also be maintained while using
the Greatsword for its defensive buffs.
Roaring Rupture — This will mainly act as an AoE taunt, but should also be maintained while using
the Greatsword for its defensive buffs.
Attributes
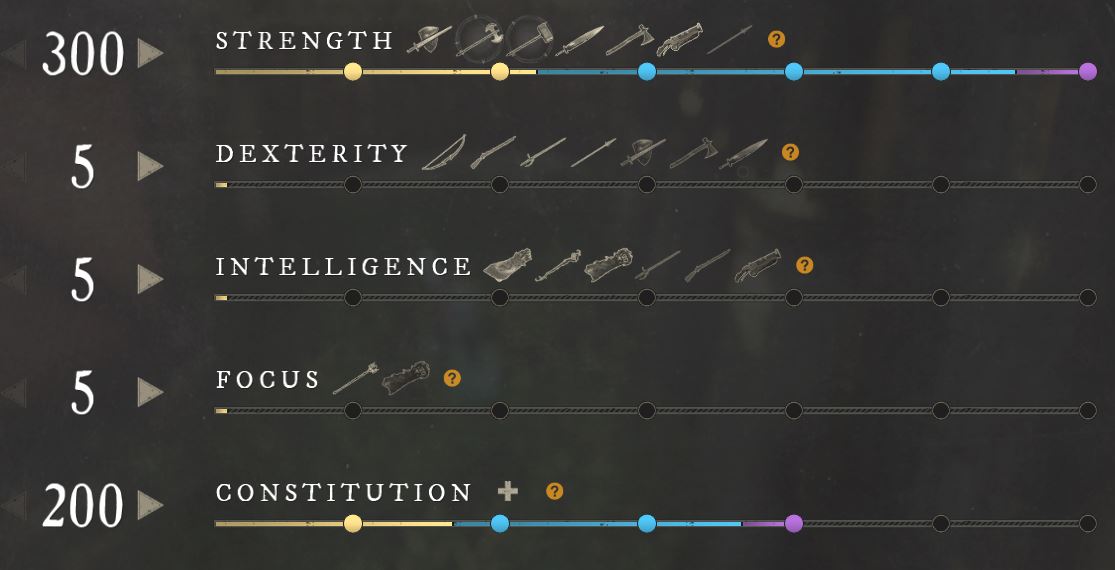
In PvE your Constitution and armor weight are dictated by your personal preferences and skill level.
Typically, a tank will not go higher than 200 Constitution because it is unnecessary with defensive perks and gems. Some tanks will play as low as 50 Constitution to maximize damage output.
Gearing
| Slot | Perks | Gem | Weight | Attribute | Source |
|---|---|---|---|---|---|
| Sword |
|
- | Strength | Crafted/BoE | |
| Hatchet*** |
|
- | Strength | Crafted/BoE | |
| War Hammer*** |
|
- | Strength | Crafted/BoE | |
| Great Axe** |
|
- | Strength | Crafted/BoE | |
| Greatsword** |
|
- | Strength | Crafted/BoE | |
| Round Shield (Light) | - | Round | Strength | Crafted/BoE | |
| Tower Shield (Heavy) | - | Tower | Strength | Crafted/BoE | |
| Helmet |
|
Elemental Damage Reduction Gem (Mutator Specific) | Light or Heavy | Strength or Constitution | Crafted/BoE |
| Chest |
|
Elemental Damage Reduction Gem (Mutator Specific) | Light or Heavy | Strength or Constitution | Crafted/BoE |
| Gloves |
|
Elemental Damage Reduction Gem (Mutator Specific) | Light or Heavy | Strength or Constitution | Crafted/BoE |
| Pants |
|
Elemental Damage Reduction Gem (Mutator Specific) | Light or Heavy | Strength or Constitution | Crafted/BoE |
| Boots |
|
Elemental Damage Reduction Gem (Mutator Specific) | Light or Heavy | Strength or Constitution | Crafted/BoE |
| Amulet | Elemental Damage Reduction Gem (Mutator Specific) | - | Strength or Constitution | Crafted/BoE | |
| Ring | Elemental Damage Reduction Gem (Mutator Specific) | - | Strength or Constitution | Named Drop*** | |
| Earring | Elemental Damage Reduction Gem (Mutator Specific) | - | Strength or Constitution | Named Drop*** |
*: The only ability perk that is needed is for Sword and Shield is ![]() Fortifying Shield Rush.
Your secondary weapon options could result in more perks needed, please reference their respective guides.
If the perk is essential, it is listed as a perk needed on the weapon.
Fortifying Shield Rush.
Your secondary weapon options could result in more perks needed, please reference their respective guides.
If the perk is essential, it is listed as a perk needed on the weapon.
**: Pick whatever secondary weapon your perfer depending on playstyle and the expedition you are running.
***: ![]() Smooth Bone Ring is a named ring option--you can choose any third perk you would like for
utility.
Smooth Bone Ring is a named ring option--you can choose any third perk you would like for
utility. ![]() Doom's Chance Earring is a named earring option that works in many builds.
Doom's Chance Earring is a named earring option that works in many builds.
Overall with gearing, this is the ideal loadout of perks for a best in slot build. With that being said, be sure to refer to the Sword Perks guide Perks guide or any of the secondary weapon options below to have a better understanding of other flexible perk options to fit into your build. You can decide what you are most comfortable with.
Gem Optimization
For more specific information on optimizing your gems in PvP and PvE please refer to our dedicated guides.
Heartrune
Use ![]() Brutal Heartrune of Grasping Vines to help group enemies together, deal AoE damage, and
apply Rend.
Brutal Heartrune of Grasping Vines to help group enemies together, deal AoE damage, and
apply Rend.
![]() Stalwart Heartrune of Stoneform can be taken as a defensive option.
Stalwart Heartrune of Stoneform can be taken as a defensive option.
Heartrune Usage
Your Heartrune will be used similarly in PvP and PvE scenarios. As such, please refer to our Sword guide or any of the secondary weapon options below for tips on how it can be used most effectively.
Rotation and Priority List
Single Target Boss Rotation
- Use Shield Rush to maintain the weaken and fortify
(Or use Shield Bash if selected).
- Use Defender's Resolve if you need damage reduction or
to group any adds that may have spawned.
- Use Upheaval for cooldown reduction.
- Hold your shield up to block enemy abilities or basic attacks, do not dodge and waste stamina unless it is necessary.
- Light attack when there are opportunities where the boss is not attacking.
AoE Trash Rotation
- Use Defender's Resolve or secondary weapon to taunt and
get initial threat.
- Use Shield Rush to apply AoE weaken.
- Hold your block as long as you are maintaining threat.
- Light attack or swap to secondary weapon to apply damage and crowd-control
Gameplay Tips
When using the Sword in PvP and PvE there are many similar aspects that go into gameplay decisions and rotations. To learn more about how you can improve your gameplay, use certain secondary weapons, or additional information on specific abilities, please refer to the Gameplay section of the Sword page any of the secondary weapon options below.
FAQ
For more information on the most frequently asked Sword or Secondary Weapon questions please refer to the FAQ section of the Sword, or secondary weapons below, for answers on PvP and PvE topics!
Changelog
- 25 Nov. 2024: 22 Oct. 2023: Guide updated for expansion.
- 22 Oct. 2023: Guide updated for expansion.
- 29 Mar. 2023: Updated gear.
- 23 Feb. 2023: Guide added.
Savvvo is a full-blown MMORPG try-hard who overthinks every build, min-maxes every stat, and theorycrafts like his life depends on it. If there’s a meta, he’s dissecting it. If there isn’t, he’s creating one.
You can take a closer look at his guides and content on YouTube.
- AMA Session with New World’s Former Lead World Designer
- New World Aeternum 2026 Roadmap Revealed
- Can New World Be Saved? Offers Are Starting to Pop Up.
- The Last Day of New World: Aeternum
- New World Server Mergers (Again)
- What Else Was Planned for New World: Aeternum?
- Global Storage Search is Now Live in New World: Aeternum
- Daggers Are Officially Live in New World: Aeternum