Void Gauntlet Void Blade PvE Build for New World
The following is a PvE DPS build that focuses solely on the Void Gauntlet with its ![]() Void Blade to act
as a support damage role that provides great group utility and self-sustain. The damage of the Void Gauntlet is
lackluster compared to other PvE builds, but this can be a fantastic option for healers looking to play as a 4th DPS,
or quickly fill into a DPS role in a pinch. It can also be played in PvP, but it is not optimal.
Void Blade to act
as a support damage role that provides great group utility and self-sustain. The damage of the Void Gauntlet is
lackluster compared to other PvE builds, but this can be a fantastic option for healers looking to play as a 4th DPS,
or quickly fill into a DPS role in a pinch. It can also be played in PvP, but it is not optimal.
Void Blade DPS Overview
The Void Gauntlet is not typically used in PvE outside of its incredible healing as a secondary
for those choosing to use a Life Staff. With that being
said, you can certainly use ![]() Void Blade for some interesting PvE DPS builds, or as a secondary when healing in order to help make a run go faster.
When choosing to be a pure DPS it is important to continually reset and use cooldowns to maintain damage increases through your passives. In all, using
Void Blade for some interesting PvE DPS builds, or as a secondary when healing in order to help make a run go faster.
When choosing to be a pure DPS it is important to continually reset and use cooldowns to maintain damage increases through your passives. In all, using
![]() Void Blade will give you significant self-sustain and apply many damage over time effects along with a constant rend.
Void Blade will give you significant self-sustain and apply many damage over time effects along with a constant rend.
For more information on PvE healing please refer to Life Staff.
Void Blade Build
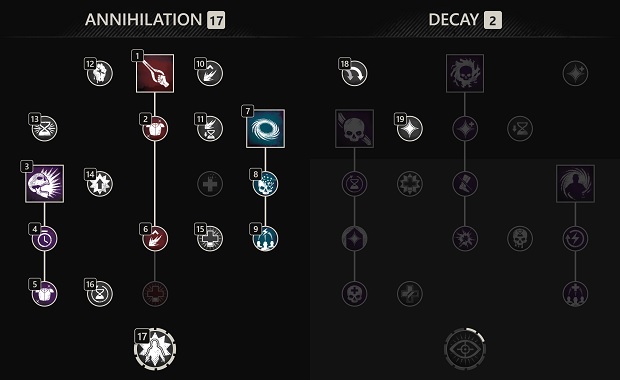
This build can flex into any weapon, even a Life Staff.
It has average damage output. It will be a consistent damage option that has a lot of great group
utility through ![]() Oblivion and the ability to keep a constant rend on targets.
Oblivion and the ability to keep a constant rend on targets.
 Petrifying Scream — Unleash a Void-infused scream, dealing 100% weapon damage, staggering and inflicting Root on
nearby enemies. This also provides a high level of defensiveness through the fortify on
Petrifying Scream — Unleash a Void-infused scream, dealing 100% weapon damage, staggering and inflicting Root on
nearby enemies. This also provides a high level of defensiveness through the fortify on  Fortifying Echoes. As a Void Gauntlet player
this skill is crucial to use properly. Focus on setting up large "clumps" of enemies or rotate it into your rotation to take advantage of
Fortifying Echoes. As a Void Gauntlet player
this skill is crucial to use properly. Focus on setting up large "clumps" of enemies or rotate it into your rotation to take advantage of  Empowering Proximity.
form of crowd control (CC). This is also great for locking down players who have exhausted themselves after avoiding other abilities.
Empowering Proximity.
form of crowd control (CC). This is also great for locking down players who have exhausted themselves after avoiding other abilities. Void Blade — This is the main source of damage output. When used correctly a player can cast this ability and right as
it hits a taget they can detonate it so that it double hits the target, also applying 2 stacks of rend and a damage over time effect. When used
on large clumps it results in a large amount of cooldown reduction in addition to damage due to the passives in the Void Gauntlet skill tree.
Void Blade — This is the main source of damage output. When used correctly a player can cast this ability and right as
it hits a taget they can detonate it so that it double hits the target, also applying 2 stacks of rend and a damage over time effect. When used
on large clumps it results in a large amount of cooldown reduction in addition to damage due to the passives in the Void Gauntlet skill tree. Oblivion — The most common use for this ability comes through its perk Nullifying Oblivion to remove buffs from
enemies. Otherwise, it deals a deceiving amount of AoE damage that is commonly under-rated. But its other purpose is to regenerate Stamina and
provide all those within the zone an empowerment buff to do more damage. This ability is great to use before going through a Void Gauntlet rotation
to maximize damage.
Oblivion — The most common use for this ability comes through its perk Nullifying Oblivion to remove buffs from
enemies. Otherwise, it deals a deceiving amount of AoE damage that is commonly under-rated. But its other purpose is to regenerate Stamina and
provide all those within the zone an empowerment buff to do more damage. This ability is great to use before going through a Void Gauntlet rotation
to maximize damage.
Secondaries
In almost all cases a Life Staff will be paired with a Void Gauntlet simply because there is no need for a second weapon and this can provide some off healing or other buffs that the dedicated healer may not be using. Alternatively, a weapon scaling with Intelligence could be used, but it is not needed.
If you are looking for a pure damage alternative you can use something like the Ice Gauntlet.
Healing Over Time Life Staff
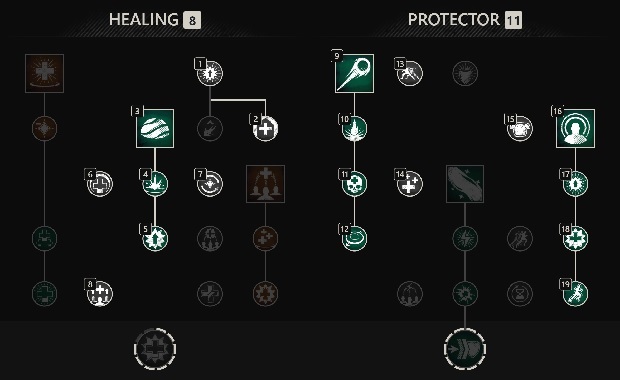
Use a HoT Life Staff build to provide some additional support when needed through abilities like ![]() Beacon since a healer will commonly not use it in PvE. This secondary build
allows you to simply use all of your abilities and then play with your Void Gauntlet until they are back up. You can choose to use them on cooldown, or save them if needed. In most cases
it will be best to pre-buff all allies and once combat starts just use your Void Gauntlet unless heals are needed.
Beacon since a healer will commonly not use it in PvE. This secondary build
allows you to simply use all of your abilities and then play with your Void Gauntlet until they are back up. You can choose to use them on cooldown, or save them if needed. In most cases
it will be best to pre-buff all allies and once combat starts just use your Void Gauntlet unless heals are needed.
Targeted Healing Build
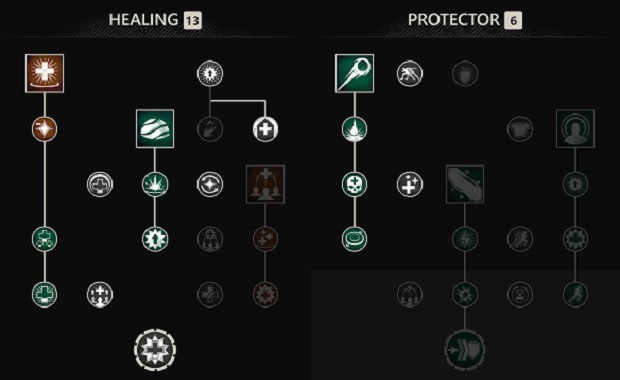
You can also use this targeted healing build for more of an individual approach or to fill in if a healer dies unexpectedly. It is often better to use a build like this to be able to save a run if needed.
To learn more about either build please refer to the Life Staff guides.
Attributes
In PvE you want to play with the least amount of Constitution possible in order to focus on damage output. Using ![]() Void Blade is fantastic since it does provide so much survivability. As
such you can easily play at a baseline 100 Constitution and go as low as 50.
Void Blade is fantastic since it does provide so much survivability. As
such you can easily play at a baseline 100 Constitution and go as low as 50.
Builds that rely on Void Gauntlet damage are interesting since they also allow for you to scale your damage with Focus. This is also valuable because it will directly translate into healing output
from abilities like ![]() Voidcaller. Additionally, you should have enough Focus to take over healing responsibilities if needed in a pinch.
Voidcaller. Additionally, you should have enough Focus to take over healing responsibilities if needed in a pinch.
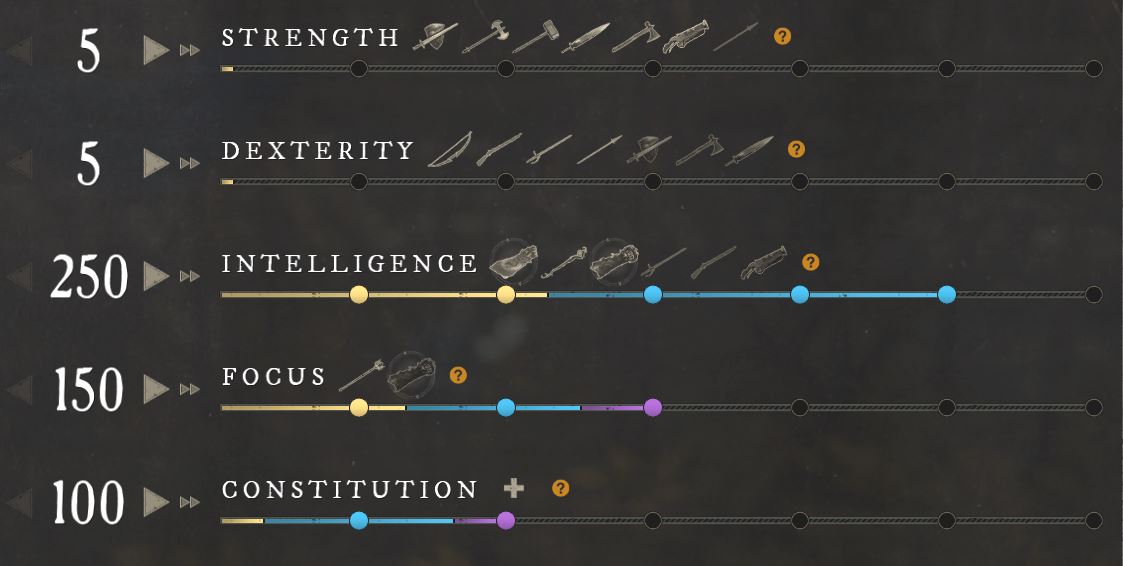
When playing with Ward gear, self-healing, and all the additional fortify/damage reduction, you should be perfectly fine playing at 100 Constitution as long as you are able to dodge when needed. You will notice that by scaling 150 Focus you gain access to the passive for increased healing, but it also provides you with more sheet damage to your Void Gauntlet than if you were to scale 300 Intelligence and 100 Focus. Your additional points as you gain gear score can go into more Intelligence for damage scaling, or Constitution for a small amount of survivability.
Gearing
| Slot | Perks | Gem | Weight | Attribute | Source |
|---|---|---|---|---|---|
| Life Staff | - | Focus | Dynasty* or Crafted/BoE | ||
| Void Gauntlet | - | Intelligence or Focus | Crafted/BoE | ||
| Helmet |
|
Elemental Damage Reduction Gem (Mutator Specific) | Light | Intelligence or Constitution | Crafted/BoE |
| Gloves |
|
Elemental Damage Reduction Gem (Mutator Specific) | Light | Intelligence or Constitution | Crafted/BoE |
| Chest |
|
Elemental Damage Reduction Gem (Mutator Specific) | Medium | Intelligence or Constitution | Crafted/BoE |
| Pants |
|
Elemental Damage Reduction Gem (Mutator Specific) | Light | Intelligence or Constitution | Named Drop*** |
| Boots |
|
Elemental Damage Reduction Gem (Mutator Specific) | Light | Intelligence or Constitution | Crafted/BoE |
| Amulet |
|
Elemental Damage Reduction Gem (Mutator Specific) | - | Intelligence or Constitution | Crafted/BoE |
| Ring | Elemental Damage Reduction Gem (Mutator Specific) | - | Intelligence or Constitution | Crafted/BoE | |
| Earring | Elemental Damage Reduction Gem (Mutator Specific) | - | Intelligence or Constitution | Crafted/BoE |
*: ![]() Glowing Lifecrystal Staff is a best in slot drop from any version of Mutated Dynasty Shipyard or it can be crafted with Materia.
Glowing Lifecrystal Staff is a best in slot drop from any version of Mutated Dynasty Shipyard or it can be crafted with Materia.
**: You will need respective Ward gear depending on the enemy type you are facing throughout the expedition. For example, if you are running Genesis you will want ![]() Angry Earth Ward, but
if you are in Lazarus Instrumentality you will want
Angry Earth Ward, but
if you are in Lazarus Instrumentality you will want ![]() Ancient Ward. The same trend follows with Protection on Amulets. Depending on the mutator there may be a certain elemental damage type that
you need extra avoidance for. Instead of swapping all of your gems to that type, you can maintain
Ancient Ward. The same trend follows with Protection on Amulets. Depending on the mutator there may be a certain elemental damage type that
you need extra avoidance for. Instead of swapping all of your gems to that type, you can maintain ![]() Cut Pristine Opal for a mix of magical defenses, but then simply change your amulet from week to week.
Cut Pristine Opal for a mix of magical defenses, but then simply change your amulet from week to week.
***: Similarly to Ward and Protection, you will need your Void Gauntlet to have a specific "Bane" perk to do more damage to each respective expedition's enemy types. This can result in incredible PvE damage output. If you do not wish to have multiple weapons, you can simply just replace this with an effective damage perk.
****: Unlike PvP, the Void Gauntlet perks are not generally necessary and can be avoided. But, if you do take ![]() Nullifying Oblivion, you will not only remove buffs, but have a faster recharge. This is
not necessary since you will have so much cooldown reduction anyway. Additionally you could take
Nullifying Oblivion, you will not only remove buffs, but have a faster recharge. This is
not necessary since you will have so much cooldown reduction anyway. Additionally you could take ![]() Voracious Blade for increased survivability. If not, just fill in something like
Voracious Blade for increased survivability. If not, just fill in something like ![]() Elemental Aversion or
Elemental Aversion or
![]() Refreshing.
Refreshing.
Overall with gearing, this is the ideal loadout of perks for a best in slot build. With that being said, be sure to refer to the Void Gauntlet/Ice Gauntlet perks guide to have a better understanding of other flexible perk options to fit into your build. You can decide what you are most comfortable with.
Gem Optimization
For more specific information on optimizing your gems in PvP and PvE please refer to our Void Gauntlet Gems and Consumables guide.
Heartrune
![]() Brutal Heartrune of Grasping Vines is the best pick to make sure that enemies caught in the rooting effect are vulnerable to high damage bursts.
Brutal Heartrune of Grasping Vines is the best pick to make sure that enemies caught in the rooting effect are vulnerable to high damage bursts.
If you are looking for more individual damage output you can use ![]() Brutal Heartrune of Detonate.
Brutal Heartrune of Detonate.
Heartrune Usage
Your Heartrune will be used similarly in PvP and PvE scenarios. As such, please refer to our Void Gauntlet guide for tips on how it can be used most effectively.
PvE Rotation
- Use Void Blade within 5 meters of the target to take advantage of Empowering Proximity.
- Use Oblivion while in melee range for empowerment and damage over time.
- Use Petrifying Scream to stack Empowering Proximity.
- Dodge to consume stamina and activate
 Cut Pristine Opal
 - Continue to light attack the enemy from behind to do the most damage possible and critically strike.
- Maintain Oblivion whenever it is available.
- Continue using abilities when they are active, and re-activate Void Blade when its duration is over. (This can be canceled and re-casted even with
significant duration to receive the Empowering Proximity buff).
- Continue dodging to maintain Cut Pristine Opal buff and light attack.
- Repeat
Gameplay Tips
When using the Void Gauntlet in PvP and PvE there are many similar aspects that go into gameplay decisions and rotations. To learn more about how you can improve your gameplay, use certain secondary weapons, or additional information on specific abilities, please refer to the Gameplay section of the Void Gauntlet page.
FAQ
For more information on the most frequently asked Void Gauntlet questions please refer to the FAQ section of the Void Gauntlet guide for answers on PvP and PvE topics!
Changelog
- 22 Oct. 2023: Guide updated for expansion.
- 29 Mar. 2023: Updated gear.
- 23 Jan. 2023: Guide added.
Savvvo is a full-blown MMORPG try-hard who overthinks every build, min-maxes every stat, and theorycrafts like his life depends on it. If there’s a meta, he’s dissecting it. If there isn’t, he’s creating one.
You can take a closer look at his guides and content on YouTube.
- AMA Session with New World’s Former Lead World Designer
- New World Aeternum 2026 Roadmap Revealed
- Can New World Be Saved? Offers Are Starting to Pop Up.
- The Last Day of New World: Aeternum
- New World Server Mergers (Again)
- What Else Was Planned for New World: Aeternum?
- Global Storage Search is Now Live in New World: Aeternum
- Daggers Are Officially Live in New World: Aeternum