The Fourth Circle (Savage) Part One: Hesperos Raid Guide
This guide aims to prepare players for the first phase of Asphodelos: The Fourth Circle (Savage) by providing detailed explanations of the fight's mechanics, as well as consistent strategies for the purpose of farming.
Introduction
As you approach the conclusion of your tale of Asphodelos, you cast a hesitant glance at the greatly enthused, yet utterly exhausted Nemjiji. Whether or not her writing arm─or the facts of your confrontation with Hesperos─will withstand the inevitable fit of excitement awaiting her remains to be seen...
Unlock Requirements
The Fourth Circle (Savage) can be unlocked at level 90 after completing the Normal difficulty of the Asphodelos raid and talking to Nemjiji in Labyrinthos (x8.4, y27.4). It requires a minimum item level of 580 to queue, but this requirement can be bypassed when entering with a full party.
Raid Guide
Part one of this encounter has a hard enrage of roughly 7:12, with a minimum required raid DPS check of 48,200. Clearing phase one will move the raid onto phase two, and any subsequent wipes will reset the party to phase two (not phase one) for the remainder of the instance.
Raid Preparation
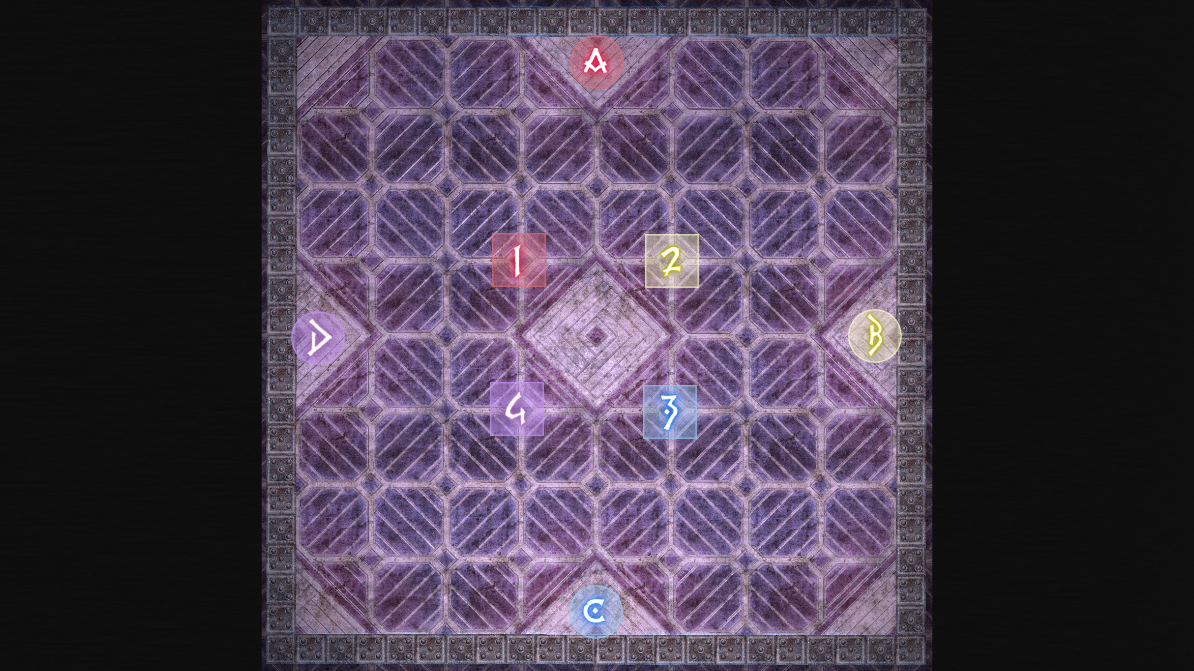
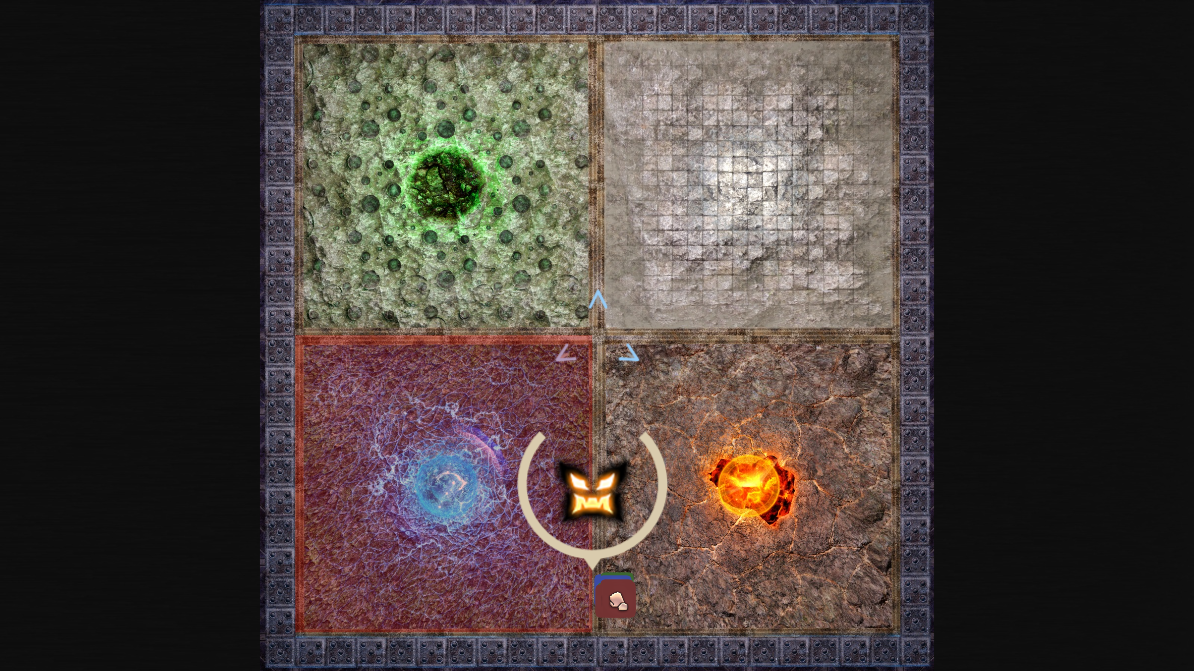
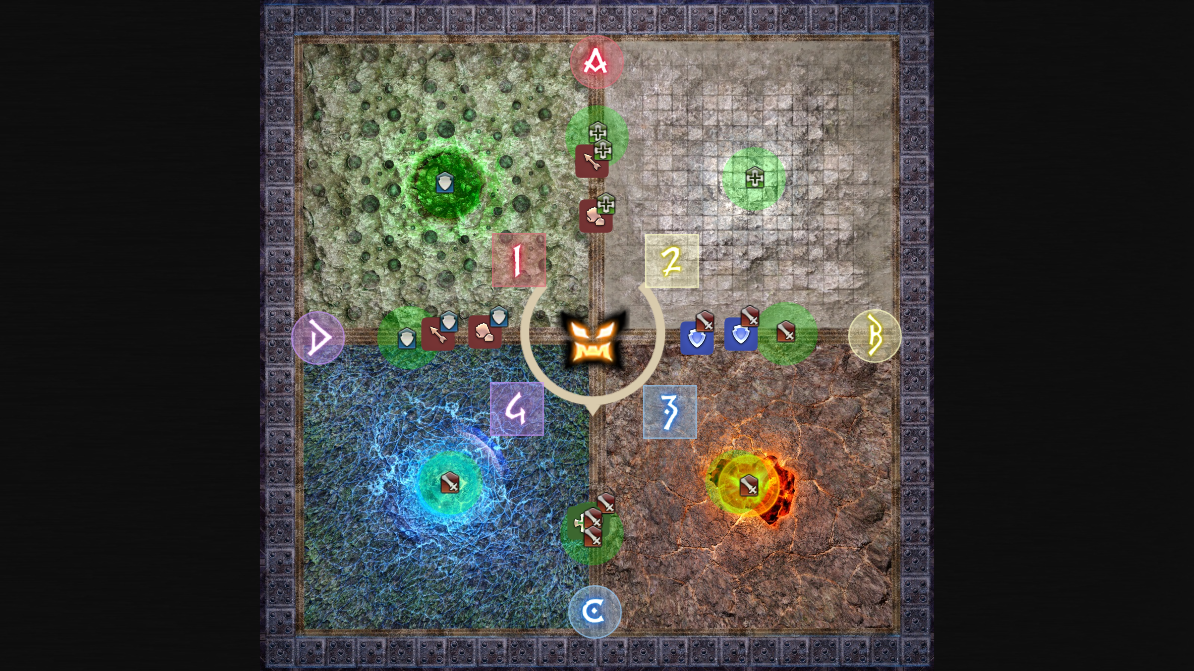
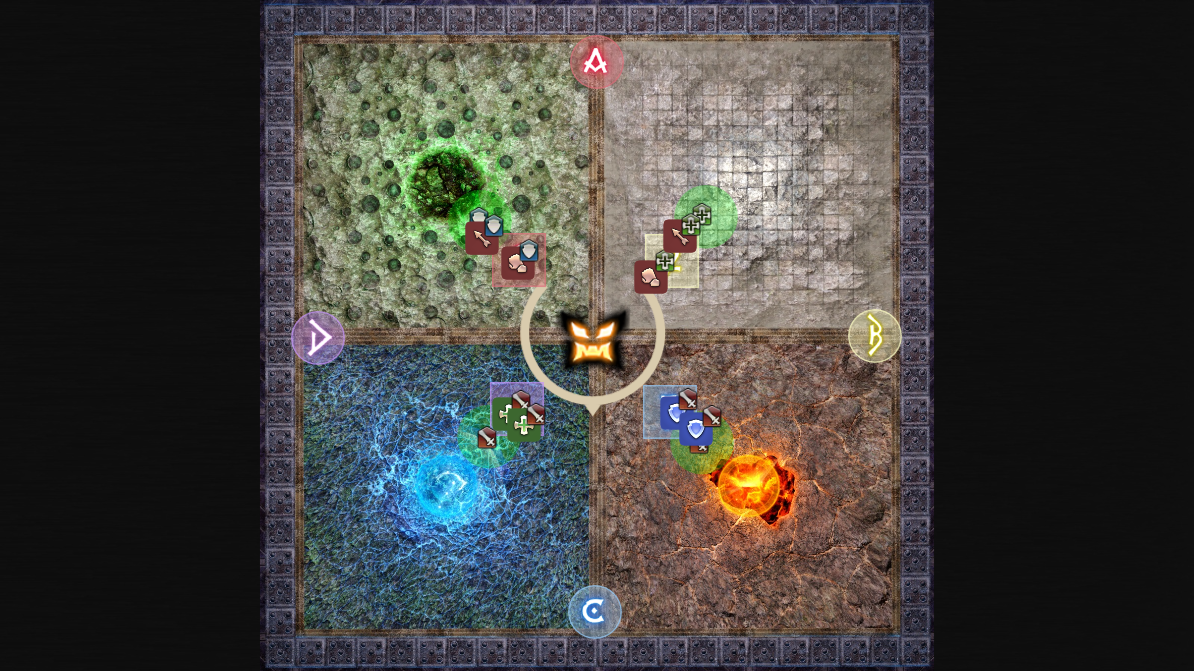
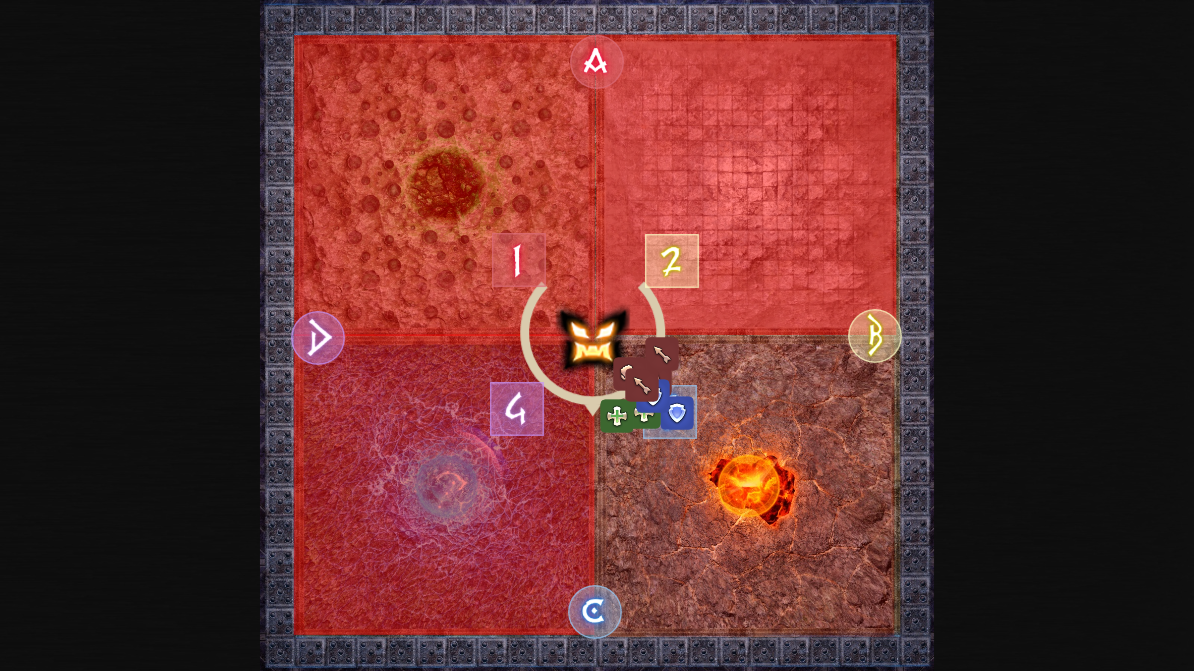
Players will be split into two light parties of one tank, one healer, and two DPS each. In addition, each player of a role will have one of four towers to soak at an inside intercardinal on a numbered marker.
Markers on the arena should be placed according to the image below.
Phase 1: Hesperos
Hesperos's Abilities
- Decollation: Heavy raidwide magic damage.
- Bloodrake: Hesperos charges his blade and drains aether from either tanks and healers or DPS. This will deal heavy magic damage to all tethered players and grant him the Aethersucker buff. Whichever role he tethers to cannot perform a certain mechanic later.
- Aetheric Chlamys: Hesperos converts the drained aether into a Role Call buff depending on what roles were drained with Bloodrake.
- Director's Belone: Hesperos uses his drained aether to inflict four players with the Role Call debuff. This will kill any player at the end of the debuff that matches the drained aether's role but will be dodged by players of the opposite role. This debuff can be passed to another player by standing on them, and players who pass a debuff is unable to receive another one.
- Inversive Chlamys: Hesperos tethers four players. When this tether goes off, it will kill the player if their role matches the one indicated by his Role Call. Otherwise, it will deal heavy magic damage. This tether can be grabbed by another player by standing in front of it.
- Setting the Scene: Hesperos modifies the arena to add four elemental
panels: Levinstrike (lightning), Acid (poison), Well (water), and Lava (fire).
These panels will do an unmarked mechanic after they are triggered by Pinax.
- Levinstrike Mekhane deals proximity damage from the center of the arena.
- Well Mekhane is a knockback from the center of the arena.
- Acid Mekhane is unmarked AoEs on all players that inflict a Magic Vulnerability Up debuff.
- Lava Mekhane is an unmarked AoE on both healers that must be shared with other players.
- Pinax: Two panels will be activated in a row. When these panels go off, they will damage players standing on them and inflict a damage down debuff.
- Shift: Hesperos will jump to a cardinal edge and perform a mechanic.
The edge he jumps to is indicated by the ability name: either Northerly Shift,
Easterly Shift, Southerly Shift, or Westerly Shift. The
mechanic he performs is based on whether his sword or cloak glows.
- If the sword is glowing, he will cleave the center of the arena. The wall will be safe.
- If the cloak is glowing, he will do a knockback from where he jumps to.
This encounter has two different mechanic subsections: the Role Call sections where Hesperos makes players of a certain role take mechanics, and the Pinax sections where elemental mechanics force players to adapt to a dance. Positioning and awareness are paramount to clearing this door boss. This guide splits up the encounter into three phases based on the mechanic sequence.
Begin by pulling the boss to the middle of the arena. Hesperos will begin with multiple heavy-hitting AoE moves, the first of which is Decollation. Next, Bloodrake will deal heavy damage to either tanks and healers or DPS. The role that was not targeted will have to take the Inversive Chlamys tethers later in this phase. The subsequent Bloodrake will also deal heavy damage to either tanks and healers or DPS. The role that was not targeted by the second Bloodrake will have to take the Role Call debuffs inflicted by Director's Belone. This can target the same role as the first Bloodrake, so heal up the targets if necessary. For example, if DPS were chosen for the first one and tanks and healers were chosen for the second, then DPS would be taking the Role Call debuffs, and tanks and healers would be taking the tethers.
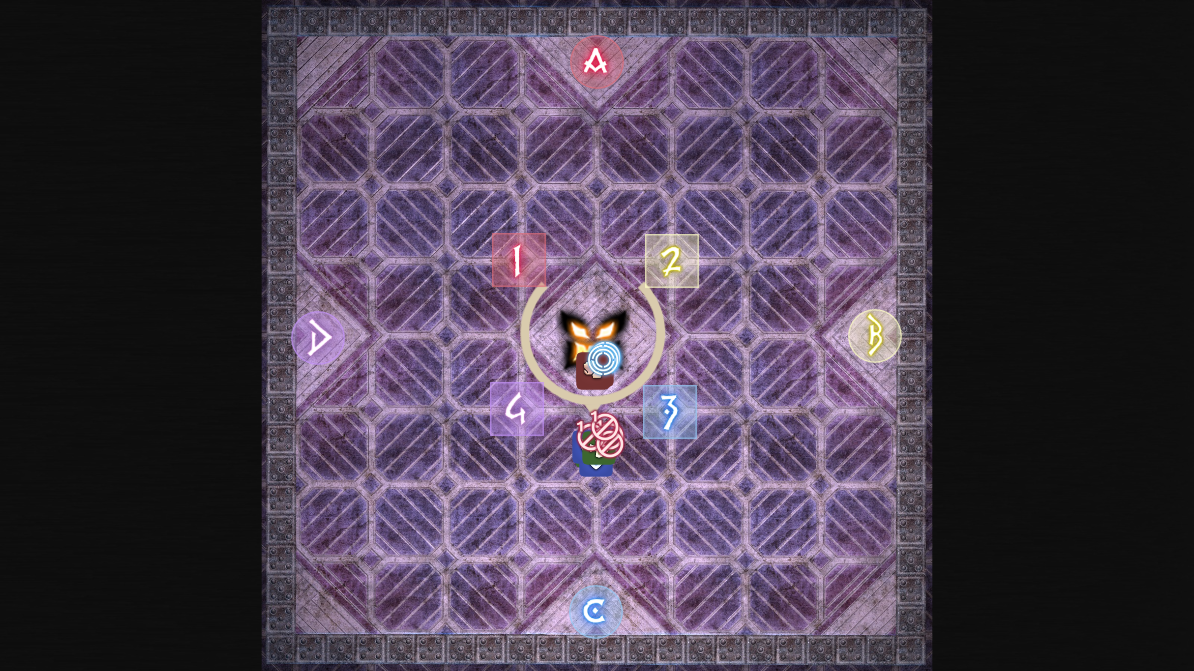
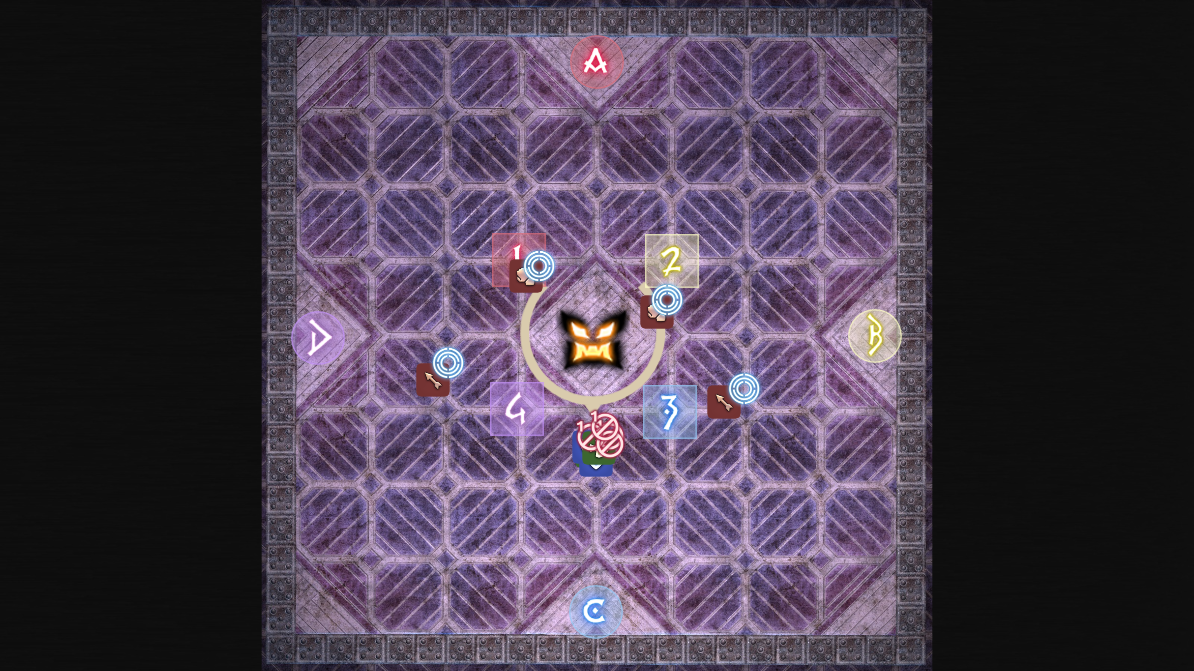
Hesperos will then cast Director's Belone. The role that cannot take the Role Call debuff should stack up behind the boss. Players who are taking the debuff should then move in one by one into the stack to take one debuff each if they do not already have one. This ensures that all players of one role have a debuff they can take, and all players of another role have immunity to receiving the debuff again. Next, the role that cannot take the tether should move south, and the role that is supposed to take the tethers should move between them and the boss. Once those players have taken the four tethers, they will fan out to the north side of the boss and spread the explosions out. Return to the boss and heal up for another Decollation, followed by Elegant Evisceration. Tanks can choose to swap during the castbar or use an immunity for both hits.
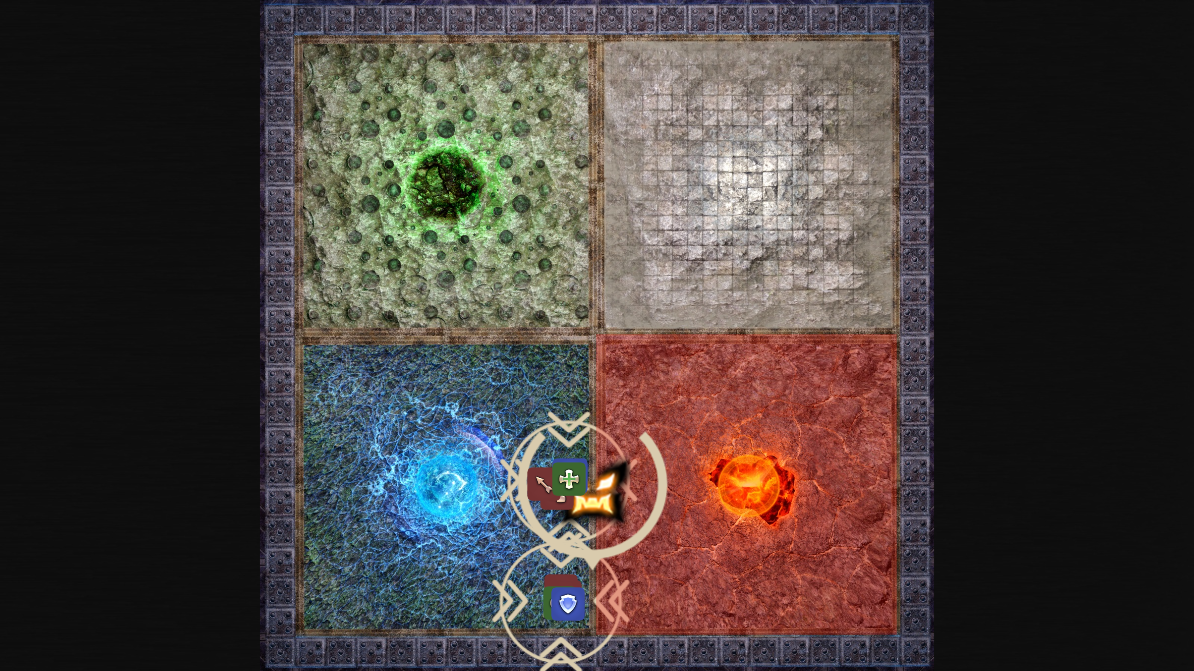
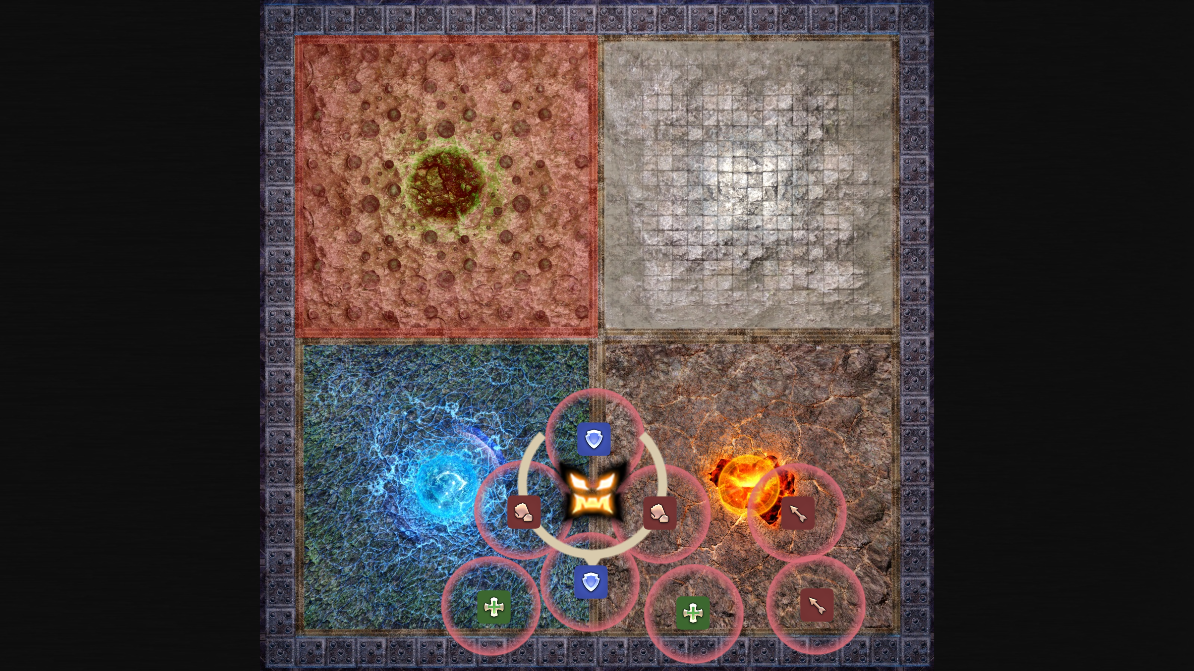
Next is the elemental phase. Hesperos casts Setting the Scene, dividing the arena into elemental quadrants. Immediately after the quadrants appear, the main tank should pull the boss in between the lightning and fire quadrants. This needs to happen extremely quickly, as the boss will cast Pinax right after and will not move anymore. The first mechanic of the two will always be either lightning or water, and the second mechanic will always be fire or poison. Players will either stay at the wall for lightning or get knocked back from the center for water before stacking in light party groups for fire or spreading for poison. Keep in mind players cannot be in the lightning panel when lightning goes off or the fire panel when fire goes off. Pulling the boss between lightning and fire gives players an edge to go to for lightning as well as ample space to spread for poison. Additionally, if it is water, players can choose to use their knockback immunity, although it will not be up for the cape knockback in the next set of mechanics. The images for this set of mechanics can be seen in this raidplan diagram.
Hesperos then jumps to the middle and casts a Shift, jumping to the indicated edge once the cast bar is almost finished. In addition, two more Pinax mechanics will occur in sequence. They will be the ones that were not triggered previously, and it will always be lightning or water first and fire or poison second. Players need to run to the indicated edge but not on lightning, or they need to get knocked back to the edge but not on water. They will then have to either stand at the wall to the side if the sword was glowing or stand in front if the cape was glowing. After doing this mechanic, return to the center and either stack in light parties for fire or spread for poison. You have ample time to do this final element. It is recommended to use knockback immunity for this water. If timed correctly, players can have it active for both the water knockback and the cape knockback.
Phase 2: Hesperos
Hesperos gains the following new abilities:
- Bloodrake can now tether to all players, as well as panels on the floor.
- Vengeful Belone: Inflicts all players with an Acting Role debuff, which will deal heavy damage when it expires to players not of that role. It can be cleansed by soaking two Belone Bursts orbs.
- Belone Bursts: Hesperos summons eight orbs at the cardinal and intercardinal edges of the arena, which tether to the closest player and slowly move towards them. They will mark themselves, indicating that the role of the player tethered cannot soak that orb. Players with the same Acting Role debuff must pair up and soak them together.
- Periaktoi: All elemental quadrants explode with Pinax, with the one not tethered by Bloodrake dealing heavy damage and all others dealing lethal damage.
- Belone Coils: Spawns four towers at the intercardinals of the arena. These must be soaked by one player each and cannot be soaked by the role indicated.
The first mechanic after the first elemental phase is Elegant Evisceration.
Again, tanks can choose to use an immunity or swap for this, and swapping is
recommended for this one in order to use immunities on the first and third. If a
WAR is present, they can use ![]() Holmgang on the first and third, and the
other tank can use their immunity on this one. Hesperos then casts
Bloodrake, tethering to all players as well as three panels on the arena.
The elemental quadrant he does not tether to will be safe for Periaktoi
later in the phase. The main tank needs to slowly move the boss back to the
center and face him north, which can prove difficult as he will cast several
abilities in sequence: Setting the Scene, Vengeful Belone, and
Elemental Belone. After Vengeful Belone, players need to look at
what debuff they have to position themselves at the beginning of Belone Bursts.
Holmgang on the first and third, and the
other tank can use their immunity on this one. Hesperos then casts
Bloodrake, tethering to all players as well as three panels on the arena.
The elemental quadrant he does not tether to will be safe for Periaktoi
later in the phase. The main tank needs to slowly move the boss back to the
center and face him north, which can prove difficult as he will cast several
abilities in sequence: Setting the Scene, Vengeful Belone, and
Elemental Belone. After Vengeful Belone, players need to look at
what debuff they have to position themselves at the beginning of Belone Bursts.

Hesperos will cast Bloodrake on all players before casting Belone Bursts. Players should preposition to the spots seen above, with DPS adjusting based on what debuff they have. Tanks and healers will always have Acting DPS, so they never have to adjust. After the orbs tether onto players, everyone will move directly across to pop the first orb with their partner. Healers will then top everyone off, and then players will rotate clockwise with their partner to soak the second orb. Healers will top players off again before players move to the quadrant that was not tethered by Periaktoi earlier. It is highly recommended to use all possible forms of party mitigation for this phase to lighten the healing check.
Afterwards, return the boss to the center if needed and mitigate the next Bloodrake. Hesperos will start casting Belone Coils, which spawns four towers at intercardinals. The role that cannot soak the towers will stand in the middle of the room, while the role that can soak the towers will stand in their pre-assigned tower. Hesperos casts Inversive Chlamys, which spawns the tethers as seen in phase one. The role that cannot stand in the towers must grab these tethers and fan out clockwise of their tower spot at max melee range or further to ensure the tether AoE does not hit the players in the adjacent towers. The role that could not stand in the towers (and grabbed the tethers) will have to grab the Inversive Chlamys tethers later in the phase.
Heal up for another Bloodrake. Again, Belone Coils is cast, but this time there are no tethers. The role that cannot stand in these towers is comprised of the players that have to grab the Role Call debuff immediately after. For example, if tanks and healers could not take the first set of towers and DPS could not take the second set of towers, then DPS would be taking the tethers, and tanks and healers would be taking the Role Call debuffs.
The debuffs and tethers themselves are handled just like in the first phase. The role that cannot take the Role Call debuff stacks up behind the boss after they soak their towers. Players of the opposite role then come and take a debuff one by one. The tethers are taken afterwards as well in the same fashion. The role that needs to take the tethers should stand between the boss and the other players before fanning out to the north side of the arena.
The final part of the fight is comprised of a final elemental phase, in addition to a healing and mitigation check before the boss enrages. Heal up for Decollation, and tanks should either use an immunity or swap for Elegant Evisceration. Hesperos changes the arena again and goes into another set of elemental mechanics. This is handled the exact same way as previously. However, after the last fire or poison mechanic, he will begin to cast three Decollations in a row, dealing heavy damage. This will need to be healed through, and if it was poison last, all players need to quickly return to the boss to receive heals. After the three raidwides, the boss will auto-attack a few times before disappearing and casting his enrage, wiping the raid.
Loot
As this is the door boss to the second phase of the fight, no loot is dropped.
Changelog
- 25 Jan. 2022: Guide added.
More FFXIV Content

This guide has been written by Lyra an accomplished raider in FFXIV and has written raid guides for the game for the past five years. You can follow him on Twitter and he streams raids on Twitch.
- New Framer’s Kit With Return Of Breaking Brick Mountains
- Last Chance For THE PRIMALS x Download Festival T-Shirt!
- Team DN Claims #WorldFirst in FFXIV’s Dancing Mad!
- FFXIV Players Blown Away By Store Updates!
- Support #WorldFirst in FFXIV Dancing Mad Ultimate — Now Available!
- Calling FFXIV Fishers To Catch The Rainbow For Charity!
- Last Chance To Enter FFXIV x Jollibee Sweepstakes!
- The Senor Otters Make Their Grand Debut in FFXIV