The Second Circle (Savage): Hippokampos Raid Guide
This guide aims to prepare players for Asphodelos: The Second Circle (Savage) by providing detailed explanations of the fight's mechanics, as well as consistent strategies for the purpose of farming.
Introduction
You continue recounting your tale of Pandæmonium, and Nemjiji is so impassioned that you aren't certain how she can even hear you over the sound of her manic scribbling. A glance over her work reveals some clear exaggerations regarding the hippokampos, but you can't find it in yourself to spoil her fun by correcting her. So long as she gets the general idea...
Unlock Requirements
The Second Circle (Savage) can be unlocked at level 90 after completing the Normal difficulty of the Asphodelos raid and talking to Nemjiji in Labyrinthos (x8.4, y27.4). It requires a minimum item level of 570 to queue, but this requirement can be bypassed when entering with a full party.
Raid Guide
This encounter has a hard enrage of 10:28 and has a DPS check of roughly 41,900 raid DPS.
Raid Preparation
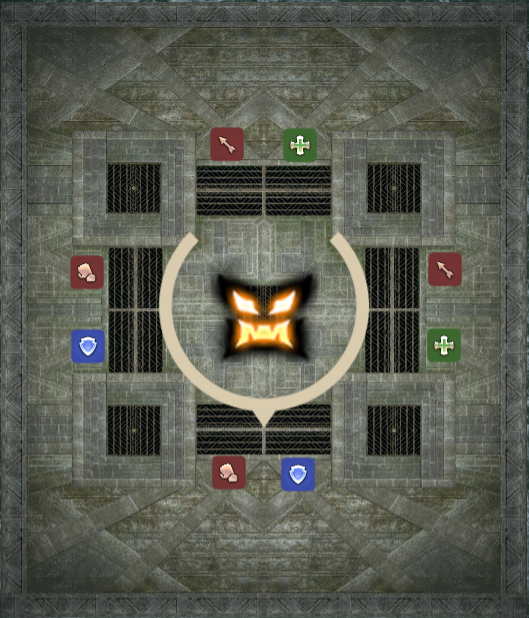
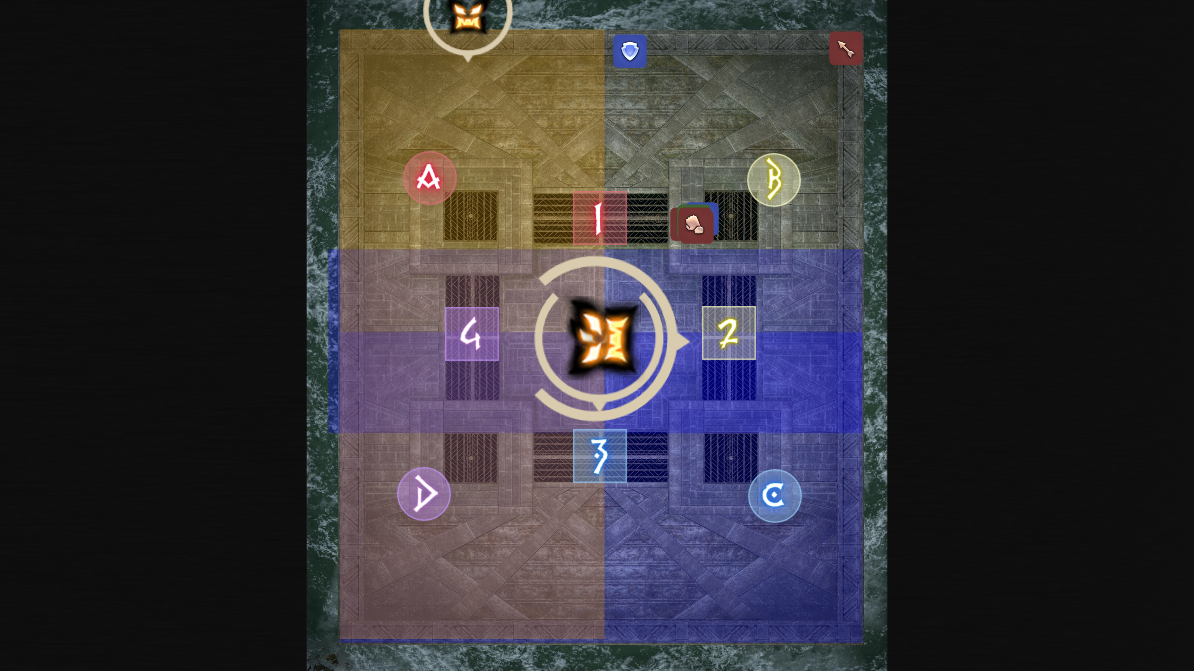
Players should be split into two light parties consisting of one tank, one healer, and two DPS each. At certain intervals in the fight, the arena will be flooded. Stepping into a flooded area will inflict the player with a Dropsy DoT. In addition, one platform will be overflowing, and players who step on that platform will be instantly killed.
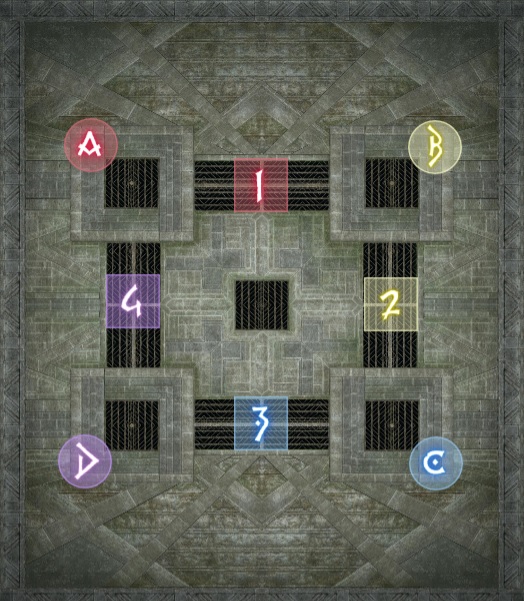
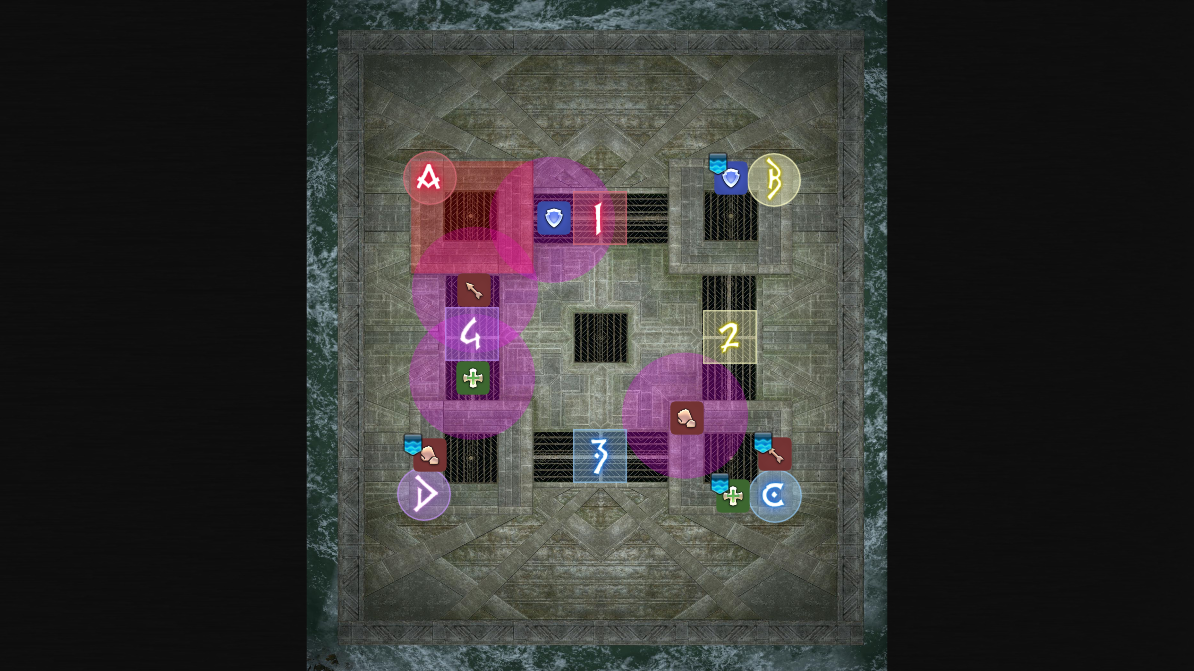
Markers on the arena should be placed according to the image below.
Phase 1: The Hippokampos
The Hippokampos's Abilities
- Murky Depths: Moderate raidwide magic damage.
- Doubled Impact: A tank buster on the main tank that deals magical damage and must be shared with the other tank.
- Sewage Deluge: Massive raidwide magic damage. When Sewage Deluge is cast, the arena will begin to get flooded.
- Spoken Cataract: The head of the Hippokampos will do a frontal AoE covering the entire arena in front, and the body of the Hippokampos will do a line AoE the width of its body.
- Winged Cataract: The head of the Hippokampos will do a rear AoE covering the entire arena behind it, and the body of the Hippokampos will do a line AoE the width of its body.
- Coherence: A random player will be tethered. At the end of the castbar, the head of the Hippokampos will jump on that player and deal massive magical damage, and the body of the Hippokampos will do a line AoE that must be shared by the party with the player in front taking extra damage. One tank will take the tether to the opposite end of the arena, and the other tank will stand in front of the party.
- Ominous Bubbling: Both healers will receive a stack marker which must be shared by four players each. The appearance of the stack markers is delayed until Shockwave is being cast.
- Shockwave: The Hippokampos will jump to a platform adjacent to the dangerous one and knock back all players from the center of the platform. Players must use their knockback immunity on it.
- Predatory Avarice: Inflicts players with Mark of the Tides, which
knocks back all players standing in the radius, or Mark of the Depths, which deals
massive damage to all players standing in the radius.
- A random tank is inflicted with Mark of the Tides and should move away from the party and the other DPS.
- A random healer is inflicted with Mark of the Depths and should stay with the party.
- A random DPS is inflicted with Mark of the Tides and should move away from the party and the other tank.
This encounter is split into two distinct periods depending on if the arena is flooded. When it is, player movement is heavily restricted to the raised platforms of the arena and the grates in between.
The fight begins with a raidwide, Murky Depths, and a tank buster, Doubled Impact. The main tank can use their invulnerability cooldown, or the offtank can stack with them. Sewage Deluge is cast next. This raidwide hits much harder than any normal raidwide and should be mitigated heavily. The arena will begin to be flooded, and one raised platform will begin to overflow. Players have a few seconds to position themselves in a safe area before the arena becomes flooded.
Spoken Cataract is done the same way as in the Normal difficulty. Players must get behind the head and outside of the hitbox of the body. Winged Cataract requires players to be in front of the head and outside the hitbox of the body. Once on the safe spot, players position themselves to be at max melee range or further. One tank will need to pick up the Coherence tether and run across to the other side of the arena. The other tank needs to stand in front of the party. Both tanks should mitigate this hit, and healers need to top the party off after the first instance of damage.
The party should slowly make their way back to the platform opposite of the dangerous one. The combo of Ominous Bubbling and Shockwave is cast next. All players need to head to the platform the boss is jumping to and use their knockback prevention ability halfway through the cast of Shockwave. One light party will stand on the platform, and the other light party will stand on the grate leading to the platform. Return to the opposite platform to make moving for Spoken Cataract or Winged Cataract easier.
Predatory Avarice is then cast. Tanks and DPS should note if they receive a debuff. Players will all have to do a Spoken or Winged Cataract, then the debuff players will move away from the party - tanks left and DPS right. Heal up the party after being hit by damage from the healer's debuff. The water will then recede, signaling the start of the next phase.
Phase 2: The Hippokampos
The Hippokampos gains the following new abilities:
- Channeling Flow: Players are inflicted with another Mark of the Tides, indicated by an arrow pointing in a direction. These will knock back players in the direction indicated. Players will need to collide with another player being knocked back to stop the collision, but they will take massive damage if they collide with a player that is too close. Taking damage will inflict players with a Water Resistance down debuff.
- Kampeos Harma: Marks all players with blue squares or purple triangles from one to four. The Hippokampos's body will dash to the players with the blue dots in sequence dealing proximity damage, and the Hippokampos's head will jump to the purple dots in sequence dealing AoE damage. Both hits inflict a Physical Vulnerability Up debuff, so players must spread out.
- Channeling Overflow: The same as Channeling Flow, but there are two sets of debuffs. Four players have Mark of the Tides with a short duration, and four other players have Mark of the Tides with a longer duration. These will need to be resolved in order.
- Tainted Flood: Marks players with AoEs that inflict Water Resistance Down. Spread these around and do not hit any other player.
Channeling Flow is only cast once in the fight, but shows players the positioning needed to perform Channeling Overflow. Players will stand just behind the grate to get pushed towards the middle, making sure to not overlap with the other player with the same arrow as you. If done correctly, all players will collide with another player, take moderate damage, and survive. Immediately following this is Doubled Impact, Murky Depths, then another Sewage Deluge, beginning another flooded phase.
The Hippokampos will cast Shockwave, orienting itself to a platform. Players must use knockback prevention on this. Next is Kampeos Harma, a group positioning challenge. The boss is untargetable during this part. Players marked with blue squares need to move to the edges of the platform marked by letters. 1 and 3 need to go across to the opposite platform of the one the boss jumped to, while 2 and 4 stay on the jumped platform. Players marked with purple triangles head to the numbered markers based on how many dots they have on their head: 1 goes to 1, 2 goes to 2, and so forth. As the boss's body dashes to blue 1 and blue 2, they need to move behind their partner, and blue 3 and blue 4 need to move in front.
Afterwards, all players should converge on a platform and heal up. The boss will cast Doubled Impact and then Murky Depths, so the tanks must move away from the party.
Channeling Overflow will have players do the collision mechanic from Channeling Flow while the arena is flooded. Players will be inflicted with Mark of the Tides, with two different durations. The players whose debuffs expire first will position themselves for the mechanic, while the other players are targeted by Tainted Flood and must spread out to avoid hitting any other player. Use the passages between the safe platforms to collide with each other. After the first set, heal up and do the second set. Again, players who are not targeted will received Tainted Flood AoE markers.
After Channeling Overflow, the water recedes once more, signaling another phase change.
Phase 3: The Hippokampos
The Hippokampos gains the following new abilities:
- Dissociation: The Hippokampos's severed head will appear at an edge of the arena and do a line AoE down that side of the arena.
- Sewage Eruption: AoEs will appear under players three times. Bait these and move together as a group.
The first mechanic set is a combination of Dissociation, Predatory Avarice, and Spoken or Winged Cataract. Predatory Avarice is cast first, and the tank and DPS inflicted with Mark of the Tides should take note. Dissociation is cast next, marking half of the arena as unsafe. Finally, Spoken or Winged Cataract is cast, and players need to head towards the single safe quadrant of the arena. The DPS with Mark of the Tides needs to stand in the corner of the arena in that safe spot, while the tank with Mark of the Tides needs to head to the other safe spot at the wall. The party will stay in melee range, taking care not to get hit by any of the debuffs or AoEs.
The boss will cast Dissociation again. This time, players will have to bait Sewage Eruption together. Start on a numbered marker north or south, and then move into the safe side of the arena, baiting three sets of AoEs together. After the third baited AoE, all players need to spread out as they will all receive a Tainted Flood marker. One tank should head to the middle to pick up the tether from Coherence easily, and the party should then head to a platform. Do this one the same as previously, with one tank in front and the tethered tank on the opposite side of the arena.
Another dual tank buster, raidwide, and Sewage Deluge will signal the start of the next flooded phase. The water will not recede for the rest of the fight.
The final Channeling Overflow is the most difficult part of the fight. Players will need to do the first set of Mark of the Tides while Coherence is being cast. The party should first head to the platform opposite of the flooded platform and position themselves to be at or outside of max melee range. When players receive their debuffs, the players that need to resolve their debuffs immediately need to head to the positions just like the first Channeling Overflow. The tank with the longer duration debuff needs to pick up the tether from Coherence right after and head to the opposite side of the arena, on a grated area. The rest of the party should stand on the corner of the platform to not get hit by any pushed players.
After the first debuffs resolve, players need to stack together on the platform. The tank that did the mechanic needs to stand in front of the party, and the party needs to be healed up and the damage mitigated. After this, the other players need to do the next set of Mark of the Tides.
The Hippokampos will cast Dissociation and Sewage Eruption yet again. This time, stay on the platform opposite of the overflowing platform. When the Sewage Eruption baited AoEs appear, the party should move as a group in or towards the safe side to dodge Dissociation.
The final mechanic is another Ominous Bubbling and Shockwave combo, handled the same way as the one done earlier in the fight. A final Doubled Impact is cast, so the tanks should move away from the party. There are two Murky Depths casts following this, and enrage is shortly after, wiping the raid at 10:28 into the encounter if not killed before then.
Loot
When the Hippokampos is defeated, treasure coffers will appear depending on how
many players have already defeated the fight for the week. The first coffer
will contain a ![]() Discal Tomestone and a
Discal Tomestone and a ![]() Asphodelos Head Gear Coffer,
Asphodelos Head Gear Coffer,
![]() Asphodelos Hand Gear Coffer, or a
Asphodelos Hand Gear Coffer, or a ![]() Asphodelos Foot Gear Coffer, while the
second one will contain a
Asphodelos Foot Gear Coffer, while the
second one will contain a ![]() Radiant Coating and another random coffer.
When opened by a player, these coffers contain gear for the job the player is
currently on.
Radiant Coating and another random coffer.
When opened by a player, these coffers contain gear for the job the player is
currently on.
Players who defeat the encounter for the first time during the weekly reset will
also receive an ![]() Asphodelos Mythos II token. Six of these can be traded
in for an Asphodelos head, hand, or foot gear of your choosing at a Pandaemonium
gear vendor. Four of these can be traded in for a
Asphodelos Mythos II token. Six of these can be traded
in for an Asphodelos head, hand, or foot gear of your choosing at a Pandaemonium
gear vendor. Four of these can be traded in for a ![]() Radiant Coating.
Radiant Coating.
Changelog
- 13 Jan. 2022: Guide added.
More FFXIV Content

This guide has been written by Lyra an accomplished raider in FFXIV and has written raid guides for the game for the past five years. You can follow him on Twitter and he streams raids on Twitch.
- Complete Dawntrail’s Art Book Collection With – Relics of Eternity –
- New Framer’s Kit With Return Of Breaking Brick Mountains
- Last Chance For THE PRIMALS x Download Festival T-Shirt!
- Team DN Claims #WorldFirst in FFXIV’s Dancing Mad!
- FFXIV Players Blown Away By Store Updates!
- Support #WorldFirst in FFXIV Dancing Mad Ultimate — Now Available!
- Calling FFXIV Fishers To Catch The Rainbow For Charity!
- Last Chance To Enter FFXIV x Jollibee Sweepstakes!