Arathi Basin PvP Battleground Guide
Arathi Basin is the third, and final, WoW Classic battleground, featuring a 15v15 zone control match. While the battleground itself is a simple 5 control point cross shaped zone, it lends itself to various strategies, as your group will need to split up and balance offense and defense in order to control more zones than your opponents.
Lore wise, the Alliance will find themselves represented by the Stromgarde Humans of The League of Arathor, while Horde players cooperate with the Forsaken Undead of The Defilers.
Arathi Basin Overview
Arathi Basin is an iconic WoW Classic battleground. It pits 15 Alliance players against 15 Horde players and can be queued for alone or with a group. Because of its open nature and added players, it is a more team-effort oriented battleground than Warsong Gulch, but stays small enough to allow for more coordination than Alterac Valley.
The gameplay is zone-capture and control, and requires both groups to assault 5 flags spread across the battleground in a cross-shaped fashion. Teams start on the top left and bottom right corner of the map, making the closest base easy to take and defend, but every other base must be fought for.
Assaulting or retaking a flag takes 8 seconds of uninterrupted channeling. If you are assaulting a neutral or enemy-controlled flag, it will take 60 seconds for the flag to become controlled by your team, at which point it will start contributing points towards the 2000 total required to win. You will also be able to be teleported and resurrect in the nearby graveyard, creating a defensive advantage for whichever team holds the flag.
Retaking a flag your team previously controlled instantly causes it to start providing resources towards your team again. Also, the more bases you control, the faster you gain map points, with a full 5-flag capture resulting in a lightning-fast win.
Arathi Basin Location and How to Queue
![]() H Horde players can find the entrance, a flight path and
The Defilers quartermaster and quest
hub north of Hammerfall, around 73,30 in the Arathi Highlands.
H Horde players can find the entrance, a flight path and
The Defilers quartermaster and quest
hub north of Hammerfall, around 73,30 in the Arathi Highlands.
![]() A Alliance players can find the entrance, a flight path and
The League of Arathor quartermaster
and quest hub in Refuge Pointe, which is located around 46,45 in the Arathi Highlands.
A Alliance players can find the entrance, a flight path and
The League of Arathor quartermaster
and quest hub in Refuge Pointe, which is located around 46,45 in the Arathi Highlands.
You must be at least Level 20 in order to queue for Arathi Basin, and can do so from the Arathi Basin battlemasters present in all major cities:
- Deze Snowbane can be found around 78,29 in Orgrimmar.
- Sir Malory Wheeler can be found around 61,92 in the Undercity.
- Martin Lindsey can be found around 28,20 in Thunder Bluff.
- Lady Hoteshem can be found around 79,16 in Stormwind.
- Donal Osgood can be found around 71,89 in Ironforge.
- Keras Wolfheart can be found around 57,38 in Darnassus.
Layout of Arathi Basin
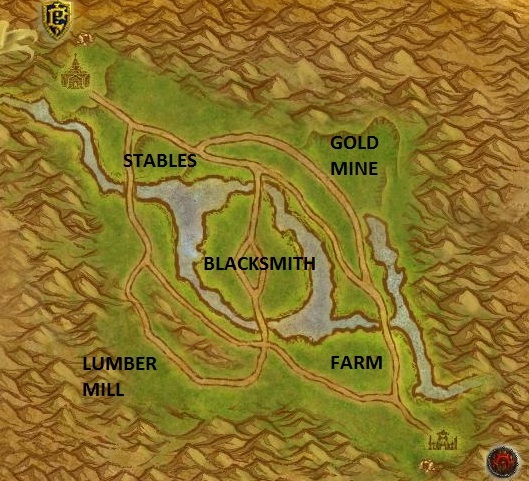
The map is cross-shaped, with the ![]() A Alliance base to the Northwest
and the
A Alliance base to the Northwest
and the ![]() H Horde base to the Southeast. Both bases are essentially identical,
with a graveyard where players of that faction can resurrect.
H Horde base to the Southeast. Both bases are essentially identical,
with a graveyard where players of that faction can resurrect.
Besides the starting areas, there are five zones, five flags, and five graveyards in the map: the Farm, the Gold Mine, the Blacksmith, the Lumber Mill, and the Stables.
Each of these zones also periodically spawns a special item, the "Zerker" buff and the "Leaf" buff, typically inside the nearby buildings. "Zerker" gives you 30% increased damage for 1 minute, while the Leaf gives you a buff that massively increases your health and Mana regeneration for a few seconds, topping you off.
The map itself is very simple, but due to the frantic pace of the battle, it is still vey important to communicate quickly and precisely, in order to coordinate attacks before the enemy can respond, and to parry enemy attacks before losing a flag and its associated graveyard.
The Zones
While there are multiple zones, not all of them have the same kind of importance, and due to their relative position in the map and significant height differences, as well as terrain layout, it can be useful to for certain strategies to focus on different zones.
The Farm
As the closest zone to the Horde starting point, this will typically be the first zone that Horde players take, and is generally very difficult for Alliance to take, assuming a close game.
While mostly a non-descript zone terrain wise, it is closer to the most valuable area, the Blacksmith, by land than the Stables, which gives Horde a slight advantage in most games.
The Gold Mine
A dug-out area, the Gold Mine is the lowest zone in Arathi Basin, both from a height, and from a strategic perspective. While it is a relatively easy area to get to, it is also the most difficult area from which to reach the remaining zones, making it a hard point to both defend and to launch attacks from.
Ultimately, this zone often ends in the hands of the losing team, but you can make the most out of it by capturing it with a small team and defending with a Hunter or long ranged casters, who can interrupt enemies trying to capture the point with impunity from the top of the Mine building!
The Blacksmith
By being the central point, the Blacksmith is, naturally, the closest point to every other node, giving it huge strategic value, for both offense and defense.
Most groups will focus their players here, but beware of over-committing, as you will still need at least two more bases to win and it can be easy to get stuck with the Blacksmith and a single other zone, if you focus too much on holding it.
The Lumber Mill
As the highest zone in Arathi Basin, Lumber Mill allows players to easily survey
the battlefield with abilities such as ![]() Far Sight and
Far Sight and ![]() Eagle Eye,
and thus to react to enemy movements accordingly.
Eagle Eye,
and thus to react to enemy movements accordingly.
It also has a fast access to other points, most notably the Blacksmith, with
abilities such as ![]() Slow Fall, and is generally difficult to get to, making
it easily defendable. Make sure to use mind controlling abilities, such as a Priest's
Slow Fall, and is generally difficult to get to, making
it easily defendable. Make sure to use mind controlling abilities, such as a Priest's
![]() Mind Control and Engineering's
Mind Control and Engineering's ![]() Gnomish Mind Control Cap,
to throw your opponents off the cliff!
Gnomish Mind Control Cap,
to throw your opponents off the cliff!
The Stables
The Stables are very similar to the Farm, but are closest to the Alliance starting
point. This makes it an easy to capture and hold area, which will generally not
see much action in the average game. It can be easily accessed from the Blacksmith
if you have ![]() Water Walking from Shamans or potions.
Water Walking from Shamans or potions.
Class Setup and Roles in Arathi Basin
Arathi Basin has a simple concept, but due to the open nature of the map and its objective, there are multiple viable strategies that teams can employ to try and win. Every class in Arathi Basin has a purpose, with some being better for offensive action, while others are more suited for defense.
Balancing offense with defense is key, as is doing adequate splitting between bases and quick adjustments to strategy to counter the enemy team.
While not mandatory by any means, our ideal composition for Arathi Basin is (+ denotes classes you can get even more of, to replace - classes, if needed):
- 3+ Warriors
- 3+ Mages
- 2+ Priests
- 2- Shamans or Paladins
- 2- Hunters
- 1+ Warlock (or Shadow Priest)
- 1- Rogue
- 1- Druids
Warrior
Warriors are juggernauts, the powerhouses of battlegrounds.
Fights will often live and die with Warriors, since they possess
huge burst damage, especially on low armor targets, and ![]() Mortal Strike is
the key to getting kills on most fights.
Mortal Strike is
the key to getting kills on most fights.
While Warriors are quite tanky and deal great damage, they do not have much self healing and are severely lacking in mobility, which means you have to pair them with healers who can heal and dispel to keep them in combat.
Ultimately, Warriors are best suited for opening a team fight, and will be the core of your zone capture teams.
Mage
Mages are control experts who also deal great damage,
especially against stacked groups or if left alone. Because of their versatility,
they can be used with great effect on attack and defense, and should try to get
enemy healers ![]() Polymorphed and / or
Polymorphed and / or ![]() Counterspelled, quickly
followed by removing their Warriors from battle with
Counterspelled, quickly
followed by removing their Warriors from battle with ![]() Frost Nova.
Frost Nova.
While this is the ideal scenario, you will often be unable to get close enough to pull it off safely, in which case you should simply nuke from a safe distance until a good opportunity to make use of your CC abilities presents itself.
Priest
Priests are one of the most versatile classes in Arathi Basin and can perform multiple roles.
Healing Priests have an excellent healing toolkit with a shield, heal over time,
and quick heals, and are the only healer who can ![]() Dispel Magic enemies and
allies, making them fundamental for keeping Warriors mobile and out of CC in the Horde
(as Shamans cannot dispel friendly targets) and to remove heals
and buffs from enemies in the Alliance (as Paladin cannot dispel
enemy targets).
Dispel Magic enemies and
allies, making them fundamental for keeping Warriors mobile and out of CC in the Horde
(as Shamans cannot dispel friendly targets) and to remove heals
and buffs from enemies in the Alliance (as Paladin cannot dispel
enemy targets).
Shadow Priests are good for team fighting, being able to help burst targets
down while keeping ![]() Shadow Word: Pain up to spread damage as well. They can
also do dispel duties, when needed.
Shadow Word: Pain up to spread damage as well. They can
also do dispel duties, when needed.
Shaman
Shamans are excellent supports in PvP. While both Enhancement and Restoration focused specs can be useful for their burst damage and healing capabilities, respectively, the best spec is the Elemental Restoration hybrid, which is capable of both amazing burst damage and strong healing.
Every type of Shaman also shares in strong utility, from enemy
dispelling with ![]() Purge and interrupting with
Purge and interrupting with ![]() Earth Shock, to providing
Earth Shock, to providing
![]() Windfury Totem for Warriors and
Windfury Totem for Warriors and ![]() Tremor Totem for the whole team,
all of which increase your ability to win battles.
Tremor Totem for the whole team,
all of which increase your ability to win battles.
Paladin
Paladins are also great supports, who use their powerful cooldowns and heals to keep themselves and others alive, typically as Holy, although Retribution Paladins can also occasionally be spotted.
Utility wise, they can keep a flag from falling under overwhelming enemy forces
with a well timed ![]() Divine Shield, allow their casters and healers a second
lease on life with
Divine Shield, allow their casters and healers a second
lease on life with ![]() Blessing of Protection, remove CC and damage over time
effects from allies with
Blessing of Protection, remove CC and damage over time
effects from allies with ![]() Cleanse and apply
Cleanse and apply ![]() Blessing of Freedom,
which is often a deal breaker for allied Warriors or enemy Warrior's targets.
Blessing of Freedom,
which is often a deal breaker for allied Warriors or enemy Warrior's targets.
Hunter
Hunters are best when they can abuse their long range, which is often the case in Arathi Basin. They make for great attackers and, especially, defenders, as they can kite away and use their pet and long range shots to stop enemies from channeling on the flag for a long time, even if they are CC'd themselves.
The open nature of Arathi Basin is very favourable to Hunters and they will rarely have to stop their shots due to line of sight issues. Try to target squishy targets and have your pet on casters for maximum disruption in team fights.
Warlock
Warlocks bring powerful damage over time effects,
as well as great CC with ![]() Fear and
Fear and ![]() Death Coil, at least against
certain classes. They also have powerful defensive abilities that allow them to
self-sustain better than most DPS and a pet, which can be used to stop a cap on
the flag, even if you are not able to do so yourself.
Death Coil, at least against
certain classes. They also have powerful defensive abilities that allow them to
self-sustain better than most DPS and a pet, which can be used to stop a cap on
the flag, even if you are not able to do so yourself.
Because of this, Warlocks are perfect for defending bases, often by themselves.
They are also great for applying split pressure in a team fight with CC, ![]() Corruption
and
Corruption
and ![]() Siphon Life spam, opening opportunities for targets to dip low and
get bursted down by your team.
Siphon Life spam, opening opportunities for targets to dip low and
get bursted down by your team.
Rogue
Rogues are great ninja cappers due to their strong
Stealth and CC abilities. Against a single non-Warlock or Hunter defender, they
can easily ![]() Sap and get the flag before anyone can arrive on the point,
and from there on they are also great at delaying the flag's recapture, often allowing
for surprise comebacks.
Sap and get the flag before anyone can arrive on the point,
and from there on they are also great at delaying the flag's recapture, often allowing
for surprise comebacks.
Druid
Finally, Druids make for good all-rounders. Their heal over time abilities allow them to counter enemy Warlocks in a team fight and provide steady healing, while their utility can often replace a Mage's when it comes down to keep enemy melee out of combat.
They also make for great defenders and ninja cappers, due to their Stealth abilities
and ability to shift into ![]() Dire Bear Form at any time for a huge
increase in durability, allowing for backup to arrive before losing the flag.
Dire Bear Form at any time for a huge
increase in durability, allowing for backup to arrive before losing the flag.
Game Strategy for Arathi Basin
The core strategy in Arathi Basin comes from how you split your group at the start in order to capture your planned points. Typically, this will mean sending roughly half of your team to the Blacksmith and the other half to Lumber Mill, while keeping a Warlock, Hunter, Rogue or Druid on defense on your first zone and sending a stealth capper, if any, behind enemy lines to try and ninja cap any poorly defended bases as the game progresses.
Quick 5-Base Cap (Against Weak Teams)
This is a strategy typically employed by organized groups against pick up groups, in order to minimize game length and, thus, maximize Honor and reputation returns.
You will be looking to deprive the enemy team of any of Arathi Basin's graveyards, thus cooping them within their starting point and ensuring you can just team fight there until the game ends.
In order to capture 5 bases quickly, you will want to send more players than usual to the Gold Mine and look to immediately send at least 2 players to the zone closest to the enemy base. Ideally, you will manage to flip the flag towards your team before the enemy team can start mass respawning at that zone, gaining precious time for the rest of your team to arrive from the other zones.
Because you will be looking to focus more than usual on attacking, the most important
thing for this strategy to succeed is to never allow any enemy to go past you and
ninja cap undefended bases in the back. Make sure to look out and stop (with ![]() Discombobulator Ray
to dismount, for example) any enemy players who try to run past your group.
Discombobulator Ray
to dismount, for example) any enemy players who try to run past your group.
3-Base Cap and Hold (Against Strong Teams)
Against strong teams, you will typically have to content yourself with capturing and holding 3 bases for a slow and steady win. Because of the graveyards provide so much advantage for the defending team, the initial rush to cap all the zones is the most important one.
Start by splitting your team in roughly half, and send them to the Blacksmith and Lumber Mill, while ensuring you keep one strong defensive class behind on the first zone. You can also use stealth class(es) to keep your opponents honest by sending them behind enemy lines to take over any poorly defended bases, but beware of relying too much on this strategy, as it can cause you to lose the main fights, instead.
From here, there will be two main outcomes: either you take the Blacksmith and Lumber Mill, and from then on, it is a game of keeping most of your group on a central position from where you can adapt and defend wherever enemies attack until the game ends. Or you lost at least one battle, and it is the enemy who managed to get one or more of these zones, instead.
In this case, you will have to leave just enough defenders behind at your controlled zones and focus on attacking a new zone, typically the Blacksmith or Lumber Mill, but feel free to try and ninja cap the Gold Mine or even the enemy's first zone as well, since you will be playing from behind and thus need to take risks in order to turn things around.
Pick-Up-Group (PUG) Strategies
Because pick-up-groups often lack the coordinated action required to pull off the aforementioned strategies, it can be easier to simply send each of the 3 party groups of players to its own zone, or have everyone move as a cohesive group while dropping a few defenders on every capped point. Ninja capping strategies are also very effective against disorganized groups, and can easily make the difference in a pick up group mirror match.
Arathi Basin Reputation and Gear Rewards
There are several reasons to do Arathi Basin. While most people like to do it for fun and its efficient Honor gain, there are also two reputations you can level for powerful gear rewards.
We compiled guides for both of them, where you can find the rewards and required reputation level. Feel free to consult them on the links below.
Changelog
- 02 May 2020: Fixed a minor typo.
- 07 Mar. 2020: Guide added.
This guide has been written by Seksi, original vanilla player and multi-class player, currently playing on Gehennas Horde. You can find him on the Classic Warrior, Mage and Shaman Discords, as well as the Icy Veins Discord.
- Burning Crusade Classic Phase 2 Now Live: Here’s What to Expect
- Did Blizzard Just Quietly Invite Creators to Play WoW Classic’s Next Chapter?
- WoW Weekly Returns: Patch 12.0.5, Twitch Drops & Classic Updates
- WoW BCC Anniversary Edition: Overlords of Outland – Everything Coming May 14
- Battleground Honor Significantly Increased
- Limited-Time Mount Alert: Get the Voidfeather Dragonhawk for TBC Classic Servers Now!
- Could WoW Be Added to Xbox Game Pass Ultimate?
- MoP Classic Escalation PTR Update Details New Content