Guide to Island Sanctuaries Pastures in FFXIV
This page contains everything related to hunting animals and raising them in your pasture in FFXIV's island sanctuary mode. It includes information such as the best pasture setups for animal leavings and animal capturing information such as rare critter spawn times, weather requirements and locations.
Animals and Your Island Pasture
Animals play a vital role in your island, capturing them is a source of experience but more importantly these animals can be placed inside a pasture where they can be harvested every day for useful workshop materials.
The animals in the pasture can be fed food to increase their mood and provide extra materials, pasture can later be upgraded to provide more space.
The best part is that the animals can also be petted.
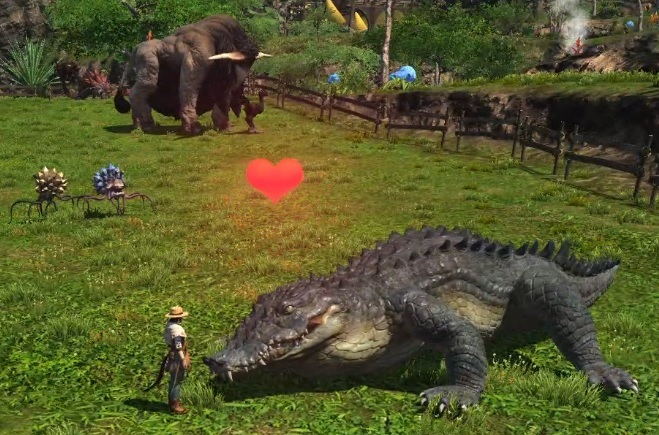
Petting provides no benefit but is regardless a fan favourite feature.
There are also rare animals such as the alligator shown above and rare variants such as the yellow coblyn in the image. These have strict time and weather requirements like big fishing and these animals can more easily get away while trying to capture them.
Hunting Animals Around The Island
Animals come in three sizes. Small, medium and large. To catch these animals you need the correct restraint and to also be on the "capture" mode using your index (new hud icon). These restraints also have rank requirements to unlock.
| Island Rank | Cabin Rank | Seafarer's Cowries Required | Features Unlocked |
|---|---|---|---|
| Tutorial | 1 | 0 | Initial pasture Unlock |
| 4 | 2 | 1000 | +5 pasture animals |
| 7 | 3 | 1500 | +10 pasture animals, mammet Pastureworkers tools(automation) |
| 20 | 4 | 0 | Flawless Net, Restraint and Soporifics which guarantee you catch an animal first try. |
All restraints are a one-time use so have a small handful at the very least before attempting to capture anything especially rare animals. Some rare animals can end up requiring 10-20+ restraints in one window and can still get away after!
Different animals give different rewards while in your pasture so plan your catches accordingly. If you have no more pasture space the game will allow you to change what animals you keep.
You can have a maximum of 5/10/20 animals depending on your upgrade level.
Listed below are a lists of animals sorted by their requirements. Any animals that have time/weather requirements can be obtained multiple times and will respawn in their next window unless it is a unique animal where the respawn is not always guaranteed.
Using Lalachievements can be useful to check the weather and time based animals much like you would use a timer site for big fishing.
Normal animals are always available:
| Animal | Size | Location | Normal Material | Rare Material |
|---|---|---|---|---|
| Lost Lamb | S | 20,23 | Fleece | Milk |
| Opo-Opo | S | 20,26 | Claw | Fur |
| Apkallu | S | 19,11 | Fleece | Egg |
| Ground Squirrel | S | 15,19 | Claw | Fur |
| Coblyn | S | 20,13 | Fang | Carapace |
| Wild Dodo | M | 16,12 | Egg | Feather |
| Island Doe | M | 21,19 | Fur | Milk |
| Chocobo | M | 20,21 | Fur | Feather |
| Glyptodom Pup | M | 30,11 | Carapace | Claw |
| Aurochs | L | 12,17 | Milk | Horn |
| Island Nanny | L | 26,24 | Milk | Horn |
| Blue Back | L | 28,28 | Egg | Feather |
| Quartz Spriggan | S | Spread Through Caves | Fang | Fur |
| Wild Boar | L | 18, 16 | Fang | Horn |
Rare animals that are exclusively time bound:
| Animal | Size | Location | Time | Normal Material | Rare Material |
|---|---|---|---|---|---|
| Glyptodon | M | 31,11 | 12am-3am | Claw | Carapace |
| Island Billy (Island Nanny Variant) | L | 26,22 | 3am-6am | Horn | Fleece |
| Lemur (Opo-Opo Variant) | S | 20,26 | 6am-9am | Fur | Claw |
| Star Marmot (Ground Squirrel Variant) | S | 15,19 | 9am-12pm | Fur | Claw |
| Apkallu of Paradise | S | 19,11 | 12pm-3pm | Egg | Fleece |
| Dodo of Paradise | M | 16,12 | 3pm-6pm | Feather | Egg |
| Stag (Doe Variant) | M | 20,19 | 6pm-9pm | Fur | Horn |
| Amethyst Spriggan | S | 28,16 or 24,19 Cave | 9pm-12am | Fur | Fang |
Rare animals that are exclusively weather bound and will always appear during that weather:
| Animal | Size | Location | Weather | Normal Material | Rare Material |
|---|---|---|---|---|---|
| Oreny Karakul (Lost Lamb Variant) | S | 20,23 | Fair | Milk | Fleece |
| Yellow Coblyn | S | 27,19 | Fog | Carapace | Fang |
| Black Chocobo | M | 13,11 | Clear | Feather | Fur |
| Grand Buffalo (Aurochs Variant) | L | 12,17 | Clouds | Horn | Milk |
| Gold Back | L | 31,28 | Rain | Feather | Egg |
Unique animals: These have no normal variant and have both a weather and time requirement.:
| Animal | Size | Location | Weather | Time | Normal Material | Rare Material |
|---|---|---|---|---|---|---|
| Beachcomb | S | 18,13 | Rain | 12am-3am | Carapace | Claw |
| Alligator | L | 17,24 | Showers | 6am-9am | Claw | Fang |
| Goobbue | L | 33,16 | Clouds | 9am-12pm | Fang | Claw |
| Paissa | M | 24,28 | Fair | 12pm-3pm | Claw | Fleece |
| Twinklefleece | S | 21,21 | Fog | 6pm-9pm | Fleece | Fur |
| Morbol Seedling | S | 19,19 | Clouds | 3am-6am | Carapace | Fang |
| Tiger of Paradise | M | 15,14 | Fair | 6pm-9pm | Fang | Fur |
| Griffin | L | 15,22 | Clear | 3pm-6pm | Feather | Claw |
| Alkonost | M | 23,30 | Clear | 9pm-12am | Feather | Egg |
| Funguar | S | 20,27 | Rain | 3pm-6pm | Fleece | Fur |
| Boar of Paradise | L | 17,16 | Showers | 9am-12pm | Horn | Fang |
| Weird Spriggan | L | 24,18 Cave | Fog | 12am-3pm | Fang | Fur |
| Adamantoise | L | 32, 12 | Fog | 12pm-3pm | Carapace | Claw |
| Grand Doblyn | L | 24, 21 Cave | Fair | 3am-6am | Fang | Carapace |
| Pteranodon | L | 25, 16 | Clear | 9am-12pm | Claw | Horn |
| Morbol | L | 29, 24 | Showers | 9pm-12am | Fang | Carapace |
As you may notice, the materials on the rare animals are often the same as normal, but the order has been switched. The chances of gaining the additional rare leaving actually change depending on the mood of the animal.
| Mood | Rare Leaving Chance |
|---|---|
| Gleeful | 80% |
| Chipper | 50% |
| Content | 25% |
| Unhappy | 15% |
| Hostile | 0% |
Pasture Basics
During the tutorial you will unlock the pasture as a means to obtain animals to care for and feed to raise their mood. Every day at the daily reset you will obtain one or two materials per animal based on the drop tables above. Animals can also be nicknamed inside of the animal management menu by right clicking or pressing square on an individual animal.
You can confirm your daily reset via the workshop, each animal is guaranteed to drop one of the two available materials in the drop tables and then has a chance based on their mood to drop the other material.
Like gardening, animals only need to be tended to and fed once a day but can be available to feed after around six hours. If not fed daily their mood will begin to drop therefore decreasing your yields. When using the automate feature they will be fed at your reset time.
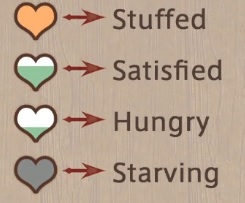
When looking in the pasture management menu an animals mood may seem confusing, please see below what each mood means:

There are three different types of animal feed available. Different food can raise an animals mood by different levels and also have different caps.
| Food | Mood increase | Max | Amount Obtained Per craft |
|---|---|---|---|
| Island Sweetfeed | +1 | Content (Cloud) | 3 |
| Island Greenfeed | +2 | Chipper (Cloudy Sun) | 3 |
| Premium Island Greenfeed | +2 | Gleeful (Sun) | 3 |
The most efficient feed is actually the Island Greenfeed. The mood increase to gleeful does not provide a large enough benefit to pay for the crops. You can instead grow in your farm just enough food for the greenfeed and use the rest in the workshop before exporting what remains. Just be careful not to go under 60 of a single item.
How To Upgrade Your Pasture, Requirements and Costs
Your pasture needs two things to upgrade, Seafarer's Cowries and cabin rank. Seafarer's Cowries come from mainly your workshop and you can increase the cabin rank over time as you rank up your island.
| Island Rank | Cabin Rank | Seafarer's Cowries Required | Upgrade Time | Max Animal Limit | Features Unlocked |
|---|---|---|---|---|---|
| Tutorial | 1 | 0 | 0 | 5 | Initial Pasture Unlock |
| 4 | 2 | 1000 | 2 Hours | 10 | First limit increase |
| 7 | 3 | 1500 | 4 Hours | 20 | Second limit increase, Mammet-sized Pastureworkers Tools (automation) |
As shown above, the final upgrade gives you access to automation making it easier to manage your animals and automatically feeding them.
To craft the tools for automation you need the following:
- Island Log x 6
- Island Copper Ore x 6
- Island Tin Sand x 6
- Island Hemp x 6
At rank 7 you should have an abundance of these materials easily.
Automating Your Animals At Max Rank
Once these tools have been crafted you can right click or press square inside the pasture management menu to select any animal you want to automate. This will then cause the mammets to take care of the animals instead, collecting materials and feeding when needed. There is even the ability to collect all at once.
This costs 10 Seafarer's Cowries a day(200 a total per day) to automate feed and collection. This will stop if you run out of cowries or reach a limit of 20 items per animal. The animals will be fed once a day with the feed you choose and have available.
I would not recommend this until you are at the stage of automating your crops and everything else is upgraded. The Seafarer's Cowries are more useful in the farm where not harvesting the crops instantly results in you slowly drifting out of sync.
Once you do have a comfortable amount of cowries you certainly should automate this. It is very convenient.
Recommended Pasture Animal Combinations
Depending on your preferences for certain animals or the rare animals, listed below are 2 different layouts. One of which aims to optimise your average leavings based on their frequency in the workshop while the other aims to do similar but with the rare animals.
All Unique Animal Pasture
This layout aims to provide as large a range of rarer animals for your pasture as possible. If you have a preference over a specific animal that you do or do not want feel free to change it as ultimately this layout is focused more so around completionism and collecting rare animals.
There are 16 unique animals with an additional 13 rare. Due to only 1 rare animal offering Milk, this layout uses the 16 unique animals and then normal animals to make up the difference in materials. You do gain enough milk to be above the minimum requirements but make sure you have a buffer, primarily of milk and fur, just in case one week uses say 40 milk.
| Animal | Normal Mat | Rare Mat |
|---|---|---|
| Alkonost | Feather | Egg |
| Alligator | Claw | Fang |
| Beachcomb | Carapace | Claw |
| Funguar | Fleece | Fur |
| Gobbue | Fang | Claw |
| Griffin | Feather | Claw |
| Morbol Seedling | Carapace | Fang |
| Paissa | Claw | Fleece |
| Tiger of Paradise | Fang | Fur |
| Twinklefleece | Fleece | Fur |
| Weird Spriggan | Fang | Fur |
| Boar of Paradise | Horn | Fang |
| Adamantoise | Carapace | Claw |
| Grand Dobyln | Fang | Carapace |
| Pteranodon | Claw | Horn |
| Morbol | Fang | Carapace |
| Ornery Karakul | Milk | Fleece |
| Aurochs | Milk | Horn |
| Apkallu of Paradise | Egg | Fleece |
| Island Doe | Fur | Milk |
Optimised Non-Rare Pasture
This is the layout most optimised to give you a fair spread of leavings based on how frequently crafts using these leavings will appear inside of the workshop. This only uses common critters to make it easy to set up your pastures.
| Animal | Normal Mat | Rare Mat |
|---|---|---|
| 2 x Apkallu | Fleece | Egg |
| 1 x Aurochs | Milk | Horn |
| 2 x Chocobo | Fur | Feather |
| 2 x Coblyn | Fang | Carapace |
| 3 x Glyptodon Pup | Carapace | Claw |
| 1 x Island Doe | Fur | Milk |
| 1 x Island Nanny | Milk | Horn |
| 2 x Lost Lamb | Fleece | Milk |
| 3 x Opo-Opo | Claw | Fur |
| 2 x Wild Boar | Fang | Horn |
| 1 x Wild Dodo | Egg | Feather |
Changelog
- 25 Mar. 2025: Reviewed for 7.2.
- 04 Oct. 2023: Updated for 6.5.
- 29 May 2023: Updated for 6.4.
- 14 Jan. 2023: Updated for 6.3.
- 26 Aug. 2022: Guide added.

This guide has been written by I'nanghal Shikhu (Discord - Shikhu). He is a Crafting & Gathering theorycrafter, mentor for The Balance and also a guide maker for Teamcraft alongside Icy Veins. He also managed to obtain 10 top 12's on the leaderboard during the Ishgard Restoration rankings.
- Same-Region Matching Starts this Fall. But There’s a Catch
- Have Your First Look At Evercold’s Realmships & Dungeons
- How Character Action Skins Will Give You More Ways to Customize
- How Auto Content Balancing Will Change How You Play Evercold
- This Rare FFXIV Minion Secretly Became Sellable in Patch 7.55
- The Yo-kai Watch Event Returns Again to Eorzea
- Best Crafting Rotations for 7.55 Phantom Occultum Relics
- FFXIV Hits the Switch 2 Soon! Here’s What We Know About the Release Date