Guide to the Island Sanctuaries Workshop in FFXIV
This page relates to everything about the FFXIV workshop on your island including what supply and popularity do, how your agenda works, how best to farm Seafarer's Cowries and how to upgrade your workshop.
The Workshop On Your Island
The workshop provides a place for your mammets to create handicrafts using the materials you gathered around your island. There is a set schedule with each craft taking 4, 6 or 8 hours to complete within a 24 hour window.
Your workshop is the most vital part of your sanctuary because it provides the vast majority of your Seafarer's Cowries used for upgrades, flight and to purchase cosmetic items.
The workshop is also by far the most complex side of the island offering a large range of bonuses, while not necessary to fully optimise there are achievements for doing so.
Workshop Rank Requirements, Materials and Upgrades
Upgrading your workshop and building more workshops should often be one of your top priorities. They increase your yield and therefore the amount of Seafarers Cowries.
You can build up to four workshops while ranking up your sanctuary and each workshop provides an increase to your value for handicrafts. The build times for your workshops can vary depending on which workshop you are building as well as the rank of that specific workshop.
| Type | XP Given | Benefit | Material 1 | Material 2 | Material 3 | Material 4 | Material 5 |
|---|---|---|---|---|---|---|---|
| Workshop I | 1425 | Island Log x10 | Island Palm Leaf x10 | Island Limestone x10 | island Vine x10 | Island Sand x10 | |
| Workshop II | 2300 | 10% increase to value | Island Log x15 | Island Limestone x15 | Island Hemp x10 | Island Clay x5 | Island Copper Ore x5 |
| Workshop III | 2760 | 20% total increase to value | Island Iron Ore x15 | Island Leucogranite x15 | Island Log x10 | Island Hemp x10 | Raw Island Garnet x3 (Only from expeditions) |
| Workshop IV | 5225 | 30% total increase to value | Island Mable x15 | Island Coal x15 | Island Iron Ore x10 | Island Log x10 | Raw Spectrine x10 |
| Workshop V | 12000 | 40% total increase to value | Island Crystal Formation x15 | Island Yellow Copper Ore x15 | Island Mythril ore x10 | Island Clay x10 | Raw Island Garnet x5 (Only from expeditions) |
Workshop Basics On Your Island Sanctuary
Explained below are the basics for your Workshop, but due to the complexities involved in the supply and demand menu they have been moved further below.
The agenda shown above is the main aspect of your workshop and is where you schedule your handicrafts, review supply and demand, set rest days for your workers and view a handicrafts category/materials. You can also see your groove in this menu which gives you an additional bonus.
To begin crafting a handicraft simply select a workshop(only one will be available initially) and then click the "+" symbol to see all available handicrafts.
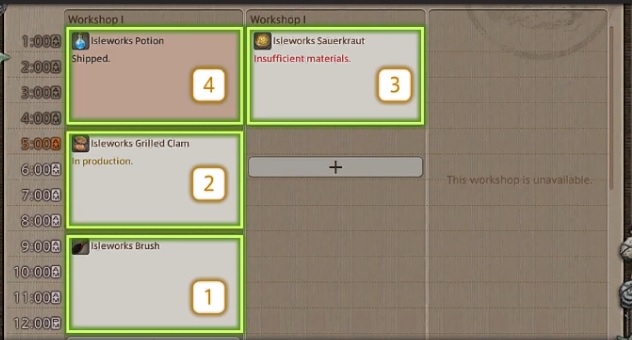
In the image above from the in-game tutorial you can see each state that a craft can be in.
- Preproduction, meaning they are in queue to be crafted at the alloted time. Items in preproduction can be changed at any time.
- Production, this is the item currently being crafted. This handicraft can be cancelled but you will lose out on any cowries you would have gained.
- Not enough materials. If you do not have the materials required before the craft hits production the workshop will not create the handicraft.
- These items have been shipped off and you have obtained the cowries for it.
Handicrafts
Handicrafts are what the workshop creates to then sell for Seafarer's Cowries. Each craft has a set time of either 4, 6 or 8 hours and provides a value relative to the materials used and time spent crafting. This value then changes depending on popularity and supply.
Some materials are gathered, some are grown, others obtained from expeditions and some harvested from your animals located inside your pasture. The rare expedition materials and animal materials provide the highest value for time. Higher rank crafts also generally have a higher value.
Categories
Each handicraft has one or two categories related to what type of item it is. While crafting in your workshop it is possible to chain items with one or two identical categories to obtain an efficiency bonus giving x2 to your value. Technically speaking, it processes the handicraft twice and therefore counts as 2 deliveries.
Every item crafted in a day aside from your first craft can have this efficiency bonus. Every efficiency bonus also increases your groove for the week up to the cap in the top right of the workshop menu.
There are two types of categories, one representing the materials of a handicraft and one representing the purpose. A handicraft can not be both textiles and woodworks for example or arms and food.
Groove Bonus On Your Workshop
When chaining multiple items of the same category you develop what is called Groove. You initially start with 0/10 Groove and build up your Groove over the week for it to reset next season. Your maximum amount of Groove also increases with each landmark you have.
- 1 Landmark - 15 Groove
- 2 Landmarks - 20 Groove
- 3 Landmarks - 25 Groove
- 4 Landmarks - 35 Groove
- 5 Landmarks - 45 Groove
Groove provides a small increase to your Seafarer's Cowries every sale for the week.
Checking Earnings And Materials
You can check the materials you require for the current day, season or both seasons using the material allocation button on your islekeep index.
To check your earnings you must speak to the workshop mammet outside of your cabin and select review earnings. This shows you a split for each day by each item and what Seafarer Cowries they provided. You will also see your highest score for a single season and your score for the current season making it easier to track your weekly earnings.
Understanding Supply, Demand And How It Changes
The supply and demand menu can be found in the top right of the isleworks agenda under the stock looking symbol. This brings up what can initially be a very daunting list of numbers, symbols, items and data but can be easy to understand with a bit of patience. This is how you will gain your highest scores and biggest rewards.

To start, you have filters at the top to make it easier to filter out items that are unappealing. From there you have a table showing each product with their popularity, supply, demand shift and predicted demand.
Popularity
Popularity naturally shows how popular an item currently is. A higher popularity gives higher multipliers on the base value of your handicrafts.
- Very High (+40%)
- High (+20%)
- Average (0%)
- Low (-20%)
Popularity changes weekly and only weekly making it easier to find good handicrafts to start off your day.
Supply
Supply is the other main metric to look at. A lower supply is more desirable and gives higher multipliers, which lore wise would be due to being able to raise prices in Limsa.
- Nonexistent (+60%)
- Insufficient (+30%)
- Sufficient (0%)
- Surplus (-20%)
- Overflowing (-40%)
As you can see, supply has higher multipliers compared do popularity. This is because supply changes both daily and based on how many of the same craft you have created making it more beneficial to watch the market.
Daily supply changes apply for everyone in the same way however the impacts on your own supply from crafting multiple of the same item can have an effect and cause differences between players meaning there can be a 'best' but whats best for you may differ depending on crafts on previous days and materials you have available. Other players crafts do not impact your own supply, it is purely solo content.
Demand Shift
Demand shift simply shows you how your supply changed since its last change. This makes it not something entirely useful on its own but it does follow set patterns that can be predicted to an extent based on the supply of the item, how the supply has changed over the week and how many items you have crafted to impact the demand of an item.
Predicted Demand
Predicted demand shows you the popularity for the next week and has no relation to demand shift.
This is useful for finding out what items are worth stockpiling or if you would like to target specific crops in your garden or animals in your pasture you can use your rest days to change these over.
Felicitous Favors
Felicitous Favors are a mechanic unlocked at rank 19 once you complete your vision for the island. This provides each player with unique items to exchange for a currency called Felicitous Tokens. You are limited to gaining 70 tokens in a single week assuming you deliver enough of each product.
This means you have to think about when you are going to craft these items for the week to gain the most cowries.
How Best To Optimise Your Supply, Popularity And Cowrie Farm
To optimise your supply and popularity you need to check every day what options are available to you that have low supply and high popularity to take advantage of the bonuses that they offer.
The first day is always a rest day to use that data to determine what items will peak on the second day, the second days data is used for the third day and so on until you hit day 4 and it is possible to calculate for the remainder of the week. There are tools, sites and communities dedicated to giving you the best recommendations possible using this information.
Items with two categories are often very useful due to their chaining potential during the day.
Please see below for a table comparison of how beneficial each combination of supply and popularity is so you can refer to those:
| Nonexistent | Insufficient | Sufficient | Surplus | Overflowing | |
|---|---|---|---|---|---|
| Very High | x2.24 | x1.82 | x1.4 | x1.12 | x0.84 |
| High | x1.92 | x1.56 | x1.2 | x0.96 | x0.72 |
| Average | x1.6 | x1.3 | x1 | x0.8 | x0.6 |
| Low | x1.28 | x1.04 | x0.8 | x0.64 | x0.48 |
There are also a range of calculators made by members of the community which helps you see what are your best items which is great to help you find combinations for the day. Give a few of them online a look and find one that suits you.
If you do not want to be efficient or you are for example away for an extended period of time you can also simply use the information available to create a workshop schedule a week in advance but you may lose a significant amount of cowries.
Changelog
- 25 Mar. 2025: Reviewed for 7.2.
- 04 Oct. 2023: Updated for 6.5.
- 29 May 2023: Updated for 6.4.
- 14 Jan. 2023: Updated for 6.3.
- 26 Aug. 2022: Guide added.

This guide has been written by I'nanghal Shikhu (Discord - Shikhu). He is a Crafting & Gathering theorycrafter, mentor for The Balance and also a guide maker for Teamcraft alongside Icy Veins. He also managed to obtain 10 top 12's on the leaderboard during the Ishgard Restoration rankings.
- Last Chance For THE PRIMALS x Download Festival T-Shirt!
- Team DN Claims #WorldFirst in FFXIV’s Dancing Mad!
- FFXIV Players Blown Away By Store Updates!
- Support #WorldFirst in FFXIV Dancing Mad Ultimate — Now Available!
- Calling FFXIV Fishers To Catch The Rainbow For Charity!
- Last Chance To Enter FFXIV x Jollibee Sweepstakes!
- The Senor Otters Make Their Grand Debut in FFXIV
- Don’t Miss the FFXIV x FFXI Collab Event Ending Soon!