Rapier Guide and Builds for New World
Welcome to our guide for Rapier, a weapon in New World. Within these pages, you will find everything required to understand how best to play with this weapon in both PvE and PvP.
- 10. Rotation and Gameplay
- 11. Gameplay Tips
- 12. FAQ - Rapier
- 13. What Perks Should I Have On My Rapier?
- 14. Can I Use Rapier For Primary DPS?
- 15. What Armor Weight Should I Be?
- 16. What Should I Use For Cooldown Reduction?
- 17. What Magic Damage Should I Use For Runeglass, Attunement, and Chain Damage?
Rapier Overview
The Rapier is a highly mobile secondary weapon in PvP that offers an array of defensive abilities and passives to negate damage. In PvE, it provides persistent DoT's and high damage abilities. It is most commonly seen in PvP because of its multi-faceted nature. It can easily fit into just about any build and offer the user the same level of mobility and defensiveness regardless of their attributes.
In both PvE and PvP content, Rapier builds tend to be some of the highest DPS builds you can
create in the game, especially when built around using the ![]() Finisher artifact. Additionaly innformation
on effective Rapier builds can be found below.
Finisher artifact. Additionaly innformation
on effective Rapier builds can be found below.
Rapier Strengths and Weaknesses
 High mobility
- Very defensive
- Can be built to have high damage output
- Universal build potential

 Difficult to land basic attacks with in PvP
- Lacks individual weapon build diversity
- Is generally a secondary utility weapon
- Can have very low damage depending on build

Rapier Builds
Riposte - PvP
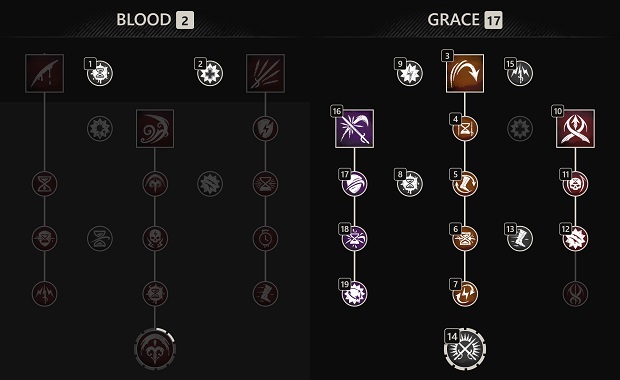
 Riposte — This will give you a moment of invulnerability and allow you to
block incoming attacks. If an enemy attacks you it will initiate a counter that will stun
any targets in front of you.
Riposte — This will give you a moment of invulnerability and allow you to
block incoming attacks. If an enemy attacks you it will initiate a counter that will stun
any targets in front of you. Evade — This can be used for a moment of invulnerability to dodge attacks
and abilities. It can also provide a damage empowerment and stamina return.
Evade — This can be used for a moment of invulnerability to dodge attacks
and abilities. It can also provide a damage empowerment and stamina return. Fleche — This is primarily a movement and repositioning ability. It
will not be blocked and will pass through enemies, also dealing damage to them.
Fleche — This is primarily a movement and repositioning ability. It
will not be blocked and will pass through enemies, also dealing damage to them.
Use this if you prefer to have a survivability option with ![]() Riposte. This ability can be
easily at times if used incorrectly. Nonetheless, it will give you a moment of invulnerability and
will certainly save your life at times.
Riposte. This ability can be
easily at times if used incorrectly. Nonetheless, it will give you a moment of invulnerability and
will certainly save your life at times.
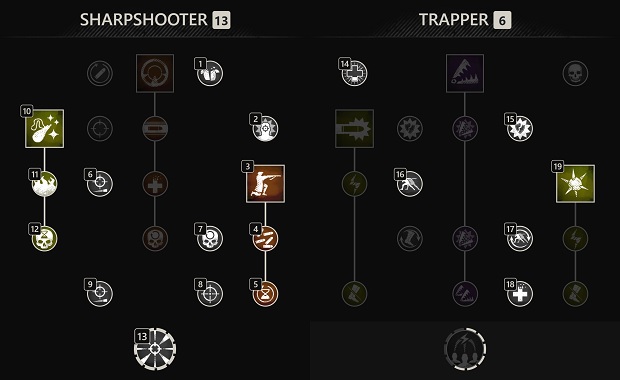
Flourish and Finish - PvP
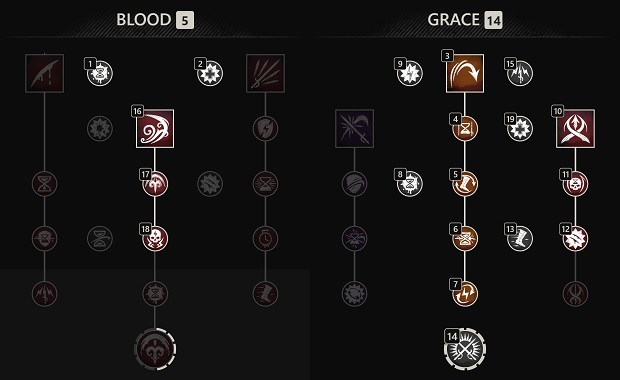
The video below highlights one of the most effective builds that use Flourish and Finish. This build is very common in PvP, as well as some of the most difficult PvE content that's currently in the game (such as Mutated Expeditions, the Hive of Gorgon, and more).
 Flourish and Finish — When used it will stagger the target, you can then
initate a lunging follow-up attack that will deal high damage.
Flourish and Finish — When used it will stagger the target, you can then
initate a lunging follow-up attack that will deal high damage.
This variant can be better for builds that focus on dealing damage. ![]() Flourish and Finish
will stagger a target and have a follow-up component that will lunge and deal high damage
to finish off kills.
Flourish and Finish
will stagger a target and have a follow-up component that will lunge and deal high damage
to finish off kills.
PvE DPS
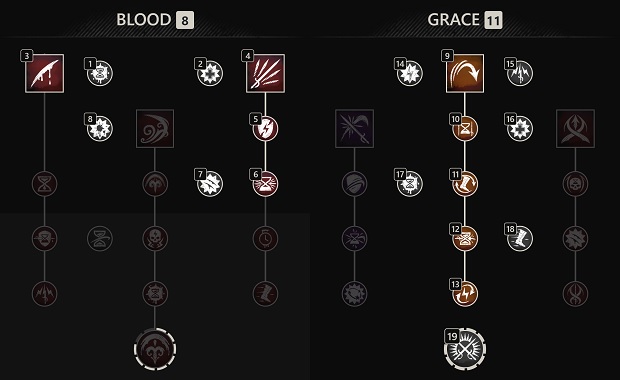
 Tondo — Stacking DoT that will deal incredibly damage when paired with Omnidirectional Evade,
and can be easily maintained.
Tondo — Stacking DoT that will deal incredibly damage when paired with Omnidirectional Evade,
and can be easily maintained. Flurry — High damage cooldown with AoE potential.
- Evade — Low cooldown ability that will constant provide a massive overall damage
increase. This should be used constantly, especially right before an ability is used.
Secondary Weapons
Life Staff
The mobility of the Rapier makes it a perfect complement to a Life Staff. This weapon has many builds depending on your role. To learn more about how to use a Life Staff, please refer to our Life Staff guide.
Musket
For more detailed information on Musket usage and other aspects of its gameplay, please refer to our Musket guide
Stopping Power
Using ![]() Stopping Power allows you to have an almost instant second shot at times when it is used
right after firing your Musket. This will also stagger the target which opens up the window for a quick
third shot to secure a kill.
Stopping Power allows you to have an almost instant second shot at times when it is used
right after firing your Musket. This will also stagger the target which opens up the window for a quick
third shot to secure a kill.
Grenade
Some players prefer using ![]() Sticky Bomb for its high damage and AoE potential.
Sticky Bomb for its high damage and AoE potential.
Bow
For more detailed information on Bow usage and other aspects of its gameplay, please refer to our Bow guide.
Spear
For more detailed information on Spear usage and other aspects of its gameplay, please refer to our Spear guide.
Javelin PvP
Sweep PvP
PvE Damage
Attributes
Due to the diversity of Rapier builds, you will have to reference its build pages to know how to properly distribute your attributes.
If you are looking to scale for damage your main scaling attribute is Dexterity, your secondary scaling attribute is Intelligence.
Important Perks
The actual weapon perks you will want on your Rapier depend on the type of content you are in and the weapon it is paired with. It is best to reference the build guides above.
Ability Perks
- Omnidirectional Evade — This will give a large damage increase when using
this ability. It is able to keep this active almost 100% of the time.
- Sundering Riposte — This applies a significant Rend to the target that can help
to secure a kill after landing a stun.
- Refreshing Fleche — This can be beneficial for healers specifically, but anyone
who is using the Rapier as a secondary support weapon. It can help to reset this ability more
quickly so it can be used again sooner.
PvP Perks
 Health — This provides free damage reduction against all sources and is one of the most beneficial PvP options.
- Shirking Heals — Incredible source of self-healing and allows for great survivability regardless of build.
 Shirking Fortification — Can be a great complement to Shirking Heals. Will add increased armor to
improve overall defensiveness.
Shirking Fortification — Can be a great complement to Shirking Heals. Will add increased armor to
improve overall defensiveness. Freedom — This will allow you to play more aggressively by reducing the duration of crowd-control. You should
play with either 3 or 5 stacks.
Freedom — This will allow you to play more aggressively by reducing the duration of crowd-control. You should
play with either 3 or 5 stacks. Elemental Aversion — Use this perk for elemental damage reduction from weapons like the Fire Staff.
 Refreshing — This can be an optional third perk when you want a source of cooldown reduction in your build.
- Harnessing Perks — Stack these for increased damage if you chose to forgo defensive options.
 Mortal Empowerment — This will be the preferred option for maximum damage output in PvP.
PvE Perks
- Elemental Aversion — This perk is a viable alternative in PvP as well, but is overshadowed by other PvP options.
It provides great defensein mutated expeditions to help mitigate magical effects.
 Physical Aversion — Only projectiles that do physical damage will be mitigated by this perk. As such, it can
be useful in PvE as another potential option. It alsoprovides a small amount of PvP value, but Elemental Aversion and
enemy Ward perks are certainly more defensive options.
Physical Aversion — Only projectiles that do physical damage will be mitigated by this perk. As such, it can
be useful in PvE as another potential option. It alsoprovides a small amount of PvP value, but Elemental Aversion and
enemy Ward perks are certainly more defensive options.
Jewelry Perks
Amulet
- Health — This is the standard pick for all builds, it is free health that will add to the defensiveness of
your kit.
 Divine — This is important for PvE.
 Stamina Recovery — This is a backpocket save when being focused and taking heavy damage.
You will receive a burst of stamina that will allow you to potentially get a quick dodge that can save your iife and continue
the fight.
Stamina Recovery — This is a backpocket save when being focused and taking heavy damage.
You will receive a burst of stamina that will allow you to potentially get a quick dodge that can save your iife and continue
the fight. Thrust Protection — This acts as a third perk slot that provides more defensiveness against other Dex and
ranged weapons.
Thrust Protection — This acts as a third perk slot that provides more defensiveness against other Dex and
ranged weapons. Slash Protection — This acts as a third perk slot that provides more defensiveness against Greatswords,
Great Axes, Hatchets, and Swords.
Slash Protection — This acts as a third perk slot that provides more defensiveness against Greatswords,
Great Axes, Hatchets, and Swords.- Elemental Protection — This can be a PvE replacement for Thrust Protection or another perk. Use whatever
elemental type you need for the mutator being ran.
Ring
 Thrust Damage
 Nature Damage or other Elemental Damage Perk
- Mortal Empowerment
- Hearty
- Refreshing
Earring
Artifacts
Weapon
Armor
Jewelry
Heartrune
Your Heartrune will be heavily dependent on your build and personal preferences. If you wish to know the specific Heartrune you should be taking, please reference the build pages listed above.
PvP builds like healers, Bows, Muskets, or any type of dive build, ![]() Minor Heartrune of Stoneform
will be the best option. It allows you to break out of crowd-control effects, remove debuffs, and
provide defensive buffs.
Minor Heartrune of Stoneform
will be the best option. It allows you to break out of crowd-control effects, remove debuffs, and
provide defensive buffs.
There are two viable upgrade options:
 Cunning Heartrune of Stoneform provides two defensive buffs to reduce damage.
- Stalwart Heartrune of Stoneform provides one defensive buff and a significant healing
over time effect.
In PvE content, you can use either ![]() Brutal Heartrune of Detonate for extra DPS, or
Brutal Heartrune of Detonate for extra DPS, or
![]() Brutal Heartrune of Grasping Vines to clump enemies together.
Brutal Heartrune of Grasping Vines to clump enemies together.
Heartrune Usage Tips
When using ![]() Cunning Heartrune of Stoneform, or other variants, you should save this for times where you are stunned
or affected by other forms of CC. Alternatively, you can use this right before pushing through a doorway or chokepoint to
negate the potential of being affected by CC.
Cunning Heartrune of Stoneform, or other variants, you should save this for times where you are stunned
or affected by other forms of CC. Alternatively, you can use this right before pushing through a doorway or chokepoint to
negate the potential of being affected by CC.
As a Musket or Bow player, you should be using your ![]() Cunning Heartrune of Stoneform, or other variants, if you have been
hit by another Musket or Bow and have taken significant damage or have a
Cunning Heartrune of Stoneform, or other variants, if you have been
hit by another Musket or Bow and have taken significant damage or have a ![]() Crippling Powder Burn on you. Otherwise, use this
whenever you are being pushed or are affected by crowd-control.
Crippling Powder Burn on you. Otherwise, use this
whenever you are being pushed or are affected by crowd-control.
Use ![]() Brutal Heartrune of Grasping Vines when 3+ targets are stacked together. You want to use this on as
many as possible. It can also be used on single-target fights for free damage or to apply Rend.
Brutal Heartrune of Grasping Vines when 3+ targets are stacked together. You want to use this on as
many as possible. It can also be used on single-target fights for free damage or to apply Rend.
Try to avoid using ![]() Brutal Heartrune of Detonate while you have low health or are being focused on.
The goal is to start the ability and wait a short duration and attempt to dive in right as
the ability detonates so you can catch enemies off guard and not be bursted down.
Brutal Heartrune of Detonate while you have low health or are being focused on.
The goal is to start the ability and wait a short duration and attempt to dive in right as
the ability detonates so you can catch enemies off guard and not be bursted down.
Save your Detonate for when there are multiple targets stacked on top of one another. Preferably the targets will
already be under some kind of CC effect, or exhausted and unable to dodge out of them. It is best paired with something
like ![]() Gravity Well or
Gravity Well or ![]() Shockwave.
Shockwave.
Take advantage of down time to charge your heartrune. For instance if you are far away you might as well continue to try hitting targets or structures to build charge.
Your heartrune will charge fast. While it is obviously beneficial to hold for times where there are large clusters of enemies. Do not wait too long and continue to waste your cooldown when you would have had the time to get another one recharged. Get familiar with how quickly you can get it back online and do not hesitate to use it to secure high priority kills.
A Heartrune in PvE is significantly different than PvP. This will charge incredibly fast due to the sustained damage output on
single targets. When using something like ![]() Brutal Heartrune of Detonate this is best used on large numbers of enemies instead of
single target. With that being said, use this as many times as possible in a boss fight since it will be available and otherwise
wasted.
Brutal Heartrune of Detonate this is best used on large numbers of enemies instead of
single target. With that being said, use this as many times as possible in a boss fight since it will be available and otherwise
wasted.
Gems and Consumables
For more information on how to manage your cooldown hotbar, what consumables to use, what foods should be eaten, or tips on how to be more effective with your consumables in PvP and PvE, please refer to Rapier Consumables guide.
Gems
Life Staff Gems
When playing with a Life Staff, please reference its guide to understand how to properly use gems in its builds.
Bow and Musket Gems
When playing with a Bow or a Musket, please reference their respective guides to understand their armor and weapon gem interactions.
Spear Gems
When playing with a Spear, please reference its guide to understand how to properly use gems in its builds.
PvE Gems
In PvE combat, more specifically mutators, elemental resistance is the main concern.
You can use the following gems in your gear:
- Elemental Resistance Gem x8 + Amulet Protection Perk (Based on mutator elemental effect.)
Consumables
For more information on how to manage your cooldown hotbar, what consumables to use, what foods should be eaten, or tips on how to be more effective with your consumables in PvP and PvE, please refer to Rapier Consumables guide.
Rotation and Gameplay
Just like many other aspects of the Rapier, your rotation and ability priorities will strictly depend on your primary weapon and the build you are using because of the many different weapons that can take advantage of the Rapier.
In general, you can use abilities like ![]() Riposte,
Riposte, ![]() Evade, and even
Evade, and even
![]() Flourish and Finish to prevent incoming damage through invulnerability or
crowd-control.
Flourish and Finish to prevent incoming damage through invulnerability or
crowd-control.
![]() Fleche and
Fleche and ![]() Evade will be your best options for getting out of danger
or to help yourself move faster.
Evade will be your best options for getting out of danger
or to help yourself move faster.
Secondary Weapon Priority List and Build Rotation
To learn how to use your second weapon properly, and complete rotation, please refer to our PvE and PvP build pages:
Gameplay Tips
Riposte
This ability can be one of the most powerful life-saving tools you have. It will completely negate incoming damage or potential crowd-control from other abilities. It is important to not waste this ability. When using it, try to save it for absolutely necessary moments as it can also give you cooldown reduction if you land the hit. You should not "telegraph" the ability and let your enemy know you are going to use it. This means do not swap to the Rapier as the enemy is running at you, and do not use it too early. Use it right as they are committing to an attack or an ability. It can be very easy to dodge the counter, so it is best to catch your enemies off-guard.
Evade
You can use ![]() Evade not only for movement, but almost just like
Evade not only for movement, but almost just like ![]() Riposte. You can use it to completely
dodge attacks because it provides an invulnerability window.
Riposte. You can use it to completely
dodge attacks because it provides an invulnerability window.
This can be used to escape abilities like ![]() Gravity Well and
Gravity Well and ![]() Ice Shower. To do this properly
you will have to wait a moment until their root effect expires, then use
Ice Shower. To do this properly
you will have to wait a moment until their root effect expires, then use ![]() Evade to quickly dash backwards.
Evade to quickly dash backwards.
You can also get a haste buff and stamina back whenever you dodge an incoming attack.
Fleche
This is a powerful tool to get out of combat and reposition. It will go through allies and enemies so you can
use it when you are in very tight spaces. When you use it with ![]() Refreshing Fleche you should try to clip the
backs of enemies to force a critical hit and get potential cooldown reduction.
Refreshing Fleche you should try to clip the
backs of enemies to force a critical hit and get potential cooldown reduction.
Flourish and Finish
This can be used as an execute, a defensive stagger, or even a movement option.
When enemies are pushing you, or are low health, you can use the first piece of this ability to quickly stagger them. Its follow-up will charge a significant range and stab them for a high amount of damage.
To use this defensively, you can use the stagger on the initial attack, then quickly turn 180 degrees and commit to the follow-up attack to dash quickly in the opposite direction. This can be down even if enemies are not nearby to dodge incoming ranged attacks, or for movement in open space.
Movement
Effective movement is incredibly important in a build like this, especially when playing in medium. Do not panic and use your entire stamina bar and exhaust yourself, as it may result in death. You can take advantage of jumping, diving (going prone while moving), and changing direction by quickly moving your mouse or taking advantage of quick inputs on your movement keys.
There are many movements in New World that will stagger you in place for a moment when quickly changing direction. If you move left and right or if you jump left and right you will notice there is a momentwhere you will be standing still. To prevent this you will need to use a key input while your character is in the animation. For example, if you hold your left directional key and jump then right before you land you hit your right directional key and jump, you will quickly jump left and right. If you simply run left and right using your directional keys your character will respond similarly. To avoid this you can move left and then right before you pivot to go right, hit the backward directional key and instantly follow up with your right directional key. If you continue doing this back and forth you will avoid the sliding animation.
Life Staff Usage
When paired with a Rapier a healer can dive in and out of dangerous engagements, or use it
for movement speed and repositioning. Abilities like ![]() Riposte will also help with
survivability.
Riposte will also help with
survivability.
To learn more about ability usage and the intracies of the Life Staff, please refer to our Life Staff guide.
Musket Usage
This weapon combination provides mobility to the Musket so that it can escape danger and quickly reposition.
Please refer to our Musket tips for how to use it properly.
Musket Usage
This weapon combination provides mobility to the Bow so that it can escape danger and quickly reposition.
Please refer to our Bow tips for how to use it properly.
Spear Usage
The Spear and Rapier create a highly mobile backline dive build that has an array of defensive capabilities and crowd-control options.
Please refer to our Spear tips for how to use it properly.
FAQ - Rapier
What Perks Should I Have On My Rapier?
This is another very build dependent thing about the Rapier. It can be very beneficial to have ability perks on it, or it can be more effective to have damage focused perks on it.
For healers, it is best to use ability perks on your Rapier with critical hit modifiers. You could
use either ![]() Refreshing Fleche or
Refreshing Fleche or ![]() Sundering Riposte with
Sundering Riposte with ![]() Keen Speed and
Keen Speed and ![]() Keen.
Keen.
For builds with Bows and Muskets it is best to get additional cooldown reduction build in. With a Bow
you can use ![]() Icicle to get another stack of
Icicle to get another stack of ![]() Refreshing Evasion and two strong offensive perks.
For Muskets you can use
Refreshing Evasion and two strong offensive perks.
For Muskets you can use ![]() Sacred Woodsabre to get another stack of
Sacred Woodsabre to get another stack of ![]() Refreshing.
Refreshing.
In PvE, focus on damage modifiers such as ![]() Vicious and Bane Perks. You will almost never
use the Rapier for primary PvP damage, so it is better to have utility perks.
Vicious and Bane Perks. You will almost never
use the Rapier for primary PvP damage, so it is better to have utility perks.
Can I Use Rapier For Primary DPS?
A Rapier has many strong options that allow for it to have high damage output. It is especially effective in Corrupted expeditions because of how strong Thrust damage is. It can certainly be used as your primary DPS weapon in PvE.
This is not as easy to do in PvP because it is very difficult to land basic attacks with the Rapier in PvP.
What Armor Weight Should I Be?
In almost all cases it is best to play builds with a Rapier in light armor. This makes them very mobile and increase the overall damage and healing you can put out.
There are some niche builds, such as a medium Spear or a medium Healer, that can still use the mobility of the Rapier very well.
What Should I Use For Cooldown Reduction?
Generally, in all builds your best option will be ![]() Refreshing for optimal cooldown reduction.
Refreshing for optimal cooldown reduction.
Bow builds you will be dodging frequently, so this makes ![]() Refreshing Evasion a valuable
source of cooldown reduction.
Refreshing Evasion a valuable
source of cooldown reduction.
What Magic Damage Should I Use For Runeglass, Attunement, and Chain Damage?
It is best practice to use a magic damage type that is the least likely to be countered. While most players tend not to focus on a specific magic damage type like they do for physical damage, it is still possible. In most cases, players may use extra Ice damage protection due to the Ice Gauntlet, or Fire due to the Fire Staff or Blunderbuss. As such, Nature, Arcane, or Lightning damage can be beneficial options. Nature specifically is beneficial because it will always work in PvE environments because it is never weak to any enemy types.
Changelog
- 04 Aug. 2025 (PvP builds page): Guide updated with new PvP Rapier build.
- 04 Aug. 2025 (gems page): Guide updated with additional gem suggestions.
- 04 Aug. 2025 (this page): Guide updated with new Rapier tips, tricks, and videos.
- 25 Nov. 2024 (abilities page): Guide updated for expansion.
- 23 Oct. 2024 (PvE builds page): New high-DPS PvE rapier build added.
- 22 Oct. 2023 (PvP builds page): Guide updated for expansion.
- 22 Oct. 2023 (PvE builds page): Guide updated for expansion.
- 22 Oct. 2023 (gems page): Guide updated for expansion.
- 22 Oct. 2023 (abilities page): Guide updated for expansion.
- 22 Oct. 2023 (this page): Guide updated for expansion.
- 29 Mar. 2023 (gems page): Updated PvE Gems.
- 29 Mar. 2023 (this page): Updated gems.
- 16 Feb. 2023 (PvP builds page): Guide added.
- 16 Feb. 2023 (PvE builds page): Guide added.
- 16 Feb. 2023 (gems page): Guide added.
- 16 Feb. 2023 (abilities page): Guide added.
- 16 Feb. 2023 (this page): Guide added.
Savvvo is a full-blown MMORPG try-hard who overthinks every build, min-maxes every stat, and theorycrafts like his life depends on it. If there’s a meta, he’s dissecting it. If there isn’t, he’s creating one.
You can take a closer look at his guides and content on YouTube.
- AMA Session with New World’s Former Lead World Designer
- New World Aeternum 2026 Roadmap Revealed
- Can New World Be Saved? Offers Are Starting to Pop Up.
- The Last Day of New World: Aeternum
- New World Server Mergers (Again)
- What Else Was Planned for New World: Aeternum?
- Global Storage Search is Now Live in New World: Aeternum
- Daggers Are Officially Live in New World: Aeternum