Magtheridon's Lair Guide: Strategy, Abilities, Loot
Magtheridon's Lair is considered the harder of the two 25-man raids available in Phase 1 of TBC Classic, though it has no attunement requirement. This raid can be located in Hellfire Peninsula on the back side of the Hellfire Citadel. The Magtheridon fight itself requires a high amount of coordination and planning as 20 coordinated players will be needed to complete the mechanics.
Magtheridon's Lair Entrance Location

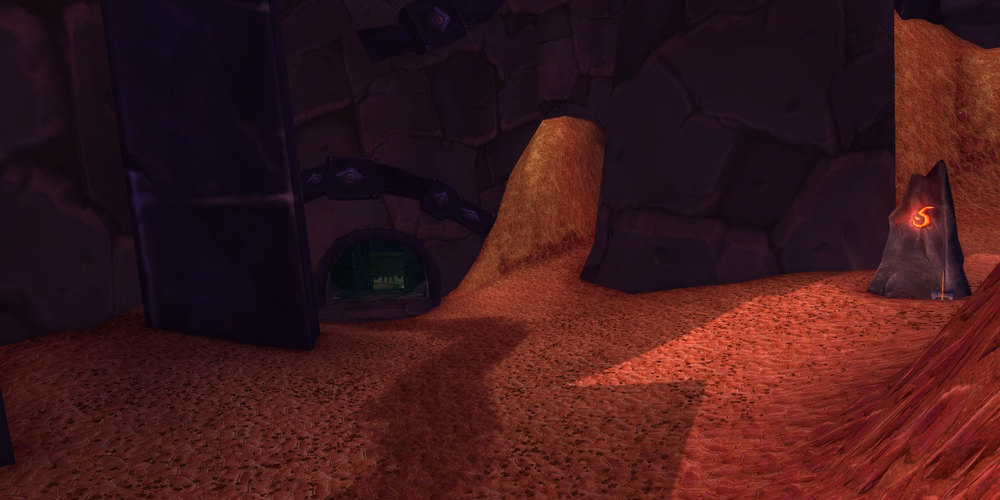
Magtheridon's Lair can be found in Hellfire Peninsula, on the back side of Hellfire Citadel. Simply fly around the back side in the area shown above around coordinates (47,53). From here you will see something similar to the picture shown below. Outside of the instance portal is a summoning stone that two players can use to get the rest of their group together.
Magtheridon's Lair Trash Mobs
Magtheridon's Lair only hosts a single trash mob as the instance is only a few short pulls and then you are engaging the boss. Nonetheless, these mobs are rather deadly as they have some very strong AoE abilities. Make sure to handle them properly, as they can wipe your entire raid in a few seconds if poorly managed.
Hellfire Warder
There are 4 packs of these mobs throughout the instance, and they will always be found in groups of 3. Three of the packs remain stationary, while the fourth one patrols in a circle around the entire instance. Be sure to not pull multiple groups at once.
Abilities
You will want to be aware of the patrolling group's positioning so you do not
pull multiple groups at once. Assign reliable interrupts to each mob
individually, as the ![]() Shadow Bolt Volley deals high damage to all nearby
enemies. Do not let any of these casts go through.
Shadow Bolt Volley deals high damage to all nearby
enemies. Do not let any of these casts go through.
These Hellfire Warders will also be constantly debuffing your
entire raid with both ![]() Shadow Word: Pains and
Shadow Word: Pains and ![]() Unstable Afflictions.
It is advised to dispel these as quickly as possible as the raid will already be
taking heavy damage from the other AoE abilities. Typically a Priest
will be casting
Unstable Afflictions.
It is advised to dispel these as quickly as possible as the raid will already be
taking heavy damage from the other AoE abilities. Typically a Priest
will be casting ![]() Mass Dispel to remove multiple
Mass Dispel to remove multiple ![]() Shadow Word: Pains
at a time. If possible, have a high-health player such as a
Protection Paladin remove the
Shadow Word: Pains
at a time. If possible, have a high-health player such as a
Protection Paladin remove the ![]() Unstable Afflictions, as it
deals very high damage and silences the dispeller when dispelled.
Unstable Afflictions, as it
deals very high damage and silences the dispeller when dispelled.
![]() Death Coils can cause issues if they hit your
tanks; be ready to quickly top up any tank afflicted by these spells.
Death Coils can cause issues if they hit your
tanks; be ready to quickly top up any tank afflicted by these spells.
![]() Shadow Burst is another spell tanks need to be aware of as it knocks
back all nearby enemies and resets threat. Be ready to taunt the mob back right
away.
Shadow Burst is another spell tanks need to be aware of as it knocks
back all nearby enemies and resets threat. Be ready to taunt the mob back right
away.
Lastly, the entire raid needs to be ready to move out of the
![]() Rain of Fire. It deals very high damage periodically to all enemies
inside of it. The Warders will cast this on top of random players and it will stay in
that area for a few seconds. Simply spread out before engaging these mobs and
be ready to move out of the fire!
Rain of Fire. It deals very high damage periodically to all enemies
inside of it. The Warders will cast this on top of random players and it will stay in
that area for a few seconds. Simply spread out before engaging these mobs and
be ready to move out of the fire!
Overview of Magtheridon Boss Fight
Magtheridon's Lair only has one boss fight, Magtheridon himself. It consists of 2 phases, the first of which you will be facing 5 of these mobs at once:
Hellfire Channelers
When you first encounter Magtheridon, he is "banished" away by 5 Hellfire Channelers. The fight begins when you attack these mobs, and all 5 will engage at once. Be ready with your assignments as mishandling these mobs will quickly lead to a raid wipe.
Abilities
As soon as you enter combat, you will have exactly 2 minutes until Magtheridon breaks free of his banishment and engages you in combat. If you manage to kill all 5 Hellfire Channelers, Magtheridon will break free early and engage right away.
Each channeler starts in their own section of the room as they are handling
their own cube. On pull, you will want tanks assigned to picking up certain
adds and even Hunters casting ![]() Misdirection to help
tanks get any mob outside of their range. The most common strategy is to have
3 tanks, with two tanks tanking two mobs each and a third tank tanking the first
add you kill. If these adds are tanked far enough away from the raid, their
Misdirection to help
tanks get any mob outside of their range. The most common strategy is to have
3 tanks, with two tanks tanking two mobs each and a third tank tanking the first
add you kill. If these adds are tanked far enough away from the raid, their
![]() Shadow Bolt Volley should not hit anyone else besides the tank.
Shadow Bolt Volley should not hit anyone else besides the tank.
Every time one add dies, it casts ![]() Soul Transfer, increasing the
damage and cast speed of all remaining adds by 20% and stacking up to 4 times.
Assign multiple healers to the tanks that are tanking multiple adds, and have
extra healers ready to assist when other adds die as the stacking buff greatly
increases their damage output. The free tank should move over and taunt one of
the mobs whenever possible.
Soul Transfer, increasing the
damage and cast speed of all remaining adds by 20% and stacking up to 4 times.
Assign multiple healers to the tanks that are tanking multiple adds, and have
extra healers ready to assist when other adds die as the stacking buff greatly
increases their damage output. The free tank should move over and taunt one of
the mobs whenever possible.
![]() Fear is still a threat here, especially on a tank or a crucial
healer. These Channelers also cast
Fear is still a threat here, especially on a tank or a crucial
healer. These Channelers also cast ![]() Dark Mending, healing themselves
or a nearby ally for a large amount. Make sure to interrupt this as the heal
can easily cause you fall far behind.
Dark Mending, healing themselves
or a nearby ally for a large amount. Make sure to interrupt this as the heal
can easily cause you fall far behind.
Similar to the trash, you will want an interrupter assigned to each
Hellfire Channeler to prevent both the ![]() Shadow Bolt Volleys
and
Shadow Bolt Volleys
and ![]() Dark Mendings from going off. Two interrupters per mob will be
needed as both of these abilities can be cast back-to-back. Since the adds that
are not currently being killed are being tanked away from the raid, we do not
need two interrupters assigned to every add; only the ones we are near.
Dark Mendings from going off. Two interrupters per mob will be
needed as both of these abilities can be cast back-to-back. Since the adds that
are not currently being killed are being tanked away from the raid, we do not
need two interrupters assigned to every add; only the ones we are near.
Lastly, while alive, the Channelers will constantly summon
![]() Burning Abyssals, which deal heavy damage to the highest-threat
target, typically a healer. It is crucial that these are crowd-controlled as
much as possible. If ignored, these will quickly kill all of your healers.
Warlocks can use
Burning Abyssals, which deal heavy damage to the highest-threat
target, typically a healer. It is crucial that these are crowd-controlled as
much as possible. If ignored, these will quickly kill all of your healers.
Warlocks can use ![]() Fear and
Fear and ![]() Banish to
CC these, and other classes like Priest can even throw out an
emergency
Banish to
CC these, and other classes like Priest can even throw out an
emergency ![]() Psychic Scream if needed.
Psychic Scream if needed.
Magtheridon
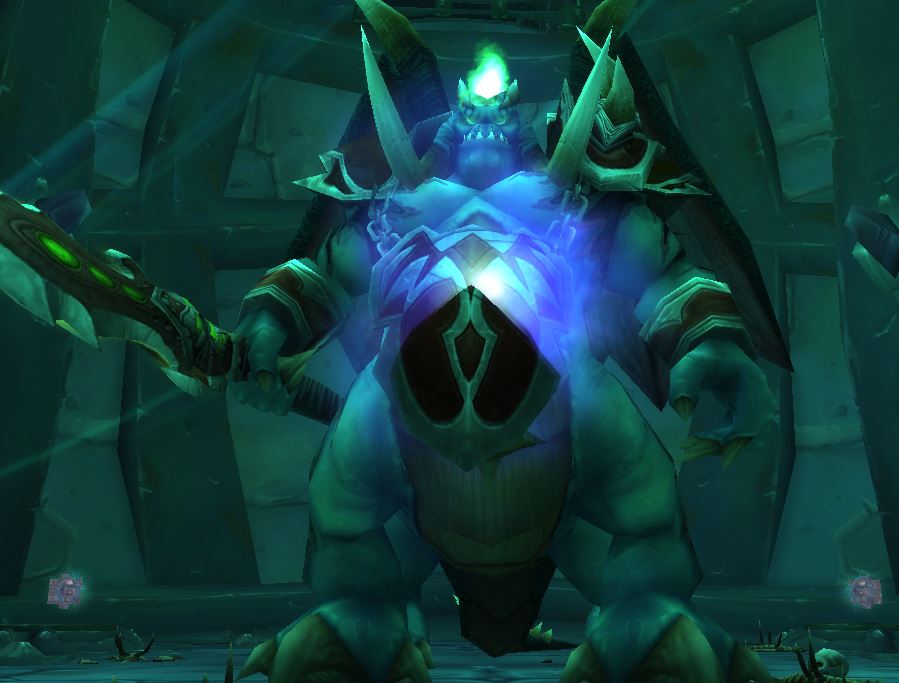
Magtheridon himself is mostly about the execution of the fight mechanics more than anything else. Pay attention to your assignments and be ready to click your assigned cube at the proper time and you will easily down this boss.
Abilities
 Cleave
 Quake
Quake Conflagration
 Blast Nova
- Debris
- Debris
 Enrage (at 22 minutes)
To start off, when Magtheridon is awakening and entering the fight make sure no one is standing near him except for the tank as he will immediately begin attacking anyone nearby. Healers especially need to be aware of when he is coming out and try not to pull threat from healing spells.
Have the tank quickly grab the boss and face him away from the raid to avoid
his ![]() Cleave from hitting anyone else. Drag him back toward a wall so
the tank avoids being knocked away by the
Cleave from hitting anyone else. Drag him back toward a wall so
the tank avoids being knocked away by the ![]() Quake.
Quake.
Healers and DPS will want to spread evenly throughout the room as the
![]() Conflagration fire on the ground will appear on top of random
players. In addition to that, healers assigned to healing the tank will want to
be within range of them and ideally have their back against a wall to avoid the
knock back from
Conflagration fire on the ground will appear on top of random
players. In addition to that, healers assigned to healing the tank will want to
be within range of them and ideally have their back against a wall to avoid the
knock back from ![]() Quake.
Quake.
The main focus of the fight is the ![]() Blast Nova. Approximately every
50 seconds, Magtheridon will begin to cast Blast Nova,
periodically dealing massive damage to all nearby players. This must be
interrupted or it will cause a raid-wide wipe.
Blast Nova. Approximately every
50 seconds, Magtheridon will begin to cast Blast Nova,
periodically dealing massive damage to all nearby players. This must be
interrupted or it will cause a raid-wide wipe.
To stop the ![]() Blast Nova cast, 5 players are required to
simultaneously click each individual Manticron Cube to temporarily
stun Magtheridon, interrupting his cast. When doing this, players
will receive a 3-minute debuff (
Blast Nova cast, 5 players are required to
simultaneously click each individual Manticron Cube to temporarily
stun Magtheridon, interrupting his cast. When doing this, players
will receive a 3-minute debuff (![]() Mind Exhaustion), preventing them from
clicking on the cubes again. Because of this, 4 different groups of 5 players
are needed to click the cubes at different times.
Mind Exhaustion), preventing them from
clicking on the cubes again. Because of this, 4 different groups of 5 players
are needed to click the cubes at different times.
Lastly, at 30% health, Magtheridon will collapse the ceiling
above, causing ![]() Debris to fall down. This deals very high damage
to all players and stuns them for 2 seconds. Make sure you are full health
before this goes off and use any health-restoring abilities you have right
after. Healers need to be ready to top the tank off immediately after as they
will quickly be melee attacked by Magtheridon soon after.
Debris to fall down. This deals very high damage
to all players and stuns them for 2 seconds. Make sure you are full health
before this goes off and use any health-restoring abilities you have right
after. Healers need to be ready to top the tank off immediately after as they
will quickly be melee attacked by Magtheridon soon after.
After the initial ceiling collapse, there will be constant falling debris on
individual players. After 5 seconds, this debris lands and kills anyone
nearby. Be ready to move out of any "cave-in" animations and keep watching your
debuffs for the ![]() Debris debuff. Simply move away from this area
or you will die.
Debris debuff. Simply move away from this area
or you will die.
Magtheridon Loot
| Item | Item Type | Slot |
|---|---|---|
| Plate | Head | |
| Cloak | Back | |
| Tier 4 Chest token | Chest | |
| Tier 4 Chest token | Chest | |
| Tier 4 Chest token | Chest | |
| Cloth | Hands | |
| Leather | Hands | |
| Waist | ||
| Plate | Waist | |
| Accessory | Trinket | |
| Staff | Weapon | |
| Polearm | Weapon | |
| Off-Hand Weapon | Off-Hand | |
| Shield | Off-Hand | |
| Wand | Ranged | |
| Gem Sack | Misc | |
| Bag | Misc | |
|
Quest Item | Misc |
Recommended Group Composition for Magtheridon's Lair
There are a few class recommendations for Magtheridon. Firstly, you will want to make sure you have enough interrupts for the Hellfire Channelers. Elemental Shamans, Rogues, and even Warriors are good for this. You MUST interrupt their casts, so bring at least 4 reliable, hit-capped interrupters.
Secondly, you will want to bring as many Warlocks as possible
to deal with the ![]() Burning Abyssals. When they spawn,
Burning Abyssals. When they spawn,
![]() Banish or
Banish or ![]() Fear them to prevent them from killing
healers. Around 4 Warlocks is a good amount for this job.
Fear them to prevent them from killing
healers. Around 4 Warlocks is a good amount for this job.
As far as tanks are concerned, we recommend bringing 3 but even 4 can be
fine for early kills. You need enough tanks to safely tank each of the
Hellfire Channelers before unleashing Magtheridon. A
Protection Warrior is recommended as the tank for
Magtheridon himself as they will take reduced damage compared to
other tanks and has strong cooldowns available such as
![]() Last Stand and
Last Stand and ![]() Shield Wall.
Shield Wall.
You will want to bring around 5 or 6 healers for this fight, depending on
your relative gear level. Early on more healers is preferred to clear the raid
safely. Restoration Shamans are good for this slot as they can act
as a backup interrupter with ![]() Earth Shock, though they are not
required for a kill.
Earth Shock, though they are not
required for a kill. ![]() Bloodlust /
Bloodlust / ![]() Heroism are also
great to ensure all 5 Hellfire Channelers are dead before
Magtheridon himself engages in combat.
Heroism are also
great to ensure all 5 Hellfire Channelers are dead before
Magtheridon himself engages in combat.
Changelog
- 14 Jul. 2021: Removed Magtheridon Double Blast Nova section as this was patched.
- 15 Jun. 2021: Added pictures; added note about double Blast Nova.
- 11 Jun. 2021: Guide added.
This guide has been written by Abide, TBC veteran for nearly a decade. Abide is a Warrior tank and multi-class expert currently playing on Faerlina as Horde. You can find him in the the Icy Veins Discord. You can also see him live on Twitch.