Splendorous Tools Stage Three Guide for FFXIV
The third stage in the FFXIV Splendorous Tools series will allow you to upgrade your tools into Chora Zoi's Relics. This further upgrades the tools stats but mainly serves as an intermediate stage before the next big upgrade. This guide will explain how best to gather the required collectables and provide rotations and lists for crafting.
Upgrading to Chora Zoi Tools in FFXIV
To continue with your relic tools, you must first complete the quest The Joy of Zoi to continue onwards with the story.
From there you can now select a new upgrade quest by speaking to Chora-Zoi in the Crystarium (X: 10.5, Y: 7.7) and begin the quest "A Tool of Her Own (3rd Enhancement)".
As with the previous stages, by speaking to Quinnana in The Crystarium(X: 10.4, Y: 7.8) you will be able to exchange your collectables for components(now called Customized Components in this stage). Gathering classes also have the ability to use Aetherial Reduction on their collectables to gain more items than by simply exchanging them.
Chora Zoi upgrades for Crafters
Crafting classes are required to craft collectables to exchange for customized components.
With a rating of 720-1199 you will obtain 1 component, whereas for 1200+ collectability you
will obtain 3. You can simply use ![]() Trained Eye to
complete these crafts without needing any HQ materials anymore. Overall,
90 Brilliant Components are needed meaning at the highest collectability
tier you need 30 crafts per class.
Trained Eye to
complete these crafts without needing any HQ materials anymore. Overall,
90 Brilliant Components are needed meaning at the highest collectability
tier you need 30 crafts per class.
Each craft uses a material purchased with White Scrips which can be found in the Other tab on the Scrip Exchange while speaking to Quinnana. It will cost you 60 scrips for every craft meaning 1800 white scrips for 30 crafts. You can farm 60 of each material instead of the 30 if you would like, the stage afterwards uses an additional 30.
Click here for a crafting list i created for these tools.
Chora Zoi Crystalline Tool Crafting Macros
For the Chora Zoi Crystalline Tools, it is not worth upgrading these tools
at level 90 anymore. Simply continue leveling to 100 and use ![]() Trained Eye
to power through these. This makes specific macros not recommended for the
current stage.
Trained Eye
to power through these. This makes specific macros not recommended for the
current stage.
Chora Zoi Crystalline Relics for Miner/Botanist
Gathering classes will need to gather two materials, collectables that you reduce or exchange for customized components as well as Customized Crystals to be handed in at the end of the quest. The Crystals like previous stages continue to be hidden so make sure to focus them when possible.
You will again need 210 of both of these items, with collectables giving one or three depending on the collectability rating of 570 for 1 and 1000 for 3.
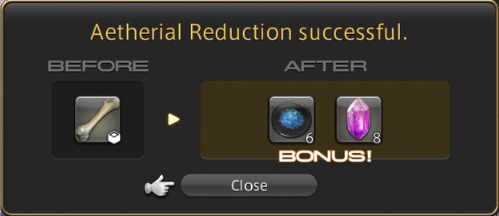
However, when you use Aetherial Reduction on a collectable at 1000 rating, you have a roughly 10% chance to obtain a bonus of 6 instead. This means it is always better to reduce your collectables both to save inventory and to get additional items.
| Class | Collectable 210(When Reduced) | Hidden Item 210 |
|---|---|---|
| Mining | ||
| Botany |
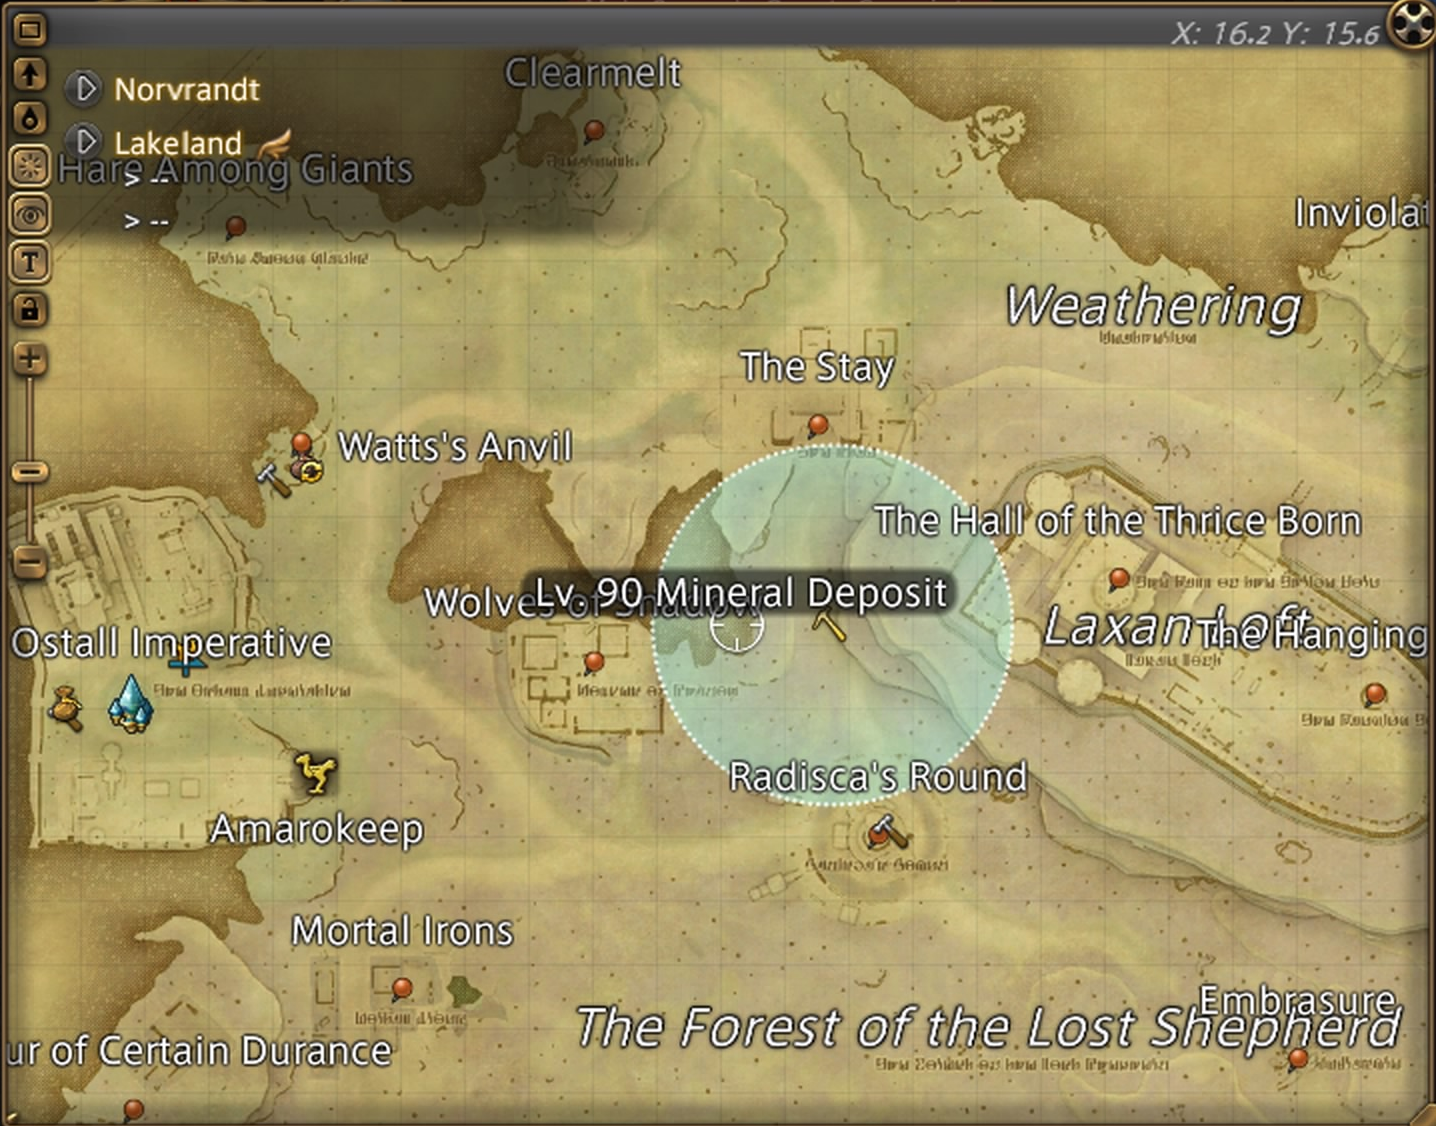
Mining materials can be found in Lakeland (X:17.7, Y:15.6).
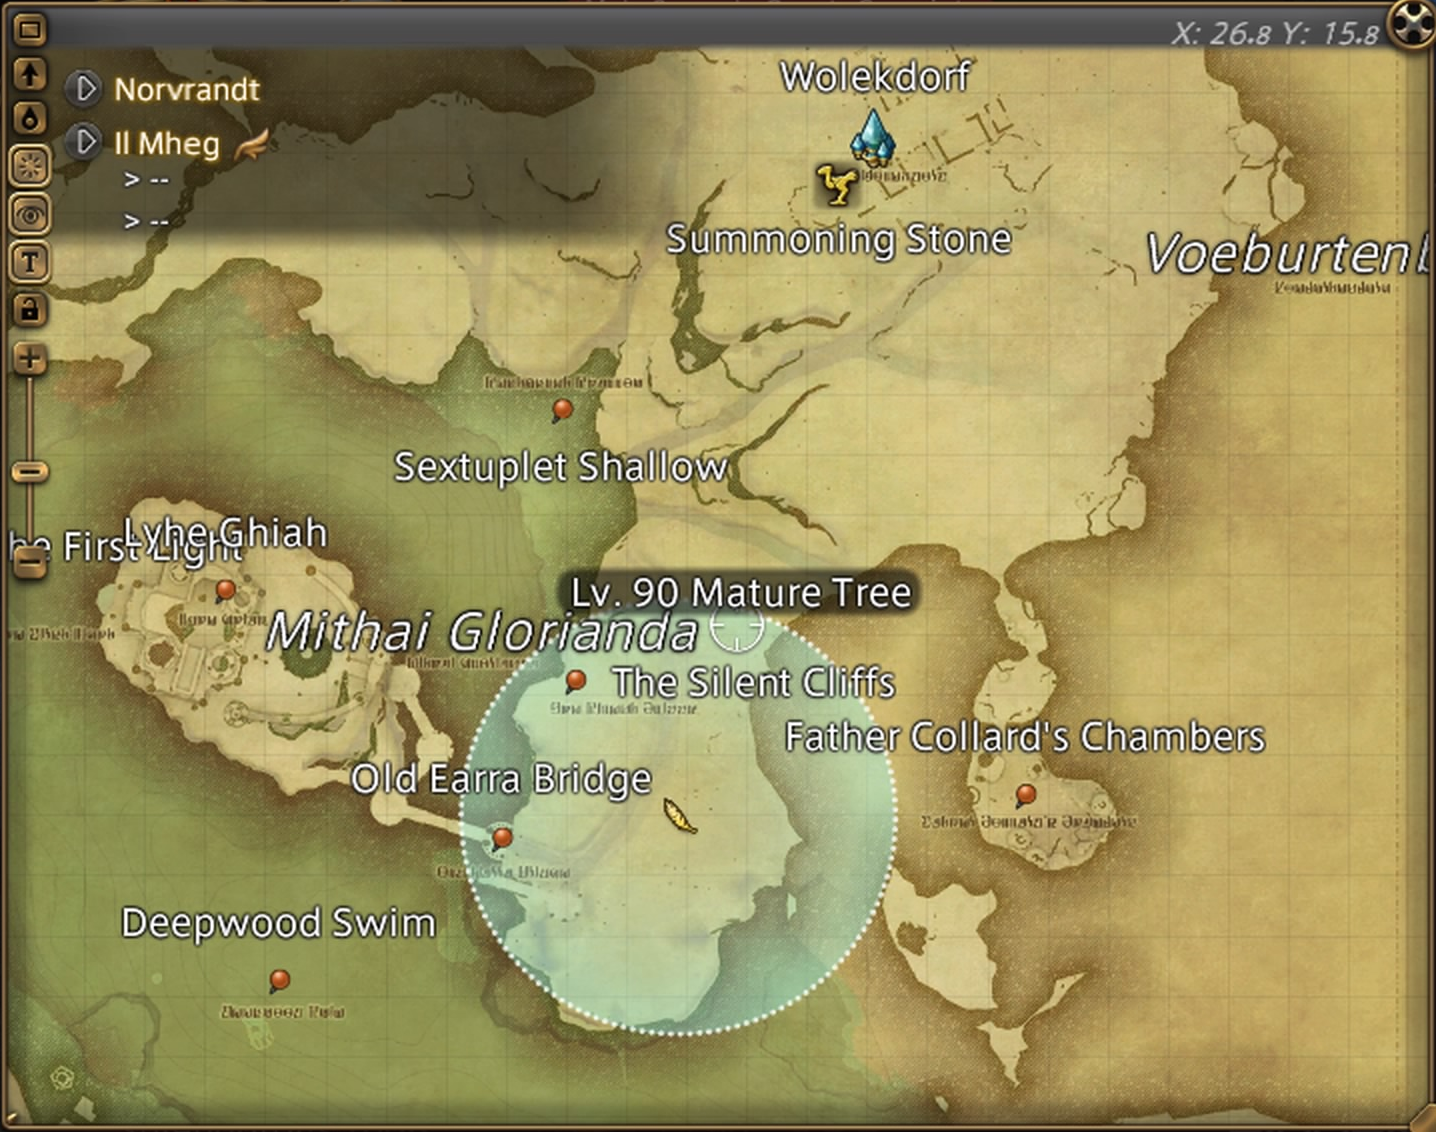
Botany materials can be found in Il Mheg (X:25.8, Y:19.0).
Breakpoints for Gathering Nodes
These nodes introduce a new series of node bonuses and skill breakpoints you may want to consider when planning your food. Do not forget you need to consider these numbers after you have your relic equipped. These are:
- 30-50% Boon Bonus - 3500-3800 Perception
- +1 Integrity - 910GP
- Collectable Skills Cap - 3919 Gathering
- Collectable Skill Proc Chance Cap - 4125 Gathering and Perception
- Scrutiny Cap - 3919 Gathering and Perception
- 60% Boon cap - 6098 Perception
Advice for Gathering Nodes
Because Reduction is always better for materials, inventory is no
longer a concern while gathering. When you don't have a usable amount of GP, three ![]() Scour will
allow you to hit above 570 collectability (unless you have lower stats), and netting
you additional collectables as your GP regenerates.
Scour will
allow you to hit above 570 collectability (unless you have lower stats), and netting
you additional collectables as your GP regenerates.
The most important thing is Cordial use. ![]() Hi-Cordial is the
most efficient Cordial and using it on cooldown will increase your yield
drastically.
Hi-Cordial is the
most efficient Cordial and using it on cooldown will increase your yield
drastically.
Aim for the crystals when possible because they are not always guaranteed to appear ,but do not spend your GP on them. Skills that increase Crystal/Cluster yield do not work on these items.
Check out our gathering collectables guide for collectable rotations.
Chora Zoi Crystalline Relics for Fishers
Fishing classes will be tasked with obtaining two separate fish as collectables, one for Rod components and one for Reel components. Quinnana requires 80 of each Customized Component with different amounts of components being given based on your collectability.
New to this stage is the ability to use Aetherial Reduction to break the fish down, rather than exchanging them. Much like with Mining and Botany, this has a roughly 10% chance to give you four components instead of two, improving efficiency with no downside.
| Fish | Component Offered | Rating for 1 Component | Rating for 2/4 Components | Location |
|---|---|---|---|---|
| 82 - 192 | 193+ | Amh Araeng (X:31, Y:31) | ||
| 322 - 757 | 758+ | Lakeland (X:9, Y:37) |
The bait for these fish is ![]() Select Bait Ball which can be
purchased from Quinnana.
Select Bait Ball which can be
purchased from Quinnana.
Fishing Advice for Gold Dustfish
You want to use ![]() Patience II with
Patience II with ![]() Precision Hookset
on Every '!' bite within the first 8 seconds of your cast.
Precision Hookset
on Every '!' bite within the first 8 seconds of your cast.
If you have spare GP or Anglers Art stacks to use on ![]() Thaliak's Favor,
you can use
Thaliak's Favor,
you can use ![]() Identical Cast to catch another
Identical Cast to catch another ![]() Gold Dustfish.
Gold Dustfish.
At the 8 second mark there is a chance that two other fish appear.
If you accidentally catch one of these fish do not worry. You can either
ignore and carry on or use ![]() Surface Slap to increase your
chances of a
Surface Slap to increase your
chances of a ![]() Gold Dustfish.It would be better to use
Gold Dustfish.It would be better to use
![]() Identical Cast where possible if your tight on GP.
Identical Cast where possible if your tight on GP.
The following macro makes it easy to catch this fish when using Patience and was the exact same macro as the previous steps. These fish are very similar:
/ac "cast" <wait.5>
/e 5 <wait.1>
/e 6 <wait.1>
/e 7 <wait.1>
/e 8
/ac "Precision Hookset"
/micon "Cast"
It is worth mentioning sometimes that fish can bite slightly before the 5
second mark because fish bites are not at exact seconds. If so, use ![]() Precision Hookset immediately.
Precision Hookset immediately.
Fishing Advice for Forgiven Melancholy
![]() Forgiven Melancholy's best catching method is by using
Forgiven Melancholy's best catching method is by using ![]() Prize Catch.
This is because it is the only '!!' bite in the hole. It can have a bit of a
long cast time. If you get a '!' hook, simply ignore it do not even press hook.
Prize Catch.
This is because it is the only '!!' bite in the hole. It can have a bit of a
long cast time. If you get a '!' hook, simply ignore it do not even press hook.
Whenever you catch ![]() Forgiven Melancholy, use
Forgiven Melancholy, use ![]() Identical Cast and
Identical Cast and ![]() Prize Catch
to then catch another.
Prize Catch
to then catch another.
It is not really advised to use ![]() Surface Slap, but if you are
getting really unlucky you can.
Surface Slap, but if you are
getting really unlucky you can.
Changelog
- 14 Sep. 2024: Updated for Dawntrail to add notes on Trained eye as well as 60% boon breakpoint.
- 19 Jul. 2023: Guide Added.

This guide has been written by I'nanghal Shikhu (Discord - Shikhu). He is a Crafting & Gathering theorycrafter, mentor for The Balance and also a guide maker for Teamcraft alongside Icy Veins. He also managed to obtain 10 top 12's on the leaderboard during the Ishgard Restoration rankings.
- New Framer’s Kit With Return Of Breaking Brick Mountains
- Last Chance For THE PRIMALS x Download Festival T-Shirt!
- Team DN Claims #WorldFirst in FFXIV’s Dancing Mad!
- FFXIV Players Blown Away By Store Updates!
- Support #WorldFirst in FFXIV Dancing Mad Ultimate — Now Available!
- Calling FFXIV Fishers To Catch The Rainbow For Charity!
- Last Chance To Enter FFXIV x Jollibee Sweepstakes!
- The Senor Otters Make Their Grand Debut in FFXIV