The Omega Protocol Ultimate (TOP) Phase 5 Run: Dynamis Omega Guide for FFXIV
This page contains detailed information and strategy about the high-end Duty "The Omega Protocol (Ultimate)", commonly abbreviated as TOP. This section of the guide will cover the Phase 5 trio, Run: Dynamis Omega, which pits players against all forms of Omega while interacting with Dynamis.
Run: ****mi* (Omega Version)
Due to the sheer length of this phase and how many details each trio mechanic has, we've decided to split these pages up into three sections. If you'd like information on either of the other two phases, feel free to use the buttons below.
Feel free to follow along with this text guide using this Toolbox, specifically catering to Run: Dynamis (Omega Version).
Once again, Omega will use the Solar Ray tankbuster before channeling a raid-wide. Unlike previous trios, she stays targetable for the entirety of the first part and will follow the main tank around. This will also be where your second and final raid buff window in this phase lands.
Two players will get ![]() Hello, Near World and two other players will get Hello,
Distant World debuffs. These have different debuff timers, which will also
be represented by an accompanying
Hello, Near World and two other players will get Hello,
Distant World debuffs. These have different debuff timers, which will also
be represented by an accompanying ![]() First-In-Line or
First-In-Line or ![]() Second-In-Line debuff.
Second-In-Line debuff.
Final Omega will spawn in the center of the arena and start channeling Diffuse Wave Cannon, a large conal AoE that hits either North and South, or West and East. This is telegraphed by the orientation of his glowing ring. If the ring is glowing North and South, then those will be the safe zones as he will be cleaving West and East, and vice versa. He will do this twice in succession, and always alternating his cleave zones.
At the same time, two sets of Omega-F and Omega-M clones will spawn one after another. Each pair will always be on intercardinals opposite of each other, and will be holding random weapons just like their initial attack in Party Synergy. These AoEs will go off at the same time as the Diffuse Wave Cannon, with the first pair that spawned performing their AoEs with the first Diffuse Wave Cannon hit, and the second pair doing it with the second Diffuse Wave Cannon. Omega-F and Omega-M weapons are random, with the only limitation being that the two pairs cannot be exactly the same. For example, you can't get staff and sword pattern twice in a row.
After two sets of these AoEs, Omega-F will despawn. Final Omega begins channeling
![]() Oversampled Wave Cannon to hit either the West or East half of the arena, once again
requiring two players to go into his cleave zone to take monitor hits. The
Oversampled Wave Cannon to hit either the West or East half of the arena, once again
requiring two players to go into his cleave zone to take monitor hits. The ![]() First-In-Line Hello World debuffs go off at the same time as the monitors.
First-In-Line Hello World debuffs go off at the same time as the monitors.
Beetle Omega will now spawn on a random cardinal and extend two Blaster tethers
that function exactly the same as they did in Program Loop. Shortly after the Blaster
tethers resolve, the ![]() Second-In-Line Hello World debuffs will go off, concluding the
entire mechanic.
Second-In-Line Hello World debuffs will go off, concluding the
entire mechanic.
Mechanic Resolution
While the dodge may seem overwhelming at first due to the small safespots and how quick they are, it can be simplified to dodging on the cardinals only, with three potential distances:
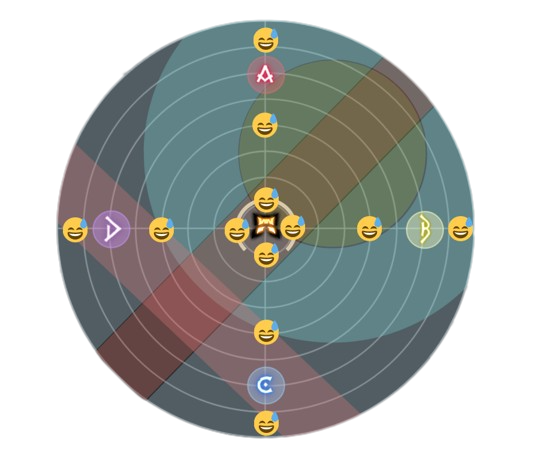
- Close: Right inside the boss's hitbox.
- Mid: In front of the waymark, similar to how Mid-Glitch is resolved in Sigma/
- Far: All the way at the wall.
While there are slightly off cardinal safespots for some patterns, I highly recommend following the pattern of waymark + close/mid/far for your dodges to keep it consistent and very easy to call. They are as follows:
- Staff + Sword: Waymarks around Omega-M + far.
- Staff + Shield: Waymarks around Omega-M + mid.
- Scythe + Sword: Waymarks around Omega-F + close.
- Scythe + Shield: Waymarks around Omega-M + close.
Because of the Diffuse Wave Cannon going on at the same time, one potential waymark will be unsafe, leaving the remaining waymark as the final safe spot. And since Final Omega always alternates his cleaves for the second round, you already know that the second safespot waymark will be a 90 degree rotation from the first round.
Let's take a look at a concrete example. In the following Toolbox, Omega-F is holding a staff and Omega-M a shield. We now know the safespot is either C or B mid.
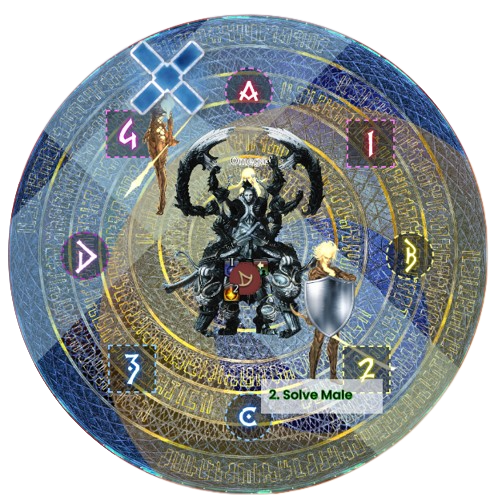
Final Omega will begin channeling Diffuse Wave Cannon, in this case cleaving West and East on the first round, so our final safe spot becomes C, South mid. At this point we already know the next safe spot is either D, West or B, East.
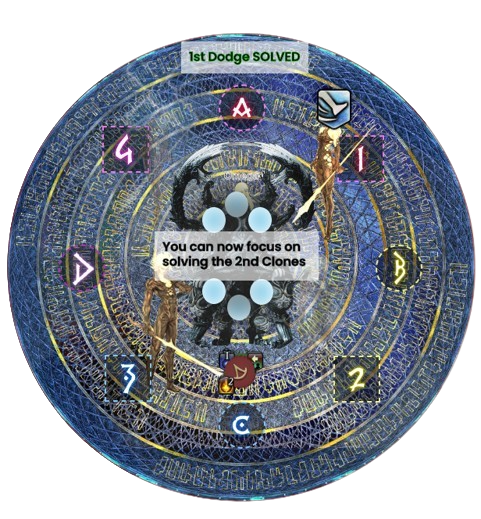
The second pair of Omega clones have Omega-F with scythe legs, and Omega-M holding a sword only. We know this pattern is close waymarks around Omega-F, so either A or B. B is the waymark 90 degrees from our first dodge at C, so it will be our safespot for the second dodge.
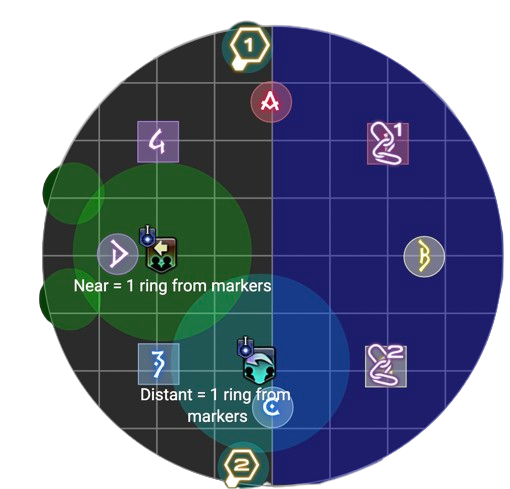
In the next part of the mechanic, we will treat the monitor cleave side as relative
North and base our spots off that. The ![]() First-In-Line
First-In-Line
![]() Hello, Near World will stand
in front of the South waymark, one ring inwards, just like in Sigma. The
Hello, Near World will stand
in front of the South waymark, one ring inwards, just like in Sigma. The
![]() First-In-Line
First-In-Line
![]() Hello, Distant World can position themselves on either the relative West or East
waymark, again, going one ring inwards. The Distant baits will go to the wall relative
West and East, while the Near baits will go to the wall South and stay slightly spread.
The two designated monitor baits will go into the cleave zone and separate in order
to not cleave each other. The Distant World, along with the Distant baits, will
need to sidestep slightly into the safe zone as being on the direct West-East
cardinal line can risk getting selected for monitor hits.
Hello, Distant World can position themselves on either the relative West or East
waymark, again, going one ring inwards. The Distant baits will go to the wall relative
West and East, while the Near baits will go to the wall South and stay slightly spread.
The two designated monitor baits will go into the cleave zone and separate in order
to not cleave each other. The Distant World, along with the Distant baits, will
need to sidestep slightly into the safe zone as being on the direct West-East
cardinal line can risk getting selected for monitor hits.
While the positioning is straightforward, the selection process is not. The priority for the first round of debuffs is as follows:
 First-In-Line players have set spots and will be ignored for both monitors
and bait positions.
First-In-Line players have set spots and will be ignored for both monitors
and bait positions.- Monitor players will be exclusively selected from players who have two
 Dynamis
stacks. If a two-stack
Dynamis player also has
Dynamis
stacks. If a two-stack
Dynamis player also has  Second-In-Line, they must bait
monitors in the first round. This is because they are guaranteed a
Dynamis stack
from their own world debuff next round, so they cannot go to three-stack this round.
Second-In-Line, they must bait
monitors in the first round. This is because they are guaranteed a
Dynamis stack
from their own world debuff next round, so they cannot go to three-stack this round. - World baiters will be selected from the remaining pool of players, which will be
one
Dynamis stack players without
First-In-Line or two
Dynamis stack players who are not selected for monitor bait.
I recommend assigning one person to mark four players, the two monitor players
and the two Distant bait players. Monitors should be marked with the Bind marker,
with Bind 1 going left and Bind 2 going right. Distant baits can be marked with
the Attack marker, with Attack 1 going left and Attack 2 going right. The
remaining two players who have no marker and do not have
![]() First-In-Line world debuffs can figure out who is baiting Near World left or right.
First-In-Line world debuffs can figure out who is baiting Near World left or right.
- Marking Monitors:
- Check all four players who have two
Dynamis stacks.
- If you see any
Second-In-Line, mark them for monitor.
- If you still need a monitor bait, mark any two
Dynamis player without
First-In-Line.
- Check all four players who have two
- Marking Distant Baits:
- Check all four players who have one
Dynamis stack.
- Mark any two players who do not have
First-In-Line.
- Check all four players who have one
If your group does not have a player who can handle all four marks, you can split the load between two players as well and have one player responsible for monitors, and the other responsible for Distant baits. As they will be looking at mutually exclusive player pools, there is no concern of them stepping on each others' toes.
The following example macros can be used for marking.
Monitors:
/mk bind <x> or /mk bind <mo>

Distant baits:
/mk attack <x> or /mk attack <mo>
You can set up 8 of each, with numbers 1 to 8 replacing the x in the sample macro, corresponding to each player on the party list, and place each macro next to the appropriate player. These macros will auto-increment, meaning that pressing the monitor macro will first assign Bind 1, and then Bind 2 when pressed again. If you have keybind space, you can also just bind two mouseover macros instead of creating one macro per player.
You can use the following optional macro to clear all active markers:
/mk off <1>
/mk off <2>
/mk off <3>
/mk off <4>
/mk off <5>
/mk off <6>
/mk off <7>
/mk off <8>
In the second round of debuffs, we will treat Beetle Omega as relative North in place
of the monitors and position the world debuffs and baiters exactly the same. The
two players who enter this round with three ![]() Dynamis stacks will be responsible for
picking up Blaster tethers and go to the wall, aligned with the intercardinal waymarks
near Beetle Omega. The priority for this round is much simpler:
Dynamis stacks will be responsible for
picking up Blaster tethers and go to the wall, aligned with the intercardinal waymarks
near Beetle Omega. The priority for this round is much simpler:
-
Second-In-Line players have set spots and will be ignored for bait and Blaster
positions.
- Three-stack
Dynamis players (there should be only two) will pick up the two Blaster tethers.
- The remaining four players will bait Distant and Near World.
Marking is optional in this round as you have significantly more time to position, and
the only people who need to negotiate their positions are the four world baiters.
However, you can continue to mark the two Distant baits for consistency; Simply
select any two players that do not have three ![]() Dynamis stacks or are
Dynamis stacks or are ![]() Second-In-Line.
Second-In-Line.
At the end of this mechanic, all players should have three ![]() Dynamis stacks. All that's
left is a final Solar Ray buster before Omega-F starts channeling her enrage, Blind Faith.
Reduce her HP to below 20% to pass to the final phase, Alpha Omega. Because the DPS check in Phase
5 is a lot more lenient than Phase 6, it is recommended for everyone
to start building gauge and saving resources for Phase 6.
Dynamis stacks. All that's
left is a final Solar Ray buster before Omega-F starts channeling her enrage, Blind Faith.
Reduce her HP to below 20% to pass to the final phase, Alpha Omega. Because the DPS check in Phase
5 is a lot more lenient than Phase 6, it is recommended for everyone
to start building gauge and saving resources for Phase 6.
Tips and Tricks
- Because the first part of Omega trio happens during a two minute burst, it is highly recommended to have a dedicated caller for the initial dodges instead of forcing all eight players to learn how to spot the safe-spots. Simply ensure all players know exactly what close/mid/far waymark calls mean so they can react quickly.
- The Hello World debuffs appear a few seconds after the Omega raid-wide cast, so player(s) who are responsible for marking can already start identifying monitor and Distant baits at that point.
- Omega-F autos the entire time during the dodges, so be sure to give your tank some single target healing and mitigation. The main tank can use their short cooldowns, and the off-tank can also help out with their shorts as well.
- In the second round of Hello World debuffs, there is ample time between the Blaster
tethers resolving and the Hello World debuffs going off. If you are scared of getting clipped
as
 Hello, Distant World you can offset yourself slightly to dodge the Blaster AoE,
and simply shift into your proper position afterwards.
Hello, Distant World you can offset yourself slightly to dodge the Blaster AoE,
and simply shift into your proper position afterwards. - Sometimes one or both tanks will get the Blaster tether, which will leave them at 1% HP going into the Solar Ray buster. Healers need to keep an eye out for when this happens and make sure the tanks are topped off.
- This is the mechanic where you're likeliest to get a damage down in but survive, as getting hit by one clone during the dodges is survivable even as a non tank. However, the damage down in this fight is brutal as it reduces your outgoing damage by 90%. You do not want to be doing 10% damage for the remaining 30s of this phase, as it could mean the difference between enrage and barely getting to 19%. Non-tanks should wall it as soon as the second Hello World set resolves, and tanks can simply choose to suicide into the Solar Ray buster by not popping cooldowns. If both tanks are attempting the suicide, they should throw their mitigation onto the third highest aggro player as Omega-F auto are survivable. Healers should coordinate who is getting the raise and immediately revive party members.
- Blind Faith does not do too much damage when it doesn't enrage, but it is still lethal
with zero mitigation or shields. Luckily,
 Reprisal is free to use here.
 - Regens do tick during the almost one minute long cutscene between Phase 5 and Phase 6. Healers should put out AoE regens right before Blind Faith hits and let them slowly top off the party before Phase 6 opener, as Cosmo Memory does enough damage through tank Limit Break 3 that you want to be decently healthy for it.
Changelog
- 07 Mar. 2023: Guide added.
More Final Fantasy XIV Content

Meru has been raiding since early Stormblood and has done high end content in a variety of roles. She has a lot of experience reading and analyzing logs and has done extensive testing on a variety of mitigation related issues. She hangs out in the Balance Discord and is often pinged in multiple channels for mitigation questions, but sadly very little fishing questions.
- FFXIV’s Berlin Fan Festival Schedule Is Out!
- Pre-Order FFXIV Nendoroids Y’shtola & G’raha Now!
- From Action to Tab Targetting — How Did You Start FFXIV?
- Developing FFXIV Big Fish Together With Ryuta Suyama
- These Changes Will Make You Think Twice Before Tanking in Evercold
- Complete Dawntrail’s Art Book Collection With – Relics of Eternity –
- New Framer’s Kit With Return Of Breaking Brick Mountains
- Last Chance For THE PRIMALS x Download Festival T-Shirt!