The Omega Protocol Ultimate (TOP) Phase 3 Guide for FFXIV
This page contains detailed information and strategy about the high-end Duty "The Omega Protocol (Ultimate)", commonly abbreviated as TOP. This section of the guide will cover Phase 3, where players will face off against Omega Reconfigured.
Introduction to Phase 3 of The Omega Protocol (Ultimate)
Phase 3 of The Omega Protocol (Ultimate) features a short 33 second intermission followed by a full uptime phase with an enrage timer of 2:35. The DPS requirement for Phase 3 is 71.8k. Potions should be used alongside one set of two minute buffs here, and groups should either use another set of two minutes or a Melee Limit Break 3, depending on their buff plan for phase 4. Using Limit Break 3 anytime before the Hello World mechanic will grant you another Limit Break 1 to use in phase 4 if needed.
Feel free to follow along with this text guide either using the video below or this Toolbox.
Intermission
During the intermission period, Omega spawns a death zone in the center of the arena, which should be avoided at all times. He then proceeds to spawn two sets of three Arm Units that will cast a big circular AoE around them at set times, in the order they spawned. Omega himself will cast Wave Repeater, an outward expanding ring-shaped AoE. Before all this happens, players are also assigned the following debuffs:
 High-powered Sniper Cannon Fodder: Assigned to two random players. Players with
this debuff will be hit by an AoE when it expires, dealing extremely high damage that needs
to be shared with one other player.
High-powered Sniper Cannon Fodder: Assigned to two random players. Players with
this debuff will be hit by an AoE when it expires, dealing extremely high damage that needs
to be shared with one other player. Sniper Cannon Fodder: Assigned to four random players. Players with this debuff will
be hit by an AoE when it expires, dealing moderate damage.
Sniper Cannon Fodder: Assigned to four random players. Players with this debuff will
be hit by an AoE when it expires, dealing moderate damage.- Two players will have no debuffs. These will be the players that share the damage with the High-powered Sniper Cannon Fodder players.
Mechanic Resolution
Have your shield healer use a GCD shield on all party members at the beginning of this mechanic. All Cannon Fodder AoEs, even when resolved properly, will deal fatal damage to non-tank players if they are not shielded.
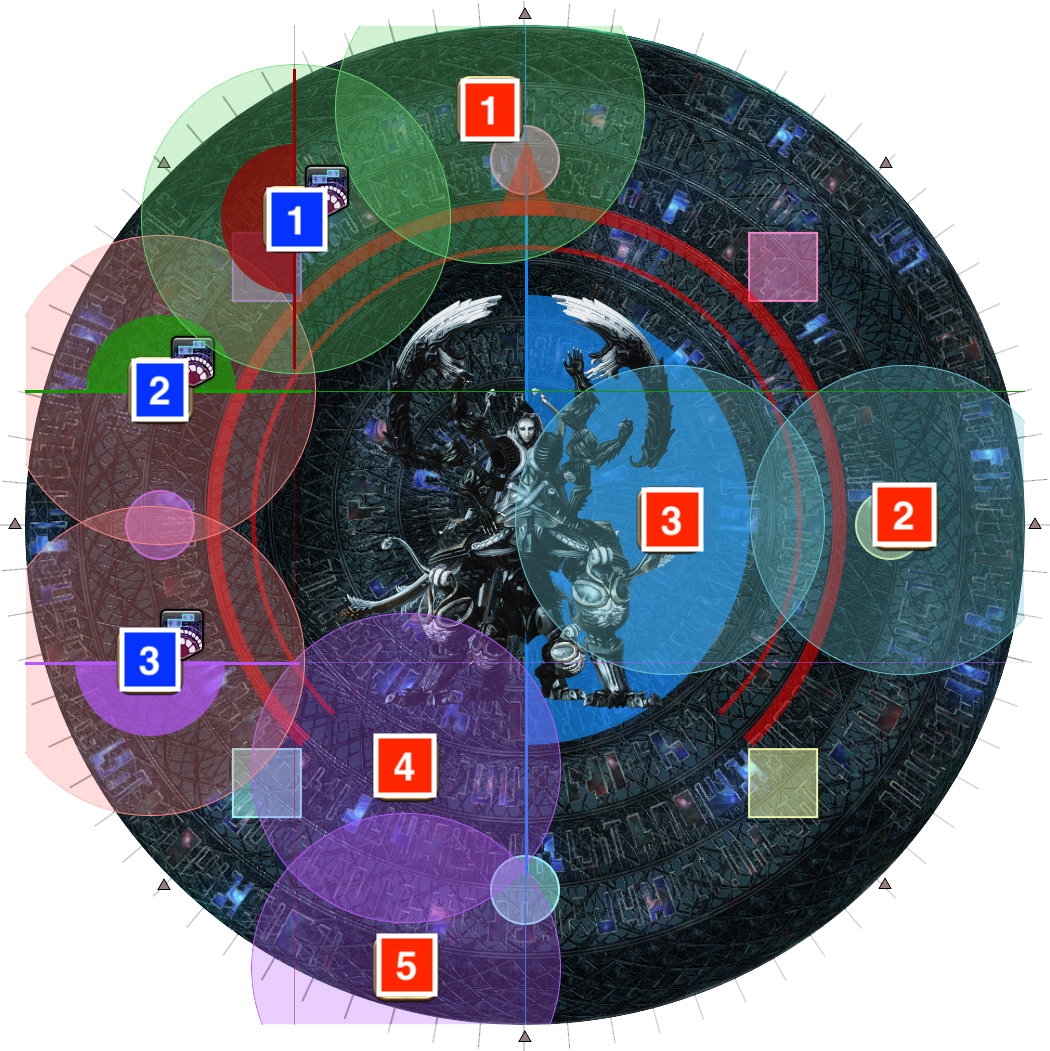
We will send the four players with Sniper Cannon Fodder to the West, North-West, North-East and East markers, while the two no-debuff players will pair up with the two High-powered Sniper Cannon Fodder players and go South-West and South-East. Because the debuffs are randomly assigned, we will line up in the beginning of the mechanic as follows to determine where players are going.
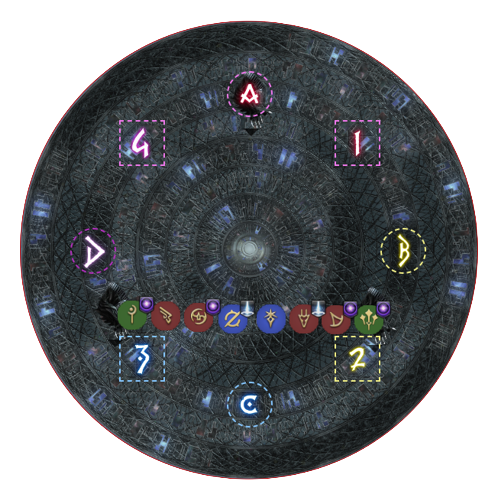
The four players with Sniper Cannon Fodder will step forward, and the two players with High-powered Sniper Cannon Fodder will step back for visibility. We will then assign spots from left to right, leading to these final positions:
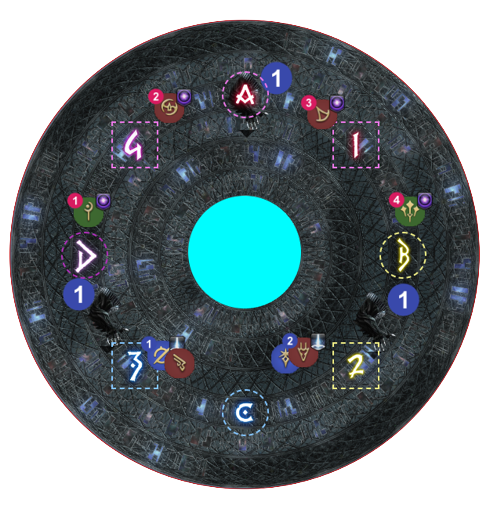
All players will start on the outer-most ring of the arena, waiting until the Wave
Repeater ring AoEs hits right in front of them, then step into it to dodge the final
pulse that hits the outer-most ring. Afterwards, step back into the outer-most ring and pop
![]() Sprint to prepare for your upcoming dodges.
Sprint to prepare for your upcoming dodges.
The first set of Arm Units will activate and telegraph three circular AoEs - do not
panic if you are caught in one, as you have ample time to ![]() Sprint out of it. Use
this time to also position yourself so that you're hugging the closest Colossal
Blow and perform the following dodge as soon as the AoE goes off:
Sprint out of it. Use
this time to also position yourself so that you're hugging the closest Colossal
Blow and perform the following dodge as soon as the AoE goes off:
The Cannon Fodder AoEs and second set of Colossal Blows resolve at this point, and assuming you've spread properly in the beginning, all eight players should survive and be ready to tackle the next mechanic. All players should come closer to the center of the arena for healing and mitigation, but take care to not go directly center - the death zone is active for a few more seconds still.
The following is a clip of the full intermission dodge in action to more clearly illustrate the timing:
Hello World
The infamous debuff vomit mechanic of the fight, Hello World may seem overwhelming at first, but is actually quite simple in its execution. After a moderately heavy-hitting raidwide of the same name, Omega assigns all players with a mixture of the following debuffs, which can be roughly divided into three categories.
-
"Rots"
 Critical Performance Bug: Informally known as "Blue Rot". Causes a small AoE around
the player when it expires, removing
Critical Performance Bug: Informally known as "Blue Rot". Causes a small AoE around
the player when it expires, removing  Latent Performance Defect and killing anyone
caught in the AoE who isn't the original target. This debuff passes to other players
by contact.
Latent Performance Defect and killing anyone
caught in the AoE who isn't the original target. This debuff passes to other players
by contact. Critical Underflow Bug: Informally known as "Red Rot". Causes a small AoE around
the player when it expires, removing
Critical Underflow Bug: Informally known as "Red Rot". Causes a small AoE around
the player when it expires, removing  Cascading Latent Defect and killing anyone
caught in the AoE who isn't the original target. This debuff passes to other players
by contact.
Cascading Latent Defect and killing anyone
caught in the AoE who isn't the original target. This debuff passes to other players
by contact.
-
"Unavoidable Damage"
 Critical Overflow Bug: Informally known as "Defamation". Causes a huge AoE around
the player when it expires that deals moderate damage, removes
Critical Overflow Bug: Informally known as "Defamation". Causes a huge AoE around
the player when it expires that deals moderate damage, removes  Latent Defect and inflicts
Critical Overflow Bug to anyone hit by it.
Latent Defect and inflicts
Critical Overflow Bug to anyone hit by it. Critical Synchronization Bug: Informally known as "Stack". Causes a small AoE around the
player when it expires that is fatal to non-tanks unless shared with at least one other player.
Removes
Critical Synchronization Bug: Informally known as "Stack". Causes a small AoE around the
player when it expires that is fatal to non-tanks unless shared with at least one other player.
Removes  Latent Synchronization Bug and inflicts
Critical Synchronization Bug to anyone hit by it.
Latent Synchronization Bug and inflicts
Critical Synchronization Bug to anyone hit by it.
In addition to their primary effects, all of the above debuffs will also grant
Debugger buffs when they expire, making the player immune to receiving the same
debuff's effects again. For example, Blue Rot will grant
![]() Performance Debugger,
which prevents the transfer of any Blue Rots to the affected player for the rest
of the mechanic. Similarly, Defamations and Stacks will grant
Performance Debugger,
which prevents the transfer of any Blue Rots to the affected player for the rest
of the mechanic. Similarly, Defamations and Stacks will grant
![]() Overflow Debugger
and
Overflow Debugger
and ![]() Synchronization Debugger respectively, preventing the player from being afflicted
by Defamation and Stack debuffs even if they were hit by them again.
Synchronization Debugger respectively, preventing the player from being afflicted
by Defamation and Stack debuffs even if they were hit by them again.
- "Tethers"
 Local Regression: Informally known as "Red-Green Tether". Spawns a red and green tether
between the two players affected, which will break when the players are too
close to each other, inflicting Magic Vulnerability Up and two stacks of Thrice-Come Ruin,
both of which last around one second.
Local Regression: Informally known as "Red-Green Tether". Spawns a red and green tether
between the two players affected, which will break when the players are too
close to each other, inflicting Magic Vulnerability Up and two stacks of Thrice-Come Ruin,
both of which last around one second. Remote Regression: Informally known as "Blue Tether". Spawns a blue tether
between the two players affected, which will break when the players are too
far from each other, inflicting Magic Vulnerability Up and two stacks of Thrice-Come Ruin,
both of which last around one second.
Remote Regression: Informally known as "Blue Tether". Spawns a blue tether
between the two players affected, which will break when the players are too
far from each other, inflicting Magic Vulnerability Up and two stacks of Thrice-Come Ruin,
both of which last around one second.
Omega will also inflict ![]() Latent Defect and
Latent Defect and ![]() Latent Synchronization Defect debuffs to players,
which are debuffs that will kill them if they are not hit with specific attacks
before they expire. However, they are naturally resolved during the course of the
mechanic and can simply be ignored as they do not factor into our decision making.
Latent Synchronization Defect debuffs to players,
which are debuffs that will kill them if they are not hit with specific attacks
before they expire. However, they are naturally resolved during the course of the
mechanic and can simply be ignored as they do not factor into our decision making.
Aside from the above debuffs directly given by Omega, the boss will also spawn four sets of four towers throughout the mechanic, with each set containing two red towers and two blue towers. The towers will explode and wipe the raid if no players are in it when they activate, but they also give the following debuffs to any players standing in them when they go off:
- "Tower Debuffs"
-
Latent Performance Defect: Given by the blue towers. This debuff will wipe the raid
when it expires, and can only be cleansed by
Critical Performance Bug (Blue Rot) expiring on the target player.
-
Cascading Latent Defect: Given by the red towers. This debuff will wipe the raid
when it expires, and can only be cleansed by
Critical Underflow Bug (Red Rot) expiring on the target player.
Mechanic Resolution
Have players stand inside Omega's hitbox loosely spread in clock positions -
Omega assigns the Code Smell
(![]() ,
,
![]() ,
,
![]() ,
,
![]() )
variants of the debuffs at first, which simply
means you have around three seconds before the Rot debuffs become active and
susceptible to passing. Two players will have Red Rot, two other players will
have Blue Rot, and one of the Rot colors will have Defamation debuffs, while the
opposite Rot color will have Stack debuffs. The remaining four players will be
paired up in one Blue Tether pair, and one Red-Green Tether pair. What you do
in each round is entirely determined by your debuff combination:
)
variants of the debuffs at first, which simply
means you have around three seconds before the Rot debuffs become active and
susceptible to passing. Two players will have Red Rot, two other players will
have Blue Rot, and one of the Rot colors will have Defamation debuffs, while the
opposite Rot color will have Stack debuffs. The remaining four players will be
paired up in one Blue Tether pair, and one Red-Green Tether pair. What you do
in each round is entirely determined by your debuff combination:
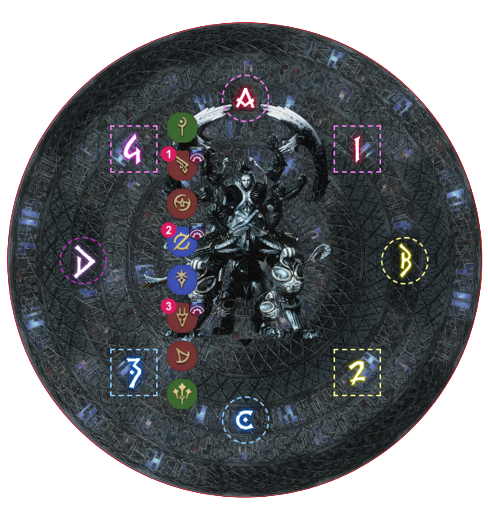
If you have rot:
- Go to a tower corresponding to your rot color, Blue Rots to the two blue towers, Red Rots to the two red towers, taking care to not run over anyone except for your same-colored Rot partner. Once in your tower, check whether you have the Defamation debuff or the Stack debuff.
- If you have the Stack debuff, stand on the inner side of your tower, closer to the other same colored tower.
- If you have the Defamation debuff, stand on side of your tower closer to the edge of the arena and away from the rest of the towers.
If you have tether:
- Red-Green Tethers: Go to the pair of towers whose rots have Defamation, and stretch out your tethers by standing near the outer sides of the towers. You will be hit by Defamation.
- Blue tethers: Go to the pair of towers whose rots have Stack, and stand between the two towers. You will share the Stack damage with the Rot players.
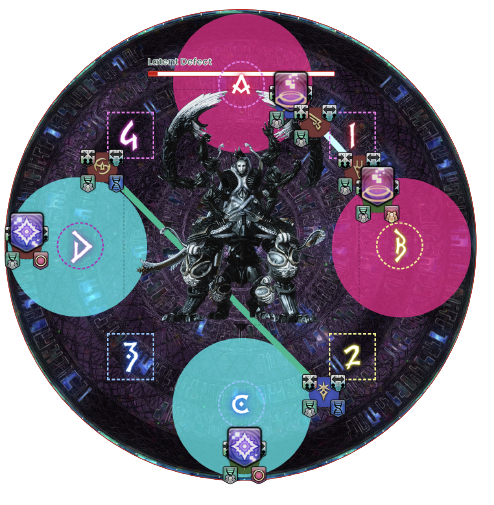
This example above assumes that Red Rots had Stack and Blue Rots had Defamation. If it had been the other way, then the tethers would be swapped in the image, and the Rots will position differently within their towers.
After tower explosions, if you have rot:
- You will mostly stay still until you have visually confirmed that your Rot has fallen off and exploded around you. Rot players who also had Defamation can move towards where the center of their tower was to make it easier for Tether players to grab rot, but should remain still afterwards.
After tower explosions, if you have tether:
- Red-Green Tethers: Immediately run to the Rot player in the tower to grab their Rot off them. Wait until you see the Blue tether break and the Thrice-Come Ruin stacks visibly fall off, then run towards your tether partner to break your own tether. Stay away from players who previously had Rot as their Rots will be exploding shortly.
- Blue Tethers: Wait until you see the Magic Vulnerability Up from the Stack damage fall off, then run to the Rot player in the tower to grab their Rot off them. Once you confirm that Rot has transferred, run away from your tether partner to break your tether. As with Red-Green tethers, stay away from former Rot players as their Rots will be exploding shortly.
If done successfully, then all towers should've resolved while Rot and Tether players would've swapped roles as a result. For example, if you had a Rot in the previous round, you would now have a Tether, and vice versa. You will then follow the same logic to resolve the remaining rounds, with a single change for the fourth and final set of towers.
For the last set of towers only, Red-Green tethers will not go to Defamation towers, but rather go to Stack towers. The Red-Green tether players will stack together so their tether will instantly pop before the Stacks go off. The Blue tether players will instead wait for the Thrice-Come Ruin stacks to fall off, before running outward and breaking their own tether. While there is no Rot transfer after this last set, Rot explosions will still happen on the players who had Rot on the last round. Make sure to wait until afterwards to gather center for healing and mitigation.
Omega then proceeds to cast Critical Error, a decently heavy hitting raidwide that also has the special quality of inflicting Critical Overflow Bug on any players that do not have the Overflow Debugger buff. Thankfully, everyone gets hit by Defamation exactly once throughout the course of Hello World and thus will be immune to the secondary effect of Critical Error.
Tips and Tricks
- Unwanted Rot passes can be one of the most common ways to wipe in this phase, especially in the first set where nobody has Rot immunity. Establish rules for movement with your team to make Rot movement predictable and avoid car crashes. For example, you may limit Rot players to only use the outer two arena rings for movement, with each player leaning right if two players with different rots are running directly at each other. Or you can specify that Red Rots will be hugging the boss hitbox for movement, and Blue Rot will be using one of the outer rings.
- After the second set of towers, Rots are free to run over Rots because there are only two possible scenarios: Either they have the same color Rot as you, or they'll have a Debugger for your current Rot because they had it in the first set of towers. You only need to watch out for tether players. After the third set, there are no more movement restrictions because even tether players will have both sets of Rot Debuggers.
- While it is possible to max-melee inside your tower as a Defamation Rot, it is not worth wiping the raid if you're not confident in your positioning. For prog, opt to roll your GCD and disengage for the half second it takes for the Defamations to go off.
- Rot passes can be inconsistent even if one player is completely stationary. If you are trying to take Rot from someone, stay stacked with them until you've visually confirmed the Rot debuff on you.
- It is possible for the Blue Tether to break too early and deal a huge amount of damage due to the Magic Vulnerability Up from Stacks and Defamation. Do not try to grab Rot immediately if you're a Blue Tether player, as the mere action of stepping inside a tower could potentially break your tether.
- Hello World is a mitigation check, as trying to heal in the middle of a tower set
is not always feasible. Instead, come up with a mitigation plan that enables players
to survive Defamation/Stack plus two sets of Patch breaks with no healing in between, and
use the downtime between sets to top off the party. Targeted mitigation such as
 Addle,
  Reprisal,
  Feint, and
  Dismantle
will all work on reducing Hello World mechanic damage,
and will catch all instances of damage in a single set if used at the end of Omega's
Latent Defect castbar. The minimum to survive a full set of damage with no healing is max HP,
one 10%, a standard GCD shield, and another layer of shielding (for example, a
Scholar's Consolation or Warrior's Shake It Off), but you should definitely aim
to have more than one 10% mitigation on each set.
Dismantle
will all work on reducing Hello World mechanic damage,
and will catch all instances of damage in a single set if used at the end of Omega's
Latent Defect castbar. The minimum to survive a full set of damage with no healing is max HP,
one 10%, a standard GCD shield, and another layer of shielding (for example, a
Scholar's Consolation or Warrior's Shake It Off), but you should definitely aim
to have more than one 10% mitigation on each set. - After the Rots explode, all players should go into Omega's hitbox to receive mitigation, shielding and healing for the next round. Prioritize sending your shield healer directly middle each time to apply shields, as White Mages have larger range healing which doesn't require them to be exactly center, and Astrologian has positioning-agnostic healing such as Earthly Star and Macrocosmos. 8. Omega autos quite a few times during the whole mechanic, so it is highly recommended for tanks to swap sometime during Hello World and rotate their cooldowns for autos. Even two minute cooldowns are free to use here.
Oversampled Wave Cannons
Omega will face true North and spawn monitors on either the West side of the arena or the East side of the arena and start channeling Oversampled Wave Cannon. At the end of the cast, Omega hits all players on the monitor side with an AoE that deals negligible damage but does inflict Magic Vulnerability Up as well as Twice-Come Ruin, ensuring that whoever gets hit more than once will die.
At the same time, three random players will get
![]() Oversampled Wave Cannon Loading debuffs, spawning a set of mini monitors on either their left side or right side.
These function very similar to the boss's monitor but are instead based on the
target player's facing and positioning. If any monitor, be it the boss's or a player's,
can't find at least two players within its search range, it'll choose to hit a completely
random player instead.
Oversampled Wave Cannon Loading debuffs, spawning a set of mini monitors on either their left side or right side.
These function very similar to the boss's monitor but are instead based on the
target player's facing and positioning. If any monitor, be it the boss's or a player's,
can't find at least two players within its search range, it'll choose to hit a completely
random player instead.
Mechanic Resolution
To resolve this mechanic, we must position all players in such a way that each
player is hit only once, with two hits from the boss's monitors, and six hits
from the three players debuffed with ![]() Oversampled Wave Cannon Loading. The following are two common ways to position during this mechanic.
Oversampled Wave Cannon Loading. The following are two common ways to position during this mechanic.
Same Side Monitors
This strat puts all monitor players on the same side, and each position can easily reference a waymark.
- Non-monitors 1, 4, 5: These players can start out exactly North or South and simply sidestep into the side that Omega's monitors are not cleaving. If you order your priority in a way that tanks and melees start from lower numbered positions and healers and ranged start from higher numbered positions, then the non-monitor 5 spot will always be a ranged player, who can always hug the wall to give 4 a lot of room.
- Non-monitors 2, 3: These players will simply align with the West/East cardinal waymark on the side that Omega is cleaving.
- Monitor 1: This player will simply go to the inner side of the Northern intercardinal waymark (either North-West or North-East) and point their monitor at the waymark.
- Monitors 2, 3: These players will position around the West/East cardinal waymark on the side that Omega is not cleaving and point their monitors away from the waymark towards North or South, taking care to not cross the line formed by the intercardinal waymarks. This is similar to positioning yourself to not get cleaved by the eye laser in Party Synergy.
- The main benefit of this positioning is some more room for mistakes when it comes to monitor angling. Because monitors are hitting players very close to them, there is a lower chance of a slight misangle completely missing an intended player. The players being hit can also visibly see the monitor's angling and can do some minor adjustments to salvage small mistakes, and nobody needs to actually do precise positioning relative to a player monitor across the arena. However, it translates slightly poorer to a congaline setup as non-monitor 2 and 3 are both on the West/East axis.
1/2 Monitor Split

This strat puts the monitor players on three waymarks, and you can position in the following manner.
- Monitors 1, 2: These players can stand on the two intercardinal waymarks being cleaved by Omega's monitors and position themselves on the inner corner of the waymark, facing their monitors north and south.
- Monitor 3: This player goes to the southern intercardinal waymark on the side that Omega is not cleaving, making sure that they are below the southern edge of the waymark, facing their monitors the opposite way of Omega.
- Non-monitors 1, 5: These players will start out North or South and sidestep into the side that Omega is not cleaving. Non-monitor 1 may want to consider backing off even more to give non-monitor 2 more space, as their positioning can be tight. Consider arranging your priority so that melees will never be non-monitor 1.
- Non-monitor 2: This player will go to the northern intercardinal waymark on the non cleave side and position on its corner like the Samurai in the picture. Their positioning can be tricky because it hinges on them dodging 3 monitor's cleave, staying inside monitor 1's cleave all while not being hit by non-monitor 1.
- Non-monitors 3, 4: These players will position themselves between the two intercardinal waymarks on the non-cleave side at max melee range. If one of them is a ranged player, consider backing off to the wall to make the positioning more lenient.
The main advantage of the strat is that it assigns a waymark to each monitor player, and the positioning translates more naturally from a congaline priority system. However, the monitor angling and positioning is much stricter, with a slight position offset potentially leading to unintentional targets getting cleaved, especially non-monitor 2 who needs to care about the angling of two player monitors that are across the arena.
Priority System
As with all things that are randomly assigned, this mechanic requires a priority system to determine which players go to what positions. You may reuse your light party priority system from before for convenience, but also considering swapping it up to ensure that ranged players always end up on positions that benefit from being taken to the wall vs max melee.
Because the monitor debuff appears both visually on the player models as well as the party list, there are two main methods of determining your place in the priority.
Party List Check
The method you've been using for Phase 1. You'll look at the players who have lower flex priority than you in your four-player group and count how many of them share your debuff state (monitor vs no monitor), and the number + 1 will be your spot in the final lineup. For example, assume we have the same light party priority as Phase 1.
- Flex priority: Tanks → Melees → Ranged → Healer
- Group 1 fills spots from 1 to 5
- Group 2 fills spots from 5 to 1
If T1 has no monitor, they will check how many players in M1, R1, H1 also have no monitor. Assume only M1 has no monitor. T1 will then go to non-monitor spot 2. If T1 has a monitor, then they will go to monitor spot 3 because both R1 and H1 have monitors.
Congaline
Before the mechanic starts, have everyone in your party line up according to their flex priority, slightly offset west so Omega's model does not get in the way of checking debuffs. The congaline from North to South will be the priority for filling spots from 1 to 5.
In the example above, the Machinist, Gunbreaker and Dragoon are filling monitors 1 to 3, while the White Mage, Samurai, Dark Knight, Summoner and Sage will be filling the non-monitor spots in that order starting from 1.
After you resolve the Oversampled Wave Cannons, Omega will start channeling the enrage, Ion Efflux. His HP needs to reach 0 for you to progress to the next phase. Note that Omega 'revives' for Phase 4 instead of spawning as a new entity, so any debuffs you apply at the end of Phase 3 will remain on him when he comes back - and the downtime between phases is extremely short, so it's generally worth refreshing DoTs and any other vital debuffs here.
Changelog
- 13 Feb. 2023: Guide added.
More Final Fantasy XIV Content

Meru has been raiding since early Stormblood and has done high end content in a variety of roles. She has a lot of experience reading and analyzing logs and has done extensive testing on a variety of mitigation related issues. She hangs out in the Balance Discord and is often pinged in multiple channels for mitigation questions, but sadly very little fishing questions.
Lavender is a theorycrafter for both Machinist and Reaper in FFXIV. They have been playing since Heavensward, having cleared every raid since the release Stormblood in 2017.
- FFXIV’s Berlin Fan Festival Schedule Is Out!
- Pre-Order FFXIV Nendoroids Y’shtola & G’raha Now!
- From Action to Tab Targetting — How Did You Start FFXIV?
- Developing FFXIV Big Fish Together With Ryuta Suyama
- These Changes Will Make You Think Twice Before Tanking in Evercold
- Complete Dawntrail’s Art Book Collection With – Relics of Eternity –
- New Framer’s Kit With Return Of Breaking Brick Mountains
- Last Chance For THE PRIMALS x Download Festival T-Shirt!