The Omega Protocol Ultimate (TOP) Phase 2 Guide for FFXIV
This page contains detailed information and strategy about the high-end Duty "The Omega Protocol (Ultimate)", commonly abbreviated as TOP. This section of the guide will cover Phase 2, where players will face off against Omega-M and Omega-F.
Introduction to Phase 2 of The Omega Protocol (Ultimate)
The second phase of The Omega Protocol (Ultimate) features both Omega-F and Omega-M. The phase has an enrage of 2:25 with a DPS check of 59k DPS including downtime from Party Synergy, and a check of 74.3k if only including uptime segments. The tightness of this check will vary based on what resources you spend at the end of the phase, which we will go into detail later.
Feel free to follow along with this text guide either using the video below or this Toolbox.
Firewall and Solar Ray
At the beginning of the phase, Omega-F and Omega-M will both cast Firewall,
inflicting the four closest players to each of them with a Packet Filter debuff
that prevents players from damaging the other Omega. The four players
closest to Omega-M will be afflicted with ![]() Packet Filter F, preventing them from
applying status effects or dealing damage to Omega-F, while the other four are afflicted with
Packet Filter F, preventing them from
applying status effects or dealing damage to Omega-F, while the other four are afflicted with
![]() Packet
Filter M, preventing them from applying status effects or dealing damage to Omega-M.
Packet
Filter M, preventing them from applying status effects or dealing damage to Omega-M.
Split up your party into two groups of four, with a tank in each group assigned to
hold aggro on their selected Omega boss. If your party composition has Ninja or
Scholar, one group should contain one tank and three DPS to take better advantage
of ![]() Mug and
Mug and ![]() Chain Stratagem. Assign the tank with higher burst profile to the
three DPS group as well - Dark Knight tend to be the ideal choice there.
Chain Stratagem. Assign the tank with higher burst profile to the
three DPS group as well - Dark Knight tend to be the ideal choice there.
Since both Omega bosses are vulnerable to all party members for a short amount of time while they cast Firewall, players should aim to squeeze in as many cleaving abilities as possible in the first few seconds of the phase, and raid buffs should be pre-applied if possible to catch the cleaving hits. Most jobs can get two GCDs of cleave before the Firewall debuff goes out.
Solar Ray is a decently hard-hitting tankbuster that deals around 190k damage
unmitigated. If you are using cooldowns instead of invulning Solar Ray, ![]() Rampart
should be used and pre-popped during the transition so it will be off cooldown
for the second tankbuster in this phase, Optimized Bladedance.
Rampart
should be used and pre-popped during the transition so it will be off cooldown
for the second tankbuster in this phase, Optimized Bladedance.
Party Synergy
At the beginning of Party Synergy, four pairs of symbols will be randomly assigned
to party members, with same-symbol players being tethered to each other. All players
will be afflicted with either ![]() Remote Glitch or
Remote Glitch or ![]() Mid Glitch.
Mid Glitch.
 Remote Glitch:
Applies Vulnerability Up when tethered players are too close together.
Remote Glitch:
Applies Vulnerability Up when tethered players are too close together. Mid Glitch:
Applies Vulnerability Up when tethered players are either too close or too far from each other.
Mid Glitch:
Applies Vulnerability Up when tethered players are either too close or too far from each other.
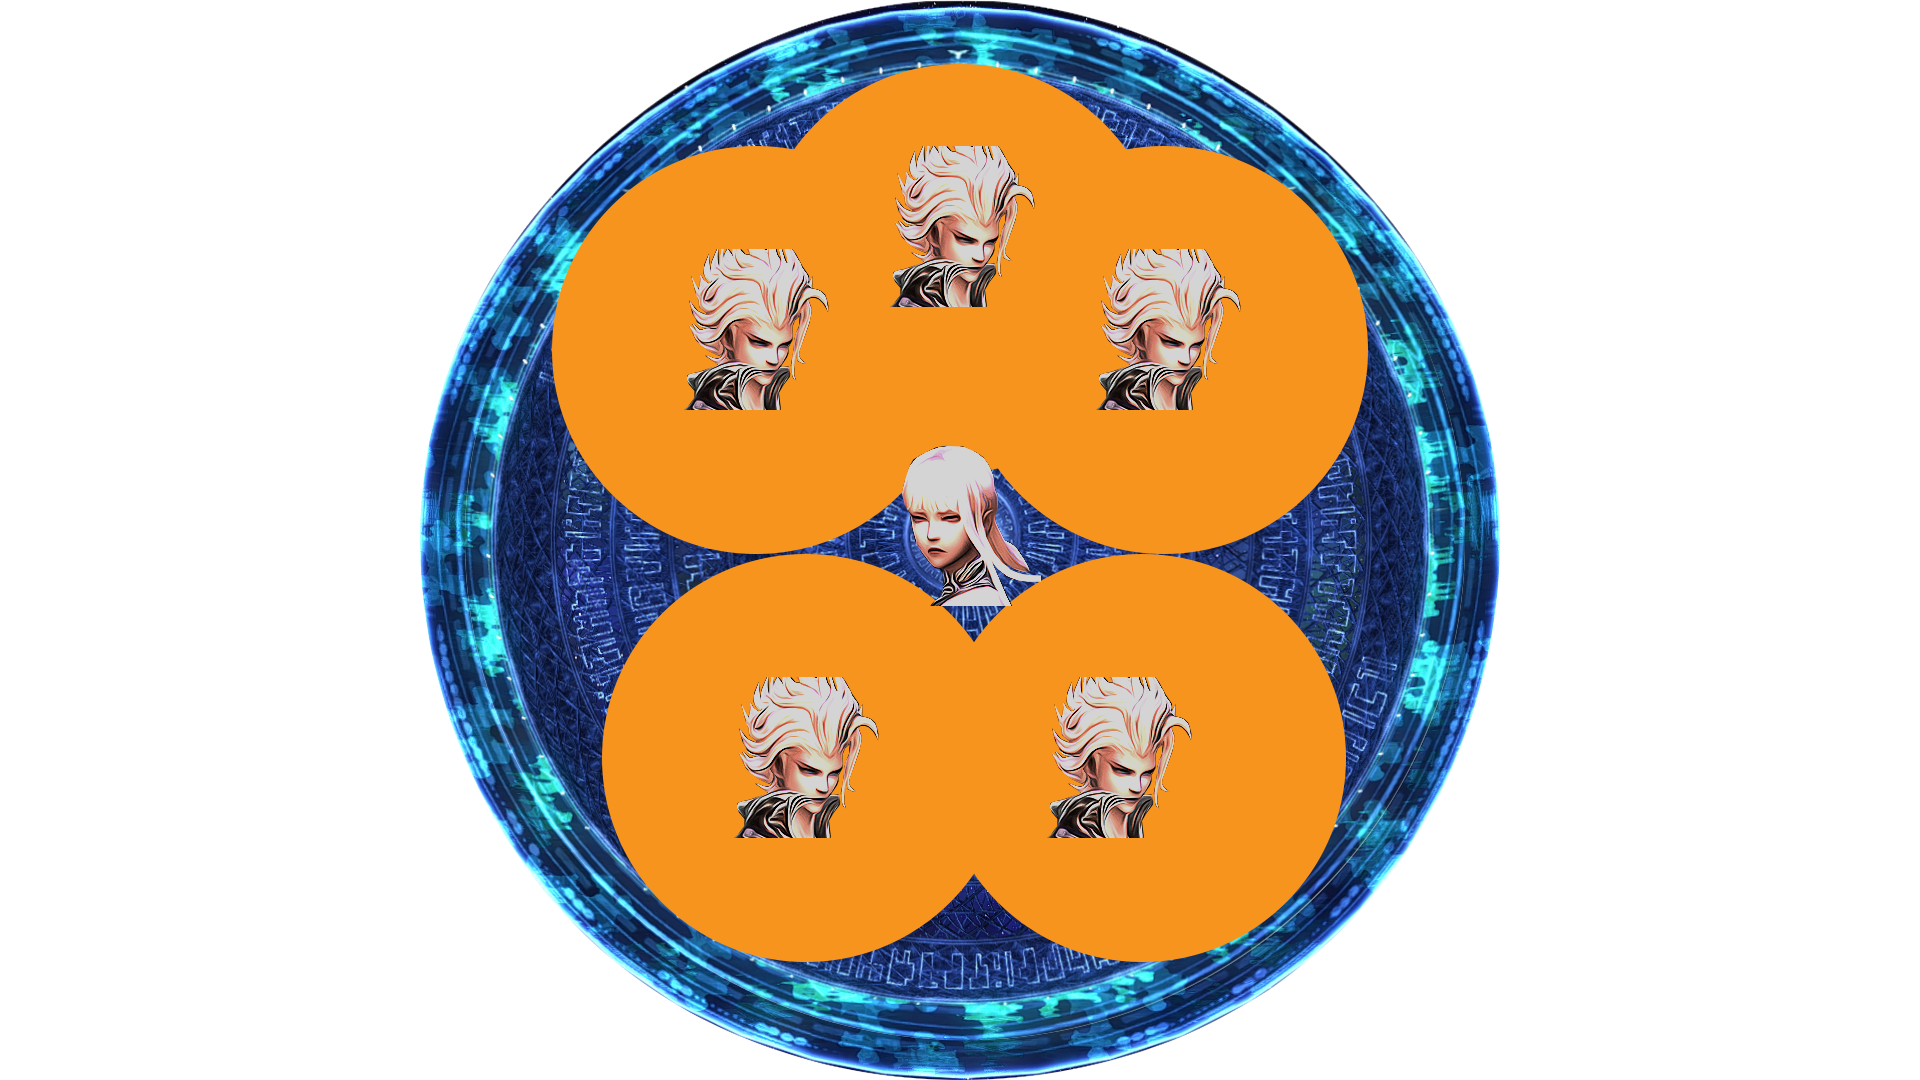
Soon after, Omega-F and Omega-M will teleport away and spawn four clones in the arena while a huge eye appears outside the arena on any intercardinal or cardinal. Three of the Omega clones will form a direct line across the arena, with one Omega-F clone and one Omega-M clone at the edges of the arena.
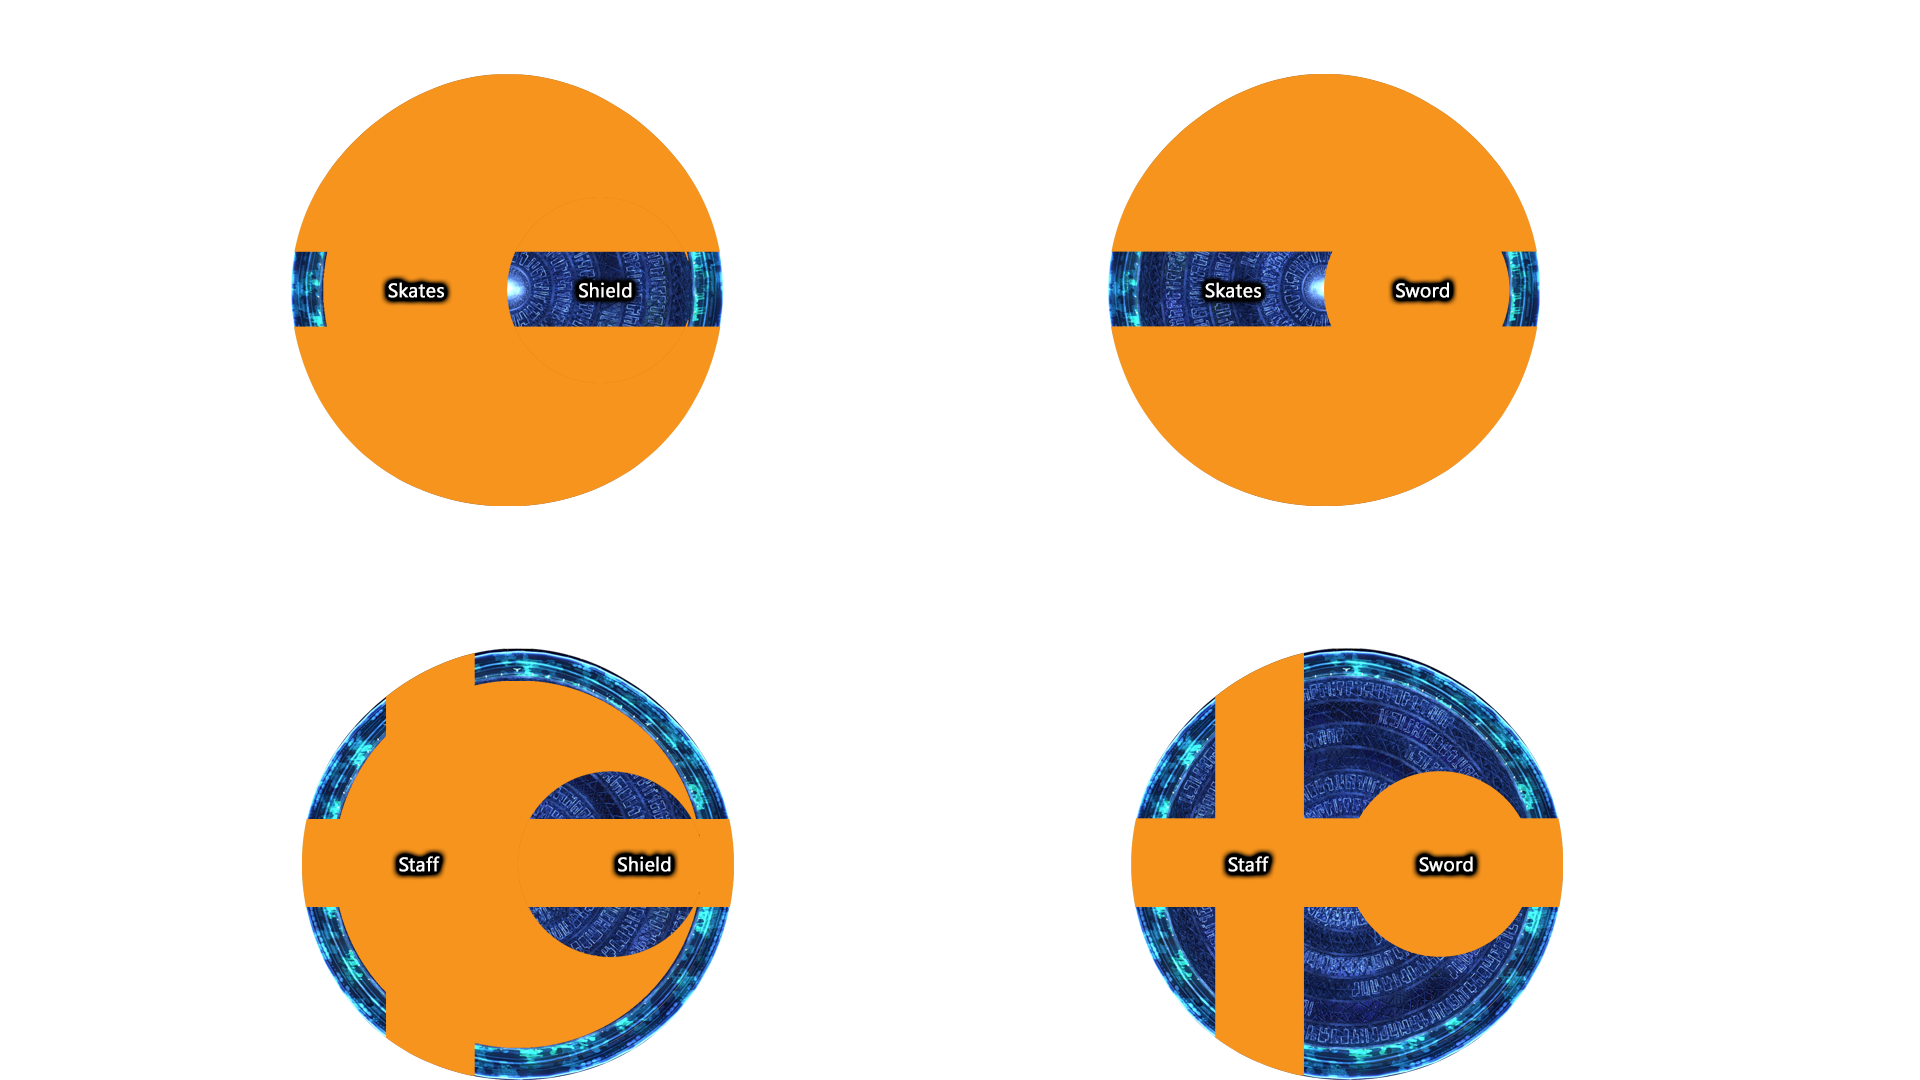
Those two Omega clones will each perform an attack specific to the weapon they are equipped with.
- Omega-F with Staff: Cross-shaped AoE centered on her.
- Omega-F with Scythe Legs: Large AoE that hits both sides of her.
- Omega-M with Sword: Large circular AoE centered on him.
- Omega-M with Shield: Large donut AoE that hits everywhere but around him.
In total, there are four patterns to this attack, with safe-spots as shown in the below diagram.
After Omega-F and Omega-M perform their attacks, the eye will then cleave a wide area directly in front of it, while each player is hit by an Optimized Fire III puddle AoE. Players need to dodge the eye cleave, spread out to not clip each other with their personal AoEs, all while resolving their assigned Glitch debuff so they do not take Optimized Fire III with a Vulnerability Up.
Immediately after, two Spotlight stacks will appear on two random players, while an Omega-F clone in the middle of the arena will cast a knockback. Five Omega-M clones will cast circular AoEs surrounding themselves, leaving three potential safe spots near the edge of the arena. The party will need to get knocked back into two separate safe-spots to resolve their stacks and Glitch at the same time. Similar to Condensed Wave Cannon Kyrios in the previous phase, a Spotlight stack will deal fatal damage to non-tanks if fewer than four people are in it, enforcing a 4:4 split.
Mechanic Resolution
To resolve the Glitch mechanic during Party Synergy, the party needs to split into two groups of four based on the symbols they are assigned, ensuring that each group has exactly one of each symbol. As the symbols are completely random, you will once again need a priority system to determine who flexes to the other group when needed. We will reuse the Tank → Melee → Ranged → Healer priority system from Phase 1 for simplicity.
At the beginning of the mechanic, line up in your two groups following the flex priority. Determining whether to flex or not then becomes very visual - as soon as you see that your tether extends in the direction of people with lower flex priority than you, you know that you need to flex to the other group.

In this example above, R1 is tethered to H1, so they will need to flex to group 2. M2 is tethered to H2, so M2 will flex to group 1. These will now be the new group 1 and group 2 for the rest of the mechanic.
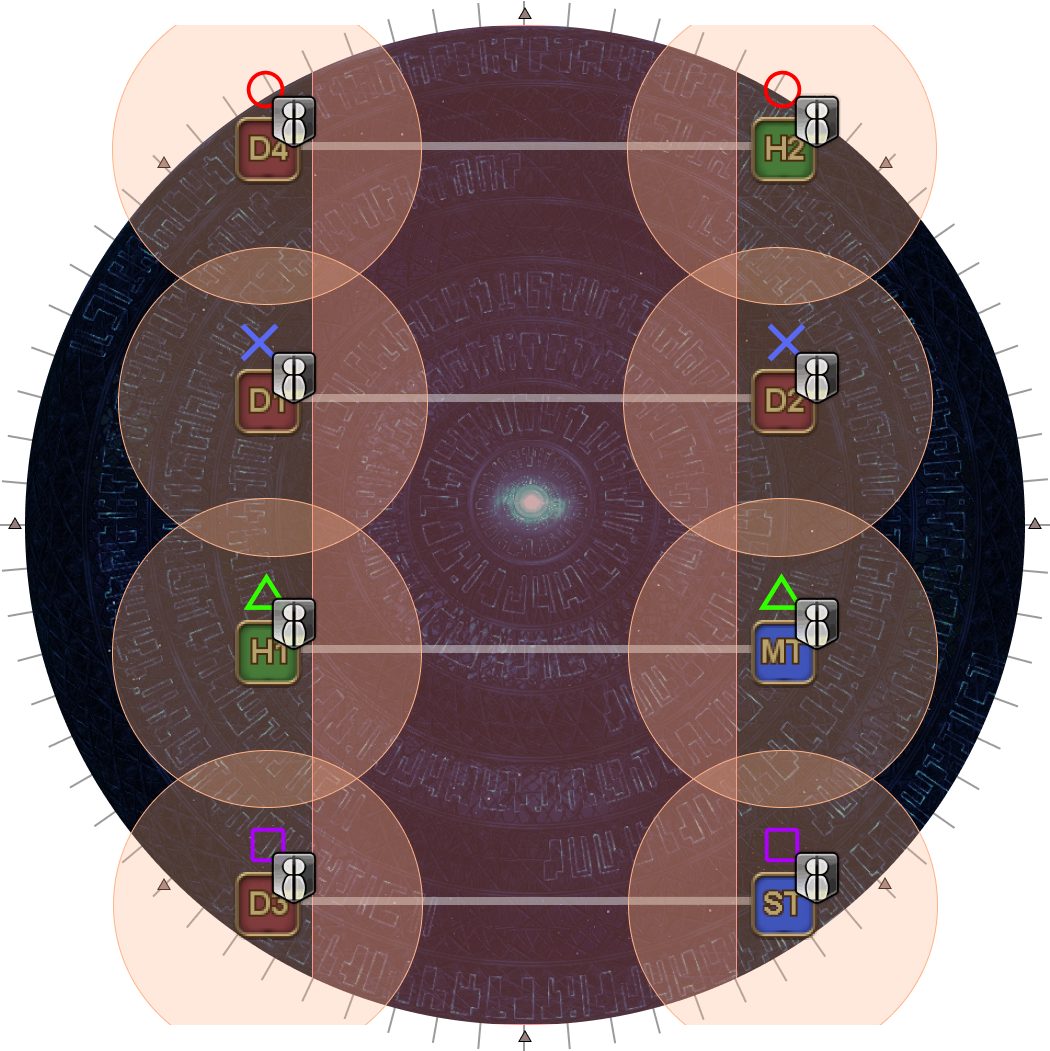
After dodging the Omega-F and Omega-M attacks, identify where the eye is. The eye will now be the new North, and players should get into the following positions depending on whether everyone has Mid Glitch or Remote Glitch. In this guide, we are using a default line up of (starting from the eye) O, X, Δ, ▢. Group 1 will line up on the left side of the eye, and group 2 will line up on the right side.
From here, Party Synergy can be done in two ways:
- Mid Glitch (Both Strats):
- The mechanic for Mid Glitch is done the same for both strategies. Both sides will line up in the default order, with players aligning on the outer edge of the waymarks to resolve the debuff, assuming that you have used the waymark coordinates in this guide.
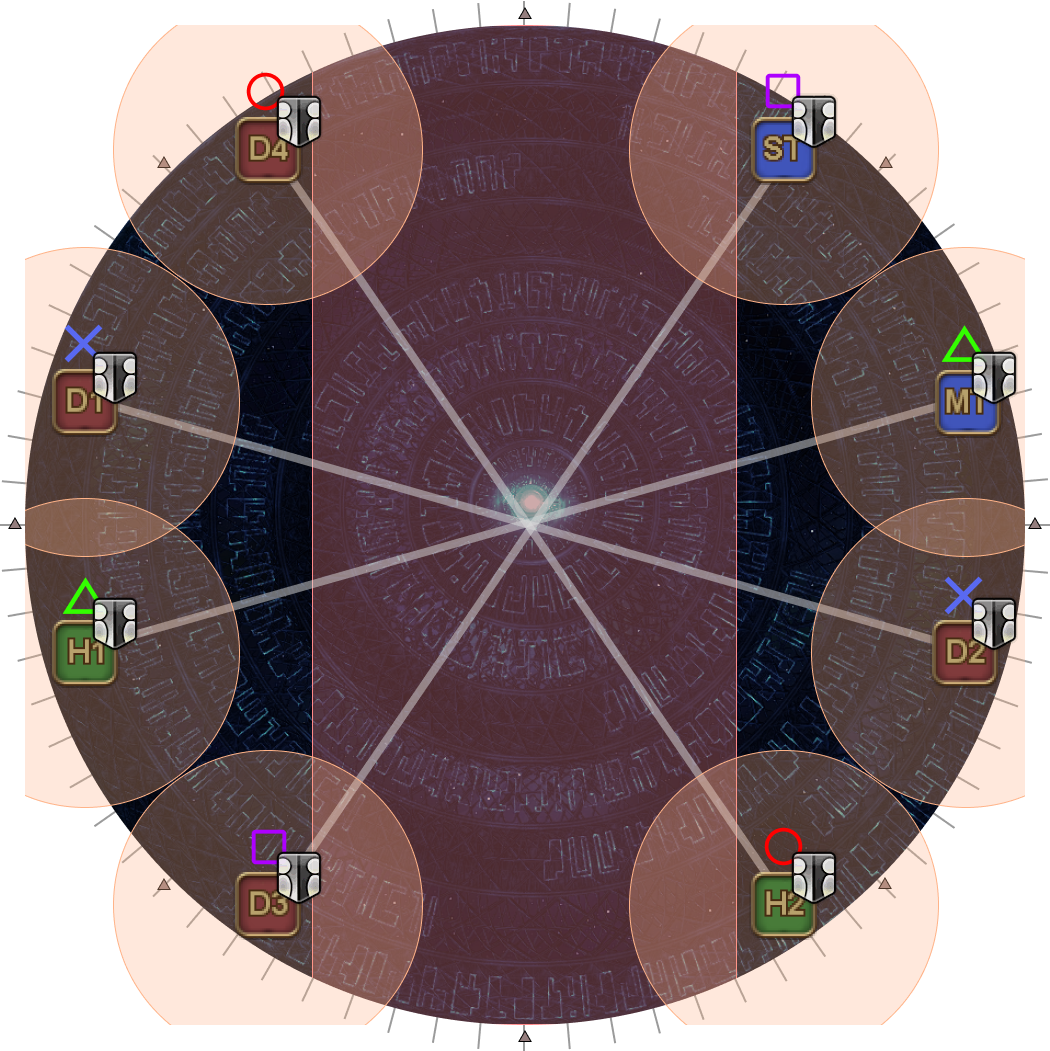
- Group 2 Full Flex Remote Glitch:
- For Remote Glitch, group 2 will need to reverse the order of the default line up to be ▢, Δ, X, O. All eight players need to go to the wall to resolve Remote Glitch.
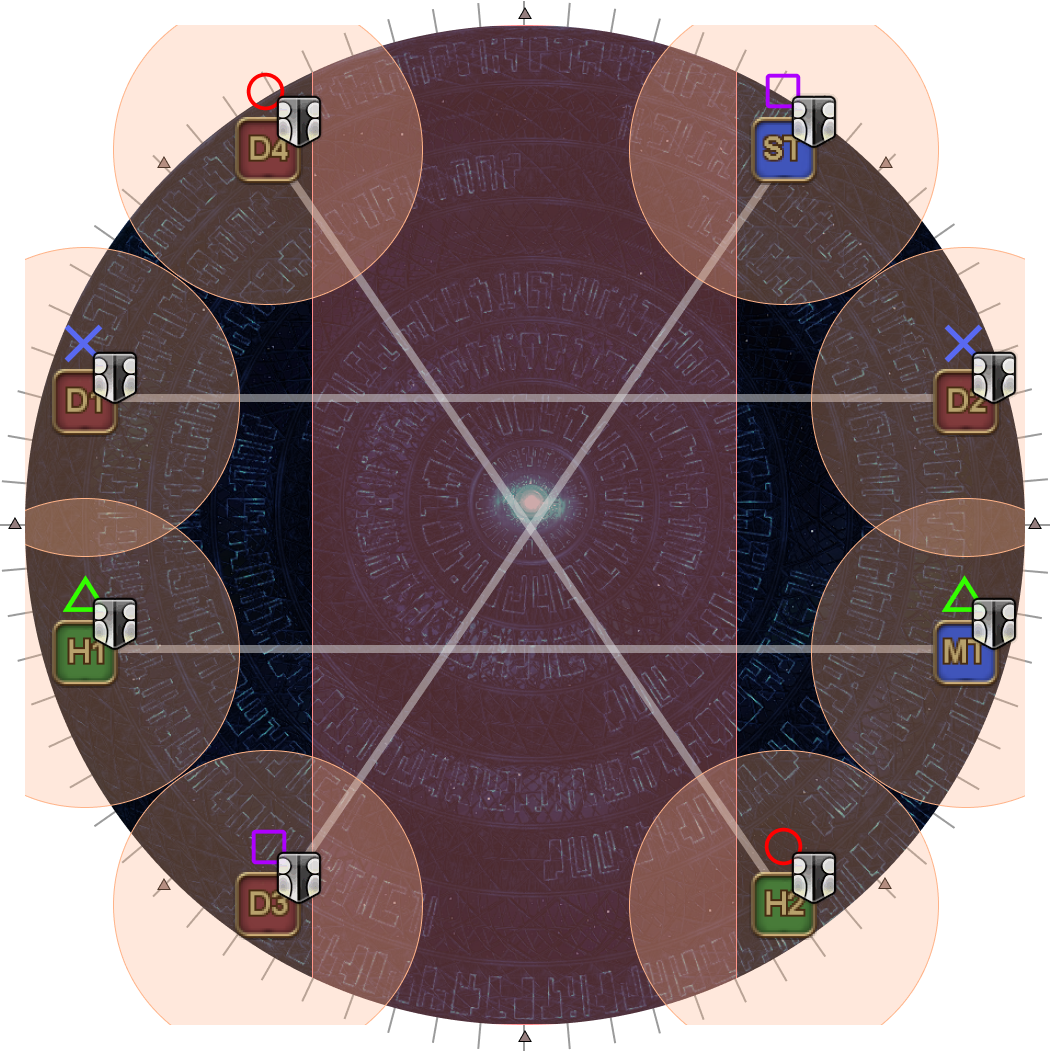
- Group 2 Semi Flex Remote Glitch:
- Remote Glitch is altered, so that O and ▢ will flip to create distance, but X and Δ will keep the same spots as Mid Glitch with the difference of running to the wall instead of to the edge of the waymarks.
Two stacks will now spawn on two random players, and occasionally they will be in the same group, requiring a swap to ensure that each group has exactly one stack. With the eye still our new North, the South-most stack will swap over to the other group, and their tethered partner will take their place in the original group.
Look for the group of three Omega-M clones on the arena. They will now be the new North for the knockback. Group 1 will always be knocked West, and group 2 will be knocked either East for Remote Glitch, or South for Mid Glitch. Once knocked into their respective safe-spots, the group should either hug the outer edge of the waymark to resolve Mid Glitch, or go to the wall for Remote Glitch.
Tips and Tricks
- You can ignore the eye completely in the beginning of Party Synergy and focus on only checking Omega-F and Omega-M. Do not get baited into trying to check every part of the mechanic at once as it will quickly overwhelm you. You have ample time to check for the eye after dodging into the safe-spot of the first mechanic.
- The Staff & Sword combination may be a hard one to recognize as all four clones will end up looking the same. Try to train your mind into associating 'no obvious weapon cue' with the Staff & Sword combo.
- If you'd like to practice pattern recognition for the initial mechanic pattern, you can use this nifty application. It's just a mini-game, but will help you gain some muscle memory on quickly visualizing certain weapon patterns.
- Some players choose to use a macro that echoes their assigned symbol into their chat, removing the necessity of remembering your symbol.
- Depending on your camera angle, it is easy to misjudge the eye's cleave and misposition as a result. Use the waymarks to align yourself instead, as the inner edges of the waymarks indicate how far the eye cleave goes. For example, if the eye spawns on a cardinal (letter marker), use the intercardinal markers (numbers) to gauge where the cleave will be. The video below shows an example of how to use the waymarkers for Mid-Glitch.
Post-Party Synergy
Because of the various transformations that happened during Party Synergy, Omega-F is now Omega-M, and Omega-M is now Omega-F. If you've focus targeted the boss you were supposed to hit before Party Synergy, you now need to update your focus target. Tanks will also find that their aggro has 'swapped' in the sense that they will now hold aggro on Omega-F when they had Omega-M before, and vice versa. You can swap back at this point, but it is not strictly necessary unless you want a specific tank to take Omega-F as she autos significantly more than Omega-M here.
The bosses will start casting Limitless Synergy, and your Packet Filter will fall off at the end of this cast, giving you around two GCDs of cleave opportunities before Omega-M starts channeling his Passage of Arms that makes Omega-F immune to damage.
Limitless Synergy
Omega-F starts channeling the one minute long enrage cast, Laser Shower, while Omega-M blocks damage to her. The party will need to DPS down Omega-M while mechanics are going on.
In the first round of mechanics, an Omega-M clone that spawns in a random location will channel Sagittarius Arrow, a decently sized line cleave baited on a random party member. Two other Omega clones will appear on intercardinals directly opposite of each other and extend two tethers - these will need to be grabbed by tanks and pointed away from the center of the arena as these are very wide cleaves that do tankbuster damage.
Have the entire party, tanks included, stack on the edge of Omega-M's hitbox to bait the Sagittarius Arrow. The two tethers will come out shortly after, and tanks should decide on who grabs which tether. Once the indicator for the Sagittarius Arrow comes out, the whole party dodges into the hitbox as the tank cleaves go off.
This is then followed up an Omega-F clone casting Optimized Meteor, three flare markers that appear on random party members, while an Omega-M clone with a shield start channeling Beyond Defense. He will jump to one of the closest players to him, hitting them with a small AoE that inflicts one stack of Twice-Come Ruin, as well as knocking back any player caught in the AoE that isn't the primary target. He will then follow up with a Pile Pitch stack targeted at the closest player, which also inflicts Twice-Come Ruin, preventing the Beyond Defense target from sharing the stack.
Since each Optimized Meteor inflicts around 45k damage to casters at point blank range, we will simplify the mechanic by completely ignoring them with mitigation and shields. With the Omega-M shield clone being North, tanks will attempt to bait Beyond Defense by standing max melee North-East and North-West, while the rest of the party stacks directly in the center of Omega-M's hitbox. Whichever tank is hit by Beyond Defense will run away along Omega-M's hitbox, ensuring that they are neither targeted nor hit by Pile Pitch, while the remaining tank slips into the party stack to share Pile Pitch.
The combined damage of three point blank flares and a seven-stack Pile Pitch can deal around 155k damage to a caster, so you'll want to use all buff based mitigation here as well as heavy shielding. Mitigation that lasts 15s will also cover the follow-up Cosmo Memory if they are used after Beyond Defense hits. Note that using all your mitigation here will not compromise your Hello World mitigation plan, as 90s will be back before the first set of debuffs, and 120s will be back for the second set.
Omega-F Burn Phase
After Cosmo Memory, all that's left is the channeling enrage cast, and your two minute buffs should be coming back at this point. For early prog, these should always be used (potentially alongside Limit Break) to ensure that you can prog Phase 3, but whether you'll use them here in the long run will depend on your comp and raid buff plan for Phase 3 onwards.
If you intend to use two sets of two minute raid buffs in Phase 3, you need to hold you final two minute in Phase 2. However, if you intend to tackle Phase 3 with one set of two minute raid buffs and Limit Break 3, then you can decide between holding your two minutes here,in which you'll do your re-opener at the beginning of Phase 3, or using them on cooldown, which means you'll need to buff after the second set of debuffs resolve during Hello World in Phase 3. Using two minutes at the end of this phase trivializes the DPS check, but buffing during Hello World may not be ideal as it requires people to burst during a mechanic, and you may run into outranging issues with raid buffs.
Changelog
- 05 Feb. 2023: Guide added.
More Final Fantasy XIV Content

Meru has been raiding since early Stormblood and has done high end content in a variety of roles. She has a lot of experience reading and analyzing logs and has done extensive testing on a variety of mitigation related issues. She hangs out in the Balance Discord and is often pinged in multiple channels for mitigation questions, but sadly very little fishing questions.
Lavender is a theorycrafter for both Machinist and Reaper in FFXIV. They have been playing since Heavensward, having cleared every raid since the release Stormblood in 2017.
- Same-Region Matching Starts this Fall. But There’s a Catch
- Have Your First Look At Evercold’s Realmships & Dungeons
- How Character Action Skins Will Give You More Ways to Customize
- How Auto Content Balancing Will Change How You Play Evercold
- This Rare FFXIV Minion Secretly Became Sellable in Patch 7.55
- The Yo-kai Watch Event Returns Again to Eorzea
- Best Crafting Rotations for 7.55 Phantom Occultum Relics
- FFXIV Hits the Switch 2 Soon! Here’s What We Know About the Release Date