The Omega Protocol Ultimate (TOP) Phase 5 Run: Dynamis Delta Guide for FFXIV
This page contains detailed information and strategy about the high-end Duty "The Omega Protocol (Ultimate)", commonly abbreviated as TOP. This section of the guide will cover the Phase 5 trio, Run: Dynamis Delta, which pits players against all forms of Omega while interacting with Dynamis.
Introduction to Phase 5 of The Omega Protocol (Ultimate)
This phase has an enrage timer of 4:44s and a DPS check of 38.4k because the phase contains three significant downtime mechanics. The check becomes 77.7k if we were to only count uptime segments. Like Phase 4, this phase only requires you to burn the boss down to 20% health. Regardless of your raid buff usage in previous phases, you will be using two sets of two minutes in this phase, with one set being under potion.
Due to the sheer length of this phase and how many details each trio mechanic has, we've decided to split these pages up into three sections. If you'd like information on either of the other two phases, feel free to use the buttons below.
Solar Ray
Solar Ray is a hard-hitting, double hit tankbuster that Omega will perform four times throughout this phase. As each hit of it inflicts a magical vulnerability up, tanks will either have to invuln both hits or do a tank swap between hits. Each hit of Solar Ray can do up to 300k damage unmitigated, so you would definitely want to invuln two sets of Solar Rays and heavily cooldown the remaining two. Which two you pick to invuln will affect your mitigation plan for Phase 6 tankbusters as well. Specifically, whether you want to invuln both Wave Cannons in Phase 6 or not - these are busters that can do up to 370k damage unmitigated. Any tank comp without a Warrior will need to invuln the first two Solar Rays in order to have invulns for both Wave Cannons in Phase 6, and a Paladin will have to invuln the first Solar Ray.
Run: ****mi* Raid-wides
Omega will cast three raid-wides in this phase before its enrage cast, each signifying the beginning of a new mechanic. These raid-wides also hit extremely hard and can do 140k damage to physical DPS, so be sure to have a solid mitigation plan for these. 90 second cooldown mitigation, especially 15 second duration ones, can easily catch all three of these raid-wides. Simply press it around the second hit of the first Solar Ray buster. 10 second duration 90 second cooldown mitigation can also catch all three, but the timing is much tighter, requiring you to time it slightly after the post Solar Ray auto and may not be worth the effort.
Hello Near World, Hello Distant World
These are recurring debuffs that will appear in every trio and are critical to resolve in a specific way to make Phase 6 possible. These debuffs have the following effects:
 Hello, Near World: When this debuff expires, the player will be hit with a large
AoE that deals moderate damage and inflicts magical vulnerability up. The player
closest to the original player will be hit by a secondary, smaller AoE with the same
effect. Finally, the player closest to the second player hit will also be hit
with the same AoE.
Hello, Near World: When this debuff expires, the player will be hit with a large
AoE that deals moderate damage and inflicts magical vulnerability up. The player
closest to the original player will be hit by a secondary, smaller AoE with the same
effect. Finally, the player closest to the second player hit will also be hit
with the same AoE. Hello, Distant World: When this debuff expires, the player will be hit with a large
AoE that deals moderate damage and inflicts magical vulnerability up. The player
farthest to the original player will be hit by a secondary, smaller AoE with the
same effect. Finally, the player farthest to the second player hit will be hit
with the same AoE.
Hello, Distant World: When this debuff expires, the player will be hit with a large
AoE that deals moderate damage and inflicts magical vulnerability up. The player
farthest to the original player will be hit by a secondary, smaller AoE with the
same effect. Finally, the player farthest to the second player hit will be hit
with the same AoE. Quickening Dynamis: Being hit by any AoE caused from Hello World debuffs will grant
players a stack of this buff. By itself, this buff has no effect, but every
party member needs to have three stacks of this before entering Phase 6. This buff
is not lost upon death.
Quickening Dynamis: Being hit by any AoE caused from Hello World debuffs will grant
players a stack of this buff. By itself, this buff has no effect, but every
party member needs to have three stacks of this before entering Phase 6. This buff
is not lost upon death.
If any of the AoE damage caused by Hello World debuffs hit more than one person, it will cause a wipe from fatal raid-wide damage. Also note that being hit once in a Hello World chain does not prevent you from being selected as a potential target again; For example, the originator of a Hello, Near World can be hit by the third bounce if they also happen to be the closest to the secondary hit player. If this happens, they will die from the magical vulnerability up, but this will not lead to an immediate wipe.
Run: ****mi* (Delta Version)
Feel free to follow along with this text guide using this Toolbox, specifically catering to Run: Dynamis (Delta Version).
The Optical Unit, Omega Beetle and Final Omega will spawn on three cardinals
of the arena, with Beetle and Final opposite each other. At the same time,
two pairs of players will get ![]() Remote Code Smell, while the remaining two pairs
of players will get
Remote Code Smell, while the remaining two pairs
of players will get ![]() Local Code Smell. These tethers work exactly the same way
as Phase 3 tethers once they activate;
Local Code Smell. These tethers work exactly the same way
as Phase 3 tethers once they activate;
![]() Local Regression tethers break when the
tethered players get too close, and
Local Regression tethers break when the
tethered players get too close, and ![]() Remote Regression tethers break when the players
get too far from each other. Two players with
Remote Regression tethers break when the players
get too far from each other. Two players with ![]() Remote Regression tethers will also
get one
Remote Regression tethers will also
get one ![]() Hello, Distant World debuff and one
Hello, Distant World debuff and one ![]() Hello, Near World debuff.
Hello, Near World debuff.
Shortly after, a colored fist will spawn above each player's head, either a blue fist or a yellow fist. These fists will jump to the player's location after a while, and if they are not hitting a fist of a different color when that happens, they will channel a fatal raidwide called Unmitigated Explosion.
Six arm units with either clockwise or counter-clockwise spinning indicators will also spawn, these will lock onto the nearest player, firing a laser beam at their location that will proceed to move in the direction indicated by their spinners. At roughly the same time as fist jumps, the Optical Unit will cleave a thick line in front of it - exactly the same as Party Synergy in Phase 2.
A random ![]() Remote Regression tether player will now get the
Remote Regression tether player will now get the ![]() Oversampled Wave Cannon
Loading debuff, which functions exactly the same as it did in Phase 3; It will
hit two random players on the monitor's side. Final Omega himself will also begin
to channel his own
Oversampled Wave Cannon
Loading debuff, which functions exactly the same as it did in Phase 3; It will
hit two random players on the monitor's side. Final Omega himself will also begin
to channel his own ![]() Oversampled Wave Cannon, and will hit all players on the side
indicated by his monitor effect at the end of the cast. While all of this is going
on, Omega-M will perform Beyond Defense followed by Pile Pitch, with the exact
same targeting rules as in Phase 2 - Beyond Defense hitting one of the two closest
players to him, and Pile Pitch hitting the closest player.
Oversampled Wave Cannon, and will hit all players on the side
indicated by his monitor effect at the end of the cast. While all of this is going
on, Omega-M will perform Beyond Defense followed by Pile Pitch, with the exact
same targeting rules as in Phase 2 - Beyond Defense hitting one of the two closest
players to him, and Pile Pitch hitting the closest player.
After all of this resolves, Beetle Omega will channel Swivel Cannon, a cleave that will hit more than half the arena. The side that he hits is telegraphed by both smoking and lighting effects on his model. Shortly after, the Hello World debuffs will resolve.
Mechanic Resolution
With many moving parts and a large amount of randomness, this mechanic may seem overwhelming at first, so it is important to break it down into small, digestible chunks.
Initial Tether Split and Colored Fist Adjustments
At the beginning of the mechanic, split up players into two groups of four based
on their colors. Players with ![]() Remote Regression should go towards Beetle Omega
("Blues to Beetle"), and players with
Remote Regression should go towards Beetle Omega
("Blues to Beetle"), and players with ![]() Local Regression should go towards Final
Omega. Both groups should line up with their tethers parallel to each other,
like the following image.
Local Regression should go towards Final
Omega. Both groups should line up with their tethers parallel to each other,
like the following image.
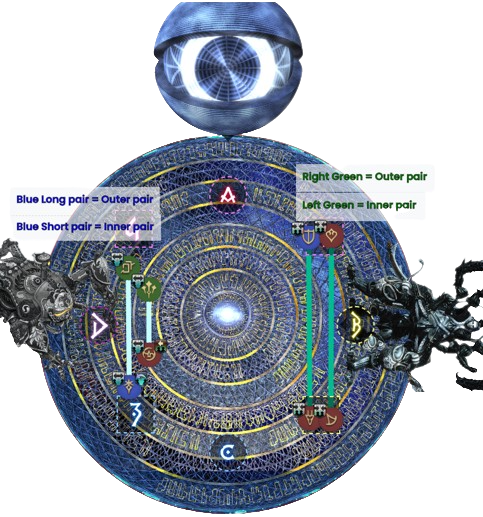
The pair of tethers that are closer to the center of the arena will be referred to as 'inner tether', and the pair of tethers that are closer to the edge of the arena will be called 'outer tethers'. In this case, both the inner blue and inner red-green tethers will be responsible for adjusting fist color pairings if needed.
Colored fists will now spawn. If you're an inner tether, check whether the fist above your head matches the color of the fist next to you (the one that does not belong to your tether partner). If it matches, swap places with your tether partner, if not, you keep your current positioning. Once the swaps are done, the red-green tether players can now stack on each other and wait for their fist AoEs to appear. I recommend designating the two intercardinal waymarks close to Final Omega as stack spots for the red-green players - this reduces ambiguity and ensures that the tether won't instantly break when it becomes active.
However, the blue tether players cannot stack on each other yet, as we would like to break one set of blue tethers as soon as they become active - specifically, we will break the outer blue tether first, so players with the outer blue tether should position far apart enough to break their tether, but close enough to their inner blue tether fist partner so they can stack their fists in time. The inner blue tether players should stay close enough that their tether won't instantly break.
Note: All players should take care to not step beyond the inner side of the intercardinal waymarks, or they will be hit by the eye cleave as it goes off. Just as in party synergy, the waymarks denote the exact area of the cleave.
A few things will happen in succession - all tethers become active, and the outer blue tether will instantly break due to our prepositioning, and the outer blue players should immediately run to stand on top of their inner blue partners to stack their fists. The Optical Unit will do its line cleave and fist AoEs should appear under all players if fists were resolved correctly. Note that AoEs will not appear if you failed to stack the proper fists, either from being too late to stack them or running away too soon, and the fists will go straight into channeling Unmitigated Explosion.
Spinny Arm Unit Baits, Beyond Defense and Monitors
As soon as the fist's AoE appears under players, everyone should be moving out to their next position in the mechanic. The red-green tethers and the outer blue tether will be baiting the spinny arms, while the inner blue tether will go into the middle of the arena to bait Beyond Defense. The outer red-green tether will bait the two spinny arms closest to Final Omega, the inner red-green tether will bait the ones in the middle of the arena, and the outer blue tether baits the two closest to Beetle Omega. The remaining inner blue tether will split off around Omega-M, breaking their tether in the process.
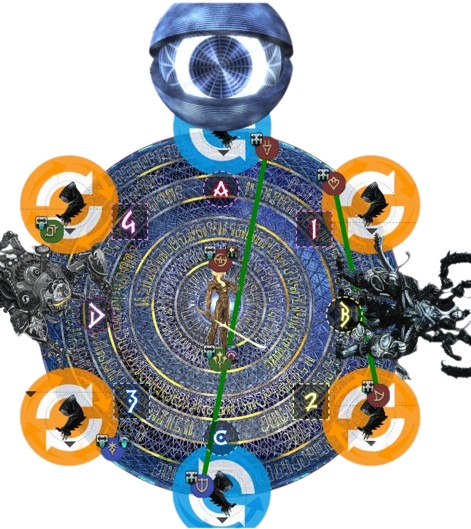
Players baiting the spinny arms should stand in such a way that the resulting laser rotates outside of the arena, taking care to hug the spinny arm model as much as possible - the spin indicators have no harmful effects, and it's especially important for the outer red-green tethers to hug their fists so they do not accidentally break their tether when both spinny arms are rotating inwards. All bait players should wait until the orange laser telegraphs spawn before moving out, as that is when the spinny arm laser baits lock in. Red-green tethers will simply spread out afterwards to take the four monitor hits, going to the wall to avoid accidental cleaving of players in the middle of the arena.
At this point, a monitor should have already spawned on a random blue tether player. This player could either be someone who is baiting a spinny arm, or one of the Beyond Defense baiters. If you have a monitor while baiting a spinny arm, check which side Final Omega is cleaving with his monitors, and as soon as the orange indicators from the spinny arm appears, run towards Omega-M on the side that Final Omega isn't cleaving and face your monitor towards that side, while leaving a 'safe lane' for players to dodge both the boss monitor and the player monitor. You will naturally share the Pile Pitch stack with two other eligible players.
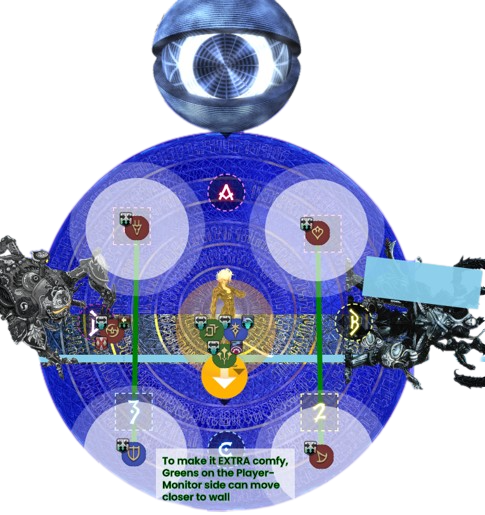
If you are a Beyond Defense baiter who gets a monitor but does not get selected for Beyond Defense, you do the same thing as above. However, if you are hit with Beyond Defense, you cannot share the Pile Pitch stack without getting Doom. In that case, you will have to shift horizontally to dodge the Pile Pitch, but still cover the same area with your monitor cleave. Similarly, if you are hit with Beyond Defense, but are not a monitor player, you also shift horizontally within the safe lane between Final Omega's monitor cleave and the player's monitor cleave to dodge both the Pile Pitch stack and the monitors.

Finally, if you are a blue tether neither selected for Beyond Defense or monitor, you will stack next to Omega-M on the side Final Omega isn't cleaving and share Pile Pitch damage. Pile Pitch requires three players to survive, though a two-stack is livable with shields.
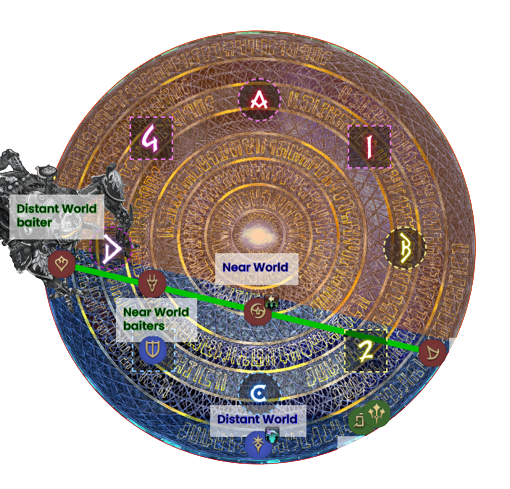
Swivel Cannon and Hello World Debuffs
After monitors resolve and Pile Pitch goes off, Beetle Omega will start channeling Swivel Cannon, indicating the side he cleaves with multiple lights and a smoking effect. We will break one pair of red-green tethers here, specifically the pair closest to Beetle Omega. The player who is on the side that Beetle Omega is cleaving will be responsible for breaking the tether, while the player in the safe side will plant. The player breaking the tether should carefully watch the party list to ensure that all stacks of Twice-Come Ruin have fallen off before breaking their tether, or they will give players Doom. It is important to note that the Twice-Come Ruin from monitors falls off faster than the Twice-Come Ruin from Pile Pitch, so you need to go off the party list instead of just checking your own debuff. Once the tether breaks, the safe spot player will stand on the intercardinal waymark closest to Beetle Omega, while the player who broke the tether will push up all the way to the edge of the Swivel Cannon cleave, but aligned with the same intercardinal waymark.
At the same time, the red-green tether farther from Beetle Omega (the outer red-green pair) will now rotate so that one player is right by Beetle Omega, and the other player is roughly opposite of them on the edge of Swivel Cannon's cleave. Again, we'll have the player who is already in the safe spot move less - they will simply go to the wall where Swivel Cannon intersects the edge of the arena, while the player in Swivel Cannon's AoE rotates all the way to Beetle Omega. Because this pair is not breaking their tether, they can start getting into position right away.
That leaves the blue tether players. Two of them will have Distant World and
![]() Near World debuffs. Assuming that Swivel Cannon's cleave is North, these
two players will align themselves with the North-South cardinal line, with the
Near World debuffs. Assuming that Swivel Cannon's cleave is North, these
two players will align themselves with the North-South cardinal line, with the
![]() Near World hugging the edge of Swivel Cannon's AoE, near the cleave, and
Distant World will go all the way at the wall, distant from the cleave. The two
remaining blue tether players with no debuffs will align themselves with the
intercardinal waymark, far from Beetle Omega, and back up all the way to the wall.
Near World hugging the edge of Swivel Cannon's AoE, near the cleave, and
Distant World will go all the way at the wall, distant from the cleave. The two
remaining blue tether players with no debuffs will align themselves with the
intercardinal waymark, far from Beetle Omega, and back up all the way to the wall.
If done correctly, all six Hello World hits will resolve without hitting the same
player twice and we end this phase with six players who have one stack of
![]() Dynamis,
and two player with zero stacks. After the magic vulnerability up from Hello World
falls off, the remaining red-green tether should break. Note that the tether will not
break if both players are max melee on opposite sides of Omega-M, so it is safe
to go hit Omega-M immediately even if two melee players are tethered, but they need
to be careful to not step into the hitbox until it is time to break.
Dynamis,
and two player with zero stacks. After the magic vulnerability up from Hello World
falls off, the remaining red-green tether should break. Note that the tether will not
break if both players are max melee on opposite sides of Omega-M, so it is safe
to go hit Omega-M immediately even if two melee players are tethered, but they need
to be careful to not step into the hitbox until it is time to break.
Tips and Tricks
- The tightest timing in this mechanic is the outer blue tether break into stacking fists. The snapshot for that is decently tight, so be ready to move immediately when you see the effect of the tether break begin. You could also go off your Remote Code Smell debuff timer if you don't want to react to the animation.
- For all other tether players, it is important to not get tricked by the animation of the blue tether breaking and move out too early. Make sure to stay still until you can visually confirm the AoE telegraphs appearing beneath you; This part always feels longer than you expect it to.
- Some players may find it hard to see the AoE telegraphs, resulting in them moving out too late and getting hit. You can instead use the animation of the Optical Unit cleave to time your movement. The fist AoE telegraphs spawn roughly when the laser makes its way across the entire arena.
- Red-green tethers should be at the wall when taking monitor hits instead of standing near waymarks. Otherwise, it is very easy for a monitor target to cleave a Beyond Defense target, especially if that target also has the monitor debuff. Always back out into the laser baits after they go off so you give as much room as possible for the non monitor targets.
- Some players may find it hard to remember which way to move as red-green tether when Beetle Omega charges his Swivel Cannon. It may be helpful to remember to always let the player in the safe spot move as little as possible. If you're in the cleave zone as the red-green tether closer to Beetle Omega you will be responsible for controlling the tether break, allowing your partner stay around the intercardinal waymark. Similarly, if you are in the cleave zone far away from Beetle Omega, you will take the long route and rotate all the way to Beetle Omega.
- While it may not be obvious, Run: Dynamis Delta is a significant heal check.
Players can take up to 200k damage throughout the mechanic where debuff mitigation
is useless, and buff mitigation can be inconsistent due to positioning and how
spread out the damage instances are. Healers can also both get red-green tethers,
meaning they will have a hard time running middle to heal. Healers should make
good use of heavy pre-shielding such as a Scholar's
 Deployment Tactics combined with
a
Deployment Tactics combined with
a  Recitation
  Adloquium, as well as position agnostic healing tools such as a White Mage's
 Liturgy of the Bell, Scholar's
 Summon Seraph and Astrologian's
  Earthly Star. The
DPS check in this phase is lenient enough that it may be worth sacrificing Earthly Star for
much smoother healing. DPS players should also use their self-healing tools
after
Earthly Star. The
DPS check in this phase is lenient enough that it may be worth sacrificing Earthly Star for
much smoother healing. DPS players should also use their self-healing tools
after  Oversampled Wave Cannon and Pile Pitch.
Changelog
- 07 Mar. 2023: Guide added.
More Final Fantasy XIV Content

Meru has been raiding since early Stormblood and has done high end content in a variety of roles. She has a lot of experience reading and analyzing logs and has done extensive testing on a variety of mitigation related issues. She hangs out in the Balance Discord and is often pinged in multiple channels for mitigation questions, but sadly very little fishing questions.
- How Character Action Skins Will Give You More Ways to Customize
- How Auto Content Balancing Will Change How You Play Evercold
- This Rare FFXIV Minion Secretly Became Sellable in Patch 7.55
- The Yo-kai Watch Event Returns Again to Eorzea
- Best Crafting Rotations for 7.55 Phantom Occultum Relics
- FFXIV Hits the Switch 2 Soon! Here’s What We Know About the Release Date
- Hear, Feel, Think: What Eorzea Immersion Sounds Like
- New Character Creation Updates With FFXIV’s Patch 8.1