Blunderbuss Hammer Assassin PvP Build for New World
The following is a PvP burst damage build using a potent burst damage weapon in combination with one of the best crowd-control weapons
in New World: the Blunderbuss and the War Hammer. While the War Hammer is generally seen as a Bruiser only weapon for players in medium and
heavy armor, it enables light armor players to play with its strengths and maximize damage by making enemies vulnerable. This build will
use abilities like ![]() Shockwave and
Shockwave and ![]() Azoth Shrapnel Blast to lock down single-targets and kill them with one-shot combinations.
Azoth Shrapnel Blast to lock down single-targets and kill them with one-shot combinations.
Blunderbuss Hammer Assassin - PvP
This is a unique backline dive build that can easily full kill enemies, deal incredibly high damage, and is very easy to pull off as long as you can land one ability. It does lack mobility and defensiveness at times, but its crowd-control makes up for that. To play this properly it will require great positioning and movement. When used correctly you will learn how to pick single targets and take advantage of a very easy to learn one-shot combo that will be enjoyable to perform time and time again.
Video Guide
This variation of the Blunderbuss can be used with a War Hammer or an Ice Gauntlet in either light or medium armor. The attributes and Blunderbuss build will always be the same no matter what weapon you choose. You will only need change gear sets depending on your second weapon perks.
Blunderbuss Builds
Double Down (Preferred Option)
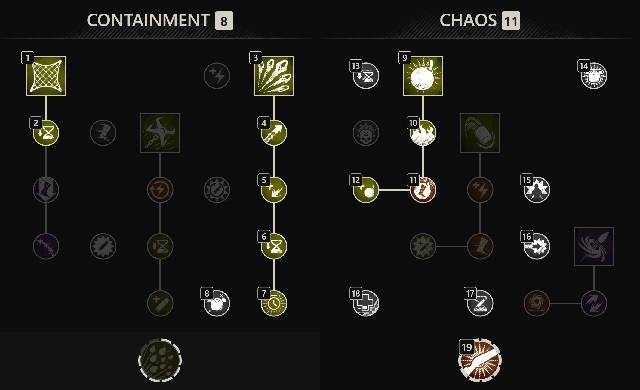
 Net Shot — When combined with Exhaustive Net Shot this is a powerful CC ability that will slow a target and make them vulnerable to exhausting themselves
and being easily taken down. It will deal a moderate amount of damage but allow you to quickly close gaps. It can also be a fantastic source of mobility if you use this while walking
backwards so that you can escape enemies.
Net Shot — When combined with Exhaustive Net Shot this is a powerful CC ability that will slow a target and make them vulnerable to exhausting themselves
and being easily taken down. It will deal a moderate amount of damage but allow you to quickly close gaps. It can also be a fantastic source of mobility if you use this while walking
backwards so that you can escape enemies. Azoth Shrapnel Blast — This is the Blunderbuss's highest damaging ability. This should always be used immediately after firing off a basic attack so that you can deal a
potent burst of damage. It has incredible range, AoE potential, and when used in combination with a regular shot it can take away a significant amount of health. It should also be used on
clumps of enemies to take advantage of the bomb it leaves on the ground after being used.
Azoth Shrapnel Blast — This is the Blunderbuss's highest damaging ability. This should always be used immediately after firing off a basic attack so that you can deal a
potent burst of damage. It has incredible range, AoE potential, and when used in combination with a regular shot it can take away a significant amount of health. It should also be used on
clumps of enemies to take advantage of the bomb it leaves on the ground after being used. Splitting Grenade — Aim to use this on
  Gravity Well or other clumps of enemies. It will deal a great amount of initial burst damage, but it can also leave a
devastating damage over time effect that lasts 10 seconds and can stack up to 3 times depending on how many of the bombs hit the target. This is the greatest source of AoE damage on
the Blunderbuss.
Gravity Well or other clumps of enemies. It will deal a great amount of initial burst damage, but it can also leave a
devastating damage over time effect that lasts 10 seconds and can stack up to 3 times depending on how many of the bombs hit the target. This is the greatest source of AoE damage on
the Blunderbuss.
This is the optimal build for maximizing cooldown usage and being able to get more abilities out for burst damage.
Unload

This build is best used in single-target backline dive builds that want to quickly deal as much damage as possible and escape. It does have more mobility, but you are missing out on
![]() Splitting Grenade which is a major debuff tool and damage option.
Splitting Grenade which is a major debuff tool and damage option.
War Hammer Build
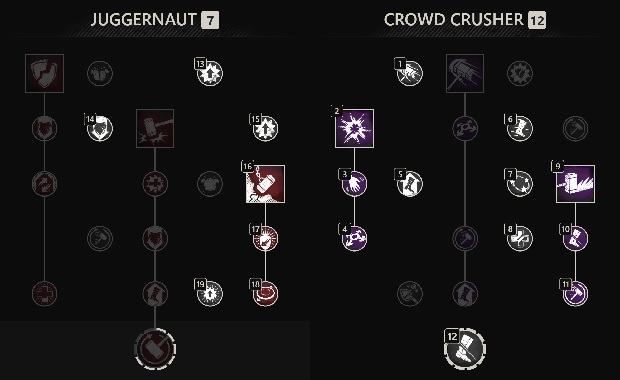
 Wrecking Ball — This is a great tool for defensiveness and crowd-control. When it is used it will apply a Fortify buff that will help with survivability. Additionally,
it has a unexpectedly large AoE knockdown effect that is essential for starting any kind of crowd-control combo.
Wrecking Ball — This is a great tool for defensiveness and crowd-control. When it is used it will apply a Fortify buff that will help with survivability. Additionally,
it has a unexpectedly large AoE knockdown effect that is essential for starting any kind of crowd-control combo. Shockwave — In most cases, this should be used as soon as a target is knocked down by Wrecking Ball. Not only with it provide a massive AoE stun. Every target
will be debuffed and rended as long as you use its perk. This makes all targets extremely vulnerable.
Shockwave — In most cases, this should be used as soon as a target is knocked down by Wrecking Ball. Not only with it provide a massive AoE stun. Every target
will be debuffed and rended as long as you use its perk. This makes all targets extremely vulnerable. Path Of Destiny — This is perfect for free AoE damage and it does stagger, so you can use it to interrupt healers or other players. It is primarily used to catch
targets who are running away because of its stagger and its slowing debuff. It can also be used defensively with its perk to provide quick healing.
Path Of Destiny — This is perfect for free AoE damage and it does stagger, so you can use it to interrupt healers or other players. It is primarily used to catch
targets who are running away because of its stagger and its slowing debuff. It can also be used defensively with its perk to provide quick healing.
Attributes
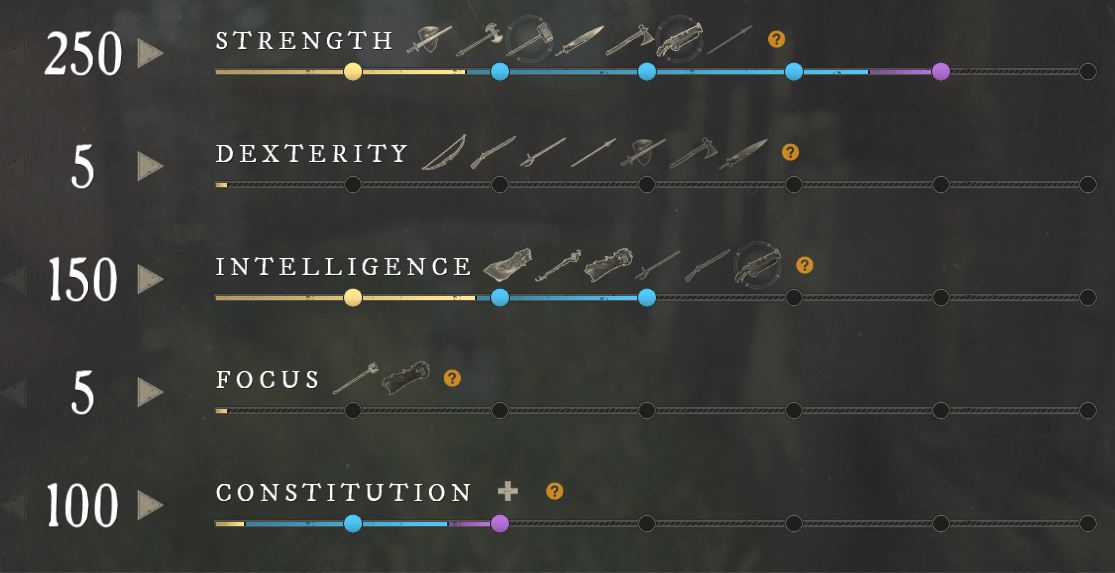
It would be most optimal to play at 100 Constitution, but this can be difficult. With proper positioning, defensive perks, and knowledge you can be very
successful. If you want more defensiveness, you can generally play with higher Constitution because you will be using ![]() Mortal Empowerment to increase damage. If you
would prefer, you can play with 150 Constitution.
Mortal Empowerment to increase damage. If you
would prefer, you can play with 150 Constitution.
Gearing
| Slot | Perks | Gem | Weight | Attribute | Source |
|---|---|---|---|---|---|
| Blunderbuss | - | Intelligence | Crafted/BoE* | ||
| War Hammer | - | Strength | Crafted/BoE | ||
| Helmet |
|
Light | Intelligence or Strength | Crafted/BoE | |
| Gloves |
|
Light | Intelligence or Strength | Crafted/BoE | |
| Chest |
|
Medium | Intelligence or Strength | Crafted/BoE | |
| Pants | Light | Intelligence or Strength | Crafted/BoE | ||
| Boots |
|
Light | Intelligence or Strength | Crafted/BoE | |
| Amulet | - | Constitution, Strength, or Intelligence | Crafted/BoE | ||
| Ring | - | Constitution, Strength, or Intelligence | Crafted/BoE | ||
| Earring | - | Constitution, Strength, or Intelligence | Crafted/BoE |
*: The ability perks you need to make sure are in your build are ![]() Plagued Splitting Grenade,
Plagued Splitting Grenade,
![]() Leeching Shrapnel Blast,
Leeching Shrapnel Blast, ![]() Exhaustive Net Shot,
Exhaustive Net Shot, ![]() Sundering Shockwave, and
Sundering Shockwave, and
![]() Leeching Path Of Destiny.
Leeching Path Of Destiny.
**: ![]() Freedom,
Freedom, ![]() Elemental Aversion, and
Elemental Aversion, and ![]() Refreshing, are all viable options.
When using
Refreshing, are all viable options.
When using ![]() Freedom you should stack 3 or 5 times. Any combination of these perks is viable.
Freedom you should stack 3 or 5 times. Any combination of these perks is viable.
***: Any Attunement perk can be used. If you go with Fire it will scale with ![]() Fire Damage.
Fire Damage.
Overall with gearing, this is the ideal loadout of perks for a best in slot build. With that being said, be sure to refer to the Blunderbuss or War Hammer guide to have a better understanding of other flexible perk options to fit into your build. You can decide what you are most comfortable with.
Gem Optimization
For more specific information on optimizing your gems in PvP and PvE please refer to our dedicated guide for Blunderbuss or War Hammer.
Heartrune
When focusing on burst damage ![]() Brutal Heartrune of Detonate will always be one
of the top picks, and it should be used in this build. You just need to play safely after activating it.
Brutal Heartrune of Detonate will always be one
of the top picks, and it should be used in this build. You just need to play safely after activating it.
For a safer alternative to allow more survivability you should use ![]() Stalwart Heartrune of Stoneform.
Stalwart Heartrune of Stoneform.
In medium builds that focus on point presence you can use ![]() Brutal Heartrune of Grasping Vines to clump
enemies.
Brutal Heartrune of Grasping Vines to clump
enemies.
Heartrune Usage
Your Heartrune will be used similarly in PvP and PvE scenarios. As such, please refer to our Blunderbuss or War Hammer guide for tips on how it can be used most effectively.
Rotation and Priority List
With a build like this it can be difficult when trying to decide what abilities to use and when. You can reference the priority list below to understand how each individual ability can be used. The main priority is successfully completing the one-shot combo to secure kills.
One-Shot Combo (Shockwave First)
- Begin combat by using Net Shot for its slowing effect.
- Use Shockwave to stun.
- Use Wrecking Ball to knock down the target.
- While the target is on the ground aim at them and fire a basic shot.
- Immediately follow basic shot with Azoth Shrapnel Blast.
- If the target does not die, finish them with a basic attack.
One-Shot Combo (Wrecking Ball First)
- Begin combat by using Net Shot for its slowing effect.
- Use Wrecking Ball to knock down the target.
- Use Shockwave immediately to stun and set up.
- Aim down sight and fire a basic shot
- Immediately after shooting use Azoth Shrapnel Blast
- If the target does not die, fire a basic attack at them
One-Shot Combo With Grenade
If you do not have ![]() Azoth Shrapnel Blast available, or if you want to kill a more defensive target, you can use
Azoth Shrapnel Blast available, or if you want to kill a more defensive target, you can use
![]() Splitting Grenade and detonate it without it hitting the stunned target. If you hit them with the grenade the stun
will break. The grenades will drop at their feet and right as they explode you can hit an aimed shot on their head.
Splitting Grenade and detonate it without it hitting the stunned target. If you hit them with the grenade the stun
will break. The grenades will drop at their feet and right as they explode you can hit an aimed shot on their head.
- Begin combat by using Net Shot for its slowing effect.
- Use Wrecking Ball to knock down the target.
- Use Shockwave immediately to stun and set up.
- Use Splitting Grenade and immediately re-activate to split the grenades.
- Aim down sight and fire a basic shot
- Immediately after shooting use Azoth Shrapnel Blast
- If the target does not die, finish them with a basic attack.
Priorities
- Perform one-shot combo (Top priority if a single target is being focused)
- Use Wrecking Ball if targets are stacked together or a priority target is alone
- Use Shockwave if targets are stacked together or a priority target is alone
- Use Net Shot to initiate combat or close gaps by slowing priority targets.
- When targets are low health or clustered, prioritize shooting a basic shot from
your Blunderbuss and following it up with an immediate Azoth Shrapnel Blast.
(This ability can be used by itself to quickly execute enemies).
- Use Splitting Grenade on AoE clumps or a priority target. This can be
reactivated to split earlier and control the location where it drops.
- Use Path Of Destiny for AoE damage, interrupting casts, or to apply a slow and catch players.
It can also be used when outnumbered for a burst heal with Leeching Path Of Destiny
- Use aimed shots from your Blunderbuss as a filler until abilities are off cooldown, or for quick bursts of damage.
Gameplay Tips
When using the Blunderbuss or War Hammer in PvP and PvE there are many similar aspects that go into gameplay decisions and rotations. To learn more about how you can improve your gameplay, use certain secondary weapons, or additional information on specific abilities, please refer to the Gameplay section of the Blunderbuss page or War Hammer page.
FAQ
For more information on the most frequently asked Blunderbuss or Ice Gauntlet questions please refer to the FAQ section of the Blunderbuss guide, or War Hammer, for answers on PvP and PvE topics!
Changelog
- 22 Oct. 2023: Guide updated for expansion.
- 28 Mar. 2023: Updated perks, gear, and heartrunes.
- 01 Feb. 2023: Guide added.
Savvvo is a full-blown MMORPG try-hard who overthinks every build, min-maxes every stat, and theorycrafts like his life depends on it. If there’s a meta, he’s dissecting it. If there isn’t, he’s creating one.
You can take a closer look at his guides and content on YouTube.
- AMA Session with New World’s Former Lead World Designer
- New World Aeternum 2026 Roadmap Revealed
- Can New World Be Saved? Offers Are Starting to Pop Up.
- The Last Day of New World: Aeternum
- New World Server Mergers (Again)
- What Else Was Planned for New World: Aeternum?
- Global Storage Search is Now Live in New World: Aeternum
- Daggers Are Officially Live in New World: Aeternum