AAC Heavyweight M2 Savage Raid Guide
Welcome to our guide to AAC Heavyweight M2 Savage (M10S), the second encounter in the final raid tier of The Arcadion. This guide aims to prepare players for the raid so they will know what to expect, with detailed mechanic instructions for clearing and consistent weekly farming.
Introduction to The Xtremes (Savage)

The Xtremes, Red Hot and Deep Blue, are the second boss fought in AAC Heavyweight (Savage).
How to Unlock The Xtremes
AAC Heavyweight M2 (Savage) can be unlocked at level 100 after completing the Normal difficulty of the Heavyweight raid and talking to Gabbro in Solution Nine (x22.3, y17.1). It requires a minimum item level of 770 to queue, but this requirement can be bypassed when entering with a full party.
Lore
For all their swaggering, the Xtremes wiped out miserably in your bout against them. Yet what if they had the skills to back up their gormless goading? Gabbro's words echo in your mind as you consider his novel notion. Just how extreme could the Xtremes have possibly been at their gnarliest?
Video Resources
Video resources for this encounter will be posted when available.
Raid Guide
The Xtremes fought on a square arena with a death wall on the outside. Throughout the fight, the arena shape will change.
The Xtremes consist of two bosses, Red Hot and Deep Blue. Both bosses have separate HP pools but cannot be defeated until both of them are. They will also balance their HP throughout the fight. They do not have to be defeated at the same time.
The enrage occurs at roughly 10:00 into the fight and requires roughly 213,000 raid DPS, though there are adds that may change the exact amount required.
Raid Preparation
Begin by dividing the raid into two light parties of one tank, one healer, and two DPS each. All players will get assigned a clock spot with supports at cardinals and DPS at intercardinals.
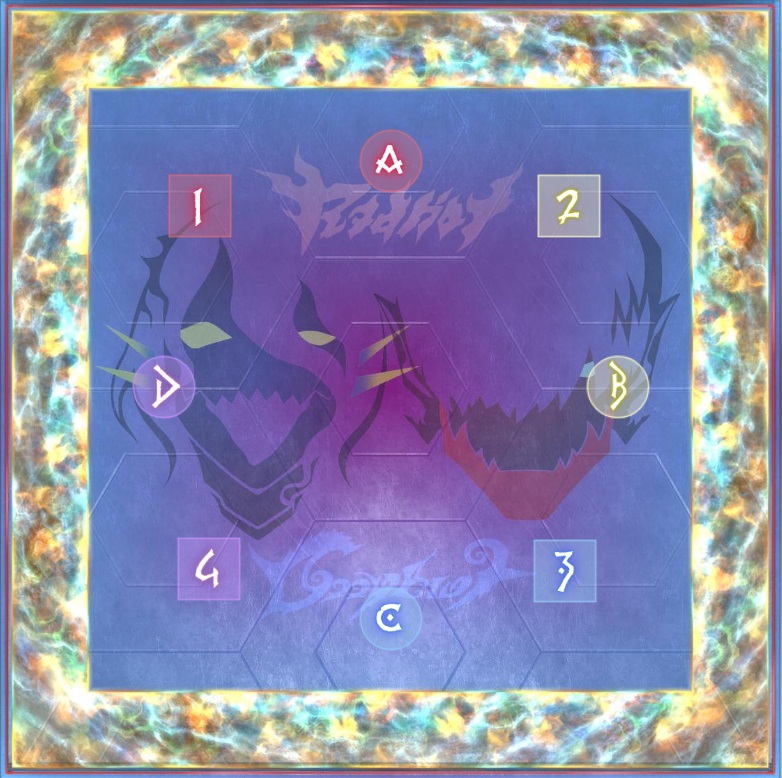
Place waymarks with letters on outer cardinals and numbers on outer intercardinals.
Waymark Code
Strategy Boards
All diagrams in this guide are available as Strategy Boards here together, or use the codes below to import individual strategy boards.
Flame Floater
Cutback Blaze
Snaking 1
Snaking 2
Snaking 3
Watery Grave
Arena Split
Main Mechanics
Certain attacks by Red Hot will leave behind fire puddles on the ground. Certain attacks by Deep Blue when intersecting a fire puddle will create a water bubble, which explodes in an AoE. Diver's Dare removes all fire puddles from the ground.
Phase One
In phase one, you face Red Hot and Deep Blue separately.
Phase One Mechanics
The following mechanics are introduced in the first phase.
- Hot Impact: Shared physical tank buster on the main tank.
- Flame Floater: Targets four random players in order with a proximity tether, giving them a Next in Line debuff. Red Hot will dash to each player in order, dealing proximity damage and leaving behind fire in his path.
- Alley-oop Inferno: Marked fire AoEs on all players. Inflicts a magic vuln and leaves behind a fire puddle.
- Cutback Blaze: Targets the furthest player from Red Hot with an AoE, dealing damage to all players and creating fire on the entire arena except in a cone directly behind him relative to that player.
- Pyrolation: Three-hit stack marker on a random healer. Each hit leaves behind a fire puddle.
- Diver's Dare: Raidwide magic damage. Removes all fire puddles from the arena.
- Sick Swell: Deep Blue tethers to one side of the arena, creating a large wave that will knock players back slightly from that direction. There is a large line AoE on the lane Deep Blue himself is on, knocking back into the wall.
- Sickest Take-off: Deep Blue dashes to the wall tethered by Sick
Swell. Orbs will appear around him, indicating a mechanic that happens
right after the knockback.
- Eight orbs indicate unmarked AoEs with magic vuln on all players, so spread.
- Two orbs indicate unmarked stacks on the healers, so stack in light parties.
- One orb indicates an unmarked stack on the healers, so stack together.
- Alley-oop Double-Dip: An unmarked conal AoE on all players. Unmarked conal AoEs will then repeat on the locations players were at. Inflicts a magic vuln debuff for the first hit and a damage down debuff for the second.
- Reverse Alley-oop: An unmarked conal AoE on all players. Unmarked conal AoEs will then repeat on the locations players were not at. Inflicts a magic vuln debuff for the first hit and a damage down debuff for the second.
- Deep Impact: A physical tank buster on the furthest player. Knocks back slightly.
- Xtreme Spectacular: A proximity AoE across the middle of the arena going east-west, then multiple magical raid-wide hits.
Phase One Strategy
The fight begins with the party fighting only Red Hot. It starts with Hot Impact on the tanks, so make sure to mitigate early. Next, Red Hot jumps to a random edge of the arena and prepares Flame Floater. The proximity tether stretches around halfway across the arena, so players don't need to run far: this also ensures that the fire puddles are only kept to a limited area for the next set of mechanics.

Though there are many configurations, we want to create this reverse L-shape to make the upcoming mechanic easier. The first player targeted will go to the corner counterclockwise, the second player will go about halfway counterclockwise again, the third player goes into the nook created, and the fourth player goes where the boss started from. Next, all players will be targeted by Alley-oop Inferno. Drag the boss slightly out of the fire corner and drop these puddles along the walls of the arena or beside the fire.

Facing the corner, light party 1 tank and melee would be left and light party 2 tank and melee would be right. The ranged can also follow this, though they can drop their puddles wherever as long as it doesn't cover the middle of the arena. All players should then stack between the corner and the boss to ensure Cutback Blaze is baited so that the safe cone extends into the opposite corner. Stutter-step the three stack AoEs from Pyrolation into the safe cone, then heal up for Diver's Dare which removes all the AoEs from the arena.
At this point, Red Hot becomes untargetable and jumps away while Deep Blue appears north of the arena. He begins to cast Sick Swell, so take note of what wall he will jump to although there is time to react for this set. He then casts Sickest Take-off, and note how many orbs he has during the cast. Eight orbs indicates a spread after the knockback, while two orbs indicate light party stacks.
Facing the wall he jumps to, there will be two safe lanes as Deep Blue is in one of them. Light party 1 will be in the relative left-most lane and light party 2 in the right-most. If spread, spread in a line of tank, healer, melee, and ranged. If light party stacks, stack and get knocked back together.
Prepare for either Reverse Alley-oop or Alley-oop Double-Dip. All players need to get in their clock spots relative to where the boss is facing at the cast. If it's Reverse, stay after the initial hit. If it's Double-Dip, players have to move between the initial AoEs to dodge another set. This is followed by Deep Impact on the furthest player: have the main tank mitigate and bait it at max melee while the rest of the party stacks behind the boss.
Red Hot returns to the arena, and players can damage both of them before they both cast Xtreme Spectacular. Stack on the north edge, heal up, and get ready for the first combined phase of the fight.
Phase Two: Insane Air and Snaking
In phase two, you fight both Xtremes as they perform mechanics together. Where possible, keep the bosses together to use multi-target or AoE attacks on them.
Phase Two Mechanics
The following mechanics are introduced or changed in phase two.
- Insane Air: Red Hot and Deep Blue prepare to dash to the marked
location on the indicated path. Once they are there, they will do a mechanic
based on the orientation of the surfboard. Red Hot's AoEs leave behind a fire
puddle, while Deep Blue's will trigger an AoE if they hit a fire puddle. All
hits inflict a magic vuln debuff.
- A surfboard pointing up indicates a tank buster on the closest player.
- A surfboard pointing straight in the middle indicates a conal share AoE on the closest player.
- A surfboard pointing down indicates four conal AoEs on the closest four players.
- Watersnaking and Firesnaking: Inflicts either the Watersnaking or Firesnaking debuff on the four closest players or the four furthest players. Attacks from each boss will only target players with their respective debuffs while they are active.
- Deep Varial: Deep Blue indicates a wall he will jump to, doing a
wide cone AoE on the arena from that wall after the jump. Orbs will appear
on the wave, indicating a mechanic that happens right after the AoE.
- Four orbs indicate unmarked AoEs with magic vuln on all players, so spread.
- One orb indicates an unmarked stack on the healers, so stack together.
- Hot Aerial: Jumps to the furthest player to Red Hot four times, dealing magic damage with a magic vuln debuff and leaving behind a fire puddle.
Phase Two Strategy
Pull the bosses together and begin to cleave them for a few GCDs before they both jump to opposite corners of the arena: Deep Blue to northwest and Red Hot to southwest. Light party 1 will be doing Deep Blue mechanics and light party 2 will be doing Red Hot mechanics for this phase.
Insane Air 1 is the first mechanic of the combined phase. Both bosses will dash in the indicated path to a surfboard. When they reach the surfboard's location, they will do one of three mechanics: spread cones, stack cone, or circle tank buster. This will happen four times, and all players need to watch what the next mechanic is and position for it accordingly. Both light parties will be doing mechanics from Red Hot and Deep Blue, though these mechanics may be different for both parties.
For spread, facing the boss from the outside of the arena players should aim to stack in order of ranged, healer, tank, and melee left to right. For stack, aim the cone outside of the arena. For the tank buster, the tank will be inside the boss's hitbox closer to the wall, while the rest of the party stands inside of the arena. The tank buster will never happen twice. Note that the final mechanic for the Deep Blue party will be covered in fire, so spread or stack along the safe side of the arena.
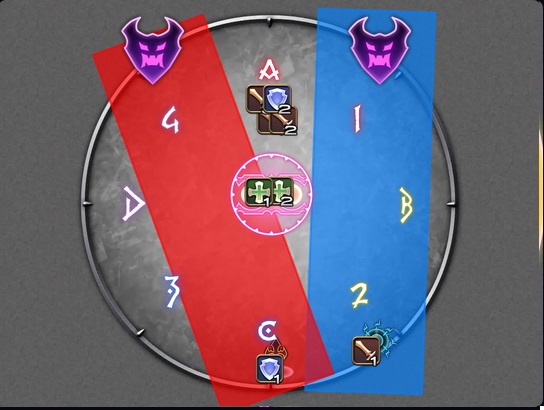
Both bosses will cast Diver's Dare and remove all the fire puddles from the arena. Bring them together and cleave them before they jump to the middle of the arena for Firesnaking and Watersnaking. Light party 1 will stand underneath Deep Blue, and light party 2 stands underneath Red Hot to bait debuffs. It is random which set of debuffs each light party receives, but if baited correctly each light party will receive the same debuffs. These indicate which boss's mechanics your party is doing for the next phase. The debuff only marks players as the target for their attacks, so continue cleaving both bosses when possible.
There are many ways to do the following set of mechanics, but the key idea is to keep the middle clear of any fire puddles for a final Cutback Blaze and to keep two columns free of fire for Sickest Take-off. The strategy described below keeps all the fire puddles on the initial fire side, but there are different ones being used that may have more uptime. Adapt and keep the middle safe!

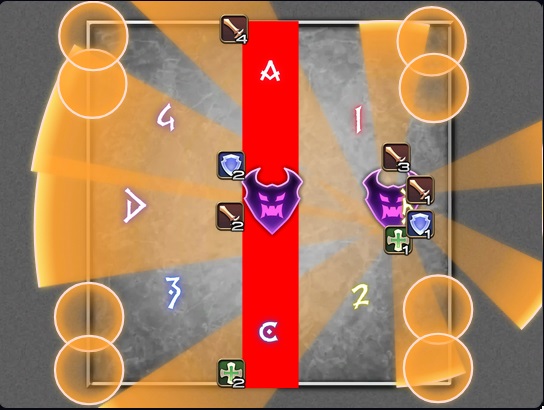
Both parties should head towards their boss indicated by their debuff, as Deep Blue will jump to the west wall and Red Hot jumps near the east wall. Both bosses cast an Alley-oop mechanic: Red Hot will use Alley-oop Inferno and Deep Blue will use either Reverse Alley-oop or Alley-oop Double-Dip. Fire team will drop puddles in a box by the east wall with supports left facing and DPS right facing the boss. Water team will bait the conal AoEs towards north and south so they don't hit the fire team. For either version, the water team can move to the large safespot in the middle.
Red Hot will then cast Hot Impact on the fire tank while Deep Blue casts Sick Swell on either the north or south wall. Have the fire tank move Red Hot to the middle so that tanks can stack together to mitigate. Deep Blue jumps to the middle and casts Deep Varial on the opposite wall of Sick Swell. Cleave them as the party moves to that wall to dodge the cone.

Accompanying the wide conal AoE is another set of Alley-oop Inferno AoEs as well as Deep Varial's AoE: either spread or stack. Have the fire players spread on the east side of the arena with melee jobs close and ranged jobs in the corner. As for the water team, look at the wave: four orbs indicates a spread, while one orb indicates a spread. Spread or stack on the west side of the arena; players will have time to spread after the cone AoE goes off.
The next mechanic set is for the fire team. Red Hot jumps to the middle and begins to cast Hot Aerial. This targets the four furthest fire players to the boss, and has to be baited by the fire team only. Bait these puddles in the order of tank, healer, melee, ranged on the northeast and southeast markers. The tank moves out first to bait, and the healer can preposition. Once the tank has baited, the melee moves to their spot, and once the healer has baited the ranged can move to their spot. After all jumps, have the tank position Red Hot back in the centre or near the centre.

Meanwhile, Deep Blue is casting Sickest Take-off at the wall indicated by Sick Swell (always opposite of Deep Varial). Look at the wall to see whether it's spread or stack. Avoid the lane Deep Blue is on, run away from the fire as it will explode, and stack or spread together; all players except the water tank can use knockback prevention abilities. After the knockback, the fire team needs to stack together to bait Cutback Blaze towards the east side of the arena where the fire puddles are.
Finally, Deep Blue will cast Deep Impact as Cutback Blaze goes off on the furthest water player. The water tank needs to run out into the far side of the safe spot and mitigate the hit. Since this knocks them back, they should use Arm's Length on the hit to ensure they're not knocked back into the wall. If the rest of the party stacks under Red Hot, it is possible for them to be relatively close to each other after the jump to cleave.
Diver's Dare removes all the fire from the arena. Get ready for the next phase!
Phase Three: Watery Grave and Arena Split
In phase three, players have to free trapped players from an add, then navigate a split arena.
Phase Three Mechanics
The following mechanics are introduced in the third phase.
- Deep Aerial: Summons a two-player tower in the middle of the arena. This traps players inside a bubble and inflicts them with Watery Grave, killing them if the bubble is not destroyed. Players inside the bubble take reduced damage from fire attacks. The arena also becomes a circle.
- Xtreme Wave: The Xtremes become untargetable and each target a random player each with a water or fire prey marker with a proximity tether. This deals damage in a line towards them, killing them if they are too close. If the water AoE hits the Watery Grave, it will give it a vuln down debuff, decreasing damage dealt to it. If the fire AoE hits the Watery Grave, it will do a raidwide AoE and deal approximately 15% of its maximum HP.
- Freaky Pyrotation: Stack AoE on four players of one role. Creates a fire puddle on the ground.
Phase Three Strategy
The first mechanic of the third phase is Watery Grave. The tower soak does not do massive damage and only prevents the player from moving or using movement abilities. Though anyone can soak the tower, avoid putting jobs with movement abilities tied to damage in, such as Warrior or Dragoon. Most parties will opt to put healers in for ease of healing the incoming damage in the phase.
The objective of the phase is to avoid hitting the bubble with the water AoE while hitting it every time with the fire AoE. Note the AoE only needs to hit the hitbox of the bubble to count; it doesn't have to go directly through. Since the Xtremes always go to the north intercardinals when they become untargetable, the idea is to have both the fire and water tethers going parallel on one side of the arena: whichever side the water one spawned on. The rest of the party can sit on the opposite side, and if they get a tether stretch it across.
The tethers happen a total of six times. Every time the fire tether hits the bubble it will do a raidwide AoE. Since each hit deals 15% of the bubble's HP, players need to do the other 10%, which serves as a hard DPS check. Use 2 minute buffs towards the end if you have to.
After the players are freed from the Watery Grave, pull the bosses tether from their final dash location as they will cast Diver's Dare. Prepare for another split phase. Red Hot will jump north and cast Flame Floater down the middle, dividing the arena into two halves. Deep Blue will cast Sick Swell on either the east or west wall of the arena, so remember this for later. Have light party 1 go on the west side while light party 2 goes on the east side.
Red Hot will jump to the middle of the arena and stay there for the rest of the arena split phase, while Deep Blue will eventually jump to a random side. Red Hot casts Alley-oop Inferno on all eight players, and these need to be dropped at the wall or corner to ensure the AoEs don't cover the safe spaces. Have role pairs drop these out: tanks with ranged DPS and healers with melee DPS. Next, Deep Blue jumps to a random side and casts either Alley-oop Double-Dip or Reverse Double-Dip.
The party Deep Blue jumps to can do this normally. However, because the other party is far away, they need to position fairly precisely, then dodge. If it's Double-Dip, they need to move towards their role partner in the middle of the cleave. If it's Reverse, the tank and melee DPS need to go in the middle to avoid their overlapping cleaves. The ranged and healer can stay in their spot for that one. Immediately after the cleaves go off, they will create AoEs on the fire puddles, so dodge them.
Finally, Red Hot casts Freaky Pyrotation and Deep Blue casts Sickest Take-off on the wall indicated earlier. For the stacks, go with your role partner to the wall in between the puddles dropped earlier and the fire line. Then take note of where Deep Blue is surfing from and move if you're in his path from the line AoE. All players should use their knockback immunity. This surf will always be a light party stack, so players can stack together in the middle, but note that the wave explodes the fire creating AoEs.
A Diver's Dare will remove all the fire, and we go to the final phase.
Phase Four: Insane Air 2
In phase four, players combine Insane Air and Snaking, with a small mechanic at the end to keep players on their toes.
Phase Four Mechanics
The following mechanics are introduced in the final phase.
- Xtreme Watersnaking and Xtreme Firesnaking: Inflicts the four closest or four furthest players from the bosses with the Xtreme Watersnaking or Firesnaking debuff. This must be cleansed by getting hit by an attack from the boss of the opposite debuff. This creates a large AoE that deals damage and inflicts a magic vuln, though it will do damage after the vuln from Insane Air is gone.
Phase Four Strategy
Pull the bosses together and cleave them before beginning to bait debuffs like Firesnaking/Watersnaking. However, this time the mechanic is combined with Insane Air. Players need to get hit by the opposite boss in order to resolve their debuffs without multiple of the same debuff going off at once.
We want to cleanse in the order of healer, melee, and ranged. The tank buster will happen once randomly, but both tank busters from both bosses happen at the same time. The mechanic is solved by going to the boss corresponding with your debuff, and swapping over to the other boss when it's time to cleanse your debuff. Because healers will always cleanse first and no other player should be hit by the tank buster, they can always swap as soon as the debuffs go out.
For example, if the first mechanic was spread, the healers have already swapped and their debuff gets cleansed. The second mechanic is stack, and the melees swap to the other boss and get hit with the opposite attack, cleansing their debuff. The third mechanic is a tank buster, and the tanks swap and cleanse their debuffs. The final mechanic is spread, and the ranged DPS will swap, completing the mechanic. Pull the bosses together and mitigate Diver's Dare, which removes the puddles from the arena for one last mechanic.
The final mechanic of the fight combines previously seen mechanics. Both bosses jump to the middle and cast Alley-oop Inferno combined with either Reverse Alley-oop or Alley-oop Double-Dip. Players will take their fire AoEs close to the wall, then either rotate clockwise if Double-Dip or stay if Reverse. Once the fire puddle appears, move out of it as it will do an AoE from the wave. Red Hot then casts Pyrolation and Deep Blue casts Deep Impact. The main tank needs to run away from the party and mitigate, while the party rotates around Red Hot starting in the middle to drop the fire puddles. Remember to use knockback immunity as the main tank if you need to run far.
Finally, the boss will continue to use Diver's Dare until the enrage cast. Defeat the Xtremes before they sink you!
Party Finder Strategies
Amendments to the guide above based on popular strategies used in party finder will be used here.
- This guide is compatible with the Toxic Friends Raidplan at https://raidplan.io/plan/uE1jm_M3oD-P6Ww8.
- This guide is compatible with Hector's video lecture guide.
Loot
When the Xtremes are defeated, a treasure coffer will appear that contains Grand Champion's Gear Coffers. When opened by a player, these coffers contain an item level 790 Grand Champion equip for the job the player is currently on. The amount of coffers that appear depend on how many players have already cleared during the weekly lockout. If no players have cleared yet, Head, Hands, and Feet coffers will appear, as well as a Thundersteeping Glaze and a Universal Tomestone 3.0. If one to four players have already cleared, two random coffers will appear with a random upgrade item. If five or more players have already cleared, no treasure coffer will appear.
Players who defeat the encounter for the first time during the weekly reset will also receive an AAC Illustrated: HW Edition II token. Four of these can be traded in for a Grand Champion Head, Hands, or Feet gear of your choosing at an Arcadion gear vendor. Three of these can be traded in for a Thundersteeping Glaze.
Changelog
- 12 Jan. 2026: Guide added.

This guide has been written by Lyra an accomplished raider in FFXIV and has written raid guides for the game for the past five years. You can follow him on Twitter and he streams raids on Twitch.
- FFXIV’s Berlin Fan Festival Schedule Is Out!
- Pre-Order FFXIV Nendoroids Y’shtola & G’raha Now!
- From Action to Tab Targetting — How Did You Start FFXIV?
- Developing FFXIV Big Fish Together With Ryuta Suyama
- These Changes Will Make You Think Twice Before Tanking in Evercold
- Complete Dawntrail’s Art Book Collection With – Relics of Eternity –
- New Framer’s Kit With Return Of Breaking Brick Mountains
- Last Chance For THE PRIMALS x Download Festival T-Shirt!