Karazhan Raid Guide
Karazhan is most likely the first raid you will venture into in TBC Classic. It is located in Deadwind Pass within the Eastern Kingdoms, not actually in Outland! Unlike most other raids in TBC Classic, it is a 10-man raid, not 25. It also has an attunement process, unlike the other two raids available in Phase One.
The Karazhan Quests
Before heading into Karazhan, you will need to complete the attunement required to enter the raid. In addition to that, we also advise you to get any of the quests for this raid that you are able to pickup. To make this process easier, we have written separate guides for the attunement process, relevant quests, and their chains.
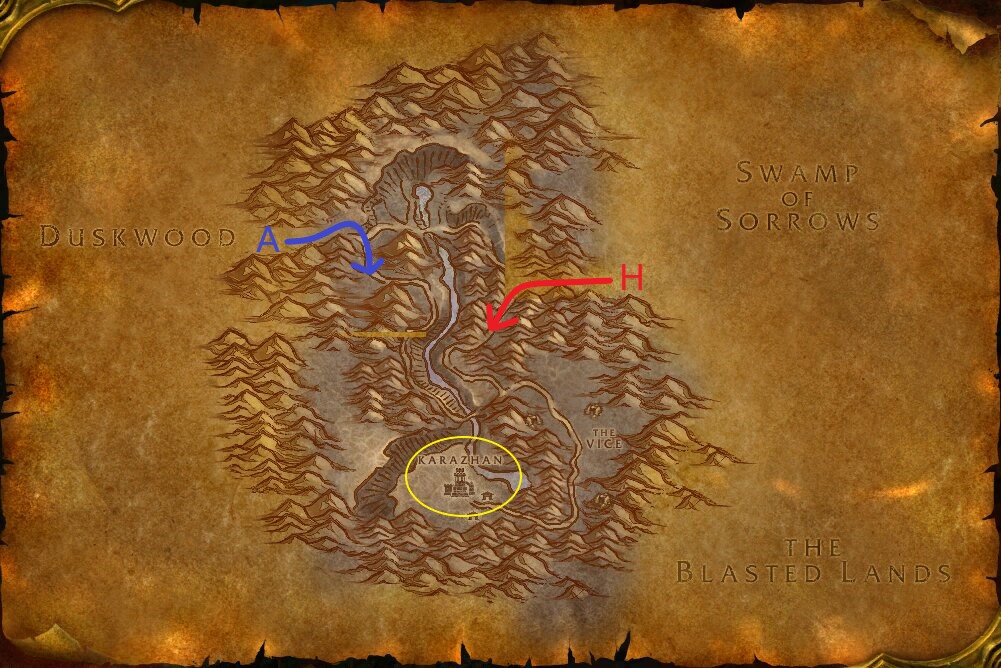
Karazhan Entrance Location
Karazhan can be found on the south side of Deadwind Pass. Alliance players will want to fly to Darkshire in Duskwood and enter from the West, while Horde players will want to go to Stonard in Swamp of Sorrows and enter from the east.
Karazhan Trash Mobs
Karazhan holds a large number of trash mobs. We will list all of the important mobs that have very threatening abilities you should be aware of.
Spectral Charger
A few of these can be found on the way to the first boss. Try to have the
raid stack behind them to prevent the ![]() Charge and make sure to
use spells such as
Charge and make sure to
use spells such as ![]() Tremor Totem and
Tremor Totem and ![]() Fear Ward to
prevent the fears.
Fear Ward to
prevent the fears.
Spectral Stable Hand
You will fight a few of these alongside the other horse-trash types on the
way to the first boss. The main danger of these mobs is the
![]() Knockdown and
Knockdown and ![]() Pierce Armor. By itself, this is
not that dangerous, but when you are tanking multiple mobs at a time it can be
quite deadly. Aim to kill these early on or use crowd controls on them such as
Pierce Armor. By itself, this is
not that dangerous, but when you are tanking multiple mobs at a time it can be
quite deadly. Aim to kill these early on or use crowd controls on them such as
![]() Shackle Undead. Make sure to also interrupt their
Shackle Undead. Make sure to also interrupt their
![]() Healing Touch.
Healing Touch.
Spectral Retainer
These should be the main focus of your DPS when pulling packs in the
Ballroom. Focus these down quickly to avoid them using
![]() Oath of Fealty and mind-controlling raid memebers.
Oath of Fealty and mind-controlling raid memebers.
![]() Antimagic Pulse is also worth mentioning as it can dispel some
vital buffs, such as a Protection Paladins
Antimagic Pulse is also worth mentioning as it can dispel some
vital buffs, such as a Protection Paladins
![]() Righteous Fury.
Righteous Fury.
Phantom Valet
While these do not have noteworthy abilities, they are listed here as they hit
extremely hard. Keep your tank full health and make sure to keep up damage-reducing
debuffs, such as ![]() Demoralizing Shout.
Demoralizing Shout.
Skeletal Waiter
These skeletons are not too deadly on their own. However, the debuff they can
apply can be quite deadly to tanks. ![]() Brittle Bones leaves a 2-minute
debuff on players, periodically reducing their Armor to 0 for a few
seconds.
Brittle Bones leaves a 2-minute
debuff on players, periodically reducing their Armor to 0 for a few
seconds.
Ghostly Steward
These are also in the list as they hit very hard. When they reach low
health, they will stun their target with ![]() Drunken Skull Crack and
then
Drunken Skull Crack and
then ![]() Enrage, greatly increasing their damage dealt.
Enrage, greatly increasing their damage dealt.
Concubine
When reaching low health, Concubines will ![]() Concubine Transform
into their true demonic forms, casting
Concubine Transform
into their true demonic forms, casting ![]() Seduction on all nearby
enemies. Have a tank ready to pick them up afterward or use
Seduction on all nearby
enemies. Have a tank ready to pick them up afterward or use
![]() Tremor Totem to break the sleep before these attack your non-tank
raid members.
Tremor Totem to break the sleep before these attack your non-tank
raid members.
Wanton Hostess
Ranged DPS and healers will want to stay at max range from these to avoid
the silence from ![]() Banshee Shriek. While above 50% health, nearby
players will be debuffed by
Banshee Shriek. While above 50% health, nearby
players will be debuffed by ![]() Alluring Aura, reducing Physical
damage dealt by 50%. When the Wanton Hostess falls below 50% health,
this aura will change to
Alluring Aura, reducing Physical
damage dealt by 50%. When the Wanton Hostess falls below 50% health,
this aura will change to ![]() Bewitching Aura, reducing spell damage
dealt of nearby players by 50%. All of these abilities can be out-ranged to
avoid them completely.
Bewitching Aura, reducing spell damage
dealt of nearby players by 50%. All of these abilities can be out-ranged to
avoid them completely.
Skeletal Usher
![]() Ice Tomb will be cast on the highest-threat target and then
they will proceed to attack whoever is second on threat. When
Ice Tomb will be cast on the highest-threat target and then
they will proceed to attack whoever is second on threat. When
![]() Ice Tomb is used it also wipes the threat from the main target,
meaning a second tank will need to be high on threat or DPS raid members will
start to die.
Ice Tomb is used it also wipes the threat from the main target,
meaning a second tank will need to be high on threat or DPS raid members will
start to die.
Spectral Performer
These mobs are fairly easy to deal with. Remove the
![]() Bad Poetry with a Magic dispel like
Bad Poetry with a Magic dispel like ![]() Cleanse or
Cleanse or
![]() Dispel Magic. When these mobs die, they will cast
Dispel Magic. When these mobs die, they will cast
![]() Curtain Call, dealing high damage to any nearby enemies.
Curtain Call, dealing high damage to any nearby enemies.
Ghastly Haunt
The main threat from these monsters is their high damage output. They also
apply a nasty Curse in ![]() Ethereal Curse, reducing the hit chance
of Physical attacks by 15% per stack. Keep this removed from your tank to help
with threat.
Ethereal Curse, reducing the hit chance
of Physical attacks by 15% per stack. Keep this removed from your tank to help
with threat.
Trapped Soul
These as well deal very high Melee attack damage. Your tank will want to
keep these faced away from the raid to reduce the amount of players hit by
![]() Cone of Cold. You will also want to keep removing the buff
Cone of Cold. You will also want to keep removing the buff
![]() Elemental Armor, which increases their Magic Resistance by
200.
Elemental Armor, which increases their Magic Resistance by
200.
Arcane Watchman
These are rather easy to deal with aside from their main ability.
![]() Overload will cause a random raid member to deal damage to all
nearby raid members. If you get this debuff on you, make sure to move away from
any nearby allies.
Overload will cause a random raid member to deal damage to all
nearby raid members. If you get this debuff on you, make sure to move away from
any nearby allies.
Syphoner
By themselves these mobs are rather weak, but when facing groups of 5 or more
the ![]() Drain Mana becomes a huge threat as it quickly drains the Mana
of random raid members. Quickly kill these off before they drain too much Mana
from your raid.
Drain Mana becomes a huge threat as it quickly drains the Mana
of random raid members. Quickly kill these off before they drain too much Mana
from your raid.
Arcane Anomaly
These mobs have a ![]() Mana Shield up, taking damage as Mana
instead of health. When they run out of Mana these die as they have very low
maximum health. Periodically they will also cast
Mana Shield up, taking damage as Mana
instead of health. When they run out of Mana these die as they have very low
maximum health. Periodically they will also cast ![]() Blink,
jumping to a random location and resetting threat. Tanks will need to quickly
pick them back up. When defeated,
Blink,
jumping to a random location and resetting threat. Tanks will need to quickly
pick them back up. When defeated, ![]() Loose Mana will be cast
around their corpse, restoring Mana to anyone nearby.
Loose Mana will be cast
around their corpse, restoring Mana to anyone nearby.
Arcane Protector
Be prepared when facing these as they are one of the hardest-hitting mobs in the entire instance. Be ready to top your tank up instantly as they can easily die fighting these. While fighting, these will deal reflective damage to specific types of attacks, either melee, physical ranged, or spells. Be aware of your health at all times and stop attacking if you are low as healers will most likely be focused on healing tanks.
Mana Feeder
While rather weak overall, these can be very annoying to deal with depending
on your raid composition. They are completely immune to all magical damage and
can only be killed by Physical attacks. Physical damage dealers should focus on
killing these off while casters deal with any other mobs in combat. These will
also burn a small amount of Mana from anyone they attack in combat with
![]() Astral Bite.
Astral Bite.
Magical Horror
You will want to focus these down quickly to prevent the
![]() Power Distortion from causing issues. This can quickly burn
through someone's Mana pool, or make it extremely difficult for Warrior/Druid
tanks to maintain threat.
Power Distortion from causing issues. This can quickly burn
through someone's Mana pool, or make it extremely difficult for Warrior/Druid
tanks to maintain threat.
Mana Warp
When these mobs die they will start to cast ![]() Warp Breach.
Be prepared to stun them before this cast finishes or they will deal a very high
amount of AoE damage to all nearby enemies.
Warp Breach.
Be prepared to stun them before this cast finishes or they will deal a very high
amount of AoE damage to all nearby enemies.
Sorcerous Shade
Stay at max range when fighting these to avoid being hit by one of the volleys above. Focus these down first as they deal high damage to all nearby enemies.
Ethereal Thief
Be cautious when pulling these as they are very dangerous when facing more
than one at a time. Keep them faced away from the raid as the
![]() Cleave hits non-tanks very hard. Periodically they will
Cleave hits non-tanks very hard. Periodically they will
![]() Disarm their target and drop threat, possibly attacking the
second-highest on threat instead.
Disarm their target and drop threat, possibly attacking the
second-highest on threat instead.
Fleshbeast
These are very dangerous, dealing high AoE damage to all nearby enemies.
They also hit very hard with ![]() Thrash, so be ready to top the
tanks off quickly.
Thrash, so be ready to top the
tanks off quickly.
Greater Fleshbeast
The improved version of the above mob, having the same abilities, just
dealing a bit more damage. These are very deadly to tanks; be ready to heal
them at all times as the ![]() Thrash makes it possible to die in
nearly one attack.
Thrash makes it possible to die in
nearly one attack.
Overview of Karazhan Boss Fights
Karazhan hosts eleven bosses in total, many of which are optional. Nightbane is one of these optional bosses, and while he is not the last boss of Karazhan, he is harder than the rest. Check out our Karazhan Quests guide to learn how to summon Nightbane.
Attumen the Huntsman
This fight consists of 2 phases. In the first phase, you will be fighting Midnight until he reaches 95% health, then Attumen the Huntsman will be called in and you will have to face both bosses at the same time.
Midnight Abilities
 Summon Attumen — Summons
Attumen the Huntsman when reaching 95% health.
Summon Attumen — Summons
Attumen the Huntsman when reaching 95% health. Mount — Merges together with
Attumen the Huntsman whenever either boss reaches 25%
health.
Mount — Merges together with
Attumen the Huntsman whenever either boss reaches 25%
health.
Attumen the Huntsman Abilities
 Knockdown — Knocks down current target, stunning them
for 3 seconds.
Knockdown — Knocks down current target, stunning them
for 3 seconds. Shadow Cleave — Frontal cone cleave attack; deals
shadow damage.
Shadow Cleave — Frontal cone cleave attack; deals
shadow damage. Intangible Presence — Curses all nearby enemies,
reducing their hit chance by 50% for 12 seconds.
Intangible Presence — Curses all nearby enemies,
reducing their hit chance by 50% for 12 seconds.- Mount — Merges together with
Midnight whenever either boss reaches 25% health.
Mounted Attumen the Huntsman Abilities
- Knockdown — Knocks down current target, stunning them
for 3 seconds.
- Shadow Cleave — Frontal cone cleave attack; deals
shadow damage.
- Intangible Presence — Curses all nearby enemies,
reducing their hit chance by 50% for 12 seconds.
 Berserker Charge — Charges the enemy that is the
farthest away between 8-40 yards.
Berserker Charge — Charges the enemy that is the
farthest away between 8-40 yards.
Tanks will need to be ready to pick up Attumen the Huntsman
whenever he spawns to prevent healer deaths as he will start attacking right
after spawning. They will also need to make sure to face the boss away from the
raid to prevent the ![]() Shadow Cleave from hitting non-tanks. DPS
need to be aware of threat constantly as the
Shadow Cleave from hitting non-tanks. DPS
need to be aware of threat constantly as the ![]() Knockdown will
constantly stun the tank, preventing them from building threat.
Knockdown will
constantly stun the tank, preventing them from building threat.
![]() Intangible Presence needs to be removed from the tanks and
DPS as soon as possible, but especially tanks to help with their threat
generation. When either boss reaches 25% health, they will "merge" together
into a single boss.
Intangible Presence needs to be removed from the tanks and
DPS as soon as possible, but especially tanks to help with their threat
generation. When either boss reaches 25% health, they will "merge" together
into a single boss.
When Attumen ![]() Mounts Midnight, he will continue to use
Mounts Midnight, he will continue to use
![]() Shadow Cleave,
Shadow Cleave, ![]() Knockdown, and
Knockdown, and
![]() Intangible Presence, in addition to a new ability. He will start to
Intangible Presence, in addition to a new ability. He will start to
![]() Berserker Charge at the enemy that is furthest away from him.
This can be avoided by having the entire raid stack within 8 yards of the boss,
as the charge as a minimum range, or you can have the off-tank stand max range
to soak the charges.
Berserker Charge at the enemy that is furthest away from him.
This can be avoided by having the entire raid stack within 8 yards of the boss,
as the charge as a minimum range, or you can have the off-tank stand max range
to soak the charges.
Attumen the Huntsman Loot
| Item | Item Type | Slot |
|---|---|---|
| Accessory | Neck | |
| Cloth | Wrist | |
| Leather | Wrist | |
| Wrist | ||
| Wrist | ||
| Plate | Wrist | |
| Cloth | Hands | |
| Cloth | Hands | |
| Leather | Hands | |
| Plate | Hands | |
| Accessory | Finger | |
| Crossbow | Ranged | |
| Engineering Schematic | Misc. | |
| Mount | Misc. |
Moroes
Moroes Abilities
 Gouge — Incapacitates a target for up to 6
seconds.
Gouge — Incapacitates a target for up to 6
seconds. Blind — Disorients a random target for 10
seconds.
Blind — Disorients a random target for 10
seconds. Vanish — Moroes will enter stealth
periodically throughout the fight for a short duration.
Vanish — Moroes will enter stealth
periodically throughout the fight for a short duration. Garrote — After using Vanish,
Moroes will put a bleed on a random target.
Garrote — After using Vanish,
Moroes will put a bleed on a random target. Enrage — At 30% health Moroes will
Enrage, increasing his damage output.
Enrage — At 30% health Moroes will
Enrage, increasing his damage output.
Moroes Adds
Below is a list of the suggested kill order of the adds during Moroes fight and their important abilities.
- Baroness Dorothea Millstipe
- Lady Catriona Von'Indi
- Lady Keira Berrybuck
- Baron Rafe Dreuger
- Lord Robin Daris
- Lord Crispin Ference
Moroes himself is the main threat of this fight. He will
periodically use ![]() Gouge on his current target, causing him to
ignore that player and attack his next-highest-threat target. For this reason,
having tanks as the top 2 on threat is recommended to prevent DPS from
dying.
Gouge on his current target, causing him to
ignore that player and attack his next-highest-threat target. For this reason,
having tanks as the top 2 on threat is recommended to prevent DPS from
dying. ![]() Blind is a Poison and should be removed as soon as
possible if your raid can remove Poisons.
Blind is a Poison and should be removed as soon as
possible if your raid can remove Poisons.
Throughout the fight Moroes will ![]() Vanish
and
Vanish
and ![]() Garrote a random raid member, leaving a 5-minute bleed on
them. These Garrote debuffs can be removed with spells such as
Garrote a random raid member, leaving a 5-minute bleed on
them. These Garrote debuffs can be removed with spells such as
![]() Ice Block or
Ice Block or ![]() Blessing of Protection.
Blessing of Protection.
Dealing with the adds at the start of the fight is the most important. You
may choose to use some crowd control such as ![]() Shackle Undead or
Shackle Undead or
![]() Turn Evil to deal with less adds at the start, or you can simply
try to AoE all adds down at once. Use the recommended priority list above to
kill off the most threatening adds first and try to interrupt their important
casts.
Turn Evil to deal with less adds at the start, or you can simply
try to AoE all adds down at once. Use the recommended priority list above to
kill off the most threatening adds first and try to interrupt their important
casts.
Moroes Loot
| Item | Item Type | Slot |
|---|---|---|
| Accessory | Neck | |
| Cloak | Back | |
| Cloak | Back | |
| Cloth | Waist | |
| Waist | ||
| Plate | Waist | |
| Leather | Feet | |
| Plate | Feet | |
| Accessory | Trinket | |
| Dagger | Weapon | |
| Off-Hand Weapon | Off-Hand | |
| Idol | Relic | |
| Enchanting Formula | Misc. |
Maiden of Virtue
 Holy Ground — Deals damage to nearby enemies and
silences them for 1 second.
Holy Ground — Deals damage to nearby enemies and
silences them for 1 second. Holy Fire — Deals Holy damage to a random target and
leave a damage-over-time magical debuff.
Holy Fire — Deals Holy damage to a random target and
leave a damage-over-time magical debuff. Holy Wrath — Deals Holy damage to a random enemy and
bounces to a nearby enemy, doubling in damage.
Holy Wrath — Deals Holy damage to a random enemy and
bounces to a nearby enemy, doubling in damage. Repentance — Incapacitates all nearby enemies for 12
seconds; the effect breaks upon taking damage.
Repentance — Incapacitates all nearby enemies for 12
seconds; the effect breaks upon taking damage.
Start the fight off by having the entire raid spread out around the room
between the different pillars. Make sure to move up toward the boss to prevent
the pillars causing line-of-sight issues for healers that are also spread
throughout the room. ![]() Holy Wrath prevents you from stacking as it
deals damage to a random target and then bounces to a nearby enemy, doubling in
damage each time it bounces.
Holy Wrath prevents you from stacking as it
deals damage to a random target and then bounces to a nearby enemy, doubling in
damage each time it bounces.
![]() Holy Ground acts similar to
Holy Ground acts similar to ![]() Consecration from
a Paladin, causing Holy damage to all nearby enemies, but also
silencing enemies hit for 1 second every other second.
Consecration from
a Paladin, causing Holy damage to all nearby enemies, but also
silencing enemies hit for 1 second every other second.
![]() Repentance will incapacitate all enemies in the raid. To
counter this, you will want to move near the boss before the
Repentence goes off to take damage and break the incapacitate
effect. Anyone able to remove magical debuffs should also be quick to remove
the debuff applied by
Repentance will incapacitate all enemies in the raid. To
counter this, you will want to move near the boss before the
Repentence goes off to take damage and break the incapacitate
effect. Anyone able to remove magical debuffs should also be quick to remove
the debuff applied by ![]() Holy Wrath on random members.
Holy Wrath on random members.
Maiden of Virtue Loot
| Item | Item Type | Slot |
|---|---|---|
| Accessory | Neck | |
| Cloth | Wrist | |
| Cloth | Wrist | |
| Leather | Wrist | |
| Plate | Wrist | |
| Leather | Hands | |
| Hands | ||
| Hands | ||
| Plate | Hands | |
| Cloth | Feet | |
| One-Handed Mace | Main-Hand | |
| Totem | Relic |
Opera Event
The Opera Event in Karazhan consists of one of three different fights that changes weekly. All three of the specfic fights will be covered here.
Big Bad Wolf
 Red Riding Hood — Marks a random target as Red Riding
Hood, chasing them around the room trying to attack them.
Red Riding Hood — Marks a random target as Red Riding
Hood, chasing them around the room trying to attack them. Terrifying Howl — Fears all nearby enemies.
 Wide Swipe — Stuns current target for 4 seconds.
The main focus of this fight is the ![]() Red Riding Hood debuff.
The target of the debuff will need to kite the boss around as they will die if he
reaches them. If you have any abilities like
Red Riding Hood debuff.
The target of the debuff will need to kite the boss around as they will die if he
reaches them. If you have any abilities like ![]() Fear Ward or
Fear Ward or
![]() Tremor Totem, use them to prevent the
Tremor Totem, use them to prevent the
![]() Terrifying Howl fear.
Terrifying Howl fear.
Big Bad Wolf Loot
| Item | Item Type | Slot |
|---|---|---|
| Head | ||
| Cloth | Back | |
| Fist Weapon | Main-Hand | |
| Gun | Ranged |
Romulo and Julianne
- Julianne
 Eternal Affection — Casts a large heal on an
ally.
Eternal Affection — Casts a large heal on an
ally. Devotion — Buffs damage and cast speed.
 Powerful Attraction — Stuns a random target for 6
seconds.
Powerful Attraction — Stuns a random target for 6
seconds. Blinding Passion — Deals damage to a target and
applies a damage-over-time effect.
Blinding Passion — Deals damage to a target and
applies a damage-over-time effect.
- Romulo
 Daring — Increases damage and attack speed by
35% for 8 seconds.
Daring — Increases damage and attack speed by
35% for 8 seconds. Backward Lunge — Attacks a random target behind
him.
Backward Lunge — Attacks a random target behind
him.- Deadly Swathe — Frontal cleave attack.
 Poisoned Thrust — Chance to apply Poison on hit. This
Poison reduces the victim's stats by 10% per stack.
Poisoned Thrust — Chance to apply Poison on hit. This
Poison reduces the victim's stats by 10% per stack.
At first you will face Julianne alone. After she dies,
Romulo appears to join in the fight. After defeating him as well,
both bosses will resurrect, with both engaging you at the same time. Make sure
to remove the ![]() Devotion and
Devotion and ![]() Daring from either boss to
reduce their damage.
Daring from either boss to
reduce their damage.
Julianne needs to be watched at all times to interrupt her
![]() Eternal Affection heal. Make sure to face
Romulo away from the group. Both bosses need to die within 15
seconds of eachother or they will both resurrect again at full health.
Eternal Affection heal. Make sure to face
Romulo away from the group. Both bosses need to die within 15
seconds of eachother or they will both resurrect again at full health.
Romulo and Julianne Loot
| Item | Item Type | Slot |
|---|---|---|
| Cloth | Chest | |
| Accessory | Trinket | |
| Two-Handed Sword | Weapon | |
| Dagger | Weapon |
Wizard of Oz
- Dorothee
 Water Bolt — Deals Frost damage to current
target.
Water Bolt — Deals Frost damage to current
target. Frightened Scream — Fears nearby enemies.
- Tito
 Annoying Yipping — Silences a random target for 2
seconds.
Annoying Yipping — Silences a random target for 2
seconds.
- Roar
- Frightened Scream — Fears nearby enemies.
 Shred Armor — Reduces target's Armor by 5,000.
 Mangle — Deals damage to a target and applies a bleed
dealing damage-over-time.
Mangle — Deals damage to a target and applies a bleed
dealing damage-over-time.
- Strawman
 Brain Bash — Stuns current target for 3 seconds.
 Brain Wipe — Silences a random target for 4
seconds.
Brain Wipe — Silences a random target for 4
seconds. Burning Straw — When hit by Fire spells,
Strawman gets disoriented.
Burning Straw — When hit by Fire spells,
Strawman gets disoriented.
- Tinhead
- The Crone
 Cyclone — Summons tornadoes around the room randomly
that knock up nearby enemies.
Cyclone — Summons tornadoes around the room randomly
that knock up nearby enemies. Chain Lightning — Deals damage to a target and nearby
allies.
Chain Lightning — Deals damage to a target and nearby
allies.
This encounter is a 2-phase fight. For the first phase you will be facing Dorothee, Roar, Strawman, and Tinhead. Follow this kill order and use your cooldowns here to quickly burn through some of these mobs.
Dorothee should be killed first quickly; if killed fast
enough, Tito can be avoided completely. Roar
can be ![]() Feared and should be killed second as the
Feared and should be killed second as the
![]() Frightened Scream can cause problems. When
Strawman enters combat, you should have someone use Fire spells
such as
Frightened Scream can cause problems. When
Strawman enters combat, you should have someone use Fire spells
such as ![]() Searing Pain or
Searing Pain or ![]() Scorch on him constantly to
stun him. Finally, when Tinhead comes out, pick him up and
make sure to face him away from the group.
Scorch on him constantly to
stun him. Finally, when Tinhead comes out, pick him up and
make sure to face him away from the group.
After all of these adds are dealt with, The Crone will appear
a few seconds later. This part of the fight is very straightforward; simply
tank and spank and stay away from the ![]() Cyclones.
Cyclones.
Wizard of Oz Loot
| Item | Item Type | Slot |
|---|---|---|
| Cloth | Head | |
| Cloth | Feet | |
| Two-Handed Axe | Weapon | |
| Wand | Ranged |
Opera Event Shared Loot
| Item | Item Type | Slot |
|---|---|---|
| Plate | Head | |
| Shoulder | ||
| Cloth | Legs | |
| Leather | Legs | |
| Accessory | Trinket | |
| Libram | Relic |
The Curator
- Summon Astral Flare — While The Curator has Mana, he will periodically summon these.
 Hateful Bolt — Deals Arcane damage to whoever is
second-highest on threat.
Hateful Bolt — Deals Arcane damage to whoever is
second-highest on threat. Evocation — Casts when out of Mana; restores Mana over 20
seconds and increases damage taken by 200% for the duration.
Evocation — Casts when out of Mana; restores Mana over 20
seconds and increases damage taken by 200% for the duration. Arcane Infusion — Adds Arcane damage to melee
attacks.
Arcane Infusion — Adds Arcane damage to melee
attacks.- Enrage — Increases damage dealt by 20%, used at 15%
health.
Start off by having the raid slightly spread out as the Astral Flares summoned during the fight have a chain-lightning-type attack. The raid needs to prioritize killing the Astral Flares over anything else as they will quickly wipe a raid if ignored.
Healers need to stay ahead of the healing at all times as there is quite a
lot of healing during this fight. Astral Flares deal high raid
damage, while ![]() Hateful Bolt deals high damage to a single target.
The Curator himself deals high melee damage as it is all Arcane
damage, thus ignoring Armor.
Hateful Bolt deals high damage to a single target.
The Curator himself deals high melee damage as it is all Arcane
damage, thus ignoring Armor.
The Curator Loot
| Item | Item Type | Slot |
|---|---|---|
| Cloth | Shoulder | |
| Leather | Shoulder | |
| Shoulder | ||
| Tier 4 Hands Token | Hands | |
| Tier 4 Hands Token | Hands | |
| Tier 4 Hands Token | Hands | |
| Plate | Legs | |
| Accessory | Finger | |
| Staff | Weapon |
Terestian Illhoof
Terestian Illhoof Abilities
 Shadow Bolt
 Fiendish Portal — Opens 2 portals that constantly
summon Fiendish Imps throughout the fight.
Fiendish Portal — Opens 2 portals that constantly
summon Fiendish Imps throughout the fight. Sacrifice — Teleports a random enemy to the middle of
the room, stuns them, and leeches life from them every second.
Sacrifice — Teleports a random enemy to the middle of
the room, stuns them, and leeches life from them every second.- Resummon Kil'rek — Summons Kil'rek back if he dies after approximately 45 seconds.
Kil'rek Abilities
 Amplify Flames — Increases Fire damage taken from all
sources.
Amplify Flames — Increases Fire damage taken from all
sources. Broken Pact — While dead, increases
Terestian Illhoof's damage taken by 25%.
Broken Pact — While dead, increases
Terestian Illhoof's damage taken by 25%.
Terestian Illhoof himself is rather easy. Simply kill the
demonic chains that are summoned by ![]() Sacrifice in the middle of
the room. From time to time you will have to deal with the
Fiendish Imps summoned during the fight before they build up too
much.
Sacrifice in the middle of
the room. From time to time you will have to deal with the
Fiendish Imps summoned during the fight before they build up too
much.
Start the fight off by killing Kil'rek to debuff
Terestian Illhoof with ![]() Broken Pact. Tanks need
to be ready to pick up Kil'rek again when he respawns during the
fight.
Broken Pact. Tanks need
to be ready to pick up Kil'rek again when he respawns during the
fight.
Terestian Illhoof Loot
| Item | Item Type | Slot |
|---|---|---|
| Cloak | Back | |
| Cloak | Back | |
| Plate | Chest | |
| Cloth | Waist | |
| Cloth | Waist | |
| Leather | Waist | |
| Waist | ||
| Accessory | Finger | |
| Accessory | Trinket | |
| One-Handed Mace | Main-Hand | |
| Staff | Weapon | |
| Thrown | Ranged | |
| Enchanting Formula | Misc. |
Shade of Aran
Shade of Aran Basic Abilities
 Fireball
 Frostbolt
 Arcane Missiles
 Dragon's Breath — Disorients a random player and deals
damage to them and any nearby allies over time.
Dragon's Breath — Disorients a random player and deals
damage to them and any nearby allies over time. Chains of Ice — Roots a random target in place for 10
seconds.
Chains of Ice — Roots a random target in place for 10
seconds.- AoE
 Counterspell — Periodically silences enemies
within 10 yards.
Counterspell — Periodically silences enemies
within 10 yards.  Summon Water Elementals — Used at 40% health to summon 4
Conjured Elementals.
Summon Water Elementals — Used at 40% health to summon 4
Conjured Elementals. Mass Polymorph;
  Pyroblast — If Aran
reaches 20% Mana, he will Mass Polymorph the entire raid, drink
some water, then Pyroblast the entire raid.
Pyroblast — If Aran
reaches 20% Mana, he will Mass Polymorph the entire raid, drink
some water, then Pyroblast the entire raid.
Shade of Aran Special Abilities
 Flame Wreath — Places rings of fire around random raid
members. If anyone inside the rings of fire move, the entire raid takes
massive damage.
Flame Wreath — Places rings of fire around random raid
members. If anyone inside the rings of fire move, the entire raid takes
massive damage. Circular Blizzard — Summons a
  Blizzard that moves
around the room in a clockwise direction, dealing high damage and slowing anyone
hit.
Blizzard that moves
around the room in a clockwise direction, dealing high damage and slowing anyone
hit. Massive Magnetic Pull;
  Mass Slow;
 Charged Arcane Explosion — Pulls everyone on top of
himself, slows them down, then starts to cast
Charged Arcane Explosion.
Charged Arcane Explosion — Pulls everyone on top of
himself, slows them down, then starts to cast
Charged Arcane Explosion.
Shade of Aran can be a rather tricky fight has he deals very
high damage with his many different abilities. Try to interrupt
![]() Fireball and
Fireball and ![]() Frostbolt as much as possible to
prevent as much damage as you can. Only interrupt
Frostbolt as much as possible to
prevent as much damage as you can. Only interrupt ![]() Arcane Missiles
if it will otherwise kill someone. Move away from anyone hit by
Arcane Missiles
if it will otherwise kill someone. Move away from anyone hit by
![]() Dragon's Breath, as it deals damage to nearby allies, and be ready to
heal that target.
Dragon's Breath, as it deals damage to nearby allies, and be ready to
heal that target.
The main portion of the fight involves around Shade of Aran's
special abilities. ![]() Flame Wreath is a very simple "do not move"
mechanic. Simply do not move if you are in a ring of fire or you will explode
and deal massive damage to the raid.
Flame Wreath is a very simple "do not move"
mechanic. Simply do not move if you are in a ring of fire or you will explode
and deal massive damage to the raid. ![]() Circular Blizzard summons
a
Circular Blizzard summons
a ![]() Blizzard that moves around the room in a clockwise direction;
try to move in front of the Blizzard at all times to reduce how much damage you
take. The last ability is a combo of a few different abilities. First, Aran will
pull everyone into melee range with
Blizzard that moves around the room in a clockwise direction;
try to move in front of the Blizzard at all times to reduce how much damage you
take. The last ability is a combo of a few different abilities. First, Aran will
pull everyone into melee range with ![]() Massive Magnetic Pull. Then,
he will slow everybody with
Massive Magnetic Pull. Then,
he will slow everybody with ![]() Mass Slow. Finally, he will cast
Mass Slow. Finally, he will cast
![]() Charged Arcane Explosion for 10 seconds, dealing lethal damage to
anyone nearby. To avoid taking the damage, simply start running to the edges of
the room as soon as you get pulled on top of Aran.
Charged Arcane Explosion for 10 seconds, dealing lethal damage to
anyone nearby. To avoid taking the damage, simply start running to the edges of
the room as soon as you get pulled on top of Aran.
At 40% health, Shade of Aran will cast
![]() Summon Water Elementals, summoning 4
Conjured Elementals. These adds have a threat table and will
most likely attack healers if left unchecked. Warlocks excel on
this fight for their
Summon Water Elementals, summoning 4
Conjured Elementals. These adds have a threat table and will
most likely attack healers if left unchecked. Warlocks excel on
this fight for their ![]() Banish and
Banish and ![]() Fear crowd
control abilities. If you have little-to-no crowd control, have your tanks pick
up as many elementals as possible. Your group may need to kill one or two adds
to help reduce the damage taken by the raid.
Fear crowd
control abilities. If you have little-to-no crowd control, have your tanks pick
up as many elementals as possible. Your group may need to kill one or two adds
to help reduce the damage taken by the raid.
The ![]() Mass Polymorph and
Mass Polymorph and ![]() Pyroblast combo
serves as a DPS and interrupt check of sorts. Try to interrupt as many casts as
possible to keep his Mana high and maintain high damage uptime to prevent this
combo of spells from happening.
Pyroblast combo
serves as a DPS and interrupt check of sorts. Try to interrupt as many casts as
possible to keep his Mana high and maintain high damage uptime to prevent this
combo of spells from happening.
Shade of Aran Loot
| Item | Item Type | Slot |
|---|---|---|
| Plate | Head | |
| Accessory | Neck | |
| Cloth | Shoulder | |
| Plate | Shoulder | |
| Cloak | Back | |
| Cloth | Feet | |
| Cloth | Feet | |
| Leather | Feet | |
| Accessory | Finger | |
| Accessory | Trinket | |
| Off-Hand Weapon | Off-Hand | |
| Wand | Ranged | |
| Enchanting Formula | Misc. |
Netherspite
 Empowerment — Increases damage dealt by 200% during
Phase 1.
Empowerment — Increases damage dealt by 200% during
Phase 1. Nether Portal - Perseverence — If this beam reaches
Netherspite, he will take 1% reduced damage per stack.
Nether Portal - Perseverence — If this beam reaches
Netherspite, he will take 1% reduced damage per stack. Nether Portal - Dominance — If this beam reaches
Netherspite, he will deal 1% increased damage per stack.
Nether Portal - Dominance — If this beam reaches
Netherspite, he will deal 1% increased damage per stack. Nether Portal - Serenity — If this beam reaches
Netherspite, he will heal for 4,000 health per second, per
stack.
Nether Portal - Serenity — If this beam reaches
Netherspite, he will heal for 4,000 health per second, per
stack. Nether Burn — Constantly deals Shadow damage to all
enemies.
Nether Burn — Constantly deals Shadow damage to all
enemies.- Void Zone — Summons a Void Zone under a random
player.
 Netherbreath — Uses this constantly during Phase
2.
Netherbreath — Uses this constantly during Phase
2.
This fight revolves around a constant rotation of Beams. There are 3
different beams, Red,
Blue, and Green.
![]() Empowerment greatly increases the boss's damage output, making
these Beams a vital part of the fight that must be used properly to kill the
boss.
Empowerment greatly increases the boss's damage output, making
these Beams a vital part of the fight that must be used properly to kill the
boss.
![]() Nether Burn is the main damage dealt during the fight,
hitting all raid members for around 450 Shadow damage every few seconds. Stay
nearby other players to help with the AoE healing. Avoid standing in any
Nether Burn is the main damage dealt during the fight,
hitting all raid members for around 450 Shadow damage every few seconds. Stay
nearby other players to help with the AoE healing. Avoid standing in any
![]() Void Zone and watch your feet for any spawning on you.
Void Zone and watch your feet for any spawning on you.
The Red beam of ![]() Nether Portal - Perseverence
is used by the tanks, giving whoever stands in it reduced damage taken and
increased defense per stack. It also greatly increases your health, but every
time you take a stack from the beam you lose 1,000 health. A single target will
be able to take a Red beam for one phase by themselves; simply weave in and out
of the Red beam, only taking a few stacks when you need to heal after taking damage.
Nether Portal - Perseverence
is used by the tanks, giving whoever stands in it reduced damage taken and
increased defense per stack. It also greatly increases your health, but every
time you take a stack from the beam you lose 1,000 health. A single target will
be able to take a Red beam for one phase by themselves; simply weave in and out
of the Red beam, only taking a few stacks when you need to heal after taking damage.
The Blue beam of ![]() Nether Portal - Dominance
is typically used by DPS members as it gives increased damage dealt. Unlike the
Red beam, this beam requires multiple soakers per
phase, as you can easily die if you take too many stacks of this beam. Aim to
have 2-3 soakers per phase for this beam.
Nether Portal - Dominance
is typically used by DPS members as it gives increased damage dealt. Unlike the
Red beam, this beam requires multiple soakers per
phase, as you can easily die if you take too many stacks of this beam. Aim to
have 2-3 soakers per phase for this beam.
The Green beam of ![]() Nether Portal - Serenity
is the most important beam to have soaked 100% of the time, as it will quickly
heal the boss to full health if not soaked. Standing in this beam increases
healing done per stack and reduces spell costs. It also reduces your maximum Mana
per stack, but also restores your Mana. Healers can take a few seconds of this
beam to help restore their Mana and increase their healing output.
Nether Portal - Serenity
is the most important beam to have soaked 100% of the time, as it will quickly
heal the boss to full health if not soaked. Standing in this beam increases
healing done per stack and reduces spell costs. It also reduces your maximum Mana
per stack, but also restores your Mana. Healers can take a few seconds of this
beam to help restore their Mana and increase their healing output.
The banish phase of the fight is the most dangerous part of the fight.
Netherspite will keep attacking anyone nearby and periodically
cast ![]() Netherbreath on a random enemy. Either spread out during
the banish phase to prevent multiple people being hit by the breath, or
out-range it by running to the windows in the back of the room. After the
banish phase ends, it comes with a threat reset.
Netherbreath on a random enemy. Either spread out during
the banish phase to prevent multiple people being hit by the breath, or
out-range it by running to the windows in the back of the room. After the
banish phase ends, it comes with a threat reset.
Netherspite Loot
| Item | Item Type | Slot |
|---|---|---|
| Cloth | Head | |
| Leather | Head | |
| Accessory | Neck | |
| Plate | Shoulder | |
| Chest | ||
| Plate | Waist | |
| Cloth | Legs | |
| Leather | Legs | |
| Legs | ||
| Accessory | Finger | |
| One-Handed Sword | Weapon | |
| Off-Hand Weapon | Off-Hand |
Chess Event
The Chess Event in Karazhan is a very unique fight where you control pieces of a chess board as pets and play a chess-style game against NPCs. The fight is started after talking with Echo of Medivh and taking control of the King piece on your faction's side. Simply move the main pieces toward the enemy's King and defeat it as quickly as possible to win.
Chess Event Loot
| Item | Item Type | Slot |
|---|---|---|
| Cloth | Head | |
| Accessory | Neck | |
| Leather | Shoulder | |
| Leather | Waist | |
| Leather | Feet | |
| Feet | ||
| Plate | Feet | |
| Legs | ||
| Plate | Legs | |
| Accessory | Finger | |
| One-Handed Sword | Weapon | |
| Shield | Off-Hand |
Prince Malchezaar
 Summon Infernal — Summons an Infernal to a random
location that cannot be attacked and deals a constant, large AoE around it
with
Summon Infernal — Summons an Infernal to a random
location that cannot be attacked and deals a constant, large AoE around it
with  Hellfire.
 Enfeeble — Reduces the health of random non-tank raid
members to 1 HP.
Enfeeble — Reduces the health of random non-tank raid
members to 1 HP. Shadow Nova — Deals Shadow damage to all nearby
players and knocks them back.
Shadow Nova — Deals Shadow damage to all nearby
players and knocks them back. Shadow Word: Pain
- Thrash — Only used during Phase 2; this allows
Prince Malchezaar to attack up to 2 extra times at once.
- Sunder Armor — Only used during Phase 2; Reduces the
tank's Armor by 1,000 per stack, and stacks up to 5 times.
 Summon Axes — Only used during Phase 3. Summons his
axes as a non-attackable enemy that attacks random targets.
Summon Axes — Only used during Phase 3. Summons his
axes as a non-attackable enemy that attacks random targets.- Amplify Damage — Only used during Phase 3. Increases
a random target's damage taken by 100% for 10 seconds.
The entire raid will need to avoid the ![]() Summon Infernals that
drop around the room in random places. If one lands near or on your raid
location, you must move away from it or you will die from the
Summon Infernals that
drop around the room in random places. If one lands near or on your raid
location, you must move away from it or you will die from the ![]() Hellfire
damage. Dispel any
Hellfire
damage. Dispel any ![]() Shadow Word: Pains on the raid.
Shadow Word: Pains on the raid.
During Phase 1 and 2, Prince Malchezaar will cast
![]() Enfeeble on random raid members, reducing their health to 1
hit point. Shortly after, he will cast
Enfeeble on random raid members, reducing their health to 1
hit point. Shortly after, he will cast ![]() Shadow Nova, dealing
Shadow damage to any nearby players. Ranged DPS and healers need to stay at max
range to avoid the damage, while melee players will need to either out-range or
line-of-sight the Shadow Nova.
Shadow Nova, dealing
Shadow damage to any nearby players. Ranged DPS and healers need to stay at max
range to avoid the damage, while melee players will need to either out-range or
line-of-sight the Shadow Nova.
Phase 2 is the most dangerous part of the fight. The ![]() Thrash
can cause tanks to die in what seems to be 1 hit. It is very important to keep
all debuffs up during this phase, such as
Thrash
can cause tanks to die in what seems to be 1 hit. It is very important to keep
all debuffs up during this phase, such as ![]() Demoralizing Shout and
Demoralizing Shout and
![]() Thunder Clap. In Phase 2 you will want to use all DPS cooldowns
such as
Thunder Clap. In Phase 2 you will want to use all DPS cooldowns
such as ![]() Bloodlust to push through this phase as quickly as
possible.
Bloodlust to push through this phase as quickly as
possible.
Phase 3, Prince Malchezaar will drop his axes and they will
attack random players. Make sure to keep these players alive as they can die
quickly without any heals. ![]() Amplify Damage will be cast on random
players, including the tank. If this debuff lands on the tank, be ready to
top them off quickly as they can die easily in this phase.
Amplify Damage will be cast on random
players, including the tank. If this debuff lands on the tank, be ready to
top them off quickly as they can die easily in this phase.
Prince Malchezaar Loot
| Item | Item Type | Slot |
|---|---|---|
| Tier 4 Helm Token | Head | |
| Tier 4 Helm Token | Head | |
| Tier 4 Helm Token | Head | |
| Accessory | Neck | |
| Cloak | Back | |
| Cloak | Back | |
| Cloak | Back | |
| Accessory | Finger | |
| Accessory | Finger | |
| Two-Handed Axe | Weapon | |
| One-Handed Mace | Main-Hand | |
| Dagger | Main-Hand | |
| Dagger | Weapon | |
| One-Handed Axe | Main-Hand | |
| Bow | Ranged |
Nightbane
Phase 1 Abilities
 Distracting Ash — Reduces a target's chance to hit by
30%.
Distracting Ash — Reduces a target's chance to hit by
30%. Smoldering Breath — Deals damage to enemies in front
of Nightbane and leaves a large damage-over-time debuff on them.
Smoldering Breath — Deals damage to enemies in front
of Nightbane and leaves a large damage-over-time debuff on them.- Cleave — This is a frontal cone attack, hitting all
enemies in front of Nightbane.
 Tail Sweep — Rear-facing cone attack, stunning all
enemies behind the boss and dealing damage over time.
Tail Sweep — Rear-facing cone attack, stunning all
enemies behind the boss and dealing damage over time. Charred Earth — Summons fire underneath a random,
non-tank member, leaving a large patch of fire on the ground.
Charred Earth — Summons fire underneath a random,
non-tank member, leaving a large patch of fire on the ground. Bellowing Roar — Fears all nearby enemies.
Phase 2 Abilities
 Rain of Bones — Deals damage to all enemies in an area
and summons 5 Restless Skeletons over a few seconds.
Rain of Bones — Deals damage to all enemies in an area
and summons 5 Restless Skeletons over a few seconds.- Smoking Blast — While in the air, attacks the
highest-threat target, dealing high Physical damage on hit and leaves a Fire
damage-over-time effect on that target.
- Fireball Barrage — Blasts raid members if anyone goes
over 40 yards away from the boss.
Phase 1 is a somewhat simple "tank and spank" fight. Have the tanks face
Nightbane's face and tail away from the raid to prevent the cone
attacks. Melee players will need to attack from the side and avoid the
![]() Cleave,
Cleave, ![]() Smoldering Breath, and
Smoldering Breath, and
![]() Tail Sweep. Ranged players will want to stay at max range and
stack tightly together. The
Tail Sweep. Ranged players will want to stay at max range and
stack tightly together. The ![]() Bellowing Roar can be outranged by
most players. Avoid standing in
Bellowing Roar can be outranged by
most players. Avoid standing in ![]() Charred Earth fires.
Charred Earth fires.
Phase 2, the air phase, is the more difficult part of the fight. When
Nightbane flies up, the raid should stack up underneath him to
force the ![]() Rain of Bones to spawn the Restless Skeletons
in one spot. After they start spawning, the raid should move away slightly to
avoid being near the Restless Skeletons as they have an
Rain of Bones to spawn the Restless Skeletons
in one spot. After they start spawning, the raid should move away slightly to
avoid being near the Restless Skeletons as they have an
![]() Immolation aura, dealing massive damage to all nearby enemies.
Immolation aura, dealing massive damage to all nearby enemies.
Melee players will need to avoid attacking these mobs as the
![]() Immolation aura deals around 1,000 damage per skeleton every
few seconds. Ranged players will want to start killing these skeletons as soon
as they have moved a safe distance away. Use any stuns or slows you have
available to you to allow your tank to kite as much as possible.
Immolation aura deals around 1,000 damage per skeleton every
few seconds. Ranged players will want to start killing these skeletons as soon
as they have moved a safe distance away. Use any stuns or slows you have
available to you to allow your tank to kite as much as possible.
After Nightbane finishes his ![]() Rain of Bones
cast, he will start to cast
Rain of Bones
cast, he will start to cast ![]() Smoking Blast on his highest-threat
target, most likely a healer. This person will take a massive amount of damage
and will require direct, focused healing to survive. It is ideal to have a
high-Armor healer such as Holy Paladin or
Restoration Shaman get hit by this ability as it deals Physical
damage. It will also leave a stacking damage-over-time Fire debuff on targets
which should be removed as soon as possible.
Smoking Blast on his highest-threat
target, most likely a healer. This person will take a massive amount of damage
and will require direct, focused healing to survive. It is ideal to have a
high-Armor healer such as Holy Paladin or
Restoration Shaman get hit by this ability as it deals Physical
damage. It will also leave a stacking damage-over-time Fire debuff on targets
which should be removed as soon as possible.
Nightbane Loot
| Item | Item Type | Slot |
|---|---|---|
| Accessory | Neck | |
| Cloth | Chest | |
| Leather | Chest | |
| Leather | Chest | |
| Chest | ||
| Plate | Chest | |
| Feet | ||
| Plate | Feet | |
| Staff | Weapon | |
| Shield | Off-Hand | |
| Shield | Off-Hand | |
| Off-Hand Weapon | Off-Hand |
Changelog
- 19 Jun. 2021: Guide added.
This guide has been written by Abide, TBC veteran for nearly a decade. Abide is a Warrior tank and multi-class expert currently playing on Faerlina as Horde. You can find him in the the Icy Veins Discord. You can also see him live on Twitch.