
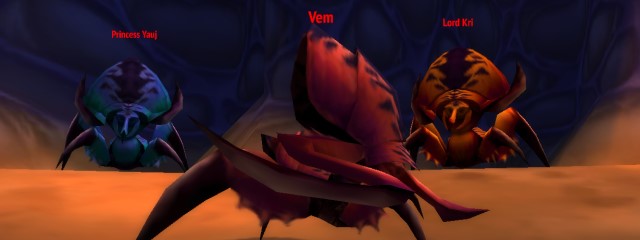
The Silithid Royalty, also known as the Bug Trio, is an optional boss encounter in the Temple of Ahn'Qiraj, and can be fought immediately after The Prophet Skeram is defeated.
They are one of the first incarnations of Council style bosses in World of Warcraft,
where there are multiple bosses to defeat in the same encounter, which heal to full whenever
one of their members is killed. The difficulty of the encounter depends on the kill
order, with higher item level loot being awarded for killing Lord Kri last, such
as ![]() Ring of the Devoured.
Ring of the Devoured.
Season of Discovery Changes
As with previous phases of SoD, all bosses will drop both new and improved loot for players to collect. The list below shows the new and original loot for a side-by-side comparison.
New Loot
Shared Loot
| Classic | SoD |
|---|---|
If Kri dies last
| Classic | SoD |
|---|---|
If Vem dies last
| Classic | SoD |
|---|---|
If Yauj dies last
| Classic | SoD |
|---|---|
Silithid Royalty (Bug Trio) Summary by Role
Tanks
- You will need at least 3 tanks (4 recommended) at the start of the fight,
one for each boss. Because Princess Yauj fears nearby players on a cooldown of
20 seconds (resetting their threat) and heals, having extra
Warrior tanks on her rotating
 Berserker Rage ensures
you always have a tank ready to
Berserker Rage ensures
you always have a tank ready to  Taunt and interrupt her heals after
Fear goes off. Alternatively, use
Taunt and interrupt her heals after
Fear goes off. Alternatively, use  Tremor Totem or
 Fear Ward.
 - Lord Kri will leave an extremely deadly poison cloud on the place where he dies, so make sure to tank him at maximum range once he is about to die.
- Because of their dangerous area of effect abilities (and Vem's charge + knockback), you should try to tank each boss in a separate corner of the room, so that no player will be hit by the abilities of multiple bosses simultaneously.
- If you are NOT killing Vem last, make sure to have defensive
cooldowns and
 Greater Stoneshield Potion ready for the enraged boss at
the end, as it will be hitting extremely hard and fast.
Greater Stoneshield Potion ready for the enraged boss at
the end, as it will be hitting extremely hard and fast.
Healers
- Use Tremor Totem or Fear Ward to help out with Princess
Yauj's area of effect Fear.
- Use
 Poison Cleansing Totem,
  Cleanse, and
 Abolish Poison to keep Lord Kri from stacking up poison debuffs on
your group. The damage done by these can be really significant, especially when
allowed to stack.
Abolish Poison to keep Lord Kri from stacking up poison debuffs on
your group. The damage done by these can be really significant, especially when
allowed to stack. - Make sure to have enough healers with each tank, with Vem requiring the least healing and Lord Kri requiring the most healing, overall.
- If you are NOT killing Vem last, make sure to have plenty of Mana left for the final boss, as you will need it to spam heals on the tank once the boss enrages.
DPS
- Interrupt Princess Yauj's heal whenever you see her casting.
- As bosses heal to full after one of them is killed, focus them down one at a time.
- Once killed, Princess Yauj spawns a lot of low health enemies, be prepared with area of effect abilities to quickly take them down before they can chase healers down!
- Stay away from Lord Kri when he is about to die, as he will spawn a poison cloud which can easily kill you, especially if you were already low life from the poison volleys beforehand.
- If you are NOT killing Vem last, save your DPS cooldowns for the final boss, as he will be doing crazy damage on tank, which will quickly drain healer Mana, leading into an inevitable wipe should you be too slow to finish the fight.
General Tips for Silithid Royalty (Bug Trio)
- Your raid should split in three groups, with all damage dealers focusing on one boss at a time. Because the bosses have dangerous abilities that target anyone close to them, try to stack up close to your boss, so that you are not targeted by the other bosses.
- Killing Vem will cause the remaining bosses to enrage, increasing their attack speed by 150% and physical damage by 100%. Thus, you should either kill him last or second to last, if attempting hard mode, in which case you should save cooldowns for the enraged final boss.
- If you make one of the bosses leave the room at any point they will despawn, causing the encounter to reset shortly afterwards, so make sure to position yourself accordingly, with Princess Yauj being tanked as far away from the entrance as possible and Vem's tank never having his back towards the entrance.
Kill Order / Hard Mode for Silithid Royalty (Bug Trio)
The first thing your group needs to decide is on the kill order, as the remaining bosses will heal to full whenever one of them is killed. Also, while some of the loot can drop from any of the bosses, there are unique items that will only drop if you kill a specific boss last.
Vem's death enrages Lord Kri and Princess Yauj, making them deal massive physical damage to their target for 10 minutes. Vem is also the easiest boss to deal with, as his only noteworthy ability is a knockbacking charge, which is more annoying than dangerous. As such, killing him last is ideal, unless you need specific loot from one of the other two bosses.
If you are not killing him last, make sure to kill him second, as killing him first will result in both Lord Kri and Princess Yauj being enraged, which will likely result in a wipe. Save your raid's cooldowns for the final boss, as he will be hitting extremely hard and fast until the end of the fight.
From easiest to hardest, and depending on which boss you need loot from, the ideal kill orders are:
- Lord Kri first, Princess Yauj second, Vem third.
- Lord Kri first, Vem second, Princess Yauj third.
- Princess Yauj first, Vem second, Lord Kri third.
Lord Kri is considered the most dangerous boss because of his poison bolt ability, which will cause high raid damage while he lives. Having to area of effect heal / remove poison while also dealing with his enraged melee damage is why Lord Kri last is considered the hard mode of the fight.
Strategy for Silithid Royalty (Bug Trio)
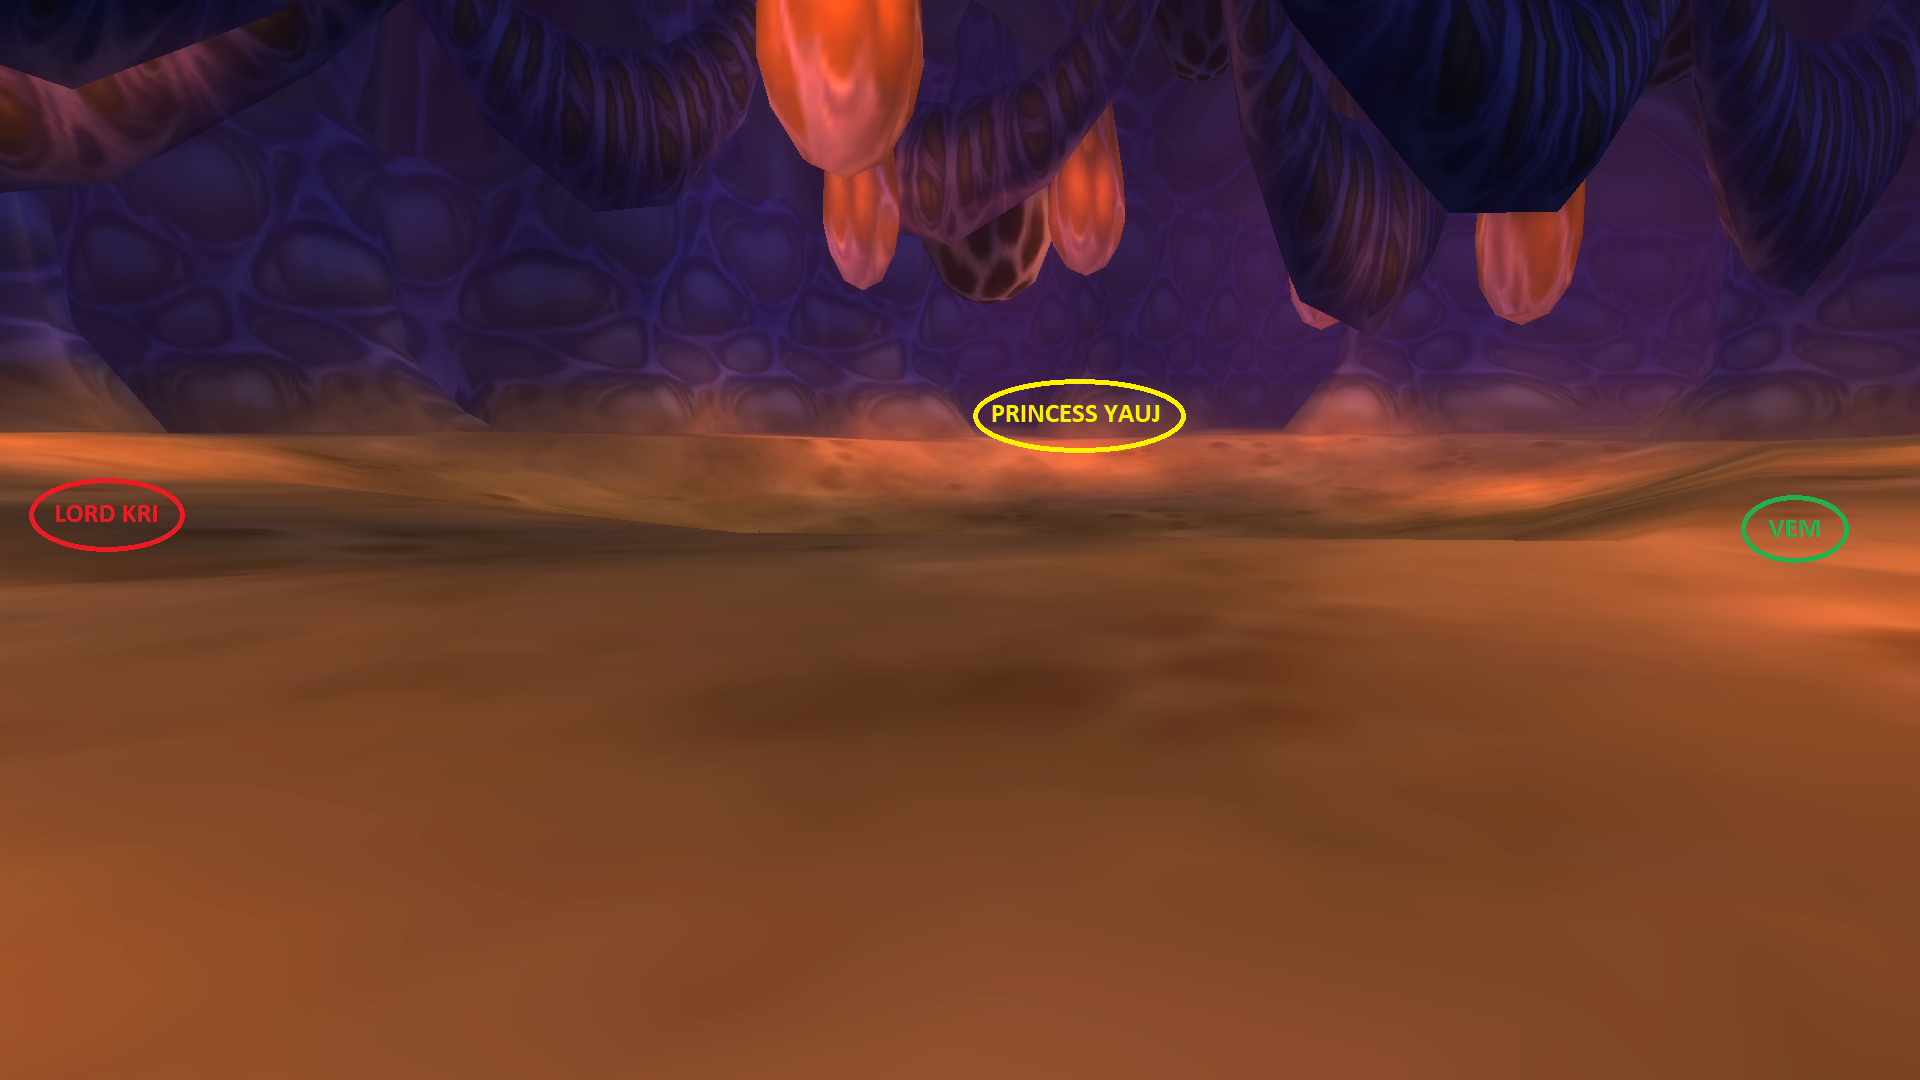
As displayed in the image, have your tanks engage their assigned boss and
immediately take them to their designated corner. Vem's tank will need the
least healing, while Lord Kri can do a lot of area of effect damage quickly
with his poison bolts and will, thus, require more healers. Princess Yauj does
not require a lot of healing, but make sure to have ![]() Tremor Totem or
Tremor Totem or
![]() Fear Ward users nearby, in order to counter her Fear effect.
Fear Ward users nearby, in order to counter her Fear effect.
Have all of your DPS focus on one boss at a time and pay attention to removing poisons on Lord Kri and Fears on Princess Yauj. Interrupt Princess Yauj's heals and use your cooldowns on Lord Kri (1st and 3rd kill order), or Princess Yauj if she is the last to be killed (2nd kill order).
Loot from Bug Trio: Yauj, Vem and Kri
The table below lists which loot can drop depending on which boss is killed last.
| Boss | Item | Slot |
|---|---|---|
| All | Head | |
| Vem | Neck | |
| All | Chest | |
| Lord Kri | Chest | |
| All | Shoulder | |
| Princess Yauj | Shoulder | |
| Princess Yauj | Shoulder | |
| Princess Yauj | Shoulder | |
| Vem | Gloves | |
| Vem | Gloves | |
| Princess Yauj | Gloves | |
| All | Ring | |
| Princess Yauj | Ring | |
| Lord Kri | Ring | |
| All | Back | |
| All | Belt | |
| Vem | Boots | |
| Lord Kri | Ranged | |
| Lord Kri | Trinket | |
| All | Token | |
| All | Token |
Changelog
- 18 Nov. 2024: Page updated for SoD P6 & Classic Anniversary.
- 06 Aug. 2024: Guide reviewed and updated.
- 21 Apr. 2022: Mentioned encounter changes in the Season of Mastery.
- 30 Jun. 2020: Added a link to the general guide at the bottom.
- 11 Jun. 2020: Guide added.
