Naxxramas Raid Guides
Naxxramas can be entered in the Western Plaguelands, and is the final and ultimate challenge of Classic World of Warcraft.
While it was originally cleared by few guilds, the added experience and knowledge sharing of the modern community should allow for many more to experience all the content this time around.
We will be doing our part in helping you and your 39 companions clear the final hurdle with this quick guide and video on all the bosses. Keep reading and have fun!
Season of Discovery Loot
You can find all of the loot available inside Naxxramas in our Season of Discovery raid loot guides below.
Season of Discovery Naxxramas Changes
During Season of Discovery, players may increase the difficulty of Naxxramas by doing the following:
- Each Quarter of Naxxramas can be Empowered by using the orbs in the main lobby. Empowering a Quarter:
- Enables a new mechanic inside that Quarter, and;
- Increases the difficulty across the entire instance, regardless of which Quarter is empowered.
- After interacting with the orbs, there is a 15 minute cooldown before enabling or disabling that orb again.
- To tackle this dangerous new content, you’ll want a new set of trinkets: “The Seal of the Dawn”.
- Players can get the Seal of the Dawn by talking to Kug Softjaw inside Naxxramas.
- The Seal of the Dawn empowers new “Sanctified” gear that can be discovered from Scourge Invasions or while inside Naxxramas.
- The Seal of the Dawn can be improved by collecting “Remnants of Valor” from Scourge Invasions or while inside Naxxramas.
- The power gain from the Seal of the Dawn is immense. Players are expected to obtain Sanctified Gear and improve their Seals of the Dawn to tackle higher difficulties of Naxxramas.
Empowered Abilities Per Wing
Empowering each wing buffs all mobs in that wing with new, unique powers:
- Arachnid Wing
 Abhorrent Infestation
- Plague Wing
 Fungal Contagion
- Military Wing
 Marching Orders
- Construct Wing
 Overcharged
Lore and Context of Naxxramas in WoW Classic
Naxxramas is a Scourge Necropolis led by Kel'Thuzad, who has returned to the Eastern Kingdoms to finish the work his Cult of the Damned started in the events of Warcraft 3.
Lore-wise, we counterattack the Necropolis after beating back the Scourge Invasions that took place all over Azeroth when the raid was released.
This is the final raid in WoW Classic, and the only one whose difficulty is in line with the item, boss, and talent versions our characters had from the start.
Classic was not progressive, which means we started with the item, boss, and talent versions of the end of Vanilla, which include great item and talent improvements, as well as nerfed bosses in earlier raids.
Season of Mastery Changes to Naxxramas
The Season of Mastery has introduced some unique changes to
Naxxramas, but the largest change Blizzard has made is the addition of the Books
of Deathstones and the subsequent Deathstone vendor
Archmage Tarsis Kir-Moldir. Books of Deathstones can drop
from any mob inside of Naxxramas and will offer you a quest to return the book
back to Archmage Tarsis Kir-Moldir. There are thirteen unique books that
will each unlock a new item that grants you a temporary bonus while inside of Naxxramas.
![]() Greater Deathstone drops from bosses while
Greater Deathstone drops from bosses while ![]() Lesser Deathstone
will drop from trash inside of the instance.
Lesser Deathstone
will drop from trash inside of the instance.
 Mask of Death — Allows you to take the appearance of a random
NPC inside of Naxxramas.
Mask of Death — Allows you to take the appearance of a random
NPC inside of Naxxramas. Rune of Teleportation: Antechamber — Teleports you to the Antechamber
of Naxxramas.
Rune of Teleportation: Antechamber — Teleports you to the Antechamber
of Naxxramas. Orb of Corruption — increases the amount of
  Lesser Deathstones
that drop from trash inside the instance by 50%.
Lesser Deathstones
that drop from trash inside the instance by 50%. Skeletal Artifact — Grants a buff by harvesting the soul of a
dead NPC; this buff varies depending on what type of mob you use this item on.
Skeletal Artifact — Grants a buff by harvesting the soul of a
dead NPC; this buff varies depending on what type of mob you use this item on. Ritual Dagger — deals a small amount of damage to all friendly
targets around you but grants 3 Stamina for each player hit; stacks up to 40 times.
Ritual Dagger — deals a small amount of damage to all friendly
targets around you but grants 3 Stamina for each player hit; stacks up to 40 times. Rod of Necromancy — Mind controls a trash mob inside of Naxxramas
for five minutes.
Rod of Necromancy — Mind controls a trash mob inside of Naxxramas
for five minutes. Fungal Spore Cluster — Allows your offensive abilities a chance to
summon a spore that is targetable and able to be killed; killing the spore gives
players in melee range of the spore a significant Critical Strike buff.
Fungal Spore Cluster — Allows your offensive abilities a chance to
summon a spore that is targetable and able to be killed; killing the spore gives
players in melee range of the spore a significant Critical Strike buff. Monstrous Spider Fang — increases movement, attack and casting
speed by 15%.
Monstrous Spider Fang — increases movement, attack and casting
speed by 15%. Thaddius' Lightning Bolts — grants a debuff replicating the Polarity
mechanic on Thaddius; you will gain a beneficial buff for being stacked with those
of the same Polarity while dealing a considerable amount of Nature damage to those
with the opposite debuff if stacked.
Thaddius' Lightning Bolts — grants a debuff replicating the Polarity
mechanic on Thaddius; you will gain a beneficial buff for being stacked with those
of the same Polarity while dealing a considerable amount of Nature damage to those
with the opposite debuff if stacked. Rune of Teleportation: Frostwyrm's Lair — Teleports you to the Frostwyrm's
Lair in Naxxramas.
Rune of Teleportation: Frostwyrm's Lair — Teleports you to the Frostwyrm's
Lair in Naxxramas. Rune of Fortune — Gives a chance for an extra item to
drop from bosses in Naxxramas, stacking up to three times
Rune of Fortune — Gives a chance for an extra item to
drop from bosses in Naxxramas, stacking up to three times Failsafe Phylactery — Prevents an attack that would otherwise
kill you and grants 3 seconds of damage immunity. This item is a one-time use but can
be purchased again.
Failsafe Phylactery — Prevents an attack that would otherwise
kill you and grants 3 seconds of damage immunity. This item is a one-time use but can
be purchased again. Skeletal Hitching Post — summons a hitching post that members
of your party can use to acquire the Skeletal Steed mount, allowing you to
mount inside of Naxxramas.
Skeletal Hitching Post — summons a hitching post that members
of your party can use to acquire the Skeletal Steed mount, allowing you to
mount inside of Naxxramas.
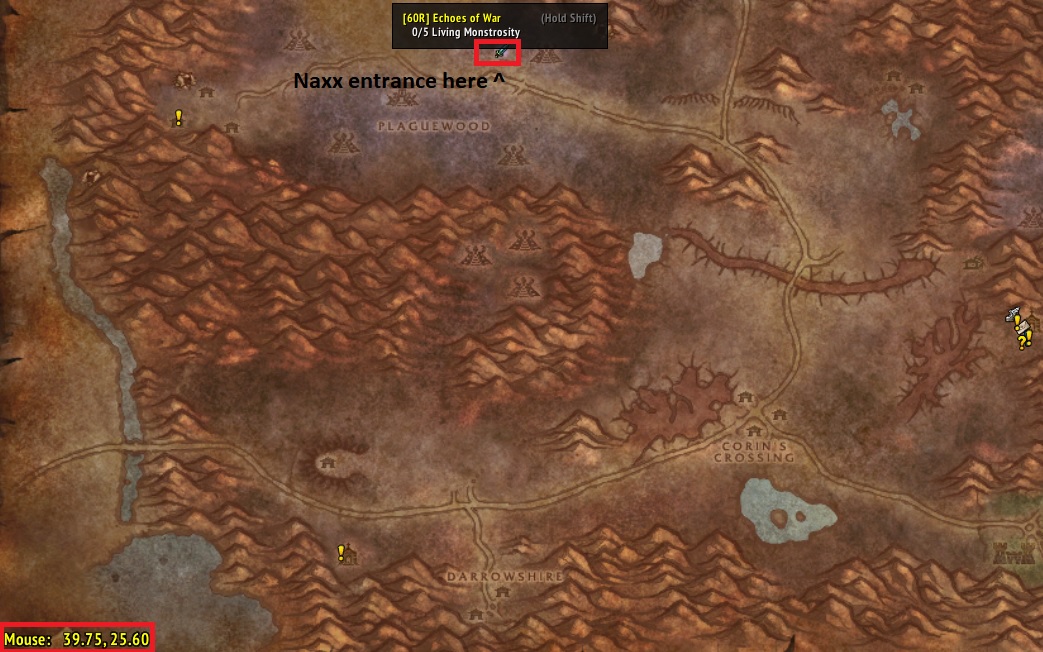
Getting into Naxxramas
You can enter Naxxramas by stepping into its teleport pad, located in Eastern Plaguelands and marked in the map below:
Naxxramas Attunement
In order to enter Naxxramas, you need both Argent Dawn reputation and some materials, depending on your reputation level:
- At Honored, you need to provide 60 gold, 5
 Arcane Crystal,
2
Arcane Crystal,
2  Nexus Crystal, and 1
  Righteous Orb.
 - At Revered, you need to provide 30 gold, 2 Arcane Crystal,
and 1 Nexus Crystal.
- At Exalted, attunement is free!
Recommended Classes for the Naxxramas
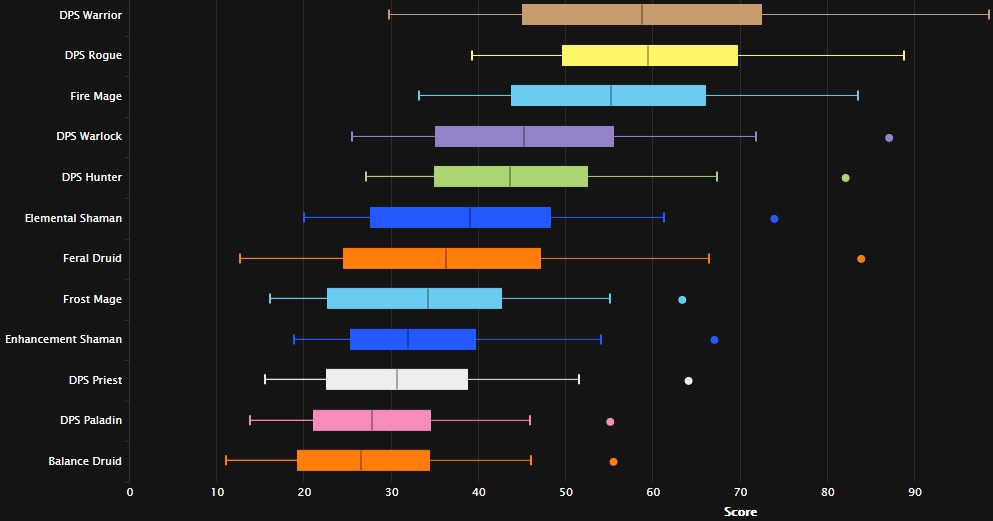
As the hardest raid in Classic, you will want more healers than usual, especially for Sapphiron and Kel'Thuzad. Aim for at least 12, preferably 14+ for the final bosses. For Sapphiron, particularly, ensure that as many groups as possible have Paladins or Shamans for the Frost Resistance Aura / Totem.
While Warriors and Rogues are still the overall best DPS in WoW Classic, Fire specialization Mages are within a hair's breadth as you can see, over at Warcraft Logs.
While still better than hybrids, Warlocks and Hunters are not looking particularly hot, and will be mostly brought for their utility with curses and tranq shot.
- 14 Warriors (2 dedicated Tank Warrior and 6+ Warriors that can off-tank when needed, specifically for The Four Horsemen);
- 2 Rogues;
- 5 Mages;
- 3 Warlocks for Curses;
- 2 Hunter for
 Tranquilizing Shot and trash pulling
or kiting;
Tranquilizing Shot and trash pulling
or kiting; - 6 Holy Paladins or 6 Restoration Shamans;
- 7 Priests (all Healers);
- 1 Restoration Druid
For more information about the best healers, tanks, and DPS, check out the tier lists for each here.
While the above setup is what would be considered an optimal group in a perfect world (and was, indeed, the setup used for the final two bosses in the world first clear!) it is important to emphasize that you can clear Naxxramas with a different composition, as long as everyone knows what they are doing, come prepared and have good gear.
At the end of the day, players are more important than specs and classes in WoW Classic, so focus on having the right players first and foremost!
Naxxramas Boss Guides
Naxxramas has 15 bosses, with none of them being optional. The sheer amount of enemies present in this raid between bosses and trash packs is sure to force you to raid for longer periods than you might be used to in previous Classic raids, so come prepared and try to split up your raid days between wings, in order to fit your raiding schedule.

While we will not be giving out detailed descriptions and pages for each boss this time around, enjoy a quick TL;DR of each boss, which you should complement with this great video of 30-second Naxxramas boss guides!
Arachnid Quarter Guide
The Arachnid Quarter has three bosses and is the easiest quarter. Pull one pack of trash at a time with care for patrols and cleanse any poisons instantly, as otherwise mobs will charge the afflicted player for one-shot damage.
Anub'Rekhan
Focus the adds before the boss. Spread out around the boss to minimize damage taken from his Impale straight-line attack on a random player. Just before he uses Locust Swarm, have the current tank use a Swiftness Potion or have a Hunter aspect of the pack helper nearby and run to the opposite side of the room.
The idea is to avoid having anyone close to the boss while he has Locust Swarm up, as that will rapidly stack a lethal DoT.
Grand Widow Faerlina
Focus Follower adds first, mind control Worshipper adds and use their silence ability on the boss to prevent or dispel her Enrage.
Dodge rains of fire, cleanse any poison DoTs and keep mind-controlling ahead of Enrage until she dies.
Maexxna
Focus adds before the boss, instantly dispel any poisons (90% healing reduction), have a few DPS and healers assigned to freeing anyone who gets cocooned in the wall of the room, and make sure the tank is topped and has defensives and heals over time on him just before Web Spray is cast, as it is a 8-second raid-wide stun.
Push her below 30% only immediately following a Web Spray as she Enrages,
making the stun even more dangerous! Try to save ![]() Shield Wall and similar
defensives for Web Sprays during Enrage.
Shield Wall and similar
defensives for Web Sprays during Enrage.
Plague Quarter Guide
The Plague Quarter has three bosses and is a more involved quarter, with more complex strategies involved. It also has a "suppression room" of sorts, which can be easily cleared by hugging the right wall until you reach the boss.
Noth the Plaguebringer
Focus adds before the boss. Stop DPS and healing momentarily after he blinks, as it is a full threat reset. Remove any curses immediately, as they become lethal DoTs otherwise.
He will blink to the balcony every so often and call on more adds, just keep killing them until he returns and finish him off.
Heigan the Unclean
The dance boss! Have any players with Mana go into the podium where he starts and take the boss well away from it as he has a lethal Mana Burn aura with a pretty large radius.
Have your tanks and melee people move around with the boss in a way that dodges the green explosions in the room, as shown in the video.
After a while, he teleports to the podium and begins channeling. All of your group needs to now do the dance together and away from the boss. Take note that the explosions are much faster at this point, and you will have to constantly be moving to not die. Do not stop to cast!
Loatheb
Healers can only cast one heal per minute. Have a healing rotation set up and
people only use their biggest heal on the tank, ensuring his survival. Healers
should DPS while their healing spells are on cooldown. Also, use ![]() Seal of Light's
judgement effect and
Seal of Light's
judgement effect and ![]() Poison Cleansing Totem to help out with some of the
damage intake.
Poison Cleansing Totem to help out with some of the
damage intake.
Spores spawn around the room, which should be picked up by groups of 5 DPS players. These grant a massive physical/spell critical strike chance increase while making abilities cause no threat. Get this buff on your best DPS as quickly as possible, for this fight is a DPS race, as Loatheb will be dealing raid-wide Shadow damage periodically after 2 minutes, with an interval of 30 seconds at first and of only 15 seconds after 5 minutes, which will quickly wipe your group.
First Aid Bandages and Alchemy Shadow Protection Potions will allow you to stay alive for longer, so make sure to bring some!
Construct Quarter Guide
The Construct Quarter has four bosses, and even the first one, Patchwerk can be a tougher challenge than anything you've seen so far in Naxxramas due to his massive single target damage.
Patchwerk
The simplest fight on Naxxramas, but also one of the hardest. He will hit your main tank and whoever has the highest HP out of the top 4 players in his threat table for huge amounts constantly, and enrage at 5% health left.
This means that these 5 players should either be tanks or have a ton of health that can take the damage, and all of your healers should constantly be casting maximum rank single-target healing spells at them.
Grobbulus
A chill fight after the stress of Patchwerk. Have your main tank always be the only person in front of the boss, as he does a cone attack that spawns one add per person hit, and slowly kite him around the edges of the room to drop his poison clouds in safe places. Kill the adds whenever they spawn.

Any player that is hit with his Mutating Injection debuff needs to move close to an existing poison cloud outside of the tank's current path, as they will drop a new poison cloud upon removal, as shown in the video.
Gluth
Tank him near and facing the door, in order to be as far away from the grates
on the floor as possible. Tank swap whenever the current tank has 4 or more debuffs
and make sure to have some kind of fear protection as he fears everyone around him
every 20 seconds or so. Use ![]() Tranquilizing Shot whenever he Enrages.
Tranquilizing Shot whenever he Enrages.
Have a kite and crowd control rotation for the zombies spawning from the grates in the back of the room. Mages and Hunters are great for this with their novas and ice traps. The goal is to keep the zombies grouped up and well away from the boss but do not bother to DPS them just yet.
Every 105 seconds he casts Decimate, bringing every player and zombie in the room to 5% health. This will prompt the zombies to move to the boss and heal him if they reach. Kill them all before this happens, and repeat until the boss is dead.
Thaddius
Split your raid evenly into two groups and fight each boss on its starting platform to avoid their most damaging ability. The group that fights Feugen cannot have any Mana-using damage dealers as he has a Mana draining aura. Healers can outrange this aura if the boss and the tank are positioned properly.
These mini-bosses will periodically throw their respective tanks across the room. This wipes threat, and you should have an off-tank ready to pick up the boss whenever this happens.
Kill them both within 5 seconds of each other or they will resurrect. Jump into Thaddius platform, as simply walking off will make you miss.
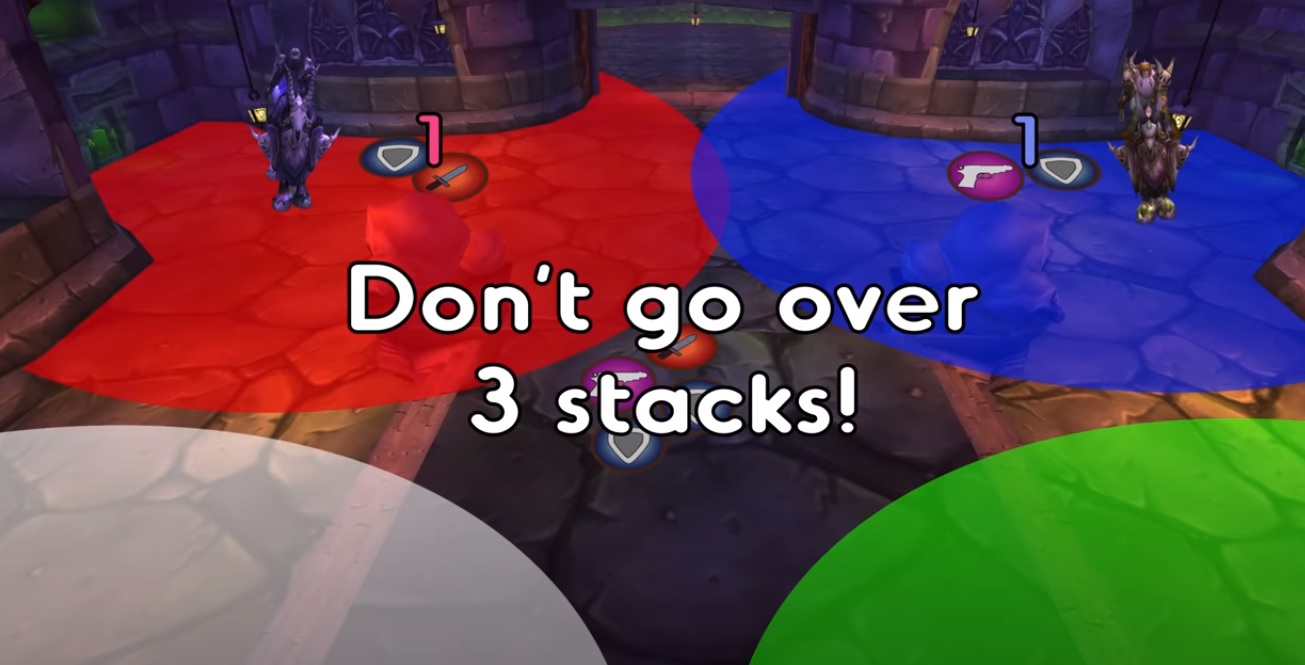
Thaddius himself only has one notable mechanic: he will mark half the raid with a positive (+) debuff and the other half with a negative (-) debuff. Players need to be grouped up with same-debuff players in order to get a damage buff. Crossing opposite debuffs means almost certain death.
Pre-assign a side of the boss for each debuff and have everyone pay close attention to their debuff status at all times, as the boss periodically changes the debuffs of the raid at random. The way this works can be seen at this point in the video.
Military Quarter Guide
The Military Quarter has three bosses, and while the first two are of comparable difficulty to the previous bosses you faced, The Four Horsemen is something else. You will need to employ many more tanks than you have so far in any WoW Classic boss encounter, and they need to have good gear and consumables because the bosses hit hard.
Instructor Razuvious
This boss hits incredibly hard and needs to be tanked by his own adds, through
the use of a Priest's ![]() Mind Control spell.
Mind Control spell.
The adds have a taunt and a shield wall ability. The idea is to always have an add with shield wall tanking the boss, so make sure your Priests are mind controlling new adds as needed whenever the current one has his shield wall effect near its end. Any adds not being mind controlled should be tanked by your tanks near the Priests.
Razuvious himself has a shout that burns all Mana of anyone in line of sight, dealing lethal damage in the process. Make sure to tank him at the bottom of the ramp, possibly behind a wall, to make it easy for your Mana users to break line of sight whenever this shout is incoming.
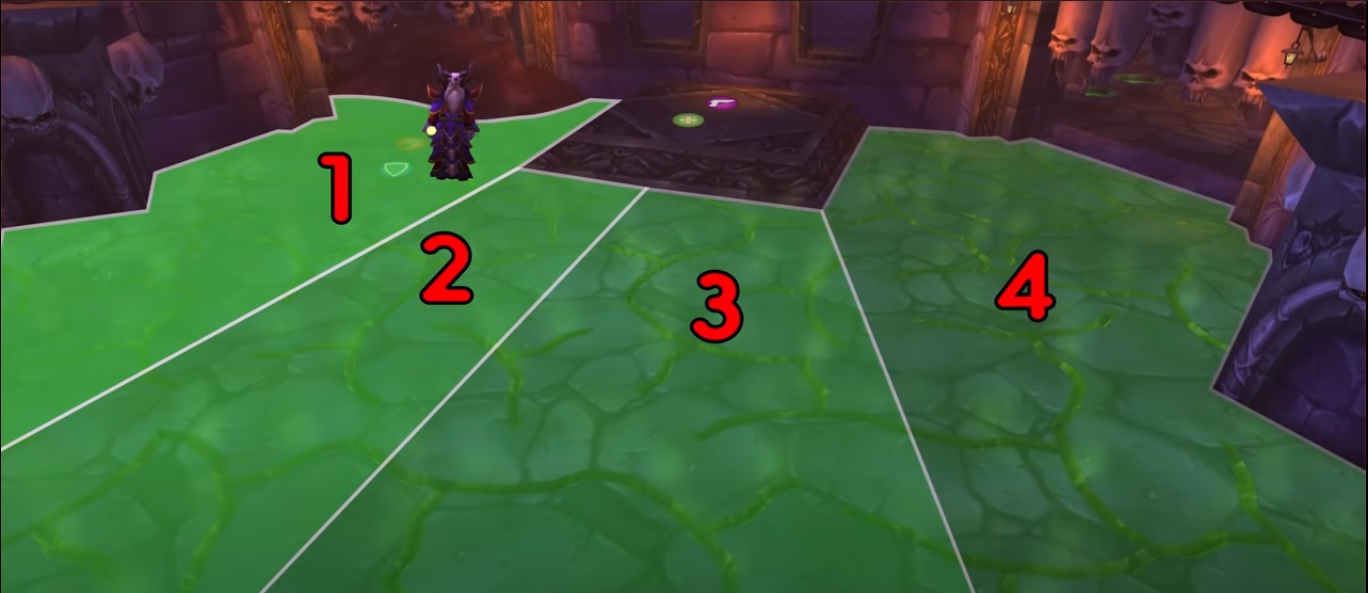
Gothik the Harvester
Split your raid evenly into two groups, with ranged on the left (living) side and melee on the right (undead) side.
The idea is to have stronger DPS on the undead side, as any adds killed in the living side are transformed into adds for the undead side to deal with, which are also generally more dangerous.
Kill riders first, then death knights and lastly trainees on the living side, and trainees, then riders, then death knights and finally horses on the undead side.
The Four Horsemen
This is where we get to the ultimate bosses of WoW Classic. We strongly recommend checking the video for the details. You will need to have your players rotate on each horseman based on their debuffs of that horseman, in order to avoid getting more than 3 of a particular debuff.
Healers have somewhat of a special rotation, as they will rotate one by one on every mark before starting to rotate on 3 like the rest of the group, in order to ensure that there is always good healer coverage on each boss, rather than having periods without anyone healing due to movement.
In order to achieve this, have one healer on each starting side rotate to the next boss, clockwise, on the first mark. A different healer in each group should move on the second mark, and the third healer moves on the third mark. After this first rotation, you move clockwise whenever you have 3 marks, ensuring optimal uptime.
Boss wise:
- Thane Korth'azz has a meteor effect that requires all players near him to be stacked to split the damage;
- Lady Blaumeux spawns void zones under players near her, which you should dodge;
- Highlord Mograine debuffs the tank with a powerful DoT which requires a lot of additional tank healing;
- Sir Zeliek has a holy
 Chain Lightning of sorts. Its damage doubles
each time it jumps, giving it unparalleled instant raid wipe potential if mistakes
are made, so have only ranged players attack this boss and no one should be near the tank
at any point.
Chain Lightning of sorts. Its damage doubles
each time it jumps, giving it unparalleled instant raid wipe potential if mistakes
are made, so have only ranged players attack this boss and no one should be near the tank
at any point.
They all shield wall at 50% and 20% health, preventing any attempts at zerging one down, but will stop all abilities except their marks upon death, making the fight much easier as they do not need to be tanked or DPSed down anymore. Slow and steady is the way to go in this encounter, good luck!
Frostwyrm Lair
The Frostwyrm Lair is the final destination of Naxxramas and houses only two bosses. Unfortunately, these are also by far the hardest bosses in the raid, and WoW Classic as a whole, and can be a big roadblock. Once you have cleared this place, it is time to get ready for Burning (Crusade) icecream flavor, because Vanilla is done and dusted!
Sapphiron
Sapphiron is a very simple boss mechanically, but also the toughest healing check in WoW Classic. The main challenge of the fight will come from his permanent frost aura, which constantly damages the whole raid for significant frost damage.
He also deals high melee damage to the tank, applies life-draining debuffs which should be dispelled instantly, and casts a Blizzard effect inside his room, which slowly moves around the room, slowing and damaging everyone caught within.
Ultimately, the biggest problem is that Sapphiron is also all but impossible to zerg down, as he will spend significant time in the air, reducing melee uptime. Spread out as soon as he starts going up, as he will proceed to freeze five players, dealing area of effect damage around them in the process.
The players who are not frozen need to hide behind a frozen person's iceblock, in order to line of sight the frost breath explosion that slowly drops to the middle of the room after all freezes go off, with any failure to do so being punished by death.
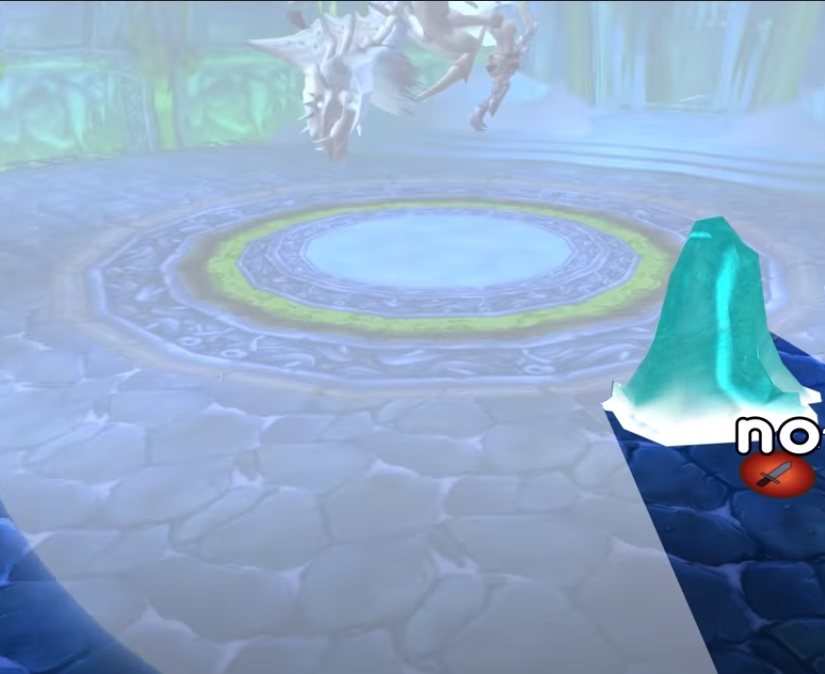
He will land shortly after the explosion, and the fight repeats until he dies.
Kel'Thuzad
The final boss in WoW Classic, Kel'Thuzad is a boss that challenges your raid in every aspect. There are DPS and healing checks, multiple one-shot mechanics to avoid, the need to quickly crowd control both humanoids and undead, an interrupt rotation to handle and three long phases to deal with.
In the first phase, you will be surrounded by adds. Wait for them to come to you, as attacking them before they start moving towards you is likely to cause your group to get overwhelmed needlessly.
Have your tanks and melee deal with the Abominations, minding their healing reduction debuff, and your ranged deal with the Skeletons and Banshees, both of which will cause large amounts of area of effect damage on the raid if they get close enough.
Once you kill enough of them, most of the remaining enemies will despawn, which indicates the second phase is about to start. Have your ranged and healer players immediately spread around the room, as Kel'Thuzad might start using his deadly area of effect abilities as soon as he becomes active.
You will need to deal with multiple abilities that can come at any point with a short interval between each of them at this point:
- His Frostbolt regular cast does one-shot damage and needs to be constantly interrupted by melee players.
- Frostbolt Volleys are not interruptible and deal significant raid damage, as well as a slow effect. Mitigate this damage with bandages and potions as much as possible.
- He will Mind Control the tank and four other random players, resetting his threat. Have an off-tank pick him up and all DPS swap to crowd controlling the affected players.
- A Void Zone can sometimes be spawned under a player. Anyone standing in it gets one-shot 3 seconds after it has spawned so move out!
- He can debuff Mana users with Detonate Mana which burns half of their Mana over 5 seconds and deals one-shot damage to anyone nearby at the end of this duration. Make sure to not be near anyone with this debuff!
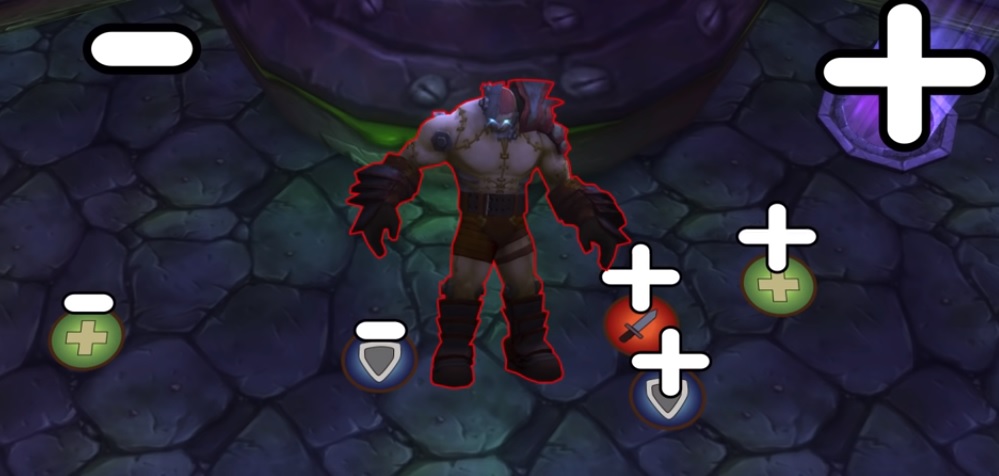
- Finally, Frost Blast will cause a player and anyone within 10 yards to become frozen and take 130% of their health in damage over 5 seconds. This is absolutely deadly and the main reason why players need to be spread out, as multiple hits are much more likely to cause deaths. Even melee should try to spread in three groups around and behind the boss to avoid this ability as shown below:

The final phase begins once he hits 40% health. Extra adds will start spawning
from the portals around the room until 5 are present. You can ![]() Shackle Undead
up to 3 of them before Kel'Thuzad breaks all the shackles instantly, which
you decidedly should. The remaining two can be tanked, but will gain 15% damage
per each player death, which will make them too difficult to tank if too many people
die.
Shackle Undead
up to 3 of them before Kel'Thuzad breaks all the shackles instantly, which
you decidedly should. The remaining two can be tanked, but will gain 15% damage
per each player death, which will make them too difficult to tank if too many people
die.
They also have a ton of health, so for the most part just off-tank or kite them while burning down Kel'Thuzad with all cooldowns. This phase can easily go out of control, as all of phase 2 abilities will still be active alongside the adds, so do your best to keep things under control for as long as it takes to finally take down the final boss of WoW Classic.
Changelog
- 01 Feb. 2025: Added Season of Discovery Information.
- 22 Jul. 2022: Updated with changes from the Season of Mastery.
- 10 Dec. 2020: Guide added.
This guide has been written by Abide, TBC veteran for nearly a decade. Abide is a Warrior tank and multi-class expert currently playing on Faerlina as Horde. You can find him in the the Icy Veins Discord. You can also see him live on Twitch.
- Burning Crusade Classic Phase 2 Now Live: Here’s What to Expect
- Did Blizzard Just Quietly Invite Creators to Play WoW Classic’s Next Chapter?
- WoW Weekly Returns: Patch 12.0.5, Twitch Drops & Classic Updates
- WoW BCC Anniversary Edition: Overlords of Outland – Everything Coming May 14
- Battleground Honor Significantly Increased
- Limited-Time Mount Alert: Get the Voidfeather Dragonhawk for TBC Classic Servers Now!
- Could WoW Be Added to Xbox Game Pass Ultimate?
- MoP Classic Escalation PTR Update Details New Content