Dire Maul North Dungeon Guide
Dire Maul is split into three wings, with all of them being recommended for players above Level 55.
The North wing of Dire Maul is home to the Gordok Ogre clan and their leader, King Gordok. The North wing is home to the famed "tribute runs" of Dire Maul.
Phase 4 Season of Discovery Loot in Dire Maul North
With Phase 4 of Season of Discovery, new loot has been added into Dire Maul North to help players prepare for raiding. Below you can find a full list of all of the new loot and each boss they drop from.
King Gordok (Tribute)
| Item |
|---|
Dire Maul North Entrance Location
The entrance to Dire Maul North is located in 43.4,66.5 Feralas, to the west of Camp Mojache
and to the north of The High Wilderness. To get to the entrance, you will need to
enter the Dire Maul compound from the southern side at 59,45. As a reminder, you cannot enter Dire Maul
North without the ![]() Crescent Key, which is from Dire Maul East.
Crescent Key, which is from Dire Maul East.
Quests in Dire Maul North
It is important that you pick up the dungeon quests for this instance before heading inside, as you can get a variety of loot from them, as well as a solid chunk of experience if you are not yet 60.
The quests are all outlined in our separate dungeon quest guide for this instance.
Dire Maul North Tribute Runs
Tribute Runs are a specific type of run that is commonly ran through Dire Maul North. Dire Maul North has a specific mechanic where you can choose not to kill any other boss apart from the final boss, King Gordok. If you can successfully make your way through the dungeon without killing any boss, the other Ogres in the dungeon will declare you the new king upon killing King Gordok, paying "tribute" to you with a new chest of loot that has valuable drops, many of which are considered more desirable than what you would normally get from clearing the dungeon.
To start the run, you need to avoid the first few bosses, making your way to the
second courtyard where you can find a chest in the center. From the chest you will
need to loot ![]() Gordok Courtyard Key to open the door leading to the hallway.
Once you make it through the doorway, you can keep clearing through the hallway.
Eventually you will come to some bugs, and just past them there will be a Broken
Ice Trap on the ground. When the patrolling boss Guard Slip'kik is away,
fix the ice trap by right clicking on it, and then wait for him to patrol over it,
freezing himself and allowing your group to run by. In order to fix the Frost Trap,
you will need a
Gordok Courtyard Key to open the door leading to the hallway.
Once you make it through the doorway, you can keep clearing through the hallway.
Eventually you will come to some bugs, and just past them there will be a Broken
Ice Trap on the ground. When the patrolling boss Guard Slip'kik is away,
fix the ice trap by right clicking on it, and then wait for him to patrol over it,
freezing himself and allowing your group to run by. In order to fix the Frost Trap,
you will need a ![]() Frost Oil, so make sure at least one person brings some!
Past the guard, you will find
a goblin named Knot Thimblejack by the fire. He will give you a guest to get
the
Frost Oil, so make sure at least one person brings some!
Past the guard, you will find
a goblin named Knot Thimblejack by the fire. He will give you a guest to get
the ![]() Gordok Ogre Suit, which you will need for later in the dungeon. To complete
the quest you will need to get the
Gordok Ogre Suit, which you will need for later in the dungeon. To complete
the quest you will need to get the ![]() Ogre Tannin, which is just on the platform
above the goblin.
Ogre Tannin, which is just on the platform
above the goblin.
Once you have the Ogre Suit, keep clearing through the instance. Eventually you will come across Captain Kromcrush in the final hallway before the King's room. Whoever has the Ogre Suit needs to put it on, and talk with Captain Kromcrush. Once you talk with him, he will move and you can all get to the King's room. Once in the room, you just need to make your way to King Gordok, killing him. Be sure not to kill Cho'Rush the Observer for even more tribute loot, but you can choose to kill him if fighting both at once is too much.
Reasons to do a Tribute Run
There are two main reasons to do a Tribute Run. First, lots of the Tribute specific pieces are incredibly powerful, and much better than anything the other 6 bosses drop. Most groups will choose to do Tribute Runs as they give the most desirable pieces, some of which are even BiS with raid gear. Second, completing a Tribute Run allows you to talk with several of the Ogres afterwards who will give you powerful buffs that last 2 hours. These are incredibly powerful buffs that you can then go into raids with, increasing your clear speed to helping you get through some tough bosses. The buffs you can get are listed below.
 Mol'dar's Moxie from Guard Mol'dar gives you 15% more Stamina
for 2 hours.
Mol'dar's Moxie from Guard Mol'dar gives you 15% more Stamina
for 2 hours. Fengus' Ferocity from Guard Fengus gives you 200 AP for 2 hours.
 Slip'kik's Savvy from Guard Slip'kik gives you 3% spell crit for
2 hours.
Slip'kik's Savvy from Guard Slip'kik gives you 3% spell crit for
2 hours.
Notable Loot from Tribute Runs
| Item | Required Level | Slot |
|---|---|---|
| 58 | 2H Axe | |
| 57 | Shield | |
| 58 | Trinket | |
| 56 | Shoulders | |
| 56 | Waist | |
| 58 | Wrists | |
| 57 | Chest | |
| 57 | Chest | |
| 58 | Cloak | |
| 58 | Staff | |
| 56 | Ring | |
| 57 | 2H Mace |
Layout of Dire Maul North
Dire Maul North is a mostly linear dungeon, but with lots of open area at the start. You can move through the dungeon quickly due to a low density of enemies inside, as many groups will choose to speed run this instance either to do a "tribute run" or a boss run to farm pre-raid BiS pieces.
You will want to start by pull the first boss from the middle of the first room back to the entrance, then working your way left to kill the next two bosses in the next room. After that you move left again, following the corridor until the end of the instance.
Notable Trash in Dire Maul North
Be careful when pulling enemies in the initial larger rooms as you do not want to pull multiple groups at the same time. As long as you are careful, they should not give you any trouble. Once you get into the hallway after the first 3 bosses, be careful of the Gordok Reavers and the Gordok Warlocks. The Reavers are some of the hardest hitting trash, and the Warlocks are part of larger groups due to the demons they have summoned with them. Lastly, watch out for Wandering Eye of Kilrogg. These eyes will call more Ogres if not killed quickly, but they only have around ~260 hp, and they should be killed almost instantly. Just be careful not to aggro one if you are not ready to instantly kill it, preferably with a ranged attack.
Remember that trash can respawn in this dungeon, so make sure to keep a good pulling pace.
Bosses in Dire Maul North
There are 7 bosses in Dire Maul North, with the final 2 bosses being in the same encounter. While several of the bosses can drop decent gear, most of the highly sought after pieces either come from King Gordok or from the chest once you complete a Tribute Run.
Guard Mol'dar
-
 Enrage
 Knock Away
 Shield Bash
 Shield Charge
 Strike

Guard Mol'dar is the first boss found in Dire Maul North, found patrolling the first courtyard from where you enter. The best way to pull him is to have a tank or ranged DPS run by themselves into the courtyard to pull him back to the entrance so as not to accidentally pull any extra groups.
Pulling Guard Mol'dar back is critical since you do not want him near any packs of dogs while killing him. He has two abilities, one which knocks back nearby targets, and at 40% he will call for help, causing any nearby guard dogs to come to his aid. As long as you pull him back to the entrance to kill him, he should not give you any trouble.
Notable Loot from Guard Mol'dar
| Item | Required Level | Slot |
|---|---|---|
| 55 | 1H Axe | |
| 55 | Wrists | |
| 55 | Shoulders | |
| 55 | Shoulders | |
| 55 | Cloak | |
| 55 | Wrists |
Stomper Kreeg
-

 Booze Spit
 Drunken Rage
- Enrage
 War Stomp
 Whirlwind
Stomper Kreeg is the second boss you will fight, found in the beginning of the second courtyard on the North side. He is a drunk Ogre who will spit alcohol on you while you fight, getting your party drunk. He actually hits quite hard, so make sure to keep your tank up while fighting him. Lastly, he occasionally will stun and knock back any close targets, so make sure your tank and melee are prepared.
If you do a Tribute Run, you can come back to Stomper Kreeg afterwards, and he will be a vendor who will sell you some special alcohol.
Notable Loot from Stomper Kreeg
| Item | Required Level | Slot |
|---|---|---|
| 55 | Off Hand |
Guard Fengus
-
Enrage
- Knock Away
- Shield Bash
- Shield Charge
- Strike
Guard Fengus is the third boss you will fight, found patrolling the second courtyard in the middle. He is quite easy to kill, as his only two abilities are a small knock back to melee and a random charge. Just make sure to pull him away from other nearby groups of enemies so you do not accidentally pull anything, and it should be an easy kill.
Guard Fengus does not have any unique loot, only low quality green items that
can also drop from other bosses such as ![]() Ogre Pocket Knife and
Ogre Pocket Knife and ![]() Modest Armguards.
Modest Armguards.
Notable Loot from Guard Fengus
| Item | Required Level | Slot |
|---|---|---|
| 55 | Wrists |
Guard Slip'kik
-
Enrage
- Knock Away
- Shield Bash
- Shield Charge
- Strike
Guard Slip'kik is the fourth boss you will fight, found in the hallway you enter after the courtyards. He is exactly like Guard Fengus, and has the same knock back ability. Just pull him away from groups of enemies and you should have no trouble killing him.
Notable Loot from Guard Fengus
| Item | Required Level | Slot |
|---|---|---|
| 55 | 1H Axe | |
| 55 | Wrists | |
| 55 | Shoulders | |
| 55 | Shoulders | |
| 55 | Cloak | |
| 55 | Wrists |
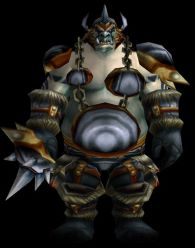
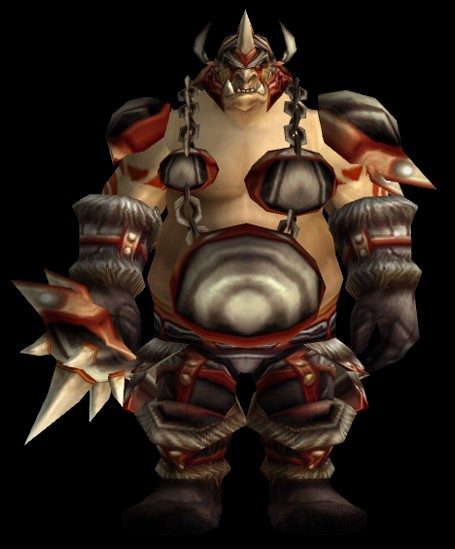
Captain Kromcrush
-
Call Reavers
- Enrage
 Intimidating Shout
 Mortal Cleave
 Retaliation
Captain Kromcrush is the fifth boss you will fight, found just before
the entrance to the King's room, blocking the door. While the previous four bosses
are all relatively easy, Kromcrush is different. This is one of the most difficult
dungeon bosses that you will face as a 5-man group, so be prepared. Captain Kromcrush
is a Warrior, and will use several Warrior abilities. He will use ![]() Mortal Strike
on his target, which puts a healing reduction on your tank in addition to already
doing a substantial amount of damage. He will occasionally fear you entire group,
which makes it imperative that you clear any other enemies even remotely close.
He will sometimes use
Mortal Strike
on his target, which puts a healing reduction on your tank in addition to already
doing a substantial amount of damage. He will occasionally fear you entire group,
which makes it imperative that you clear any other enemies even remotely close.
He will sometimes use ![]() Retaliation, which will do lots of damage to any
melee attackers. Lastly, he will call two Gordok Reavers to join the fight
when he hits 75% health, both of which are incredibly dangerous. If you do not have
two crowd control abilities to keep them controlled until you finish off the captain,
you will need to immediately turn and kill both of them when they spawn before finishing
off Kromcrush. If you have long cooldowns, it is absolutely worth making sure that
they are up for this fight.
Retaliation, which will do lots of damage to any
melee attackers. Lastly, he will call two Gordok Reavers to join the fight
when he hits 75% health, both of which are incredibly dangerous. If you do not have
two crowd control abilities to keep them controlled until you finish off the captain,
you will need to immediately turn and kill both of them when they spawn before finishing
off Kromcrush. If you have long cooldowns, it is absolutely worth making sure that
they are up for this fight.
Notable Loot from Guard Fengus
| Item | Required Level | Slot |
|---|---|---|
| 57 | Polearm | |
| 57 | Feet | |
| 57 | Chest | |
| 57 | Waist |
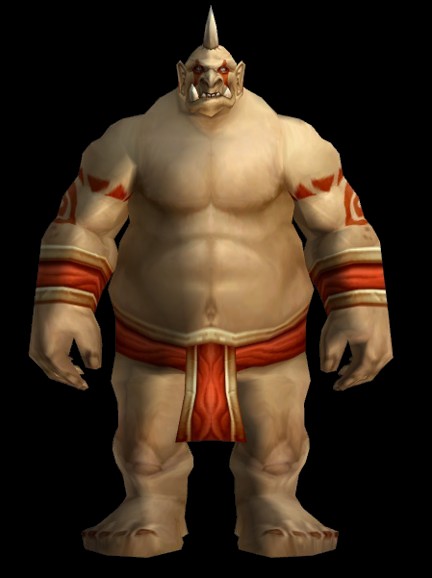
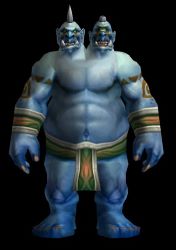
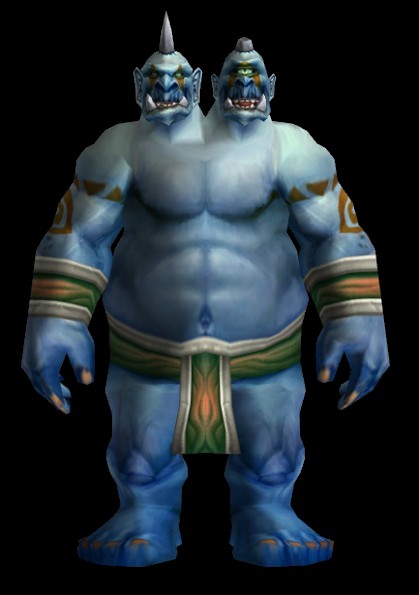
King Gordok and Cho'Rush's the Observer
 King Gordok
- Berserker Charge
- Mortal Strike
 Sunder Armor
- War Stomp
King Gordok and Cho'Rush the Observer are the final two bosses of the instance, found in the final room. These two are relatively easy to kill, just burn down the King with your tank holding him. In a Tribute Run this might take longer since Cho'Rush will occasionally heal him as well as casting Chain Lighting sometimes.
-
 Mage
Mage
 Arcane Explosion
 Bloodlust
 Fireball
 Frost Nova
-
Priest
 Heal
Heal- Mind Blast
 Power Word: Shield
 Psychic Scream
-
Shaman
 Chain Lightning
 Earthgrab Totem
 Healing Wave
 Lightning Bolt
Cho'Rush the Observer will have the abilities of one of the three classes shown above. You should always start by killing Cho'Rush the Observer due to his ability to heal himself and the King, but if you are doing a Tribute Run just ignore him and kill the King.
Notable Loot from Cho'Rush the Observer
| Item | Required Level | Slot |
|---|---|---|
| 56 | Shield | |
| 56 | 1H Sword | |
| 56 | Head | |
| 56 | Wand |
Notable Loot from King Gordok
| Item | Required Level | Slot |
|---|---|---|
| 58 | Off Hand | |
| 58 | Hands | |
| 58 | Legs | |
| 58 | Wrists | |
| 58 | Head | |
| 58 | Feet | |
| 58 | 2H Sword | |
| 58 | Finger |
Dire Maul North Quick Dungeon Reset Method
The fastest way to reset a dungeon in WoW Classic, typically used for speed farming, is to convert the group to a raid, invite a person from outside the party, grant them leader status, and have everyone who was inside the dungeon log off their characters. If the person who is outside resets the dungeon in this state, the persons who were inside will find themselves teleported to a fully reset dungeon instance once they log back in.
Recommended Classes for Dire Maul North
If you are going in underleveled, Rogues and Mages
are excellent choices due to their CC abilities against the many humanoid Ogres
present in the dungeon. You can ![]() Sap /
Sap / ![]() Polymorph one or more
enemies in almost every single pull.
Polymorph one or more
enemies in almost every single pull.
If you are farming for pre-raid BiS gear at 60, the any group comp should be fine. The more important thing will be to make sure you have a diverse group setup to maximize gear distribution; if you go in with 4 Warriors, you should expect lots of competition for the same drops.
Regardless, you should be able to clear the dungeon with any group setup.
Changelog
- 18 Nov. 2024: Page updated for Classic Anniversary.
- 09 Jul. 2024: Added section for new loot in Phase 4 of Season of Discovery.
- 05 Apr. 2024: Added boss pictures and abilities.
- 15 Oct. 2019: Page added.
This guide has been written by Abide, TBC veteran for nearly a decade. Abide is a Warrior tank and multi-class expert currently playing on Faerlina as Horde. You can find him in the the Icy Veins Discord. You can also see him live on Twitch.
- Burning Crusade Classic Phase 2 Now Live: Here’s What to Expect
- Did Blizzard Just Quietly Invite Creators to Play WoW Classic’s Next Chapter?
- WoW Weekly Returns: Patch 12.0.5, Twitch Drops & Classic Updates
- WoW BCC Anniversary Edition: Overlords of Outland – Everything Coming May 14
- Battleground Honor Significantly Increased
- Limited-Time Mount Alert: Get the Voidfeather Dragonhawk for TBC Classic Servers Now!
- Could WoW Be Added to Xbox Game Pass Ultimate?
- MoP Classic Escalation PTR Update Details New Content