Beginner Guide
Table of Contents
Introduction
The purpose of this guide is to introduce new Overwatch players to several key concepts, with the aim of helping them have a better gaming experience and hopefully perform better. Those who have played (or closely followed) Overwatch from its Beta stages will probably have little to learn, while none of this will be new for seasoned players.
Game Performance and Settings
Game Performance
Having the game run smoothly on your computer is essential for any shooter, much more so than for other games, since lightning-fast reflexes and pinpoint accuracy are very important. Having sudden FPS (frames per second) drops while you are trying to shoot at other heroes will negatively impact your performance, not to mention that it will frustrate you.
Before you even begin playing Overwatch, you should first customise the game's settings. The goal is to reduce the graphics settings to a degree where the game will run smoothly, even if this means the graphics quality will be diminished. Enhancing the beauty of the effects might be satisfying to the eye, but if it affects performance, it is not worth doing.
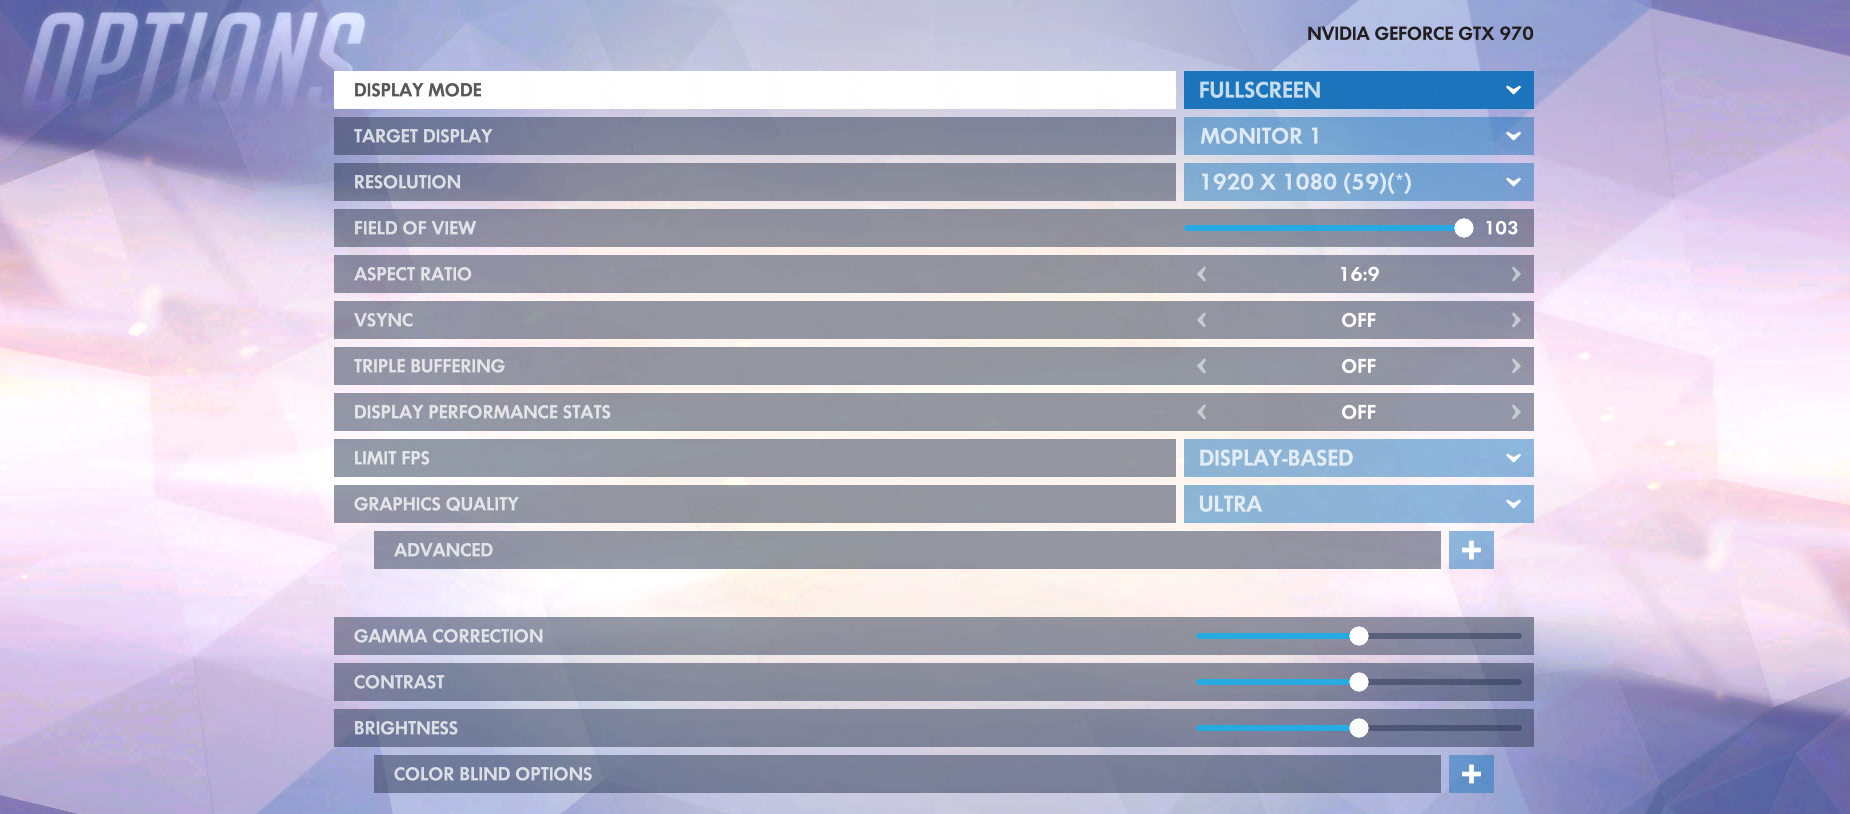
In the Options menu, the "Graphics Quality" section allows you to choose from a few preset configurations, and initially this will do for those who do not wish to tweak things too much. If you are more technically knowledgeable, of course, you can customise the Advanced settings (located directly below in the menu) to find the perfect mixture.
Game Settings
Aside from getting constant, high FPS, there are other settings you should look to customise. The first and most important goal is for you to feel perfectly comfortable within the game, when you are controlling heroes. This has to do mostly with appropriate mouse sensitivity and comfortable keybindings.
Mouse Sensitivity
The process for finding the right mouse sensitivity is all about trial and error, and you should not hesitate to repeatedly tweak your sensitivity until you reach a comfortable level. You are looking for a sensitivity level that is high enough to allow you to quickly look around (in a 360 degree angle) to be able to deal with enemies who appear behind you or who move around you, but still low enough to allow you to aim precisely. Moreover, the exact sensitivity you choose will have to do with the size of your mousepad.
Regarding sensitivity, it is also worth noting that, depending on what heroes you prefer playing, different sensitivity levels might be appropriate. For example, if you play a lot of Tracer, you will want to have a higher than usual sensitivity, considering how mobile she is and how often she has to do sudden 180 degree turns.
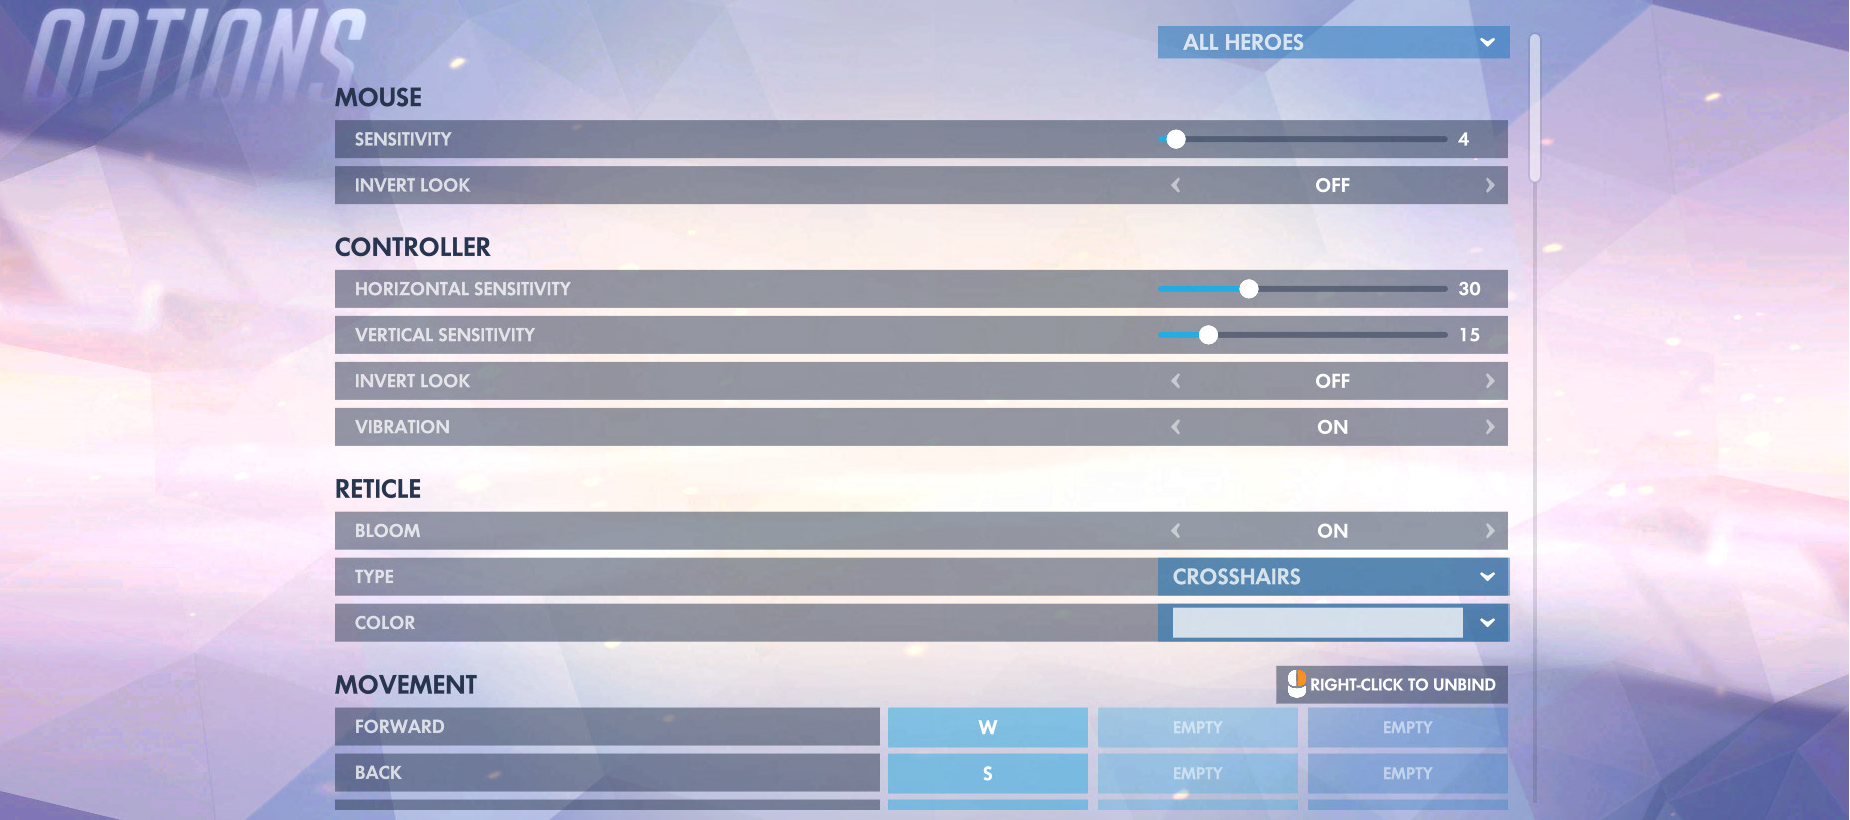
Mouse sensitivity and other control options.
Keybindings
The default Overwatch keybindings are acceptable, but depending on your preferences (length of your fingers, type of keyboard, previous gaming habits) you may want to look into customising them to suit you better. Your goal is simple: be able to use all of your hero's abilities quickly and easily, without wasting any time, since every second will of delay can cost you greatly.
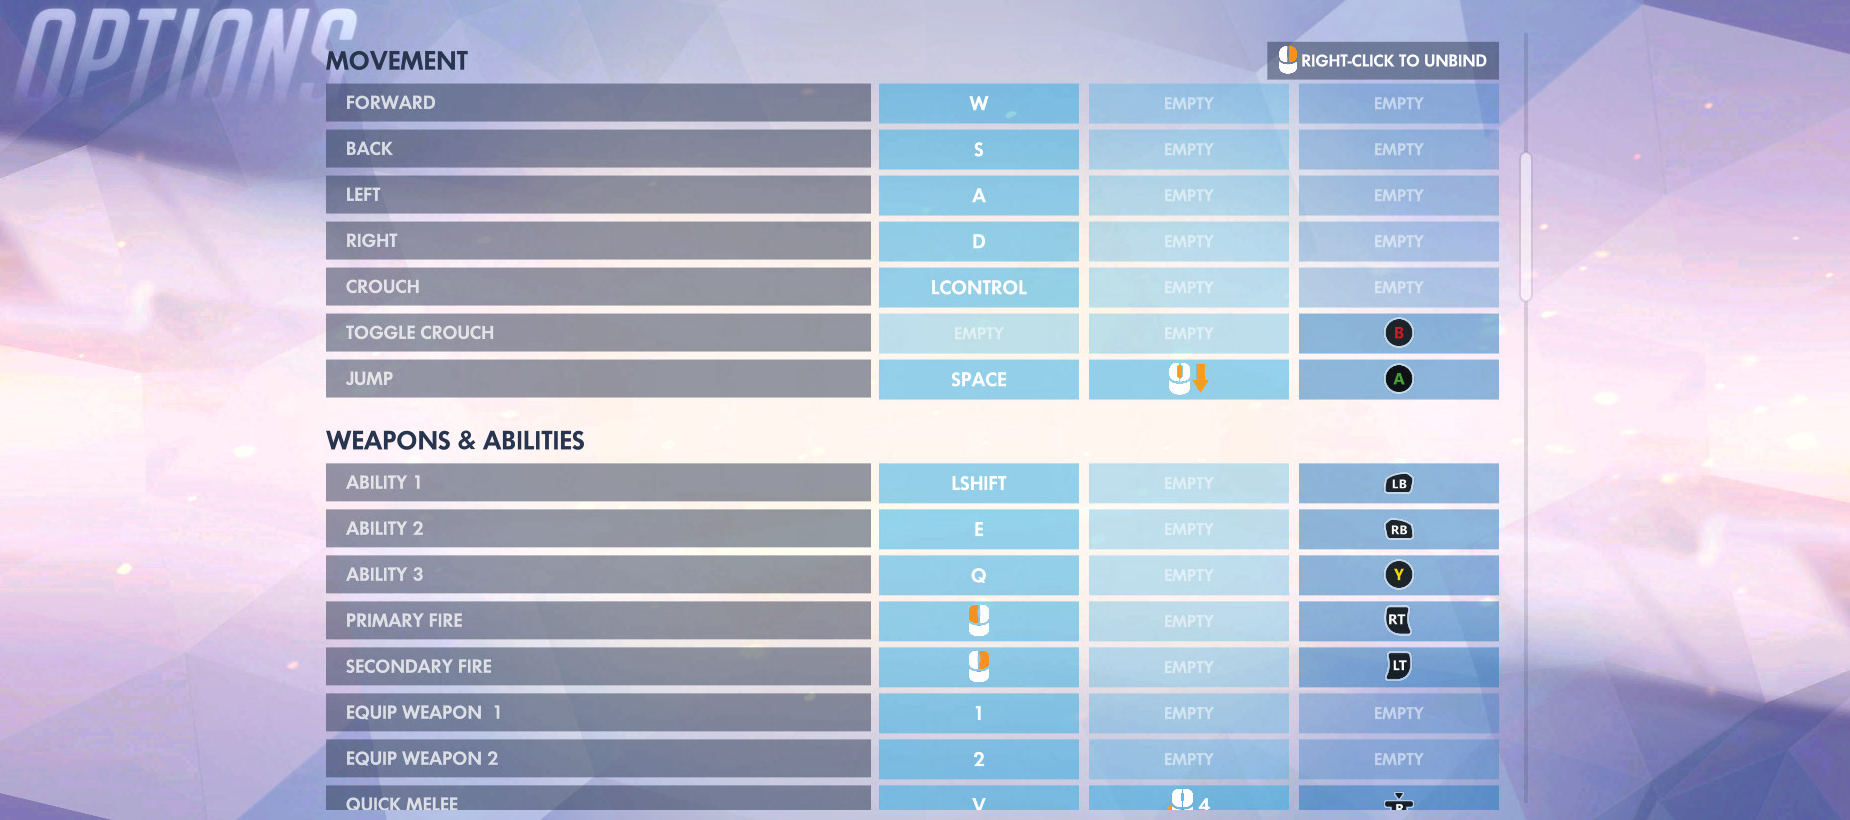
The keybind selection screen.
Other Settings
The Options menu offers a great variety of other settings that it is a good idea to look over and possibly change.
The most important things to look at are Field of View (located in the Video options,explained below), as well as turning on the Kill Feed and tweaking your reticle (crosshair).
While the last two are evident, Field of View requires more explanation. In simple terms, Field of View determines how much peripheral vision you have. The lower the number of the setting, the less you will see at the sides of your screen, with the advantage (if it can be called that) that the center of the screen will be larger. A higher Field of View number grants you more peripheral vision, but the center of the screen (including whatever it is you are aiming at) will be smaller, therefore more difficult to see.
In general, we recommend setting your Field of View to the maximum possible value (103), since seeing as much of your surroundings as possible is very useful in Overwatch. That said, given the fact that some people can get nauseous when playing with certain Field of View settings (though this typically happens at low rather than high values), you can tweak it to make it more comfortable for you. Always try to get it as high as you are comfortable with, though.
Team Composition and Hero Switching
An integral part of teamplay in Overwatch has to do with having a viable team composition throughout the game, and also with making sure that individual hero choices are adapted to the in-game situation.
Team Composition
There are 4 roles that heroes can have, according to the in-game classification.
- offense heroes (mostly mobile damage dealers);
- defense heroes (mostly stationary/slow damage dealers);
- tanks (resilient, bulky heroes that can block damage and protect teammates);
- support heroes (3 of which are healers, while the 4th one is only able to shield her teammates).
There is no golden rule for how many heroes of each role you should have, but there are some good guidelines.
- You should always have at least 1 healer on your team (Mercy, Lúcio, or Zenyatta).
- You should have several heroes capable of sustained damage at any given time (offense heroes, most defense heroes).
- Having or two tanks can be very helpful.
- Avoid having several of the same hero, especially when they fill a very situational role (multiple snipers, too many healers, for example).
Also, as a very general rule, defense heroes are not suited for Attacking (though there are exceptions, and high skill levels can compensate for this); offense heroes are always a good choice, though.
The higher the level of coordination between teammates (especially in case of actual teams), and the higher the skill discrepancies between the opposing teams, the more creative the team compositions can be. The guidelines above are meant for teams that are evenly matched and have only reasonable amounts of coordination and communication.
Hero Switching
As stated repeatedly by Blizzard, Overwatch is designed with the idea of dynamically switching between heroes in mind. The various advantages and disadvantages of heroes, as well as the fact that some heroes are very good counters to others all mean that switching heroes fluently is crucial to maximising your (and your team's) chances of success.

The hero selection screen.
Using the keybind (default H), you can switch at any time before the game has started, while you are dead, or when you are in your team's spawn room.
As you play the game and read our hero guides, you will develop a good understanding of which heroes are suited to which situations, and also which heroes are good at countering others. The point we wish to make in this guide is that you are very encouraged to switch heroes whenever you feel that your current choice is not optimal or no longer suited to the game.
At the start of the game, it is advised that your team heads out of the spawn with a viable team composition (as outlined above), but this is not all there is to it. Once you see what heroes the enemies have chosen, and once you start moving along the map and the environment changes, you should always consider switching your hero.
For example, if the enemy team has a strong hero combination that is proving devastating, someone on your team should switch immediately to a hero that can counter the enemies. Likewise, if your hero is being countered or you feel the other team are locking down certain areas of the game that make it very difficult for you to play, you should quickly switch hero to something that will do better.
Keep in mind also that some heroes are very good on some segments of certain maps, but then they lose their value as the action moves to another area of the map, at which point it is a good idea to switch to a different hero.
General Strategy
Now that we have covered some of the basics about getting into Overwatch, there are a few actual in-game strategies that we feel it is important to convey the right idea about. These are things that are not always immediately obvious, especially to new players.
The Importance of Objectives
Each of the 12 Overwatch maps revolves around an objective (capturing a Point, pushing a Payload, or a combination of the two). It is extremely important that all members of a team focus on the objective at all times.
Indeed, for newer players, a very common situation is to get carried away skirmishing with enemies in areas of the map that are irrelevant, while leaving the rest of your teammates to fend for themselves at the actual objective. This is particularly bad when you are not keeping an equal number of enemies occupied (for example, you are going around remote areas of the map looking to kill stragglers, while the rest of your team is outnumbered on the objective).
Moreover, when fighting for an objective, you should always make it a point to actually contest it (by being on the Point/close enough to the Payload), especially during critical moments (when you need to prevent the other team from capturing it, when you need to trigger or prolong Overtime. Many times, players will simply fight or stand next to the objective, when moving only a few steps close would make a big difference.
Attacking in Waves/Running in Together
One of the most common mistakes that new players make in public Overwatch matches is to run back to the action/objective as soon as they respawn. The instinct is understandable — players want to make themselves useful to the team as quickly as possible. However, this can lead to devastating consequences when the result is that a team's players trickle into the fight one at a time, only to each get killed on their own.
So, if when you respawn the rest of your team is dead or no longer engaging the enemy at the objective, do not run into the enemy team. Instead, wait (either at the spawn point or at some other suitable, safe location) for the rest of your team to respawn, and attack the enemies when you are all (or almost all) together.
Naturally, if your team is still holding out at the objective (even if outnumbered) when you respawn, you should hurry back to help them as quickly as possible.
Basic Combat
The majority of time in Overwatch is spent engaged in fights against enemies, and there are a number of things that players (new ones, especially) should keep in mind.
Staying Alive
The importance of surviving cannot be overstated. The penalty for dying in Overwatch is substantial, since you deprive your team of your presence for an extended period of time, leaving them outnumbered and giving the enemies a good chance to capture the objective.
As such, you should always do everything in your power to avoid dying. Whenever you are engaged in a fight that seems lost, or when your ambush or backstab was discovered, you should try to make your escape so that you can return and contribute to your team in another way. Many heroes have abilities that allow them to get away, and even those who do not should try to simply run away/to the security of their team.
Health packs also play an important role in your survival, so becoming familiar with their locations on the map is very useful. Not only does this allow you to quickly heal yourself up when you have escaped your enemies, but it can even be useful for healing up during combat, which can make a huge difference.
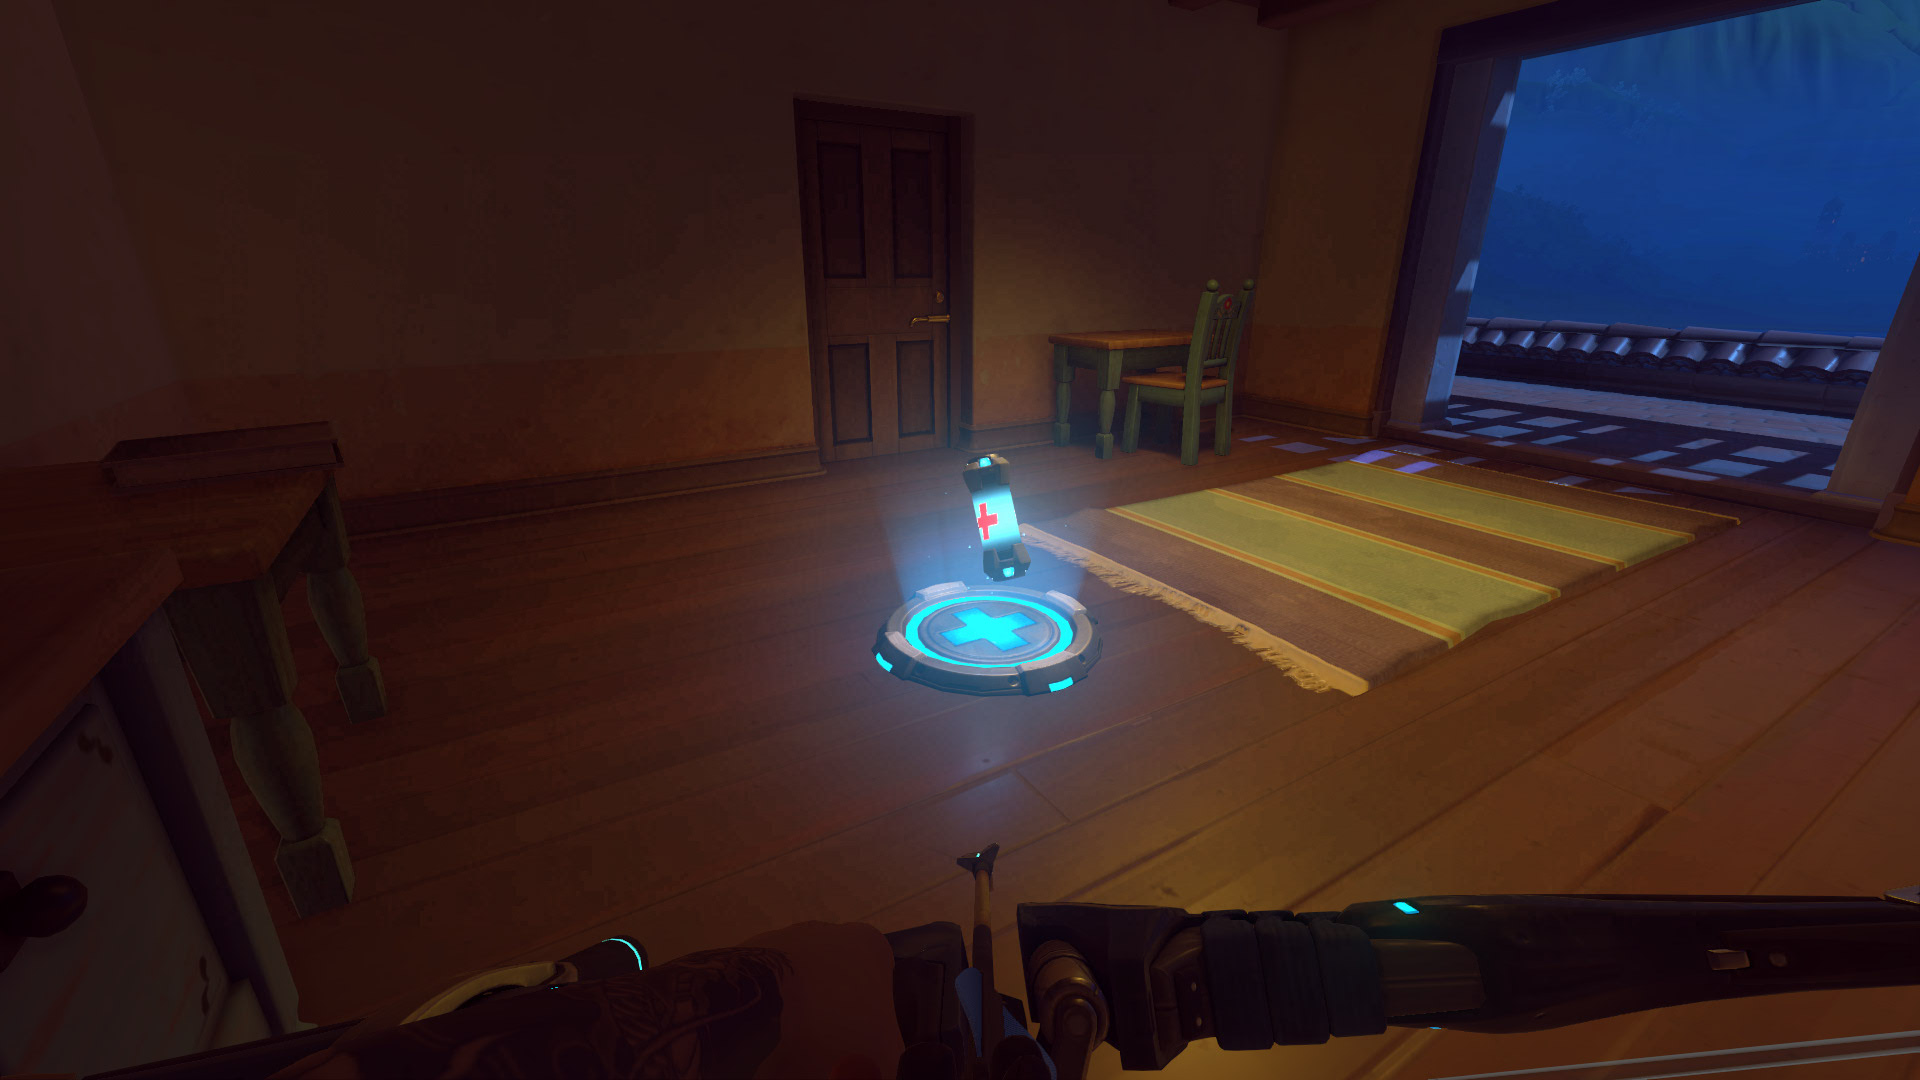
A health pack.
In any case, you will have to learn to really value your life, because even if you have to run away, run around after health packs, and find another way into the fight, you will have lost less time than dying would have cost you.
Sound
Sound is very important in Overwatch, serving much more than just to immerse you into the game and give heroes some more character.
First of all, you can hear the footsteps of heroes near you. While the effect is nowhere near as precise as in other shooter games (such as Counter-Strike), it is still sufficient for you to be able to tell when there is a hero closing in on your location, around the corner, and so on. It is difficult to keep track of this at all times, given how many different sound effects there are in the game, but you should still make an effort.
For example, if you are in a rather isolated area of the map (for example, you are playing Bastion or Widowmaker and you are away from the action) and you hear footsteps close-by, you should quickly look to see if there are any allies near you. If not, then you should prepare to be backstabbed.
Another use for sound is related to the warnings that go out when heroes use their ultimate abilities. Every ultimate in the game has a loud sound warning that the enemy team can hear when the ultimate is used. In some cases, the warning comes too late, or has little relevance (such as for Zenyatta or Winston), but in most cases, players who hear the warning have a chance to avoid the ultimate. Here are some of the most important ones to look out for.
- When McCree casts
 Deadeye, there is a clear warning
("It's high noon!"), which normally gives you a chance to take cover.
 - When Genji activates his
 Dragonblade, he yells out a
distinctive Japanese phrase that alerts you, and which gives you a chance to
protect yourself or try to kill him.
 - When Soldier: 76 activates his
 Tactical Visor, there is both
an initial warning ("I've got you in my sights!") and a persistent noise
throughout its duration, which lets you know that it is still unsafe to
show yourself.
 - When Junkrat casts
 RIP-Tire there is both an initial warning
and a persistent noise that give you a chance to avoid the tire.
 - When D.Va uses
 Self-Destruct, there is a clear warning as
well as a persistent noise (until the mech explodes) that indicates where
the explosion will come from.
Aside from these, there are many others that you should master, but provided that you play for long enough and pay attention, this will not be a problem.
Reloading
Reloading your weapon happens automatically when you run out of ammo, and you can also do it yourself as long as you are not at full ammo using R. The process is standard in all shooter games, but there are a few subtleties to keep in mind.
For starters, simply because you can reload your weapon (some ammo is missing) does not mean that you have to do so. If you are engaged in combat, reloading your weapon should only be done if absolutely necessary (you are out of ammo), and even then it is sometimes better to do something else (like use a melee attack, as we will see below). Even out of combat, you should try to consider the situation before you reload. For example, if you know there is a low-health enemy nearby and you have half of your ammo capacity, you are probably better off not reloading so that you can shoot them immediately when they appear, as opposed to being stuck reloading your weapon.
Conversely, there are times when reloading is not only safe, but the only
thing you can do. For example, if you are forced to take cover from an enemy
ultimate (![]() Deadeye,
Deadeye, ![]() Self-Destruct,
Self-Destruct, ![]() Tactical Visor),
that is a great opportunity to reload your weapon.
Tactical Visor),
that is a great opportunity to reload your weapon.
Using Melee Attack
Every hero in Overwatch (except Reinhardt) can perform a melee attack that deals 25 damage. The default keybind is this action is V. It deals damage to a single target, within a short range in front of your hero, but the aiming process is quite lenient (targets located basically anywhere in front of you can be hit).
You should use your melee attack often, especially when you are fighting targets that are very low on health, since its damage is almost guaranteed. It is also a good way to deal additional damage to a target quickly when you have run out of ammo, without having to wait for the 1-2 second reload time.
Keep in mind, however, the using your melee attack will reset and prevents the process of reloading your weapon, so depending on the situation (enemy has a lot of health, killing them very quickly is not a priority), it may be better to reload your weapon instead.
Zarya Shields
Zarya can protect herself with a 2-second shield called
![]() Particle Barrier, and she can protect an ally with a similar shield
(which absorbs more damage) called
Particle Barrier, and she can protect an ally with a similar shield
(which absorbs more damage) called ![]() Projected Barrier. These shields
can absorb a large amount of damage before they are destroyed (unless they
expire first), and any damage that they absorb only serves to boost
Zarya's damage potential (thanks to her
Projected Barrier. These shields
can absorb a large amount of damage before they are destroyed (unless they
expire first), and any damage that they absorb only serves to boost
Zarya's damage potential (thanks to her ![]() Energy passive).
Energy passive).
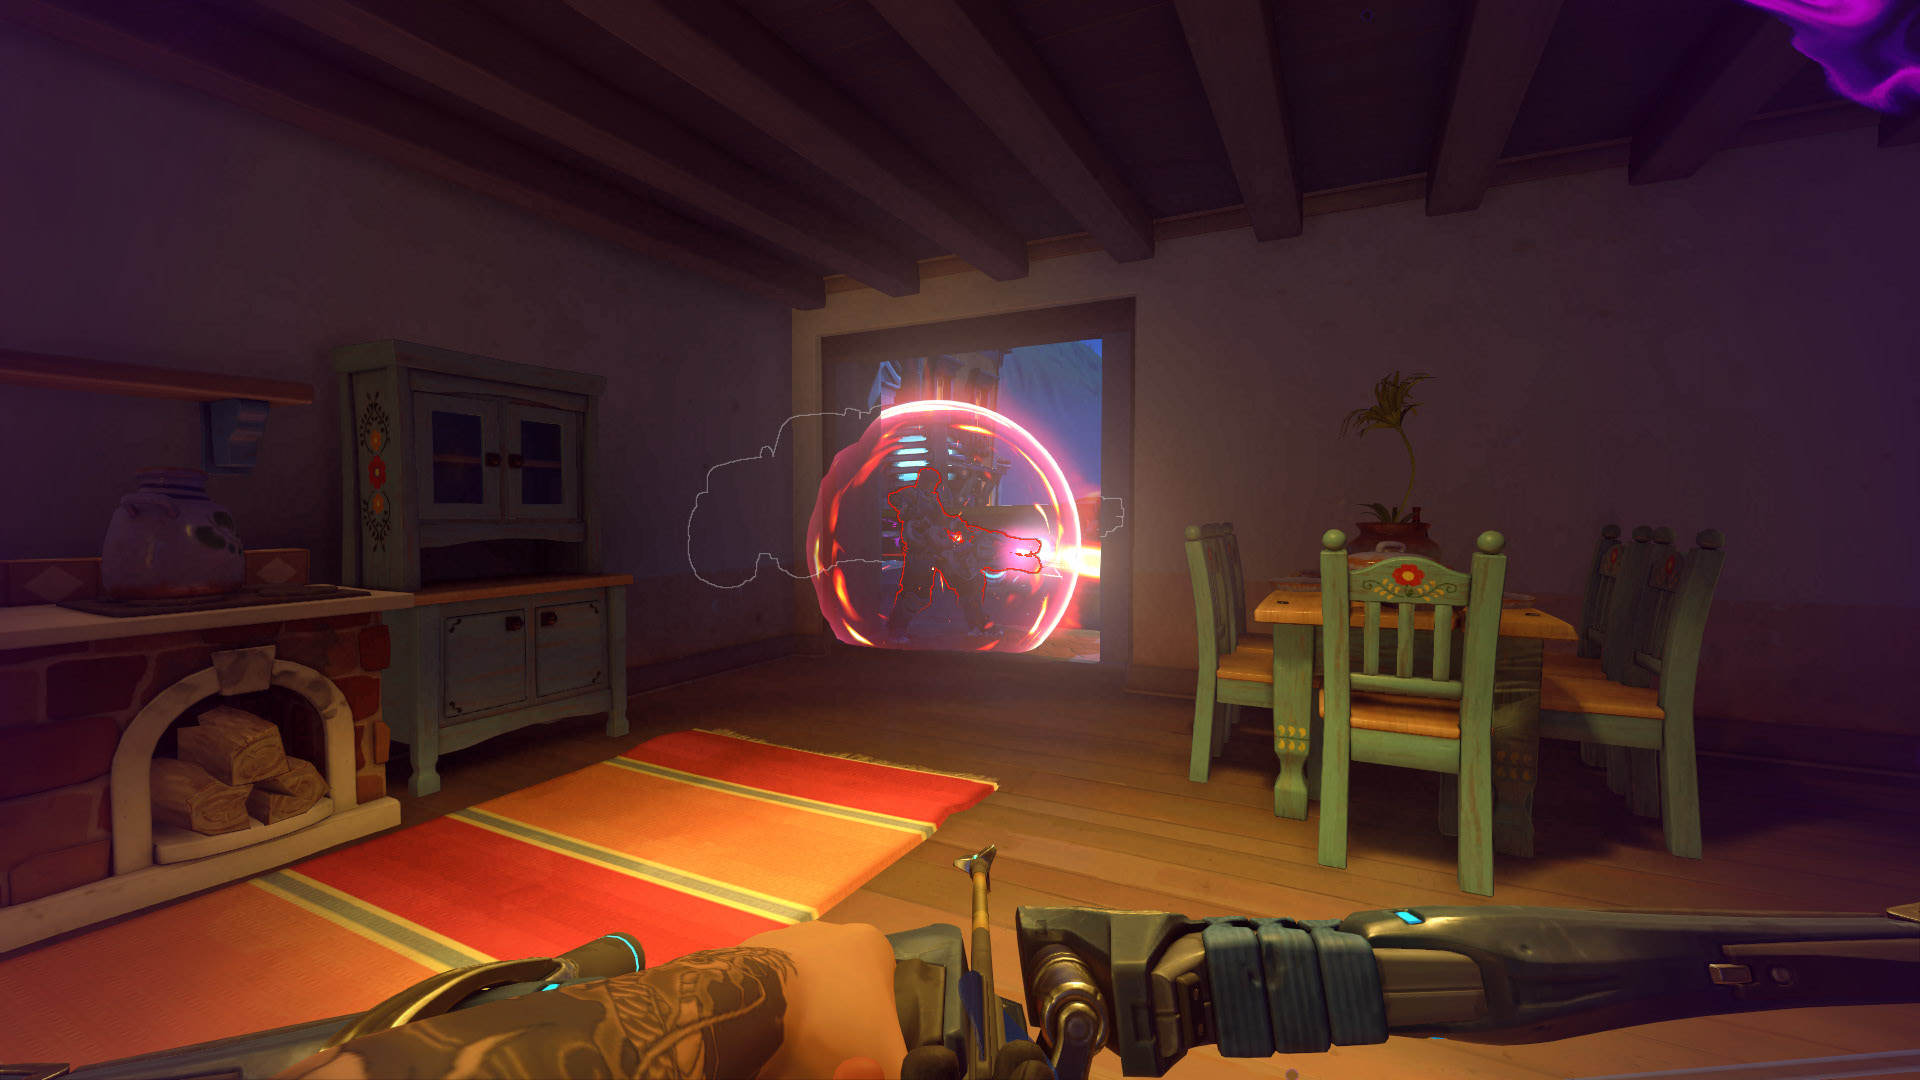
As such, it is never a good idea to damage a target that is shielded. This is because, given the low duration of the shield and the large amount of damage it can absorb (200 and 400, respectively, for the two shields), you are unlikely to be able to destroy the shield and deal any meaningful damage before it expires. Moreover, any damage you deal boosts Zarya's damage (to potentially extremely dangerous levels), and also charges up her ultimate.
Below, you can see the graphical effect of Zarya's shields (as seen from an enemy point of view).
Changelog
- 28 May 2016: Guide added!
- Blizzard at Gamescom 2024
- Icy Veins Seeking Writers for Zenless Zone Zero: Apply Today!
- No BlizzCon in 2024
- Blizzard Games Return to China: New Agreement Signed With NetEase
- Blizzard Reportedly Reuniting with NetEase to Bring Back WoW in China
- Ex-Activision Blizzard CEO Bobby Kotick Shows Interest in Buying TikTok
- Timeline of Blizzard Presidents
- Johanna Faires Appointed Blizzard Entertainment President
