Stratholme Undead Dungeon Guide
Stratholme is a single dungeon that is often split by players into 2 wings: the Live and Undead wings. Stratholme Undead is recommended for players between Level 55 and 60.
Stratholme was one of the most populous cities of the human kingdoms, but it fell at the hands of the dreadlords and Prince Arthas, whose mind was slowly descending into madness as he began his journey of becoming the Lich King. The Undead side of the city has now been completely overrun by Scourge forces and their leader, Baron Rivendare.
You can read more about the dungeon in our Stratholme hub guide.
Phase 4 Season of Discovery Loot in Stratholme Undead
With Phase 4 of Season of Discovery, new loot has been added into Stratholme Undead to help players prepare for raiding. Below you can find a full list of all of the new loot and each boss they drop from.
Nerub'enkan
| Item |
|---|
Baroness Anastari
| Item |
|---|
Maleki the Pallid
| Item |
|---|
Magistrate Barthilas
| Item |
|---|
Ramstein the Gorger
| Item |
|---|
Baron Rivendare
| Item |
|---|
Stratholme Undead Entrance Location
The Undead wing of Stratholme can be entered after obtaining the
![]() Key to the City from Magistrate Barthilas.
Key to the City from Magistrate Barthilas.
You will use this key to open the service gate that is found to the southeast of the main instance entrance and will skip the Live wing completely.
If you do not have the key, you can clear into the Undead wing from the Live wing, but it is much more time consuming if you want to complete multiple farming runs.
Stratholme Undead Quests
Before setting foot in either of the Stratholme wings, we strongly advise you to get all the dungeon quests related to it. To make this process easier, we have written a separate guide.
Layout of Stratholme Undead
The Undead wing of Stratholme is actually fairly linear, despite the need for players to double back slightly to destroy the crystals and access the final bosses.
When you first enter the dungeon, assuming you have used the service gate entrance, you will follow a short corridor to a gate. After you have opened the gate, you will have to clear the area ahead and meet the first boss of the dungeon, Magistrate Barthilas. Note that he will run away from your group and you will fight him later, just before Ramstein the Gorger.
If you entered the dungeon through the main entrance and have cleared through from the Live wing, Barthilas will not run away and you can fight him in this courtyard.
Once this area has been cleared, you will head to the opposite side from where you entered and follow another path towards the gauntlet area.
There are 3 buildings that are each guarded by a boss and they all contain a group of Thuzadin Acolytes that must be killed in order to access the final bosses. The eastern boss is Baroness Anastari, the northeastern boss is Maleki the Pallid, and the western boss is Nerub'enkan.
Once you have cleared all 3 buildings of the acolytes, you can head to the north side of this area and kill Barthilas, the boss that ran away from your group at the start.
A gate to the west will have been opened and, if you head through it, you will come to a group of abominations that must all be killed in order to summon Ramstein the Gorger. After he has been slain, you can clear the final bits of trash and head into the main crypt where the final boss, Baron Rivendare, is waiting on the bottom floor.
Notable Trash in Stratholme Undead
Stratholme has 1 rare spawn in the Undead wing, Stonespine, as well as Black Guard Swordsmith, a mini-boss that drops an item for players with the Blacksmithing profession.
Stonespine
-
 Vicious Rend

Stonespine is a Level 60 Undead rare elite that spawns just outside the corridor that leads to the ziggurat gauntlet event and roams the area.
There are no mechanics worth mentioning on this boss, but it can drop some fairly notable loot and is worth killing if it is up. Just be careful of the trash surrounding it, as you can easily pull other mobs, or have Stonespine join a fight that you have already started.
Loot from Stonespine
| Item | Level Requirement | Slot |
|---|---|---|
| 54 | Weapon | |
| 56 | Back | |
| 56 | Boots |
Black Guard Swordsmith
Black Guard Swordsmith is an Undead mob that spawns when you interact with the Blacksmithing Plans that are on the floor near the ziggurat of Baroness Anastari.
You can kill him just as you would a normal trash mob, as he has no mechanics worth mentioning.
Loot from Black Guard Swordsmith
This mob drops no loot for players unless they are have the
Blacksmithing profession, in which case it will
drop ![]() Bottom Half of Advanced Armorsmithing: Volume III, which is required to
learn how to create the
Bottom Half of Advanced Armorsmithing: Volume III, which is required to
learn how to create the ![]() Enchanted Thorium Helm.
Enchanted Thorium Helm.
Bosses in Stratholme Undead
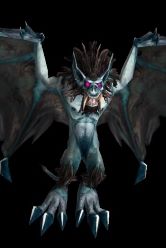
Magistrate Barthilas
-

 Crowd Pummel
 Draining Blow
 Furious Anger
 Mighty Blow

Magistrate Barthilas is a Level 58 Undead boss that can be fought at two different points in the Undead wing, depending on how you entered. If you cleared through the Live wing, then you will fight him as the first boss of the Undead wing. If you came through the service gate, then he will flee from your party and instead fight you after you have cleared the ziggurat event.
There are no mechanics worth mentioning for this boss.
Loot from Magistrate Barthilas
| Item | Level Requirement | Slot |
|---|---|---|
| N/A | Key | |
| 54 | Head | |
| 57 | Hands | |
| 60 | Relic | |
| 54 | Wrist | |
| 54 | Weapon | |
| 54 | Back |
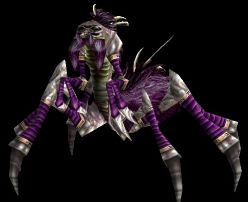
Nerub'enkan
-
 Crypt Scarabs
 Encasing Webs
 Pierce Armor
 Raise Undead Scarab
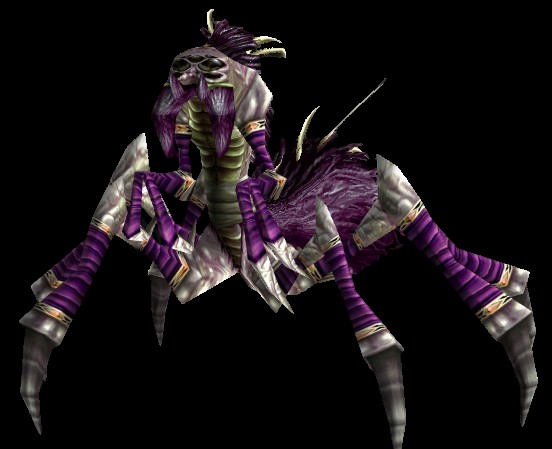
Nerub'enkan is a Level 60 Undead and is one of the ziggurat gauntlet bosses.
Other than the small adds that must be killed when he summons them, there is very little to this boss other than a tank and spank.
Make sure to clear the ziggurat behind the boss and kill the Acolytes within, otherwise you will not be able to access the final bosses.
Loot from Nerub'enkan
| Item | Level Requirement | Slot |
|---|---|---|
| 56 | Shoulder | |
| 56 | Legs | |
| 56 | Hands | |
| 55 | Consumable | |
| 56 | Feet | |
| 54 | Feet | |
| 56 | Ranged Weapon | |
| 56 | Legs | |
| 56 | Shield | |
| 56 | Waist |
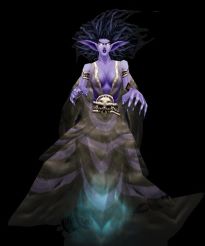
Baroness Anastari
-
 Banshee Curse
 Banshee Wail
 Possess
 Silence

Baroness Anastari is a Level 59 Undead and is one of the three bosses that you will encounter in the gauntlet area of the dungeon.
The Baroness is a fairly simple fight, as long as you are aware of her abilities and their effects.
- Banshee Curse — this curse will reduce the hit chance of all
players within an area around the boss. It only lasts 12 seconds, as well as only
having a 10% effect, so this should not cause many issues.
- Possess — a player will have their mind possessed
for 2 minutes, or until their health is brought to 50%. The afflicted player will
have their maximum health increased by 2000%, so make sure that your DPS swap to
the target as soon as possible to remove the effect.
- Silence — this is a 10 second silence that, if it
is placed on the healer, can cause problems for your group. Make sure any hybrids
help to heal if they are not silenced while the healer is.
Make sure to clear the ziggurat behind the boss and kill the Acolytes within, otherwise you will not be able to access the final bosses.
Loot from Baroness Anastari
| Item | Level Requirement | Slot |
|---|---|---|
| 55 | Hands | |
| 55 | Wrist | |
| 55 | Chest | |
| 55 | Consumable | |
| 55 | Shoulder | |
| 55 | Neck | |
| 55 | Wand | |
| 54 | Feet | |
| 55 | Bow | |
| 55 | Hands |
Maleki the Pallid
-

 Drain Life
 Drain Mana
 Frostbolt
 Ice Tomb

Maleki the Pallid is a Level 61 Humanoid and is the last of the three ziggurat gauntlet bosses.
The only mechanic that is worth mentioning on this boss is the ![]() Ice Tomb,
which will stun the current target for 10 seconds. During this time, your tank
will be unable to generate aggro, so any high-DPS players should take care.
Ice Tomb,
which will stun the current target for 10 seconds. During this time, your tank
will be unable to generate aggro, so any high-DPS players should take care.
Make sure to clear the ziggurat behind the boss and kill the Acolytes within, otherwise you will not be able to access the final bosses.
Loot from Maleki the Pallid
| Item | Level Requirement | Slot |
|---|---|---|
| 55 | Consumable | |
| 57 | Hands | |
| 57 | Waist | |
| 57 | Feet | |
| 57 | Wrist | |
| 57 | Weapon | |
| 54 | Feet | |
| 57 | Feet | |
| 57 | Back | |
| N/A | Blacksmithing Plans | |
| 57 | Off-hand |
Ramstein the Gorger
-

 Flurry
- Knockout
 Trample

Ramstein the Gorger is a Level 61 Undead and is the penultimate boss of the dungeon.
In order to spawn Ramstein, you will need to clear all of the abominations that are roaming the area outside the final crypt.
Once he spawns, there is very little to this boss beyond ensuring your tank
picks up aggro as soon as possible after it is reset by ![]() Knockout.
Knockout.
Loot from Ramstein the Gorger
| Item | Level Requirement | Slot |
|---|---|---|
| N/A | Reagent | |
| 57 | Neck | |
| 55 | Finger | |
| 55 | Shield | |
| 54 | Hands | |
| 55 | Trinket | |
| 55 | Weapon | |
| 55 | Shoulder |
Baron Rivendare
-

 Cleave
 Mortal Strike
- Shadow Bolt
 Unholy Aura

Baron Rivendare is a Level 62 Undead and the final boss of the instance.
This fight is known as being fairly difficult, but as long as you stay focused on the tactics, it is very simple.
- Tanks — tank the boss on one side of the room, away from the rest of your party, and make sure he is facing away from them. Do not pick up the adds when they spawn, as your DPS can tank them.
- Healers — make sure to keep your melee DPS healed, as they will be
taking damage from Unholy Aura. Stay on the other side of the room from
Rivendare to avoid Aura damage.
- Ranged DPS — stay near your healer to ensure the adds do not swarm them. As soon as the adds spawn, focus them down. Stay on the other side of the room from Rivendare to avoid Aura damage.
- Melee DPS — make sure you stay behind the boss whenever attacking him. As soon as the adds spawn, move to them ASAP and help to tank the damage and kill them.
Loot from Baron Rivendare
| Item | Level Requirement | Slot |
|---|---|---|
| 56 | Legs | |
| 57 | Weapon | |
| 58 | Back | |
| 60 | Mount | |
| 56 | Legs | |
| 58 | Hands | |
| 56 | Legs | |
| 58 | Hands | |
| 58 | Helm | |
| 56 | Legs | |
| 56 | Legs | |
| 56 | Legs | |
| 56 | Legs | |
| 58 | Wand | |
| 58 | Chest | |
| 58 | Weapon | |
| 58 | Ring | |
| 56 | Legs | |
| 58 | Weapon | |
| 58 | Chest | |
| 56 | Legs | |
| 58 | Weapon |
Recommended Classes for Stratholme Undead
The dungeon contains a huge number of Undead mobs in this wing, so any class that brings CC that can be used on Undead enemies will be of huge help to your party.
Paladins rarely get the chance to use ![]() Turn Undead
in a group setting and the Undead wing has massive potential for mobs to chain
pull more enemies, so take care when using this ability. It can very quickly lead
to a wipe.
Turn Undead
in a group setting and the Undead wing has massive potential for mobs to chain
pull more enemies, so take care when using this ability. It can very quickly lead
to a wipe.
Priests are a great choice for your healer, not only because of their solid
output, but their ![]() Shackle Undead is extremely useful to CC enemies without
any chance of them pulling more enemies.
Shackle Undead is extremely useful to CC enemies without
any chance of them pulling more enemies.
Changelog
- 18 Nov. 2024: Page updated for Classic Anniversary.
- 09 Jul. 2024: Added section for new loot in Phase 4 of Season of Discovery.
- 05 Apr. 2024: Added boss pictures and abilities.
- 24 Jul. 2020: Updated for Phase 5.
- 30 Oct. 2019: Guide added.
This guide has been written by Abide, TBC veteran for nearly a decade. Abide is a Warrior tank and multi-class expert currently playing on Faerlina as Horde. You can find him in the the Icy Veins Discord. You can also see him live on Twitch.
- Burning Crusade Classic Phase 2 Now Live: Here’s What to Expect
- Did Blizzard Just Quietly Invite Creators to Play WoW Classic’s Next Chapter?
- WoW Weekly Returns: Patch 12.0.5, Twitch Drops & Classic Updates
- WoW BCC Anniversary Edition: Overlords of Outland – Everything Coming May 14
- Battleground Honor Significantly Increased
- Limited-Time Mount Alert: Get the Voidfeather Dragonhawk for TBC Classic Servers Now!
- Could WoW Be Added to Xbox Game Pass Ultimate?
- MoP Classic Escalation PTR Update Details New Content