Uldaman Dungeon Guide
Uldaman is a dungeon with a huge number of quests for players of both factions. Players are advised to bring a group between Level 42 and 46 to ensure a smooth run. This dungeon will take approximately 2 hours to complete.
Uldaman is a former titan city that has now been taken over by Troggs. The Titans created this race from stone, but after seeing the failures in their creation, they locked the race away and eventually created the Dwarves instead. This titan vault has been breached by the Dark Iron Dwarves, who hope to find the secrets of the Titans and use them to serve their master, Ragnaros, but the Titans' defenses are still present throughout the city.
Uldaman Entrance Location
The entrance to Uldaman is in the far north of the Badlands, just along the border with Loch Modan.
To reach the instance, you should follow the tunnels until you come to the first open area. Drop down into the center and follow the tunnel underneath to the next open area, Dig One. The instance entrance is just on your right after entering.
Uldaman Quests
Before setting foot in Uldaman, we strongly advise you to get all the dungeon quests related to it. To make this process easier, we have written a separate guide.
Layout of Uldaman
Uldaman can be very difficult to navigate, as most of the bosses are not on the main path throughout the dungeon, but instead, they are located in side rooms that break off from the tunnel.
When you enter, you will want to clear the left side of the two rooms until you find a tunnel that contains the first boss of the dungeon, three Dwarven brothers.
After killing them, head back into the Titan room and follow the corridor
until you encounter Revelosh, the second boss. Directly behind him is
an open room with a large door at the back. Using the ![]() Gni'kiv Medallion
and
Gni'kiv Medallion
and ![]() The Shaft of Tsol, which are obtained from the chest in the room of
the first boss and as a drop from Revelosh respectively, you can open the door
by combining them and placing the
The Shaft of Tsol, which are obtained from the chest in the room of
the first boss and as a drop from Revelosh respectively, you can open the door
by combining them and placing the ![]() Staff of Prehistoria in the
keystone.
Staff of Prehistoria in the
keystone.
Head back into the large room and follow the northern tunnel until you come to a fork in the path. Head to the right side and you will find the Ancient Stone Keeper, the next boss of the instance.
After killing the Stone Keeper, head to the northwestern corner and follow the tunnel, moving in a northwestern direction. You will find Galgann Firehammer first in a small nook, followed by Grimlok in a Titan room to the north.
Once these are both dead, head back into the tunnels and move to the northeast, moving through the Titan rooms until you find Archaedas, the final boss of the instance.
Notable Trash in Uldaman
The mobs in this dungeon will run away at low health, as they do in The Stockade. The strategy is the same, where your party should try to CC as many mobs as they can before pulling the mobs back, rather than moving forward to engage them. There are a huge number of opportunities to use the walls of the dungeon to line of sight pull the caster mobs, rather than letting them cast freely at the back and risk pulling more mobs.
Digmaster Shovelphlange is the only rare of the dungeon, but is located outside of the instance. He is worth killing, as he drops excellent loot.
-
 Defensive Stance
 Sunder Armor

Loot from Digmaster Shovelphlange
| Item | Required Level | Slot |
|---|---|---|
| 33 | Head | |
| 33 | Weapon |
Bosses in Uldaman
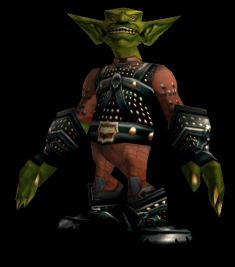
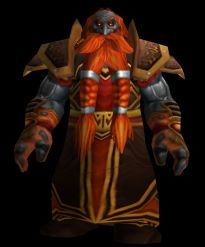
Baelog, Eric, and Olaf

- Baelog
 Strike
- Eric "The Swift"
 Rushing Charge
- Olaf
 Shield Slam
Baelog is a Level 41 humanoid elite, while Eric "The Swift" and Olaf are both Level 40 humanoid elites, and together they are the first boss of the dungeon for Horde players. Alliance players do not need to kill the Dwarves.
Olaf can be killed alone, without engaging the other 2. You should do this to make the fight easier for your group. He has no mechanics worth mentioning.
For the other 2, you can kill them in any order, as neither boss has a mechanic worth mentioning. This is a very easy fight.
After you have killed this, you should loot the chest in the room, as it contains an item required to engage Ironaya later.
Loot from Baelog, Eric, and Olaf
| Item | Required Level | Slot |
|---|---|---|
| 36 | Weapon | |
| 35 | Off Hand | |
| N/A | Consumable | |
| N/A | Consumable | |
| 35 | Projectile | |
| 35 | Feet | |
| 40 | Head | |
| 38 | Weapon | |
| 37 | Off Hand |
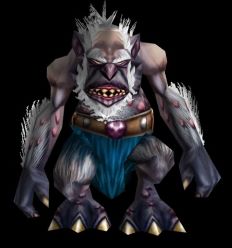
Revelosh
-
 Chain Lightning
 Lightning Bolt

Revelosh is a Level 40 elite humanoid and is the second boss of the dungeon.
There are no mechanics worth mentioning on this boss, but you should CC the adds if you can to make the fight easier for your group.
After killing this boss, make sure that the player who picked up the
summoning item from the chest behind the previous boss also loots
![]() The Shaft of Tsol.
The Shaft of Tsol.
Loot from Revelosh
| Item | Required Level | Slot |
|---|---|---|
| 35 | Wrist | |
| 40 | Feet | |
| 35 | Hands | |
| 36 | Shoulder |
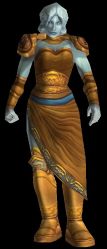
Ironaya
-
 Arcing Smash
 Knock Away
 War Stomp

Ironaya is a Level 40 elite giant and is the third boss of the instance. In
order to summon this boss, players will need to combine the two items from the
previous bosses, ![]() Gni'kiv Medallion and
Gni'kiv Medallion and ![]() The Shaft of Tsol to form
the
The Shaft of Tsol to form
the ![]() Staff of Prehistoria. Place this in the keystone in the centre of the
room to summon her.
Staff of Prehistoria. Place this in the keystone in the centre of the
room to summon her.
Tank the boss facing away from your group to avoid extra damage from her cleave and save your taunt ability for her knockback, as you will lose all aggro when she casts this.
Loot from Ironaya
| Item | Required Level | Slot |
|---|---|---|
| 37 | Wrist | |
| 37 | Weapon | |
| 35 | Legs |
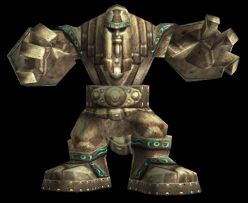
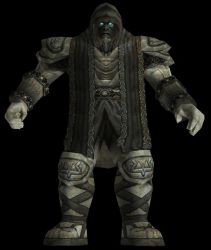
Ancient Stone Keeper
-
 Sand Storms

The Ancient Stone Keeper is a Level 44 elite elemental and is the fourth boss of the instance.
Move out of his ![]() Sand Storms and this fight will be extremely
easy.
Sand Storms and this fight will be extremely
easy.
Loot from Ancient Stone Keeper
| Item | Required Level | Slot |
|---|---|---|
| 40 | Shoulder | |
| 40 | Weapon |
Galgann Firehammer
-
 Amplify Flames
 Fire Nova
- Flame Lash

Galgann Firehammer is a Level 45 elite humanoid and is the fifth boss of the instance.
Kill his bodyguards as soon as possible and then focus on Galgann. Your ranged should stay out of melee range to avoid being hit by his AoE attacks.
This boss does a huge amount of damage, so if you have access to any consumables or armor that boosts your Fire Resistance, especially as the tank, this can help to mitigate the damage.
Loot from Galgann Firehammer
| Item | Required Level | Slot |
|---|---|---|
| 41 | Back | |
| 41 | Weapon | |
| 42 | Shoulder | |
| 42 | Weapon |
Grimlok
-
 Bloodlust
- Chain Bolt
- Lightning Bolt
 Shrink
Grimlok is a Level 45 elite humanoid and is the sixth boss of the instance.
Use CC on any adds that you can and kill Grimlok as soon as possible. You
should spread out to avoid taking more damage than necessary from ![]() Chain Bolt.
Chain Bolt.
Loot from Grimlok
| Item | Required Level | Slot |
|---|---|---|
| 41 | Legs | |
| 42 | Weapon | |
| 42 | Chest |
Archaedas
-
 Awaken Earthen Guardians
- Awaken Vault Warder
 Enrage
- Ground Tremor

Archaedas is a Level 47 elite giant and is the final boss of the instance. To activate him, you must all click on the altar positioned just in front of him.
This boss is extremely difficult with an underleveled group, so be prepared for a tough fight if your tank is low level. The boss will periodically summon dwarf adds that need to be killed as soon as possible. Once Archaedas summons the elite adds, you will need to focus him down and ignore all other adds. Your ranged should try to kite the adds as best they can to avoid wasting damage on killing them.
You could previously make this encounter trivial by causing the adds to bug out when your healer was standing on the ledge above the room, but we are uncertain of whether this will be possible in Classic or not.
Loot from Archaedas
| Item | Required Level | Slot |
|---|---|---|
| 42 | Ring | |
| 44 | Weapon | |
| 44 | Weapon |
Recommended Classes for Uldaman
You can complete this dungeon with any group composition, as long as you have a dedicated tank. If your tank is lower level than the rest of your group, you may benefit from an off-healer, as the later mobs hit extremely hard.
We recommend bringing a Mage to this dungeon, as their CC is invaluable due to the large number of humanoid mobs, as well as their strong AoE DPS.
Changelog
- 18 Nov. 2024: Page updated for Classic Anniversary.
- 05 Apr. 2024: Added boss pictures and abilities.
- 22 Oct. 2019: Moved quests to separate section.
- 21 Aug. 2019: Guide added.
Classic Leveling Guides
Classic Dungeon Guides
Classic Profession Guides
Classic Reputation Guides
This guide has been written by Abide, TBC veteran for nearly a decade. Abide is a Warrior tank and multi-class expert currently playing on Faerlina as Horde. You can find him in the the Icy Veins Discord. You can also see him live on Twitch.
- Burning Crusade Classic Phase 2 Now Live: Here’s What to Expect
- Did Blizzard Just Quietly Invite Creators to Play WoW Classic’s Next Chapter?
- WoW Weekly Returns: Patch 12.0.5, Twitch Drops & Classic Updates
- WoW BCC Anniversary Edition: Overlords of Outland – Everything Coming May 14
- Battleground Honor Significantly Increased
- Limited-Time Mount Alert: Get the Voidfeather Dragonhawk for TBC Classic Servers Now!
- Could WoW Be Added to Xbox Game Pass Ultimate?
- MoP Classic Escalation PTR Update Details New Content