Zul'Gurub Heroic Dungeon Guide (WoD 6.1.2)
Table of Contents
Zul'Gurub is a heroic 5-man dungeon located in the East of Northrern Stranglethorn. Before Cataclysm, the instance housed a 20-man raid instance tuned for level 60 players.
General Information
Type: Heroic 5-man Dungeon
Number of bosses: 6
Loot: item level 353, epic
This is our WoW Retail guide. Please follow the link for our Zu'Gurub guide for WoW Classic.
Overview of the Dungeon
Zul'Gurub is a heroic 5-man dungeon containing a number of 6 bosses. The design of the instance is non-linear, meaning that the final boss can be accessed and defeated before all the other bosses in the dungeon are defeated.
This guide will focus on teaching you how to deal with both the more complex trash groups as well as, of course, how to defeat each of the bosses.
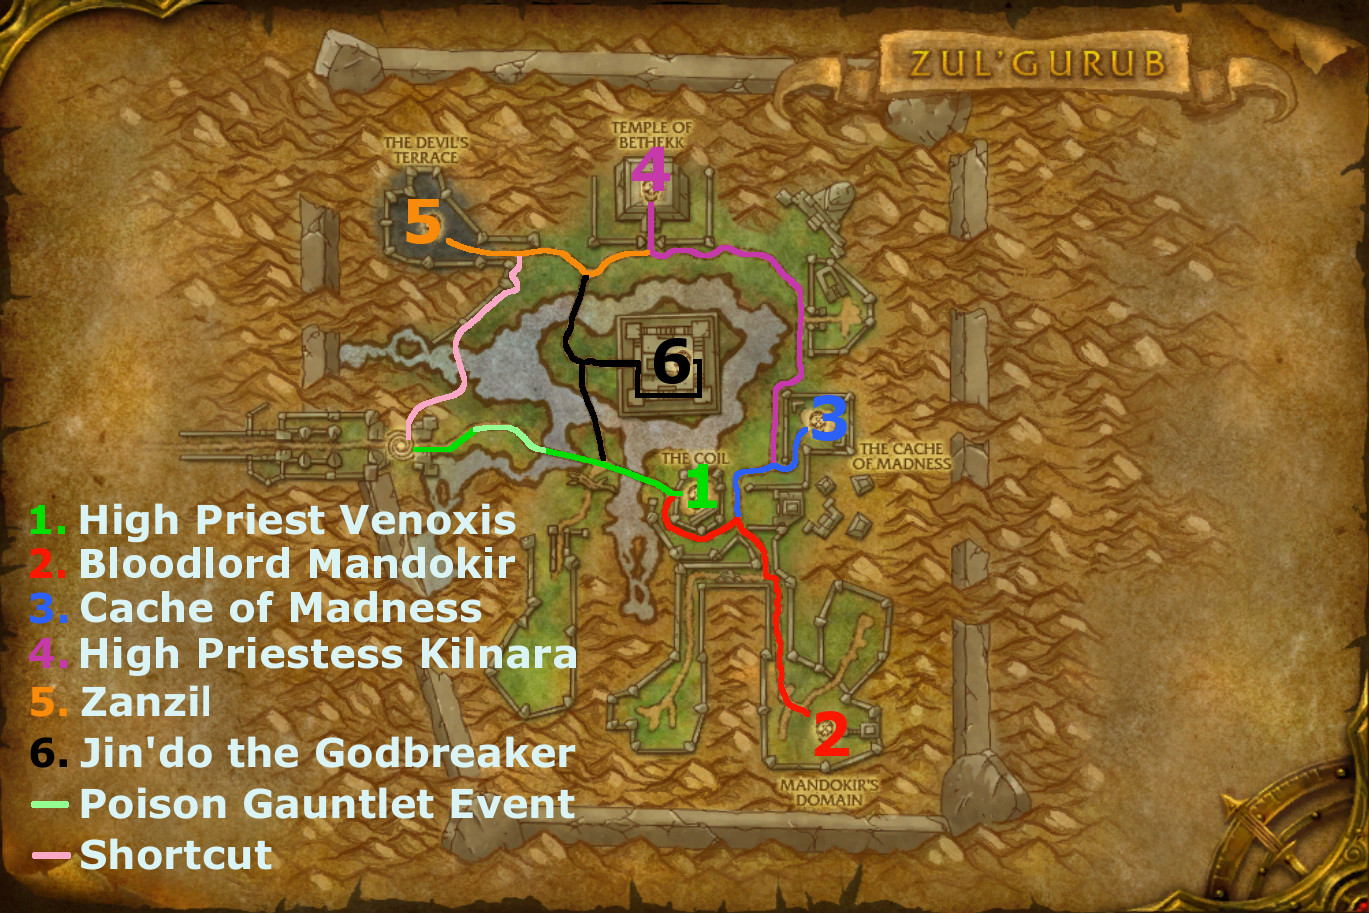
Map
Below is a map of Zul'Gurub, indicating the locations of all bosses, as well as suggesting a path that will lead your group to all of them. As mentioned above, bosses can be skipped and done in any order, so feel free to explore.
Cauldrons
An important note must be made about the cauldrons present throughout the dungeon, as using them is crucial to completing the instance. There are three types of cauldrons present: poison, frost and fire.
- Poison cauldrons provide 90% resistence to nature damage.
- Frost cauldrons cause your next attack to freeze the target and damage it for roughly 80% of their health (does not work on bosses).
- Fire cauldrons cause you to deal fire damage to yourself and enemies around you.
Quests
Stranglethorn Vale Quest Chain
There is a quest chain, the majority of which takes place in Stranglethorn Vale, which introduces players to the new events surrounding the threat found within Zul'Gurub. The chain is fairly easy and quick to complete, and rewards players with a good amount of gold, a non-combat companion pet and a lot of information about the bosses in Zul'Gurub and their plans for destruction and conquest.
The quest line begins with:
- The Zandalari Menace for the Horde;
- The Zandalar Representative for the Alliance.
This quest chain has no bearing whatsoever on completing the dungeon, so it is entirely optional for players.
Quests Inside the Dungeon
The quests within Zul'Gurub have various objectives, generally requiring players to kill a combination of mini-bosses found inside the dungeon, for a gold reward. There is also a quest to kill Jin'Do, the final boss of the dungeon, as well as to collect a couple of artifacts. You can find a full list of the quests below:
- The Beasts Within
- Secondary Targets
- Break Their Spirits
- Break the Godbreaker
- Booty Bay's Interests
- Putting a Price on Priceless
None of the mini-bosses should present any difficulty to defeat, as they are tank and spank, and, at best, have one mechanic each. They each drop a sack that your group will roll for, which contains a small amount of gold. They do not reward Justice or Valor Points.
The Road to High Priest Venoxis
After entering the dungeon, straight ahead of you you will see Venomancer Mauri. This trash mob guards a poison cauldron which, upon defeating him, becomes clickable by your group. Venomancer Mauri himself has some inconsequential mechanics and is essentially tank and spank.
After defeating Venomancer Mauri you will be faced with a gauntlet event of sorts. The ground between Venomancer Mauri and the bridge which takes you to the first boss is covered by poison which deals a very high amount of damage. In addition to the poison the area is swarming with flying mobs called Venomtip Needlers. When passing through the poisonous area, these mobs will aggro. In order to get through the poison your entire group should right click the poison cauldron, thus gaining a debuff which reduces nature damage taken by 90% for 30 seconds. Doing so will enable you to get through the gauntlet. Any Venomtip Needlers that have aggroed should be picked up by your tank and killed on the bridge past the gauntlet.
On your way to the first boss you will encounter yet another Venomancer. This one is named T'Kulu and works very similarly to the first one. Once dead his cauldron is usable by your group.
In the room behind him you will notice two large serpent guards protecting High Priest Venoxis. Your entire group should stay close to the cauldron and your tank should pull both of the serpent guards out of the boss' room and next to the cauldron. By keeping the cauldron debuff up the entire time, these two mobs do not present any difficulty. Be mindful that occasionally they will dispel the cauldron debuff.
High Priest Venoxis
The High Priest Venoxis encounter is one that revolves greatly around movement and positioning, while also requiring good output from your entire party. It is the most difficult encounter in Zul'Gurub.
Abilities
Whispers of Hethiss is a channeled, interruptible ability which Venoxis will cast at a random party member. This ability does a pretty large amount of nature damage over time.
Toxic Link is an ability Venoxis will cast repeatedly throughout the fight, linking two players to each other. The linked players take increasing nature damage the closer they are to each other. Spreading out far enough will break the link. Breaking the link will cause an explosion which deals roughly 40,000 damage in a small radius.
Venomous Effusion is a poison maze on the ground covering the entire room. Players must move through the maze and will be damaged severely if they attempt to run or jump over the walls of the maze. The pattern of the maze is fixed and will never change during an attempt or between attempts.
In the image below you can see the poison maze. This should prove useful in determining what good positions are, especially for your tank:
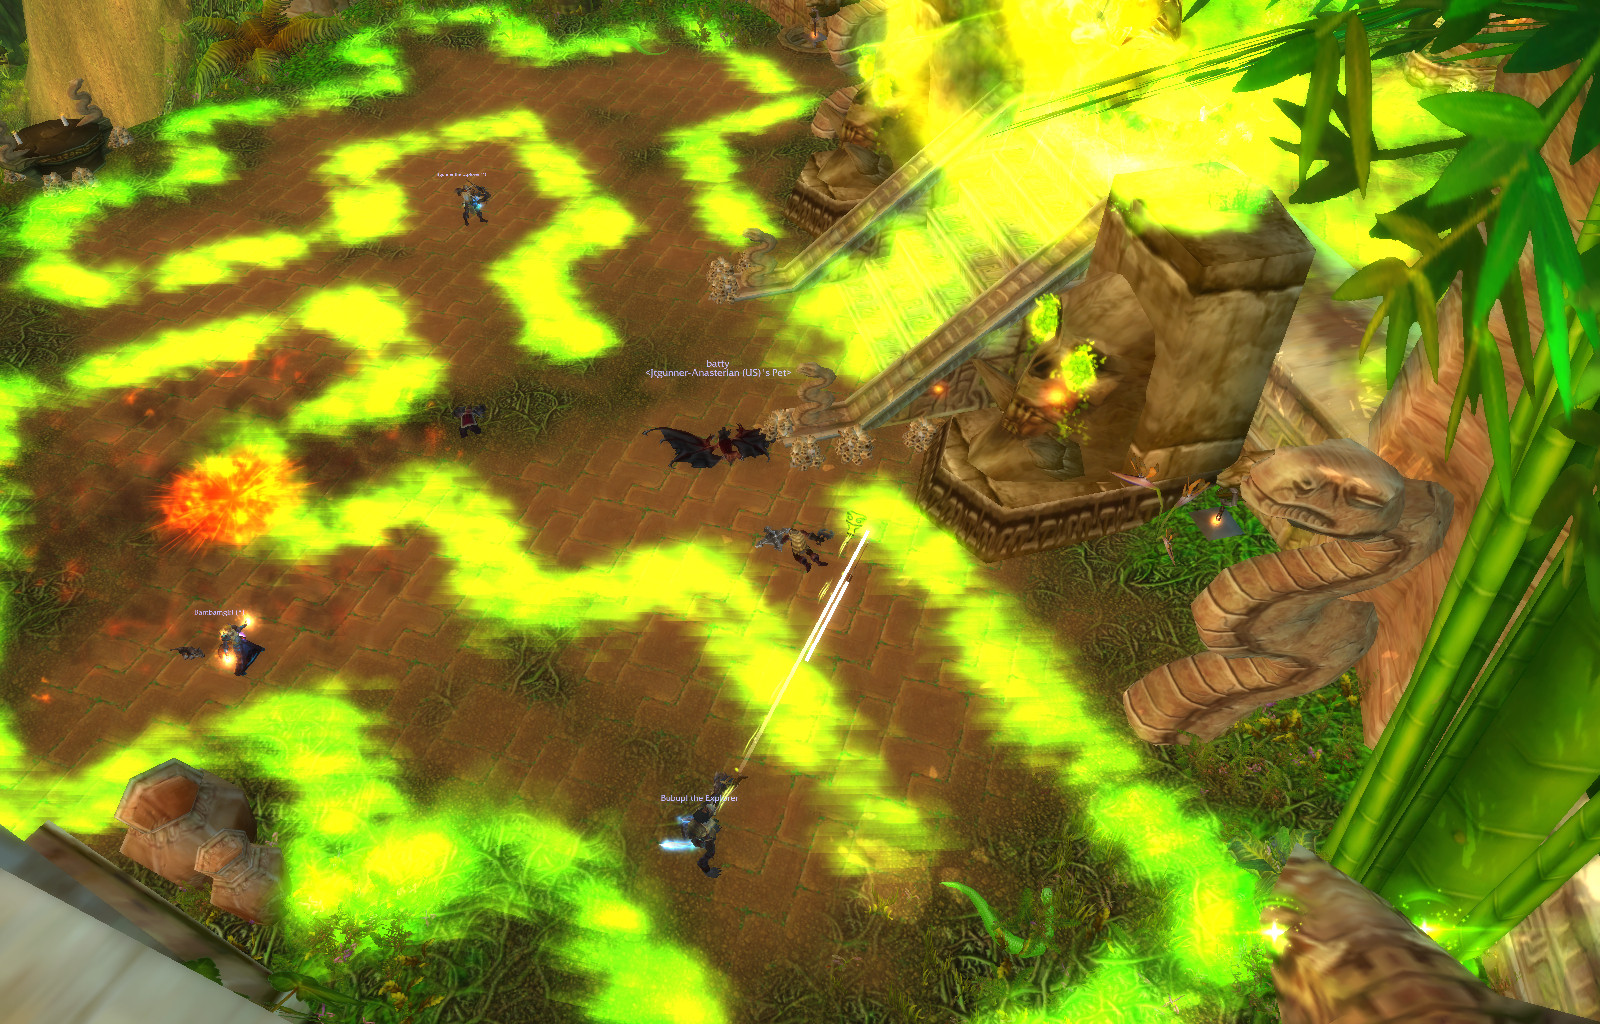
Around 75% health, Venoxis buffs himself with Blessing of the Snake God. This increases his physical damage dealt by 100% and gives him some new abilities. In addition to this, he is unable to dodge or parry.
Breath of Hethiss is an uninterruptible breath that affects targets in front of the boss. He is stationary while casting it.
Pool of Acrid Tears is a poison puddle, created by Venoxis in random areas of the room where you fight him. These puddles expand over time and deal damage to players standing in them.
At 50% health Venoxis moves back up to his throne and casts an ability called Bloodvenom. This causes beams of poison to chase players around the room and deal massive amounts of nature damage to anyone getting hit.
After casting Bloodvenom, High Priest Venoxis will return to the bottom of the stairs and become stunned for 10 seconds while taking increased damage.
Provided that the encounter lasts long enough, Venoxis will gain Blessing of the Snake God again, and even perform another Bloodvenom phase.
Strategy
Your group should begin the fight spread out to minimise damage from Toxic Link. Whenever Whispers of Hethiss is being cast it should be interrupted.
Players affected by Toxic Link should move away from each other immediately so as to break the link. Healers should watch out for the damage from the explosion when the link breaks.
When Venoxis enters his snake form, he gains new abilities. Players should watch out for the maze on the ground and make sure they are not standing in any poison. It's important to plan out a path to follow when running through the maze so that you do not become trapped if you are targeted by Venoxis' later ability, Bloodvenom.
Breath of Hethiss should be avoided by everyone, including the tank who can die from its brutal damage within one or two seconds. As the tank, you should position the boss in such a way that he is not facing any party members. After that, either run to one side or simply run through the boss to avoid taking damage. In addition to this, make sure you do not cross the maze when trying to avoid the breath. Thus, thinking ahead of time and positioning the boss correctly is crucial.
When the boss goes up to his throne and starts casting Bloodvenom, players should run away and not take damage from the very visible poison beams. It is important that you run through the maze and not over the poison walls on the ground as you will take large amounts of damage by doing that.
During this phase, ranged DPS can still damage the boss.
After casting Bloodvenom, Venoxis will become exhausted and stunned, taking increased damage for 10 seconds. This is the ideal time for Heroism/Bloodlust or Time Warp, as it provides 10 seconds of increased damage followed by a period of relatively little movement.
From this point on Venoxis will cast Toxic Link and Whispers of Hethiss before going back to his snake form again later in the fight.
The Road to Bloodlord Mandokir
After defeating Venoxis, your group should move out of the room where you fought him and to the left up the path. The first road on the right leads to a crossroads. The right hand side way is blocked and there is a mini-boss present there which you can opt to kill. The left hand side way leads up to Mandokir's Domain.
None of the trash up to Mandokir himself is particularly challenging so we will not go into details here. It is recommended that you use some form of crowd-control, though this is far from mandatory. The only mention worth making is the presence of frost cauldrons which, if used, will allow you to dispose of the trash faster.
Bloodlord Mandokir
The Bloodlord Mandokir encounter is essentially a DPS race, and somewhat of a gear check.
You will notice that Mandokir is accompanied by his skeletal raptor, Oghan. During the fight you will have to engage both of them. The arena in which they are found is surrounded by 8 Chained Spirits. These are integral to the completion of the fight.
Abilities
Decapitate is a one-shot ability which Mandokir will cast repeatedly throughout the fight. The boss will charge a random party member (including the tank) and deal roughly 15,000,000 damage, killing them. The dead party member will then be resurrected by one of the Chained Spirits found around the arena, consuming the spirit in the process.
Level Up is a buff Mandokir gains each time he kills a player with Decapitate. It increases damage done by 20% per stack and does stack up to at least 8.
Bloodletting is an uninterruptible channeled ability Mandokir casts on a random party member. It drains 50% of the current health of the target every 2 seconds for 10 seconds, and heals Mandokir for three times the amount of damage dealt.
Devastating Slam is an ability Mandokir will cast repeatedly throughout the fight. He will light an area on the ground on fire and a few seconds later earth shards will damage anyone standing in it.
Strategy
The Bloodlord Mandokir encounter is fairly simple, the only real challenge for your group being avoiding the AoE damage from Devastating Slam.
When Mandokir summons Oghan, your party should focus and kill the raptor quickly. Oghan will be resurrected several times during the encounter and should be killed each time. If he is not killed, Oghan will go around killing Chained Spirits, thus reducing the amount of resurrections your party has.
Whenever a party member dies to Decapitate, Mandokir gains a stack of Level Up. This, together with the limited number of resurrections available to your party, work as a soft enrage timer.
It is advised that your healer not bother healing players affected by Bloodletting unless their health drops dangerously low (under 10K). This is because Bloodletting only deals damage based on the player's current health, and the more health the player is damaged for, the more Mandokir will be healed for. There is no danger in this approach, as there are no other sources of damage in this fight which would not otherwise one-shot players anyway.
Beyond these mechanics, simply DPS Mandokir until he dies.
The Cache of Madness
The Cache of Madness is a boss event where your group will face one of 4 potential bosses. Which boss is chosen is random. Because the strategies required for defeating each of these bosses are simple, we will only present them briefly.
In order to start the encounter, someone in your party must have at least 425 skill in Archaeology. That person must then inspect the various artifacts located around the area. Once this is done, the artifacts will slowly float to the center and summon a boss.
Gri'lek
Gri'lek is a Gurubashi Berserker, one of four random bosses in the Cache of Madness. He has two abilities:
- Pursuit: Gri'lek targets a random party member and chases them very slowly. Simply kite him.
- Gri'lek will also target an area on the ground and, after a few seconds, damage anyone standing in it with earth shards. Simply move out of the respective area.
Hazza'rah
Hazza'rah is a large troll, one of four random bosses in the Cache of Madness. He has two abilities:
- Wrath: Hazza'rah will spam this spell throughout the encounter. It is interruptible and should be interrupted as it does a fairly large amount of damage.
- Awaken Nightmares: Hazza'rah will summon 4 nightmares. These adds will each target a party member, put them to sleep, and head slowly towards them. The 5th, unslept, party member needs to attack the nightmares in order to cause them to disappear. If any nightmare add makes contact with its target, it will kill it. It is recommended that you stay away from the edges of the room, as that is where the adds spawn.
Wushoolay
Wushoolay is one of four random bosses in the Cache of Madness. He has three noteworthy abilities:
- Forked Lightning: This spell deals damage to enemies in a cone in front of the boss, so your tank should face him away from the group.
- Lightning Cloud: Wushoolay will place a cloud which deals damage to enemies standing in it. Simply move out of the designated area.
- Lightning Rod: Wushoolay will target a random party member with this spell. Because Lightning Rod damages and knocks back party members around the target, your group should be spread out.
Renataki
Renataki is one of the four random bosses in the Cache of Madness. He has two abilities, but is essentially tank and spank:
- Ambush: Renataki will deal a very high amount of damage to a target. They require healing.
- Thousand Blades: Renataki will deal AoE damage in an area around him. Move away when he does it, or simply heal through.
High Priestess Kilnara
The High Priestess Kilnara encounter is not at all difficult, and simply involves that your group does not bring the boss to 50% health prematurely.
Abilities
Shadow Bolt is an interruptible spell which the boss casts numerous times during the encounter.
Tears of Blood is a channeled, interruptible spell which does a large amount of AoE damage.
Wave of Agony is an ability Kilnara will cast several times during the encounter. It forms a shadow wave in front of the boss which travels forward and gravely damages anyone in its path.
There are 4 packs of adds in the room where you fight Kilnara. They are hostile and attackable but do not aggro on their own.
When the boss reaches 50% health, all adds currently alive will aggro.
Around 10% health the boss disappers for a few seconds before reappearing.
Strategy
Your group should interrupt Shadow Bolt and Tears of Blood in order to minimise damage taken. If you have a limited amount of interrupts to work with, you should prioritise interrupting Tears of Blood over Shadow Bolt, as its damage is far higher. Players should be prepared to avoid Wave of Agony, by making sure the boss is not facing them. The tank should position the boss in such a way as to facilitate this.
After the pull, your group should engage each of the 4 packs of adds, one pack at a time. It is best if your tank pulls the boss to each pack so that he can maintain aggro on them. Once you have killed all the adds, it is safe to bring the boss below 50% health. If the damage caused by the adds is too great of a strain, your tank can pull one or two adds at a time instead, as the adds within a group are not linked and will not aggro together.
Once at 50% health, the boss will cause the room to seeminly cave in and will take on a panther form, but will remain generally harmless until her death.
Zanzil
Zanzil is a fairly simple encounter which requires the group to make use of the different types of cauldrons presented earlier. The area where you engage the boss has a fire cauldron, a frost cauldron and a poison cauldron, all of which will make this encounter considerably easier.
Abilities
Voodoo Bolt is an interruptible shadow bolt which Zanzil will spam throughout the encounter.
Zanzilii Fire is a fire wave that Zanzil will regulary cast on the ground. It deals damage to anyone standing in it and should be avoided.
In addition to these two abilities, Zanzil will perform another three actions during the encounter.
- he will summon a large number of zombies which have low damage and health.
- he will summon a large Zanzili Berserker which fixates on party members and chases them, ignoring any aggro.
- he will cause the entire floor of the area to become covered in poison, dealing large amounts of nature damage.
Strategy
Dealing with Zanzil's Voodoo Bolt and Zanzilii Fire is fairly straightforward and involves interrupting and moving out of the fire on the ground.
The fight becomes slightly more complicated, though not by much, when the group has to deal with Zanzil's other three mechanics. This should be done by use of the cauldrons found in the combat area as follows:
- when Zanzil summons zombies, a few designated party members should take the fire cauldron debuff and stand in the middle of the zombies, thus killing them. The zombies can and should be tanked. It is of course possible to have everyone take the fire cauldron debuff, though it is not necessary.
- when Zanzil summons a Berserker, a party member should take the frost cauldron debuff and attack the Berserker. The remaining health of the Berserker should be burned down by your party. Anyone being chased by the Berserker should not get caught.
- when Zanzil covers the floor in poison, everyone should take the poison cauldron debuff, thus negating the majority of the damage.
As you can see, this is an easy encounter, made even easier by the relatively low amounts of damage done by all of Zanzil's abilities.
Jin'do the Godbreaker
Jin'do the Godbreaker is the final boss of the instance, and is a two phase encounter. In the first phase you will face Jin'do himself, while in the second phase you are transported to the spirit realm where you will have to perform a few tasks in order to complete the encounter.
Abilities
Deadzone is a bubble which Jin'do will cast repeatedly throughout the first phase. Anyone inside the Deadzone will take 90% less magic damage and their casting speed will be reduced by 90%.
Shadows of Hakkar is an ability which Jin'do will cast a few times during the first phase. It deals AoE damage to your party.
Strategy
Phase One
Jin'do will be in the first phase from the start of the fight until reaching 70% health. During the first phase, he will repeatedly cast Deadzones. Your tank should aim to keep the boss out of Deadzones at all times, and your party should also stay out of the Deadzones themselves. When the boss casts Shadows of Hakkar, everyone (including the tank, ideally) should move inside a Deadzone to minimise the damage taken. Try not to bring Jin'do inside a Deadzone as it will also make him nigh-invulnerable.
Phase Two
On reaching 70% health, Jin'do will transport everyone into a spirit realm. Here you can see Hakkar being chained by three targetable, attackable but initially invulnerable chains. These chains are protected by barriers and cannot be damaged until the barriers are broken. Also in the spirit realm you will need to deal with:
- adds called Twisted Spirits, which spawn at an increasing rate as the phase goes on, which should be DPSed by your group.
- fireballs shot by Jin'do which target random party members and announce this visibly with graphical effects on the ground. They should be avoided as much as possible.
In order to break the barriers, the group must make use of Gurubashi Spirits. These are large Gurubashi Berserkers, found on the lower platforms that your group traveled through to get to Jin'do (both on the left and right sides). Your tank should bring one of these Spirits up to the area where the chains are present. Gurubashi Spirits will occassionally cast Body Slam, effectively charging a random party member, dealing damage and breaking the barrier protecting a chain, if such a barrier is close to the targeted player.
Thus, once your tank brings a Gurubashi Spirit into the fight, everyone should position themselves on top of barriers protecting the chains and wait for the Gurubashi Spirit to Body Slam someone and break a barrier.
Ideally, you should assign two of your DPS to attack and kill the chains as soon as they are attackable, while one ranged DPS player should be assigned to handle Twisted Spirits exclusively. As the fight goes on, more Twisted Spirits will spawn, and the assigned player may require help.
While Twisted Spirits do not have a lot of health, they do melee very hard and should be slowed and kept away from your healer at all costs.
Note that your tank will never have to travel far to pick up Gurubashi Spirits, as they respawn quickly and are easily tauntable from the platform where the encounter takes place.
Gurubashi Spirits gain a stacking buff which increases their attack speed greatly, and as such they cannot be kept up indefinitely or your tank will simply die. For this reason, they should be killed after either one or two Body Slams and a new Gurubashi Spirit should be pulled into the fight.
The area where a Body Slam is performed is covered in a purple zone, which causes any targets within it to take 100% increased damage (including the chains). The zone disappears after a short while.
Repeat this until all three chains are destroyed. At this point Hakkar will break free and kill Jin'do, which will mark the end of the encounter.
Final Considerations
The dungeon contains a couple of other gauntlet events, but due to their reduced level of difficulty, we'll let you discover them on your own!
- Priest Changes in War Within Alpha Build 54521
- Awesome Hallowfall Crystal Void Switch Animation
- Wrath Classic PvP Gear Significantly Discounted
- Paladin Changes in War Within Alpha Build 54521
- 9 Players with 100% Achievement Completion
- Monk Changes in War Within Alpha Build 54521
- Children's Week Extended by 1 Week
- Mage Class Changes in War Within Alpha Build 54521