
Stygian Onslaught Luna VII / 6.6 Best Characters and Teams in Genshin Impact
This is our guide for Stygian Onslaught in the current version of Genshin Impact. Read on to learn about the best teams available for the current cycle of Stygian Onslaught.
Stygian Onslaught Luna 7 Best Characters and Boss Advice
Stygian Onslaught is the hardest endgame content available in Genshin Impact facing against 3 different bosses with harder mechanics. Stygian Onslaught proves to be a challenge for all types of players. Here you can see an overview of the boss mechanics, some general combat advice as well as our recommended team compositions to clear Stygian Onslaught in version Luna 6.
But first, some general gameplay advice.
Co-Op Is Your Friend!
Stygian Onslaught can be cleared in Co-Op to an extent with some limitations. Difficulty 1/2/3 support matchmaking-based Co-Op allowing you to farm artifacts easily at Hard III difficulty while still being able to build up Dire Prestige.
Difficulties above that however require you to Co-Op with people inside your world. Furthermore, Fearless V and Dire VI's rewards are solo only. But you can therefore still gain the Dust of Enlightenment from Menacing IV.
Make Sure to Use Exalted Ones
2 Hours after each phases reset, Exalted Ones become available. These are the 16 characters based on the entire server's completion of Dire VI and grants a buff to your characters too. Providing increases to ATK, DEF and HP if you own that character. Exalted Ones do not give you access to that character!
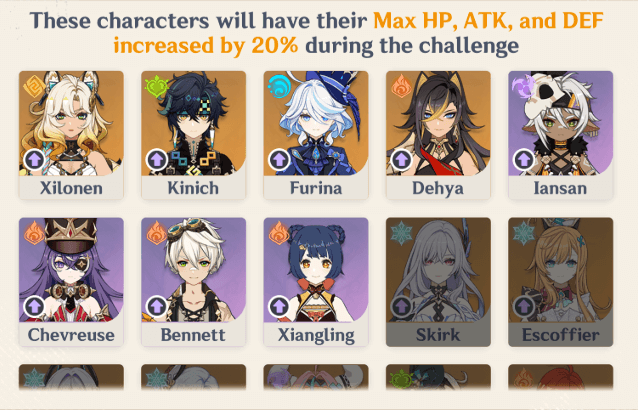
Exalted ones can change daily too so if a character you own is not currently listed, they may change tomorrow.
Stygian Onslaught Luna 6 Current Duration
- Event Duration: 2026/05/27 10:00 - 2026/06/30 03:59
- Disturbance Outbreak: 2026/05/27 10:00 - 2026/06/06 03:59
Video Guide for Stygian Onslaught
Stygian Onslaught Luna 6 Bosses and Best Team Compositions
Click below to see each of the 3 available bosses in the current patch Luna 6 Stygian Onslaught phase as well as weaknesses, and the best team compositions to clear easily.
Hydro Tulpa

- Recommended: Pyro Characters
Enemy Details
Helping Half-Tulpa
1 Half-Tulpa will emerge during the challenge at intervals. After some time, the Hydro Tulpa will absorb Half-Tulpas to enhance itself: It will grow larger, its ATK will increase, and it will launch more dangerous attacks.
Use attacks or Elemental Reactions to destroy Half-Tulpas in time or Freeze them to interrupt this absorption.
Twin Half-Tulpas
Affected by the Ley Line disturbance, 2 Half-Tulpas will emerge during the challenge at intervals. After some time, the Hydro Tulpa will absorb Half-Tulpas to enhance itself: It will heal a large amount of HP and grow larger, its ATK will increase, and it will launch more dangerous attacks.
Use attacks or Elemental Reactions to destroy the Half-Tulpas in time or Freeze them to interrupt this absorption.
Torrential Flurry
Affected by the Ley Line disturbance, the Hydro Tulpa will deploy a Shield during the challenge and enter a charging state as it prepares to launch Torrential Flurry. If it is successfully unleashed, your current active character will be immediately defeated.
When the Hydro Tulpa deploys its Shield, all party members' Elemental Skill and Burst CDs will be reset, while their Elemental Energy, Fighting Spirit, and Serpent's Subtlety will be restored. Breaking the Shield before the Hydro Tulpa can charge up will interrupt Torrential Flurry.
Recommended Team Compositions
This is not a comprehensive list of teams. The inclusion or exclusion of any specific team that matches the advantageous elements does not necessarily reflect their strength in the meta.
| Team Suggestions | |||
|---|---|---|---|
| Skirk | Furina | Escoffier | Mona |
| Flins | Ineffa | Chevreuse | Bennett |
| Mavuika | Xilonen | Citlali | Bennett |
| Varesa | Durin | Iansan | Chevreuse |
Battle-Hardened Glacial Wolf

- Recommended: Elemental Reactions
Enemy Details
Ancestral Wolf Spirit
During the combat, the powerful opponent will summon an "Ancestral Wolf Spirit" to fight by its side. While blessed by the spirit, the opponent's all Elemental and Physical RES are significantly increased. As a spiritual entity, the "Ancestral Wolf Spirit" is protected by a special Cryo Ward that can only be broken by Pyro or Electro Swirl Reactions. Once the Ward is shattered, the spirit will vanish, leaving the opponent temporarily paralyzed.
Ancestral Wolf Spirit: Manifestation
At the start of the combat, the powerful opponent will summon an "Ancestral Wolf Spirit" to fight by its side. Affected by the Ley Line disturbances, the opponent is invulnerable to all DMG while blessed by the spirit. As a spiritual entity, the "Ancestral Wolf Spirit" is protected by a special Cryo Ward that can only be broken by Pyro or Electro Swirl Reactions. Once the Ward is shattered, the spirit will vanish, leaving the opponent temporarily paralyzed and dealing massive backlash DMG. The more DMG the Ward absorbs while it is active, the greater the backlash DMG will be; furthermore, Pyro and Anemo DMG will further increase this backlash DMG.
Recommended Team Compositions
This is not a comprehensive list of teams. The inclusion or exclusion of any specific team that matches the advantageous elements does not necessarily reflect their strength in the meta.
| Team Suggestions | |||
|---|---|---|---|
| Varka | Nicole | Durin | Prune |
| Mavuika | Xilonen | Sucrose | Bennett |
| Arlecchino | Xilonen | Kaedehara Kazuha | Bennett |
| Flins | Columbina | Ineffa | Sucrose |
The Open-Eyed

- Recommended: Elemental Reactions
Enemy Details
Supreme Overseer
During combat, the Open-Eyed will enter the "Supreme Overseer" state. While in this state, it tracks the number of times it takes Pyro/Hydro/Electro/Cryo damage. When the number of hits from any one element reaches 3, it will exit this state and record that element as a monitored target. If no element is successfully monitored, the record will remain empty, and it will instead deal a single instance of Geo DMG. After the first monitoring state ends, the enemy will re-enter this state again after a set interval. During the second monitoring phase, elements that have already been recorded will require a significantly higher number of hits to be monitored again.
Phenomena's Delirium
After completing two rounds of Elemental Monitoring, the Open-Eyed will take to the air and begin preparing "Phenomena's Delirium." It will release the previously recorded elements and summon two corresponding Active Elemental Stars. If no elements were recorded, it will instead summon Inert Elemental Stars with high resistance to all elements and Physical DMG. When an Active Elemental Star is destroyed, it deals a large amount of damage to the enemy based on the recorded element. If an Inert Elemental Star is destroyed, it instead deals Geo DMG to the enemy. Destroy all Elemental Stars to interrupt the preparation of "Phenomena's Delirium." If both stars are not destroyed within the time limit, they will explode, dealing massive AoE damage.
Supreme Overseer
When combat begins, the Open-Eyed will enter the "Supreme Overseer" state. While in this state, it tracks the number of times it takes Pyro/Hydro/Electro/Cryo damage. When the number of hits from any one element reaches 3, it will exit this state and record that element as a monitored target. If no element is successfully monitored, the record will remain empty, and it will instead deal a single instance of Geo DMG. After the first monitoring state ends, the enemy will re-enter this state after a set interval. During the second monitoring phase, elements that have already been recorded will require a greater number of hits to be monitored again.
Phenomena's Delirium
After completing two rounds of Elemental Monitoring, the Open-Eyed will take to the air and begin preparing "Phenomena's Delirium." It will release the previously recorded elements and summon two corresponding Active Elemental Stars. If no elements were recorded, it will instead summon Inert Elemental Stars with high resistance to all elements and Physical DMG. If the enemy summons two Active Elemental Stars of different elements, both stars will become easier to destroy. When an Active Elemental Star is destroyed, it deals a large amount of damage to the enemy based on the recorded element. If an Inert Elemental Star is destroyed, it instead deals Geo DMG to the enemy. Destroy all Elemental Stars to interrupt the preparation of "Phenomena's Delirium." If both stars are not destroyed within the time limit, they will explode, dealing massive AoE damage.
Oversight of Vigil
When combat begins, the Open-Eyed will enter the "Oversight of Vigil" state. While in this state, it tracks the number of times it takes Pyro/Hydro/Electro/Cryo DMG. When the number of hits from any one element reaches 5, it will exit this state and record that element as a monitored target. If no element is successfully monitored, the record will remain empty, and it will instead deal a single instance of Geo DMG. After the first "Oversight of Vigil" ends, the enemy will re-enter this state again after a set interval. Due to the effects of the Ley Line Disturbance, the second monitoring phase lasts longer, and elements that have already been recorded will require a significantly higher number of hits to be monitored again. Due to the effects of the Ley Line Disturbance, the Open-Eyed will have increased Elemental and Physical RES during "Oversight of Vigil."
Phenomena's Delirium
After completing two rounds of Elemental Monitoring, the Open-Eyed will take to the air and begin preparing "Phenomena's Delirium." It will release the previously recorded elements and summon two corresponding Active Elemental Stars. If no elements were recorded, it will instead summon Inert Elemental Stars with high resistance to all elements and Physical DMG. If the enemy summons two Active Elemental Stars of different elements, both stars will become easier to destroy. When an Active Elemental Star is destroyed, it deals a large amount of damage to the enemy based on the recorded element. If an Inert Elemental Star is destroyed, it instead deals Geo DMG to the enemy. Destroy all Elemental Stars to interrupt the preparation of "Phenomena's Delirium." If both stars are not destroyed within the time limit, they will explode, dealing massive AoE damage.
Recommended Team Compositions
This is not a comprehensive list of teams. The inclusion or exclusion of any specific team that matches the advantageous elements does not necessarily reflect their strength in the meta.
| Team Suggestions | |||
|---|---|---|---|
| Zibai | Illuga | Linnea | Columbina |
| Mavuika | Iansan | Bennett | Citlali |
| Kinich | Nicole | Durin | Emilie |
| Skirk | Furina | Escoffier | Yelan |
Changelog
- 27 May 2026: Luna VII Stygian Onslaught guide updated.
- 14 Apr. 2026: Luna VI Stygian Onslaught guide updated.
- 05 Mar. 2026: Luna V Stygian Onslaught guide updated.
- 21 Jan. 2026: Luna IV Stygian Onslaught guide updated.
- 10 Dec. 2025: Luna III Stygian Onslaught guide updated.
- 28 Oct. 2025: Luna II Stygian Onslaught guide updated.
- 13 Sep. 2025: Luna I Stygian Onslaught guide updated.
- 01 Aug. 2025: 5.8 Stygian Onslaught teams added.
- 25 Jun. 2025: Guide added.
This guide has been written by Shikhu (Discord - Shikhu), an avid Genshin Impact player who has been exploring Teyvat since the game has launched. He has experienced all the game has to offer from building his favorite characters, exploring the world to clearing Spiral Abyss each rotation. His favorite character being his C6 Furina.