WoW Classic Enhancement Shaman Leveling Guide 1-60
On this page, you will find our Level by Level Enhancement Shaman leveling guide for WoW Classic. Make sure to use the slider to make the guide adapt to your level. For more general leveling information, please refer to our Shaman leveling guide. We also have an Elemental Shaman leveling guide and a Restoration Shaman leveling guide.
If you were looking for TBC Classic advice, please refer to our TBC Classic Enhancement Shaman leveling guide.
Enhancement Shaman Leveling Talents, Rotation, and Trainer Skills
Talent Tree
Your first talent unlocks at Level 10.

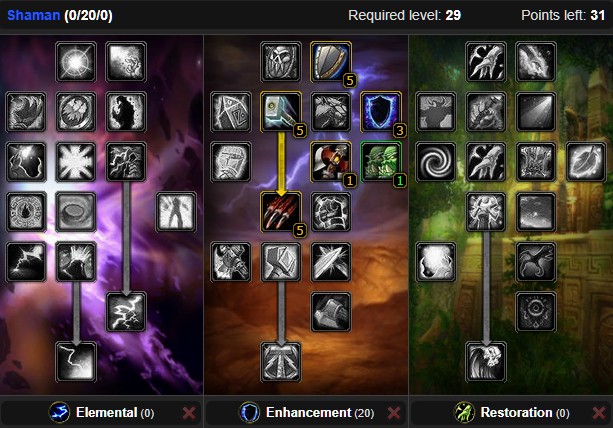
- Levels 10 to 14 — 5 points in
 Shield Specialization
 - Levels 15 to 19 — 5 points in
 Thundering Strikes
![]() Shield Specialization is great
early on, as you are likely to be using a 1H + Shield setup until you get
Shield Specialization is great
early on, as you are likely to be using a 1H + Shield setup until you get ![]() Two-Handed Axes and Maces.
It is also the best talent for tanking in dungeons, which you can do very well with
Two-Handed Axes and Maces.
It is also the best talent for tanking in dungeons, which you can do very well with
![]() Rockbiter Weapon's extra threat, or when dealing with elites / high level
enemies.
Rockbiter Weapon's extra threat, or when dealing with elites / high level
enemies. ![]() Thundering Strikes is a good damage increase and is required for
Thundering Strikes is a good damage increase and is required for
![]() Flurry later on.
Flurry later on.
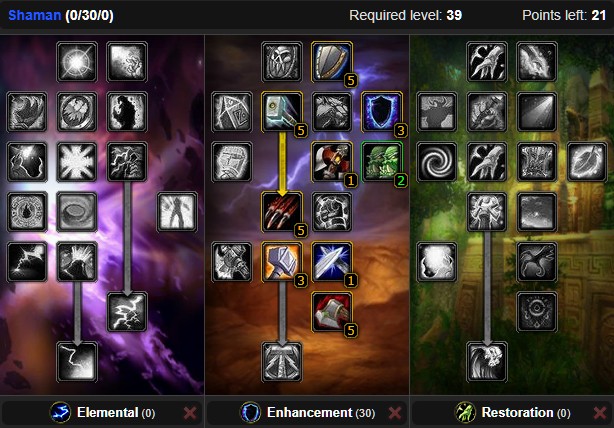
- Level 20 — 1 point in
 Two-Handed Axes and Maces
 - Levels 21 to 23 — 3 points in
 Improved Lightning Shield
 - Level 24 — 1 point in
 Anticipation
 - Levels 25 to 29 — 5 points in
 Flurry
![]() Two-Handed Axes and Maces allows to use
important leveling weapons such as
Two-Handed Axes and Maces allows to use
important leveling weapons such as ![]() Ravager from Scarlet Monastery: Armory.
Ravager from Scarlet Monastery: Armory.
![]() Improved Lightning Shield is a decent damage increase,
Improved Lightning Shield is a decent damage increase, ![]() Anticipation
is preferable to
Anticipation
is preferable to ![]() Improved Ghost Wolf because it will reduce your damage
taken during combat, thus gaining you more time in the long run than casting
Improved Ghost Wolf because it will reduce your damage
taken during combat, thus gaining you more time in the long run than casting ![]() Ghost Wolf
one second faster. Finally,
Ghost Wolf
one second faster. Finally, ![]() Flurry is a great damage increase with
synergy with
Flurry is a great damage increase with
synergy with ![]() Thundering Strikes.
Thundering Strikes.
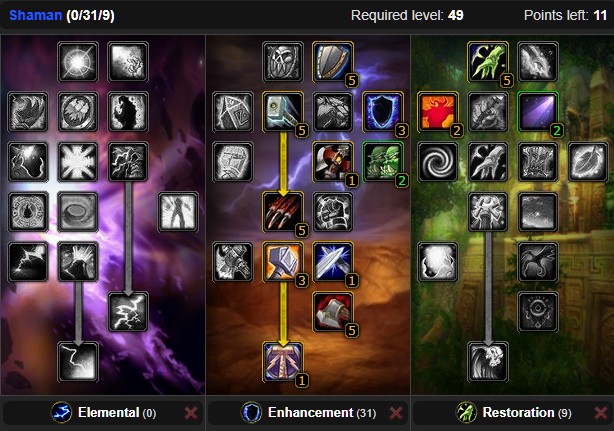
- Level 30 — 1 point in
 Parry
Parry - Levels 31 to 33 — 3 points in
 Elemental Weapons
 - Level 34 — 1 point in Anticipation
- Levels 35 to 39 — 5 points in
 Weapon Mastery
![]() Parry is an amazing survivability
increase, as it will give you almost 5% parry with a single talent, and parry is
a superior stat to dodge because it makes your next-auto attack faster when it happens.
Parry is an amazing survivability
increase, as it will give you almost 5% parry with a single talent, and parry is
a superior stat to dodge because it makes your next-auto attack faster when it happens.
![]() Elemental Weapons is a good damage increase, the second point into
Elemental Weapons is a good damage increase, the second point into ![]() Anticipation
improves your survivability further and maximizing
Anticipation
improves your survivability further and maximizing ![]() Weapon Mastery provides
a great damage increase with your melee attacks.
Weapon Mastery provides
a great damage increase with your melee attacks.
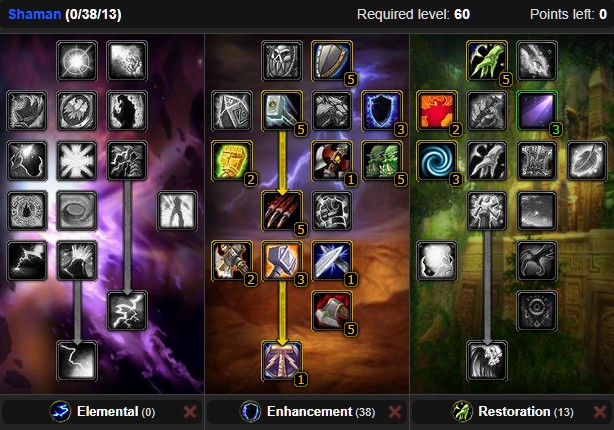
- Level 40 — 1 point in
 Stormstrike
 - Levels 41 to 45 — 5 point in
 Improved Healing Wave
 - Levels 46 & 47 — 2 points in
 Improved Reincarnation
 - Levels 48 & 49 — 2 points in
 Totemic Focus
![]() Stormstrike will be your main attack
from here on and a nice damage increase, although it has a long 20 second cooldown.
Stormstrike will be your main attack
from here on and a nice damage increase, although it has a long 20 second cooldown.
![]() Improved Healing Wave allows you to heal faster with your efficient
Improved Healing Wave allows you to heal faster with your efficient ![]() Healing Wave
when needed,
Healing Wave
when needed, ![]() Improved Reincarnation provides a better cushion from
Improved Reincarnation provides a better cushion from ![]() Reincarnation
for when things go terribly wrong. Finally, get two points into
Reincarnation
for when things go terribly wrong. Finally, get two points into ![]() Totemic Focus
to increase your Mana efficiency.
Totemic Focus
to increase your Mana efficiency.
- Level 50 — 1 point in Totemic Focus
- Levels 51 to 53 — 3 point in
 Nature's Guidance
 - Levels 54 & 55 — 2 points in
 Enhancing Totems
 - Levels 56 to 58 — 3 point in Anticipation
- Levels 59 & 60 — 2 points in
 Improved Weapon Totems
Get one more point into ![]() Totemic Focus
and proceed to the main reason why we went down the Restoration tree,
Totemic Focus
and proceed to the main reason why we went down the Restoration tree, ![]() Nature's Guidance.
This talent is a great damage increase as it provides hit for both melee and spell
attacks. Maximize
Nature's Guidance.
This talent is a great damage increase as it provides hit for both melee and spell
attacks. Maximize ![]() Enhancing Totems, as the extra stats from
Enhancing Totems, as the extra stats from ![]() Strength of Earth Totem
and
Strength of Earth Totem
and ![]() Grace of Air Totem will come in handy against tough mobs and while farming
dungeons for end game gear. Three points into
Grace of Air Totem will come in handy against tough mobs and while farming
dungeons for end game gear. Three points into ![]() Anticipation will further
improve your toughness while dungeon tanking and out in the world. Finally, get
Anticipation will further
improve your toughness while dungeon tanking and out in the world. Finally, get
![]() Improved Weapon Totems to make yourself the ultimate melee Shaman support
just in time for a raid invite!
Improved Weapon Totems to make yourself the ultimate melee Shaman support
just in time for a raid invite!
Your talents should roughly look like this, but keep
in mind there are plenty of individual points that can be swapped around based
on preference. For example, ![]() Enhancing Totems and
Enhancing Totems and ![]() Improved Weapon Totems
will be great if you are leveling in a group, and if you never, ever intend on
using a shield, you should get
Improved Weapon Totems
will be great if you are leveling in a group, and if you never, ever intend on
using a shield, you should get ![]() Ancestral Knowledge instead of
Ancestral Knowledge instead of ![]() Shield Specialization.
Shield Specialization.
Leveling Rotation
![]() Earthbind Totem kiting can help you avoid
a lot of damage. Simply drop
Earthbind Totem kiting can help you avoid
a lot of damage. Simply drop ![]() Earthbind Totem next to an enemy to slow it,
then run out of melee range until your swing timer
is ready again. Once this happens, return to melee range, hit the mob and run
out of melee range again. Rinse and repeat until the enemy is dead.
Earthbind Totem next to an enemy to slow it,
then run out of melee range until your swing timer
is ready again. Once this happens, return to melee range, hit the mob and run
out of melee range again. Rinse and repeat until the enemy is dead.
![]() Windfury Weapon is a strong weapon enchant
that can allow you to one shot an enemy out of nowhere, but is generally outclassed
by
Windfury Weapon is a strong weapon enchant
that can allow you to one shot an enemy out of nowhere, but is generally outclassed
by ![]() Rockbiter Weapon during leveling, which does more overall damage and
also has less potential to waste damage when an enemy is low health.
Rockbiter Weapon during leveling, which does more overall damage and
also has less potential to waste damage when an enemy is low health.
- Make sure to always heal yourself with Healing Wave
if you are low health after a pull, this will allow you to quickly get back to action
with minimal downtime, as you will be able to regenerate that Mana until you next
need to heal again.
- Make sure
 Rockbiter Weapon is active on
you at all times, to maximize your potential damage output.
Rockbiter Weapon is active on
you at all times, to maximize your potential damage output. - Make sure both Rockbiter Weapon and Lightning Shield
are active on you at all times, to maximize your potential damage output. Refresh
Lightning Shield when engaging enemies or immediately after shocking, in order to
mess as little as possible with your 5-second rule Mana regeneration.
- Drop Strength of Earth Totem and
 Searing Totem
as your main totems, when grinding in a small space for a prolonged amount of time,
in dungeons, or when facing hard enemies.
Searing Totem
as your main totems, when grinding in a small space for a prolonged amount of time,
in dungeons, or when facing hard enemies. - Drop Strength of Earth Totem,
 Healing Stream Totem
and Searing Totem as your main totems, when grinding in a small space for
a prolonged amount of time, in dungeons, or when facing hard enemies.
Healing Stream Totem
and Searing Totem as your main totems, when grinding in a small space for
a prolonged amount of time, in dungeons, or when facing hard enemies. - Drop Strength of Earth Totem, Healing Stream Totem
and Searing Totem as your main totems (also
 Windfury Totem when
playing with Warriors or Rogues),
when grinding in a small space for a prolonged amount of time, in dungeons, or when
facing hard enemies.
Windfury Totem when
playing with Warriors or Rogues),
when grinding in a small space for a prolonged amount of time, in dungeons, or when
facing hard enemies. - Drop Strength of Earth Totem, Healing Stream Totem ,
Searing Totem and
 Grace of Air Totem ( Windfury Totem when
playing with Warriors or Rogues)
as your main totems, when grinding in a small space for a prolonged amount of time,
in dungeons or when facing hard enemies.
Grace of Air Totem ( Windfury Totem when
playing with Warriors or Rogues)
as your main totems, when grinding in a small space for a prolonged amount of time,
in dungeons or when facing hard enemies. - Use
 Lightning Bolt (rank 1 if Mana is an issue)
to initiate combat against mobs placed in dangerous places to body pull.
Lightning Bolt (rank 1 if Mana is an issue)
to initiate combat against mobs placed in dangerous places to body pull. - Use Stormstrike whenever possible, for
its damage and to increase the damage of your next two
 Earth Shocks.
 - Use Earth Shock whenever possible for
extra damage.
- Auto-attack the enemy until he dies. This idle time will allow you to regenerate some Mana, as you will not be casting any more spells until you are pulling the next enemy.
List of Trainer Skills to Buy
![]() Windfury Totem and
Windfury Totem and ![]() Ancestral Spirit
should always be bought if you will ever be playing in a group at all. We
do not list them down below because, if you are a pure solo player, you will be able
to easily do without them and get your level 40 mount and
Ancestral Spirit
should always be bought if you will ever be playing in a group at all. We
do not list them down below because, if you are a pure solo player, you will be able
to easily do without them and get your level 40 mount and ![]() Runecloth Bags
a little bit earlier.
Runecloth Bags
a little bit earlier.
- At Level 1, as soon as you have the copper, buy
Rockbiter Weapon. It provides a significant damage boost that lasts for 5 minutes.
Also, buy Healing Wave, allowing you to heal, when needed.
- At Level 4, buy Earth Shock. Earth Shock
is an instant, high damage spell that also interrupts any casts the target was doing
when it hits. You will be using it to interrupt enemies and activate
 Elemental Focus
/
Elemental Focus
/  Elemental Devastation in the process throughout all of the leveling process.
 - At Level 6, buy
 Earthbind Totem and
Rank 2 Healing Wave. Earthbind Totem slows enemies around itself, enabling
kiting strategies.
Earthbind Totem and
Rank 2 Healing Wave. Earthbind Totem slows enemies around itself, enabling
kiting strategies. - At Level 8, buy Lightning Shield, Rank
2 Lightning Bolt, Rank 2 Earth Shock and Rank 2 Rockbiter Weapon.
Lightning Shield is a Mana-efficient way to damage enemies you are in melee combat
with, and should always be kept up on yourself.
- At Level 10, buy Strength of Earth Totem
and Searing Totem. Strength of Earth Totem increases your strength, and
thus your damage. Searing Totem deals damage to enemies by itself.
- At Level 12, buy Rank 3 Healing Wave.
- At Level 14, buy Rank 3 Lightning Bolt
and Rank 3 Earth Shock.
- At Level 16, buy Rank 2 Lightning Shield
and Rank 3 Rockbiter Weapon.
- At Level 18, buy Rank 4 Healing Wave.
- At Level 20, buy
 Ghost Wolf, Rank 2
Searing Totem, Healing Stream Totem and Rank 4 Lightning Bolt.
Ghost Wolf allows you to transform into a Wolf while outdoors which moves much faster
than your normal run speed. Use it to speed up your leveling, especially before
a mount is available. Healing Stream Totem will provide some steady healing when
you are at the same place for a while.
Ghost Wolf, Rank 2
Searing Totem, Healing Stream Totem and Rank 4 Lightning Bolt.
Ghost Wolf allows you to transform into a Wolf while outdoors which moves much faster
than your normal run speed. Use it to speed up your leveling, especially before
a mount is available. Healing Stream Totem will provide some steady healing when
you are at the same place for a while. - At Level 24, buy Rank 3 Lightning Shield,
Rank 4 Rockbiter Weapon, Rank 5 Healing Wave, Rank 2 Strength of Earth Totem
and Rank 4 Earth Shock.
- At Level 26, buy Rank 5 Lightning Bolt.
- At Level 30, buy Reincarnation, Rank
3 Searing Totem, Rank 2 Healing Stream Totem and
 Astral Recall.
Reincarnation allows you to recover instantly from dying, saving time in the process.
Finally, Astral Recall allows you to get a second Hearthstone, but with half the
cooldown, allowing for a lot of extra mobility.
Astral Recall.
Reincarnation allows you to recover instantly from dying, saving time in the process.
Finally, Astral Recall allows you to get a second Hearthstone, but with half the
cooldown, allowing for a lot of extra mobility. - At Level 32, buy Rank 4 Lightning Shield,
Rank 6 Healing Wave and Rank 6 Lightning Bolt.
- At Level 36, buy Rank 5 Earth Shock.
- At Level 38, buy Rank 7 Lightning Bolt
and Rank 3 Strength of Earth Totem.
- At Level 40, buy Rank 5 Lightning Shield,
Rank 4 Searing Totem, Rank 3 Healing Stream Totem and Rank 7 Healing Wave.
- At Level 42, buy Grace of Air Totem.
Grace of Air Totem increases your agility, and thus your damage. Use it when in a
group or facing dangerous enemies.
- At Level 44, buy Rank 8 Lightning Bolt.
- At Level 48, buy Rank 6 Lightning Shield,
Rank 8 Healing Wave and Rank 6 Earth Shock.
- At Level 50, buy Rank 9 Lightning Bolt,
Rank 4 Healing Stream Totem and Rank 5 Searing Totem.
- At Level 52, buy Rank 4 Strength of Earth Totem.
- At Level 56, buy Rank 7 Lightning Shield,
Rank 9 Healing Wave, Rank 2 Grace of Air Totem and Rank 10 Lightning Bolt.
- At Level 60, buy Rank 7 Earth Shock,
Rank 5 Healing Stream Totem and Rank 6 Searing Totem.
Shaman Macros and Addons
By setting yourself up with an upgraded user interface and macros from the get go, you will make your leveling process much easier. Check out our Enhancement Shaman Macros and Addons guide in the link below for the full list.
Enhancement Shaman Quests and Weapons
When leveling, stay alert for weapon upgrades you might encounter, as these will
improve your experience significantly. You will also need to complete various class
quests in order to be able to use your totems, ![]() Windfury Totem. To help you
with both of those pursuits, we have made two dedicated guides.
Windfury Totem. To help you
with both of those pursuits, we have made two dedicated guides.
Playing an Enhancement Shaman Beyond Level 60
Now that you are max level, we would recommend you to read our Enhancement Shaman Guide, which covers every detail of maximum level gameplay extensively.
Pay special attention to these pages, as they deal with the most pressing issues you will face at level 60:
- In our Enhancement Shaman Talent builds guide you will find multiple builds, some focused on being as offensive as possible, others focused on being as good of a support as possible, at the cost of your personal DPS;
- Inside the PvP Shaman guide, you can
read on various recommended PvP builds, including an Enhancement focused one. Best
of luck with your
 Windfury Weapon critical strikes!
 - Goldmaking Guide for Enhancement Shamans has all the information you need in order to farm efficiently as an Enhancement Shaman at maximum level;
- Our Enhancement Shaman Rotation guide explains how to use your spells in order to produce maximum damage, and most importantly, how to be the best support you can be to your group at the same time, including some advanced tips on totem twisting;
- Check the Enhancement Shaman Stats guide if you require more information on Enhancement Shaman's stat priority and the reasoning behind each stat's power;
- Last but not least, our Gear guide for Enhancement Shamans has all the gear pieces you should look for, some for damage, others for better support ability, and where you can find them at.
Changelog
- 18 Nov. 2024: Page updated for Classic Anniversary.
- 28 Feb. 2021: Changed the slider starting point to maximum level.
- 25 Apr. 2020: Fixed a typo with Lightning Bolt Rank 10 being recommended to buy at the wrong level.
- 05 Jan. 2020: Added a Macros and Addons section.
- 23 Sep. 2019: Added a final section with useful links for players who just hit 60.
- 14 Sep. 2019: Guide added.
Classic Dungeon Guides
Classic Profession Guides
Classic Race Guides
Classic Class Overviews
This guide has been written by Seksi, original vanilla player and multi-class player, currently playing on Gehennas Horde. You can find him on the Classic Warrior, Mage and Shaman Discords, as well as the Icy Veins Discord.
- Burning Crusade Classic Phase 2 Now Live: Here’s What to Expect
- Did Blizzard Just Quietly Invite Creators to Play WoW Classic’s Next Chapter?
- WoW Weekly Returns: Patch 12.0.5, Twitch Drops & Classic Updates
- WoW BCC Anniversary Edition: Overlords of Outland – Everything Coming May 14
- Battleground Honor Significantly Increased
- Limited-Time Mount Alert: Get the Voidfeather Dragonhawk for TBC Classic Servers Now!
- Could WoW Be Added to Xbox Game Pass Ultimate?
- MoP Classic Escalation PTR Update Details New Content