WoW Classic Fury Warrior Leveling Guide 1-60
On this page, you will find our Level by Level Fury Warrior leveling guide for WoW Classic. Fury gains power when it critical strikes or gets hit with a critical strike, making it an unpredictable, but high potential specialization for leveling. Make sure to use the slider to make the guide adapt to your level. For more general leveling information, please refer to our Warrior leveling guide. We also have an Arms Warrior leveling guide and a Protection Warrior leveling guide.
If you were looking for TBC Classic advice, please refer to our TBC Classic Fury Warrior leveling guide.
Fury Warrior Leveling Rotation, Talents and Trainer Skills
Talent Tree
Your first talent unlocks at Level 10.
Your talents should roughly look like this, but keep in mind
there are plenty of individual points that can be swapped around based on preference.
For example, if you want to level with dual wield weapons instead of using a two-hander
(an option for which it is harder to get good weapons for), you should put four points
into ![]() Dual Wield Specialization instead of
Dual Wield Specialization instead of ![]() Improved Battle Shout:
Improved Battle Shout:

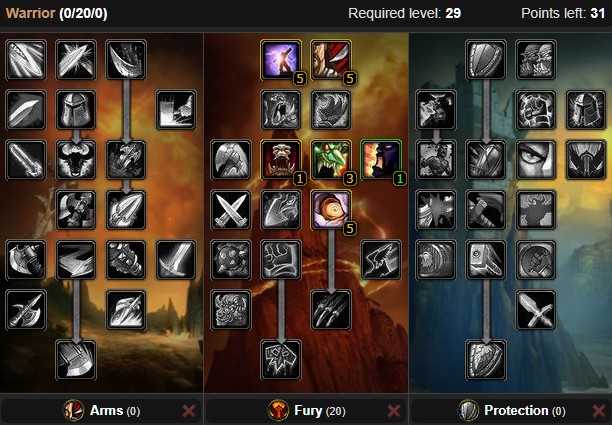

- Levels 10 to 14 — 5 points in
 Cruelty
 - Levels 15 to 19 — 5 points in
 Booming Voice
![]() Cruelty is the best damage increasing talent
for Warriors early on and should be taken as soon as possible, while
Cruelty is the best damage increasing talent
for Warriors early on and should be taken as soon as possible, while ![]() Booming Voice
is a nice quality of life increase that also helps you save some Rage.
Booming Voice
is a nice quality of life increase that also helps you save some Rage.
- Level 20 — 1 point in
 Piercing Howl
 - Levels 21 to 23 — 3 points in
 Blood Craze
 - Level 24 — 1 point in
 Improved Battle Shout
 - Levels 25 to 29 — 5 points in
 Enrage
![]() Piercing Howl allows you to kite packs of enemies,
and is extremely helpful when things go wrong and you need to run for it.
Piercing Howl allows you to kite packs of enemies,
and is extremely helpful when things go wrong and you need to run for it. ![]() Blood Craze
gives you some health back occasionally.
Blood Craze
gives you some health back occasionally. ![]() Improved Battle Shout is a decent
damage increase for you and any melee party members. Finally,
Improved Battle Shout is a decent
damage increase for you and any melee party members. Finally, ![]() Enrage
is a great damage increase that procs from being critically hit, just like Blood Craze.
Enrage
is a great damage increase that procs from being critically hit, just like Blood Craze.
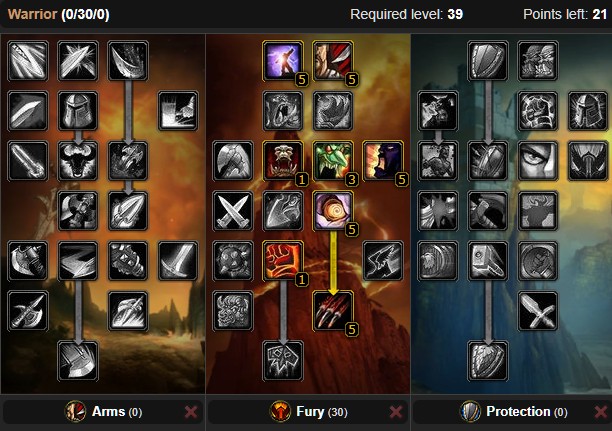
- Level 30 — 1 point in
 Death Wish
 - Levels 31 to 34 — 4 points in Improved Battle Shout
- Levels 35 to 39 — 5 points in
 Flurry
![]() Death Wish is a great cooldown that drastically
increases your damage output at the cost of some armor reduction. Make sure to use
it often! The remaining points into
Death Wish is a great cooldown that drastically
increases your damage output at the cost of some armor reduction. Make sure to use
it often! The remaining points into ![]() Improved Battle Shout contribute to
your damage output. You can alternatively put some points into
Improved Battle Shout contribute to
your damage output. You can alternatively put some points into ![]() Improved Execute
if you prefer, but the difference is minor. Finally, get
Improved Execute
if you prefer, but the difference is minor. Finally, get ![]() Flurry
to increase your damage output by a whooping 30% whenever you get a critical strike!
Flurry
to increase your damage output by a whooping 30% whenever you get a critical strike!
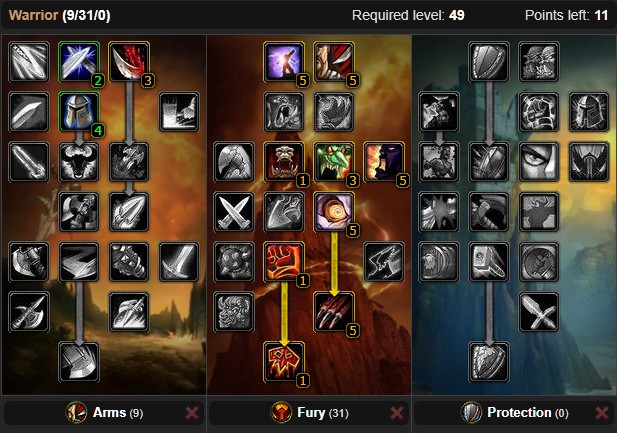
- Level 40 — 1 point in
 Bloodthirst
 - Levels 41 & 42 — 2 points in
 Deflection
 - Levels 43 to 45 — 3 points in
 Improved Rend
 - Levels 46 to 49 — 4 points in
 Tactical Mastery
![]() Bloodthirst will be your main attack from
here on and deals significant damage with a minor self-healing component.
Bloodthirst will be your main attack from
here on and deals significant damage with a minor self-healing component. ![]() Deflection
improves your survivability.
Deflection
improves your survivability. ![]() Improved Heroic Strike is skipped because we
will rarely be using it while leveling.
Improved Heroic Strike is skipped because we
will rarely be using it while leveling. ![]() Improved Rend is required for
Improved Rend is required for ![]() Deep Wounds,
and a small damage increase. Finally,
Deep Wounds,
and a small damage increase. Finally, ![]() Tactical Mastery improves your tanking
capabilities significantly, and is required for
Tactical Mastery improves your tanking
capabilities significantly, and is required for ![]() Anger Management.
Anger Management.
- Level 50 — 1 point in Tactical Mastery
- Levels 51 & 52 — 2 points in
 Improved Overpower
 - Level 53 — 1 point in
 Anger Management
 - Levels 54 & 55 — 2 points in
 Deep Wounds
 - Levels 56 to 60 — 5 points in
 Two-Handed Weapon Specialization
The final point into ![]() Tactical Mastery allows you
to progress to
Tactical Mastery allows you
to progress to ![]() Improved Overpower, which has great synergy with
Improved Overpower, which has great synergy with ![]() Flurry.
Flurry.
![]() Anger Management is also taken at this point as it grants 1 rage ever 3
seconds, a welcome boost. Because of how low a leveling Warrior's critical strike
chance is, only two points are put into
Anger Management is also taken at this point as it grants 1 rage ever 3
seconds, a welcome boost. Because of how low a leveling Warrior's critical strike
chance is, only two points are put into ![]() Deep Wounds and none into
Deep Wounds and none into ![]() Impale.
Impale.
![]() Two-Handed Weapon Specialization is maximized on the final levels
as it provides a good boost to your overall damage.
Two-Handed Weapon Specialization is maximized on the final levels
as it provides a good boost to your overall damage.
Leveling Rotation
You start with a single active ability, ![]() Heroic Strike,
which you should use whenever possible. Once you train
Heroic Strike,
which you should use whenever possible. Once you train ![]() Battle Shout,
make sure to keep up its buff while fighting.
Battle Shout,
make sure to keep up its buff while fighting.
The absence of ![]() Thunder Clap from the rotation and
training list is intended. This skill is great against 3+ targets, especially
when you are dungeon leveling with a premade group, in which case it should absolutely be
one of your priorities.
However, it is also expensive to train its multiple ranks, and its damage against
less than three targets is weak for the Rage spent, which makes it a trap skill
for most players.
Thunder Clap from the rotation and
training list is intended. This skill is great against 3+ targets, especially
when you are dungeon leveling with a premade group, in which case it should absolutely be
one of your priorities.
However, it is also expensive to train its multiple ranks, and its damage against
less than three targets is weak for the Rage spent, which makes it a trap skill
for most players.
![]() Hamstring kiting can help you avoid a lot of damage.
Simply apply Hamstring to an enemy to slow it, then run out of melee range until
your swing timer
is ready again. Once this happens, return to melee range, hit the mob, and run
out of melee range again. Rinse and repeat until the enemy is dead, reapplying
Hamstring as needed.
Hamstring kiting can help you avoid a lot of damage.
Simply apply Hamstring to an enemy to slow it, then run out of melee range until
your swing timer
is ready again. Once this happens, return to melee range, hit the mob, and run
out of melee range again. Rinse and repeat until the enemy is dead, reapplying
Hamstring as needed.
- Use
 Charge to initiate combat whenever possible.
 - Activate
 Bloodrage to generate extra Rage if you are currently healthy.
 - Cast Battle Shout if you miss its buff.
- Death Wish causes you to deal 20% more damage
and become fear immune, but lowers your armor and resistances by 20%. Use it
whenever it is available, as the extra kill speed is well worth the risk.
- Cast
 Execute whenever an enemy is below 20% health.
 - Use
 Overpower whenever the enemy dodges.
  Whirlwind is a powerful burst AoE attack, which
is also worth using whenever possible in single-target situations.
Whirlwind is a powerful burst AoE attack, which
is also worth using whenever possible in single-target situations.- Cast Bloodthirst as your main attack.
- Apply Rend if it will have time to run its full duration.
- Use
 Sunder Armor as quickly as possible, while
the enemy is high health, in order to increase your damage. Using it is generally
more efficient
than using
Sunder Armor as quickly as possible, while
the enemy is high health, in order to increase your damage. Using it is generally
more efficient
than using  Heroic Strike.
  Cleave can be used instead of Heroic Strike
for Rage dumping on AoE situations.
Cleave can be used instead of Heroic Strike
for Rage dumping on AoE situations.- Queue Heroic Strike whenever you have excess Rage that you won't be
able to use before letting it expire post combat. Keep in mind that Heroic Strike
(and Cleave) replace your next auto-attack with a stronger one that will not
grant you any Rage. So their real Rage cost is much higher than what
is stated in the tooltip, which is why they are lowest in the priority list.
Summary of Trainer Skills
- At Level 1, as soon as you have the copper, buy Battle Shout.
It provides a significant damage boost that lasts for 2 minutes.
- At Level 4, buy Charge and Rend.
Charge is a mobility tool that also generates Rage, but cannot be used in combat.
Rend is a damage over time effect that will help you kill enemies faster.
- At Level 6, buy Parry to boost your survivability at little cost.
- At Level 8, buy Rank 2 Heroic Strike, and get
 Hamstring to enable Hamstring kiting.
 - At Level 10, buy Rank 2 Rend and Bloodrage, which provides Rage at the cost of health.
- At Level 12, buy Rank 2 Battle Shout, Overpower, and
 Shield Bash.
Overpower is a strong, unavoidable attack that you can use whenever enemies dodge.
Shield Bash allows you to interrupt enemy casts.
Shield Bash.
Overpower is a strong, unavoidable attack that you can use whenever enemies dodge.
Shield Bash allows you to interrupt enemy casts. - At Level 14, buy
 Demoralizing Shout and
  Revenge.
While these skills will not be of much help during questing, you will be grateful
to have bought them whenever you have to tank.
Revenge.
While these skills will not be of much help during questing, you will be grateful
to have bought them whenever you have to tank. - At Level 16, buy Rank 3 Heroic Strike,
 Mocking Blow, and
  Shield Block.
Similar to Level 14 skills, the logic behind buying Mocking Blow and Shield Block
is that it is quite cheap to do so, and using them while tanking helps a lot.
Shield Block.
Similar to Level 14 skills, the logic behind buying Mocking Blow and Shield Block
is that it is quite cheap to do so, and using them while tanking helps a lot. - At Level 18, buy
 Disarm, another defensive
tool that also comes in handy in PvP. Being disarmed disables most of your attacks
if you are playing a weapon-reliant class.
Disarm, another defensive
tool that also comes in handy in PvP. Being disarmed disables most of your attacks
if you are playing a weapon-reliant class. - At Level 20, buy Rank 3 Rend, Cleave, and
 Retaliation.
Cleave works similarly to Heroic Strike in that it replaces your next swing, but
instead of just added damage, it will make that attack hit a second target nearby.
Retaliation makes you counter-attack whenever you are melee attacked for 15 seconds, on a
huge 30-minute cooldown. Use it when you are pulling multiple enemies.
Retaliation.
Cleave works similarly to Heroic Strike in that it replaces your next swing, but
instead of just added damage, it will make that attack hit a second target nearby.
Retaliation makes you counter-attack whenever you are melee attacked for 15 seconds, on a
huge 30-minute cooldown. Use it when you are pulling multiple enemies. - At Level 22, buy Rank 3 Battle Shout, Rank 2 Sunder Armor and
 Intimidating Shout, which will cause enemies to cower or run away in fear when used.
 - At Level 24, buy Rank 2 Demoralizing Shout,
Rank 2 Revenge, Rank 4 Heroic Strike, and Execute.
Use it to finish off targets below 20% health.
- At Level 26, buy Rank 2 Charge.
- At Level 28, buy
 Shield Wall, which will allow
you to reduce the damage you take by 75% damage for 10 seconds, with a huge cooldown of 30 minutes.
Shield Wall, which will allow
you to reduce the damage you take by 75% damage for 10 seconds, with a huge cooldown of 30 minutes. - At Level 32, buy Rank 2 Hamstring, Rank 5
Heroic Strike, Rank 4 Battle Shout, Rank 2 Execute, and
 Berserker Rage.
Berserker Rage allows you to be immune or break out of fear and incapacitate effects,
and you generate more Rage from being hit than normal during its effect.
Berserker Rage.
Berserker Rage allows you to be immune or break out of fear and incapacitate effects,
and you generate more Rage from being hit than normal during its effect. - At Level 34, buy Rank 3 Sunder Armor.
- At Level 36, buy Whirlwind, which will be
one of your main damage dealers from here on.
- At Level 38, buy
 Pummel, which will allow
you to interrupt enemies while in
Pummel, which will allow
you to interrupt enemies while in  Berserker Stance.
 - At Level 40, buy Rank 6 Heroic Strike, Rank 3 Execute, and
 Plate Mail, enabling you to
use plate armor.
Plate Mail, enabling you to
use plate armor. - At Level 42, buy Rank 5 Battle Shout.
- At Level 46, buy Rank 3 Charge and Rank 4 Sunder Armor.
- At Level 48, buy Rank 7 Heroic Strike, Rank 2 Bloodthirst, and Rank 4 Execute.
- At Level 50, buy
 Recklessness, a powerful
cooldown which turns all of your attacks into guaranteed critical strikes for 15
seconds, while also causing you to take 20% extra damage, on a huge cooldown of 30 minutes.
Recklessness, a powerful
cooldown which turns all of your attacks into guaranteed critical strikes for 15
seconds, while also causing you to take 20% extra damage, on a huge cooldown of 30 minutes. - At Level 52, buy Rank 6 Battle Shout.
- At Level 54, buy Rank 3 Hamstring and Rank 3 Bloodthirst.
- At Level 56, buy Rank 8 Heroic Strike and Rank 5 Execute.
- At Level 58, buy Rank 5 Sunder Armor.
- At Level 60, buy Rank 4 Bloodthirst.
Warrior Macros and Addons
By setting yourself up with an upgraded user interface and macros from the get go, you will make your leveling process much easier. Check out our Fury Warrior Macros and Addons guides in the link below for the full list.
Fury Warrior Quests and Weapons
While leveling, you will need to keep open for weapon opportunities. You will
also need to complete various class quests for key skills such as ![]() Berserker Stance
and
Berserker Stance
and ![]() Intercept. To help you with that, we have made two dedicated guides.
Intercept. To help you with that, we have made two dedicated guides.
How to Progress as a Fury Warrior After Hitting Level 60
Now that you are max level, we recommend reading through our DPS Warrior Guide, which covers every aspect of maximum level gameplay at length.
Some of the most important individual pages to read through are listed below.
- DPS Warrior Talent builds guide, which contains the PvE oriented builds for DPS Warriors, which rely heavily on the Fury tree.
- PvP Warrior guide, where you can find PvP oriented builds for DPS Warriors and various tricks and tips that can you help against other players.
- Read our Goldmaking Guide for Warriors, which explains some techniques that you can employ to farm gold quickly at level 60.
- DPS Warrior Rotation guide, where you can see a description of how to play in various situations, including some advanced Rage management tips.
- The DPS Warrior Stats guide contains various information on the different stats you can have as a Warrior and a list of their relative importance for damage dealing.
- Gear guide for DPS Warriors has all of the best pieces of gear that you should look to farm at maximum level in order to optimize your damage as much as possible.
Changelog
- 18 Nov. 2024: Page updated for Classic Anniversary.
- 28 Feb. 2021: Changed the slider starting point to maximum level.
- 05 Jan. 2020: Added a Macros and Addons section.
- 21 Sep. 2019: Added a final section with useful links for players who just hit 60.
- 20 Sep. 2019: Page added.
Classic Dungeon Guides
Classic Profession Guides
Classic Race Guides
Classic Class Overviews
This guide has been written by Seksi, original vanilla player and multi-class player, currently playing on Gehennas Horde. You can find him on the Classic Warrior, Mage and Shaman Discords, as well as the Icy Veins Discord.
- Burning Crusade Classic Phase 2 Now Live: Here’s What to Expect
- Did Blizzard Just Quietly Invite Creators to Play WoW Classic’s Next Chapter?
- WoW Weekly Returns: Patch 12.0.5, Twitch Drops & Classic Updates
- WoW BCC Anniversary Edition: Overlords of Outland – Everything Coming May 14
- Battleground Honor Significantly Increased
- Limited-Time Mount Alert: Get the Voidfeather Dragonhawk for TBC Classic Servers Now!
- Could WoW Be Added to Xbox Game Pass Ultimate?
- MoP Classic Escalation PTR Update Details New Content