Moze (Gunner) Short Fuze Build Guide
Welcome to our Short Fuze build guide for Moze the Gunner in Borderlands 3. Combining Iron Bear, Grenades and Guns, this build offers a straightforward yet satisfying and effective gameplay. With no glaring weakness, the build's versatility and power make short work of even the hardest content available. Here, you will learn everything you need to know to gear yourself up and play this build at the highest level.
Moze Short Fuze build overview
Short Fuze is an extremely competitive build for Moze, and arguably the best at this time, boasting flexible weapon selection and a well rounded toolkit that can tackle any situation without having to worry much. It is not very gear reliant and can work with most of the guns in the game.
Skill Tree
Strengths
- Great damage on both multiple targets and tougher enemies.
- Great sustain through Vampyr.
- Enables a more liberal use of grenades; you can lob them at your heart's content!
- Works well with any automatic and/or splash weapons.
Weaknesses
- Grenade economy is tied either to a splash damage weapon or the player ability to hit critical shots if using Mind Sweeper.
- Not the fastest boss killer, althought dedicated weapons can be used to make things easier.
Playstyle
Short Fuze offers a rather straight forward yet very effective playstyle,
centered around shooting at bad guys while lobbing grenades at the same time in
order to never have to reload and provide a constant stream of healing through
![]() Vampyr. Auto Bear is generally used to soften targets up, provide a
distraction from enemy fire and increase survivability or mobility if
needed.
Vampyr. Auto Bear is generally used to soften targets up, provide a
distraction from enemy fire and increase survivability or mobility if
needed.
Short Fuze Skills
Skills Breakdown
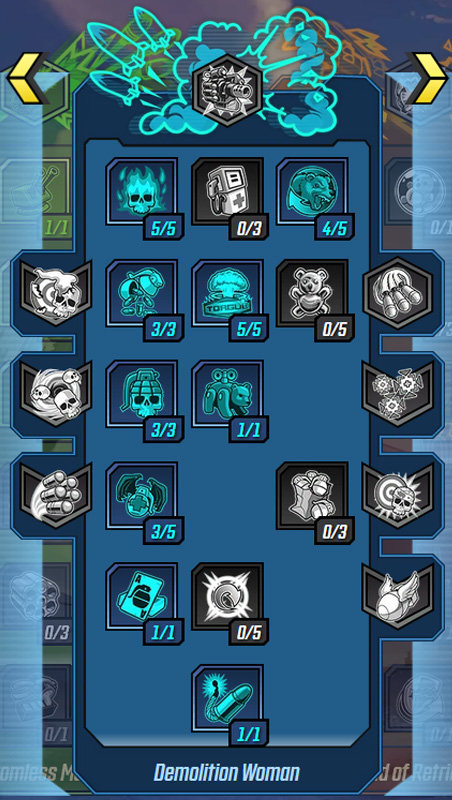
 Grizzled—enables fast Iron Bear resets which in
turns bolster survivability, applies damage debuff, soak enemy fire, give
grenades back and can make a pretty good coffee.. almost.
Grizzled—enables fast Iron Bear resets which in
turns bolster survivability, applies damage debuff, soak enemy fire, give
grenades back and can make a pretty good coffee.. almost. Means of Destruction—the key trait that enables the
whole build, as the only way to regenerate grenades. After 10th October 2019
patch, it has a 0.3-second internal cooldown which prevents us to get back
multiple grenades from a single instance of splash damage, but it remains a
very powerful trait.
Means of Destruction—the key trait that enables the
whole build, as the only way to regenerate grenades. After 10th October 2019
patch, it has a 0.3-second internal cooldown which prevents us to get back
multiple grenades from a single instance of splash damage, but it remains a
very powerful trait. Torgue Cross-Promotion—maxed to gain an additional
30% splash damage increase. The chance for double the splash radius requires you to
keep the distance with any target to avoid blowing up randomly with your own
damage.
Torgue Cross-Promotion—maxed to gain an additional
30% splash damage increase. The chance for double the splash radius requires you to
keep the distance with any target to avoid blowing up randomly with your own
damage. Pull the Holy Pin—increases Grenades damage in a very
noticeable way, while also offering additional synergy with On Critical Hit
traits.
Pull the Holy Pin—increases Grenades damage in a very
noticeable way, while also offering additional synergy with On Critical Hit
traits. Auto Bear—works as force multiplier, and often enough
allow to drag most of the enemy fire away from the Vault Hunter.
Auto Bear—works as force multiplier, and often enough
allow to drag most of the enemy fire away from the Vault Hunter. Vampyr—our main source of sustain. Thanks to the
constant stream of grenades, we are able to outheal any source of damage that is
not a direct 1-shot.
Vampyr—our main source of sustain. Thanks to the
constant stream of grenades, we are able to outheal any source of damage that is
not a direct 1-shot. To the Last—a safety net trait allowing us to
score a second wind more reliably, without the need of a launcher; lob as many
grenades as needed to get back on your feet, soldier!
To the Last—a safety net trait allowing us to
score a second wind more reliably, without the need of a launcher; lob as many
grenades as needed to get back on your feet, soldier! Short Fuse—the center of the build, enabling
more explosions instances, thus more chances to get grenades back and to
trigger additional fire damage through
Short Fuse—the center of the build, enabling
more explosions instances, thus more chances to get grenades back and to
trigger additional fire damage through  Fire in the Skag Den
 Armored Infantry—mostly taken to advance further
down the tree, even though the gun damage increase and the damage reduction
provided are still nice.
Armored Infantry—mostly taken to advance further
down the tree, even though the gun damage increase and the damage reduction
provided are still nice. Drowning in Brass—a noticeable gun damage increase.
 Experimental Munitions—some extra Incendiary
damage everytime we score a Critical hit, grenades included.
Experimental Munitions—some extra Incendiary
damage everytime we score a Critical hit, grenades included.
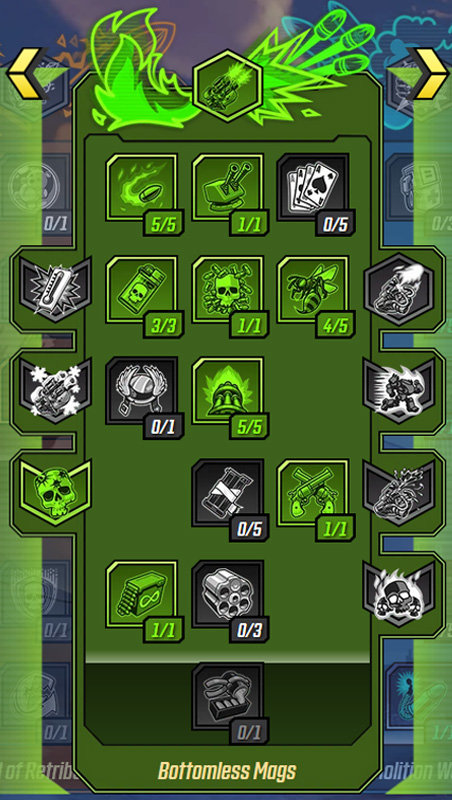
 Cloud of Lead—increases our ammo efficiency, which is
especially important on ammo inefficient weapons such as shotguns and
launchers.
Cloud of Lead—increases our ammo efficiency, which is
especially important on ammo inefficient weapons such as shotguns and
launchers. Dakka Bear—offers added flexibility in multiplayer and a
bit more variety in the playstyle loop even during solo sessions at a low
opportunity cost.
Dakka Bear—offers added flexibility in multiplayer and a
bit more variety in the playstyle loop even during solo sessions at a low
opportunity cost. Redistribution—just another tool to regenerate
ammo, further reducing the need of reloading.
Redistribution—just another tool to regenerate
ammo, further reducing the need of reloading. Scrappy—taken over
  Rushin’ Offensive as I
personally never find myself running in a straight line shooting during a
gunfight and I would rather have faster swap speed while strafing.
Rushin’ Offensive as I
personally never find myself running in a straight line shooting during a
gunfight and I would rather have faster swap speed while strafing. Scorching RPM's—increases the critical damage while
also providing a damage increase to Short Fuse.
Scorching RPM's—increases the critical damage while
also providing a damage increase to Short Fuse. Specialist Bear—was buffed in the April patch to a 60%
damage increase, making it a fairly intuitive pick for just 1 point
Specialist Bear—was buffed in the April patch to a 60%
damage increase, making it a fairly intuitive pick for just 1 point- The additional 3 points added in the latest DLC allow us to reach
 Some for the Road with relative ease, allowing to make use of high
damage but otherwise ammo inefficient weapon such as
launchers/snipers/shotguns.
Some for the Road with relative ease, allowing to make use of high
damage but otherwise ammo inefficient weapon such as
launchers/snipers/shotguns.
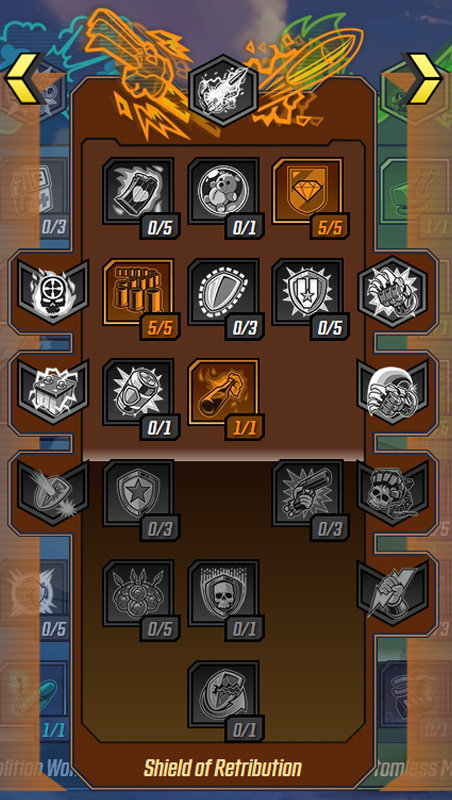
Action Skill, Augments, and Elements
Double Miniguns with ![]() Exploding. Bullets. is the preferred choice there,
providing sustain, grenade return, and allows us to trigger
Exploding. Bullets. is the preferred choice there,
providing sustain, grenade return, and allows us to trigger ![]() Short Fuse like a madman.
Short Fuse like a madman.
Alternative Skill choices
1 point in ![]() Some for the Road and 2 points from
Some for the Road and 2 points from ![]() Scrappy can be
redistributed in different traits depending on the situation:
Scrappy can be
redistributed in different traits depending on the situation:
- Rushin’ Offensive offers some conditional Life Steal and can be used
to outheal any incoming damage with high-impact weapons.
 Full Can of Whoop-Ass reinforces the usage of Iron Bear as panic button
under pressure and also helps the team.
Full Can of Whoop-Ass reinforces the usage of Iron Bear as panic button
under pressure and also helps the team. Security Bear is an option when not running splash weaponry on Iron
Bear to increase its durability.
Security Bear is an option when not running splash weaponry on Iron
Bear to increase its durability.
Short Fuze Gearing
Best in Slot
The build is relatively lenient in terms of gearing. That said, some slots are somewhat required to make it function at its best:
For the grenade mod, a Cloning Maddening Tracker is the best option in terms
of sustain from ![]() Vampyr and
Vampyr and ![]() Means of Destruction procs. Other
alternatives include Moxxi's Bouncing Pair and Epicenter.
Means of Destruction procs. Other
alternatives include Moxxi's Bouncing Pair and Epicenter.
Regarding Class mods, Blast Master is the first choice, synergising well with splash damage fast-firing weapons as long as you dont accidentally reload your gun. Mind Sweeper is a higher skill alternative that requires you to hit critical shots but opens up weapon choice by allowing to take non-explosive guns without hurting your grenade economy.
Weapon choice is more of a personal preference as long as it either does splash damage or is accurate enough to land critical hits with mindsweeper.
Guns worth mentioning when using Blast Master are: Kyb's Worth, Tigg' Boom, Plaguebearer, Backburner and the DLC2 shotgun Insider.
Mind Sweeper opens up the weapon selection allowing to pick up guns like DLC3 Beacon and Flipper, DLC2 Soulrender. Good vanilla weapons are Hellshock, Kaoson, Sand Hawk, Faisor and Breath of the Dying.
When choosing the Artifact, the newly added The Pearl of Ineffable Knowledge provides the highest damage increase. If you have yet to find it, other temporary options are Otto Idol for added sustain or Victory Rush for added mobility and damage.
Shield mods offer more room for choice: in general any good defensive shield is viable from The Transformer which grants shock damage absorb to DLC1 Rico. Re-Charger and Stop-Gap are also an option as well as DLC2 Old God. Big Boom Blaster is also worth mentioning when running a launcher heavy build.
Anointed Rolls
Anointed rolls are special additional effects that can appear on weapons and shields at higher levels. The special effects relate to the use of action skills and provide powerful temporary buffs.
As the focus on this build is around splash damage, the best anoints are the following:
- 'On Action Skill End, Splash Damage is increased by 200% for a short time'.
- 'After exiting Iron Bear gain 160% increased Splash Damage for 18 seconds'.
- 'Consecutive Hits increase Weapon Damage by 1% per hit, misses remove all bonuses'
For a defensive anointed effect the best one is without question the Gunner specific that increases your shields and health by 75% for 25 seconds after exiting Iron Bear.
For the Grenade mod slot, the best anointed is the one that increases Weapon, Grenade and Skill damage by 25% for 6 seconds.
Alternative Gear from Missions
As this build is not really focused around specific gear but rather good individual items, there are no recommended gear from missions.
Best-in-slot Gear and Stat Priority List
| Slot | Item | Special Effect | Secondary Stat/Effect Priority |
|---|---|---|---|
| Weapon 1 |
|
|
|
| Weapon 2 | Plaguebearer |
|
|
| Shield | The Transformer | Absorbs all Shock damage. | |
| Shield Alternative 1 | Re-Charger | Instantly recharge when depleted. | |
| Class Mod |
|
|
|
| Artifact | The Pearl of Ineffable Knowledge | Consecutive hits grant 1% damage increase. At 15 stacks gain additional 90% extra damage. |
|
| Artifact Alternative | Otto Idol | Restores Health after killing an enemy. |
|
| Grenade Mod | Cloning Maddening Tracker | Homing Grenade that splits in 6 additional grenades. | |
| Grenade Mod Alternative | Epicenter | On impact releases burning spheres in a radial pattern. |
Changelog
- 13 Jul. 2020: Updated for DLC3 and the 2nd July patch.
- 16 Apr. 2020: Guide added.
This guide has been written by Motoko, Warlock main since The Burning Crusade, co-admin in the Warlock Discord, and theorycrafter and contributor for LockOneStopShop.
- Icy Veins Seeking Writers for Zenless Zone Zero: Apply Today!
- Icy Veins Launches Genshin Impact Guides Section
- Icy Veins Podcast About Path of Exile
- ARPG Vault Discord Giveaway
- Icy Veins is Getting a New Look
- Join Us Live on Twitch for the Icy Veins Podcast
- Icy Veins Black Friday Giveaway Ends Today!
- Icy Veins Black Friday Giveaway!